Page 249 of 290
, the pressure monitor indi
cator may be delayed.
- Ask your authorized Audi dea")
-Under certain conditions (such as a spor
ty driving style, winter conditions or un
paved roads), the pressure monitor indi
cator may be delayed.
- Ask your authorized Audi dealer if run
flat tires may be used on your vehicle.
Your vehicle registration becomes invalid
if you use these tires when not permit
ted. Damage to your vehicle or accidents could also result.
(D Tips
- The tire pressure monitoring system
stops working when there is an ESC/ABS
malfunction.
- Using snow chains may result in a system
malfunction .
- The tire pressure monitoring system on
your Audi was developed using tires with the "AO" or "RO" identification on the
tire sidewall ~
page 238. We recom
mend using these tires.
Reset tire pressure monitoring system
Applies to vehicles: with tire pressure monito ring system
If the tire pressure is adjusted, wheels are ro
tated or changed, the
TPMS must be reset via
radio or
MMI*.
~ Before resetting the TPMS, the current pres
sures of all four tires must correspond to
the specified values. Adjust the tire pressure and reset the pressure in the tire pressure
monitoring system according to the load
you are carrying
~ page 231.
~ Turn on the ignition.
~ Select: the ICARI function button> Tire
pressure monitoring
> Store now . Or
~ Select: the ICARI function button > Car sys
tems*
control button > Servicing & checks >
Tire pressure monitoring > Store tire pres
sures.
(D Tips
Do not store the ti re pressure if there a re
snow chains on the tire.
Tires and wheels 24 7
•
•
Page 250 of 290

248 What do I do now?
What do I do now?
Vehicle tool kit
The tools ore stored underneath the floor
panel in the luggage comportment.
Fig. 188 luggage compartment: tool kit
When you need access to the vehicle tool kit
or jack*, you will need to take out the spare
tire* and cover¢
page 248.
The vehicle tool kit includes:
- Hook for removing wheel covers*
- Plastic hook to remove wheel bolt covers*
- Alignment p in for changing the whee l
- Screwdriver w ith reversible blade
- Tool for changing light bulbs
- Reversible bit (reversible Torx bit for chang-
ing light bulbs)
- Rod for jack
- Jack*
- Lug wrench
- Towing eye
Some of the vehicle items listed above are provided on certain models on ly or are opt ion
a l extras.
Before returning the jack* to its place, retract
the jack arm fully.
A WARNING
-
-Never use the screw driver hex head to
tighten wheel bolts, since the bolts can
not attain the necessary tightening tor
que if yo u use the hex head, potentially
causing an accident.
- The factory-supplied jack is intended on
ly for your vehicle model. Under no cir- cumstances should it be
used to lift
heavy veh icles or other loads; you risk in
juring yourself.
- Never start the engine when the vehicle
is raised, which could cause an accident.
- Support the vehicle securely with appro
priate stands if work is to be performed
underneath the vehicle; otherwise, there is a potential risk for injury .
Space-saving spare tire
(compact spare tire)
App lies to vehicles: with space -saving spare t ire
The spare tire/wheel is located in the luggage
comportment under the cargo floor cover. It
is intended for short-term use only.
Fig. 189 Spa re tire
Removing the spare tire
.. Lift the cargo floor by the p lastic handle
¢ fig. 189 .
.. Hook the handle into the luggage compart
ment weather strip .
.. Turn the large screw ¢
fig. 189 counter
clockwise .
.. Take out the spare tire .
.. Always store the vehicle tool kit, the jack*,
and the replaced tire in the luggage com
partment
¢ page 127.
.. Unhook the cargo floor before closing the
rear lid.
Using the spare tire (compact spare tire)
The compact spare t ire is only intended for
emergencies until you can reach a repair shop .
R ep lace it as quickly as possible with a stand-
ard wheel and tire. ..,.
Page 251 of 290

There are some restrictions on the use of the
compact spare tire. The compact spare tire
has been des igned specifically for your type of
ve hicle.
It must not be swapped with a com
pact spare t ire from another type of veh icle.
Snow cha in s
For technica l reasons, the use of snow chains
on the compact spare tire is
not permitted .
If you do have to dr ive with snow chains and a
front tire fails, mou nt the spare whee l w ith
tire instead o f a rea r ti re . Install the snow
chains on the rear tire and use it to replace
the defective front tire.
A WARNING
- Never use the spare tire if it is damaged
o r if it is worn down to the tread wear in
dicators.
- If the spare tire is more than 6 years o ld,
use it only in an emergency and w ith ex
t reme caution and careful driving .
- The spare tire is intended only for tem
porary and short-term use. It should be
replaced as soon as possib le w ith the
normal wheel and t ire.
- After mounting the compact spare tire, the tire pressure must be checked as soo n as poss ible. The tire pressure of the
c ompac t sp are tire must be 4.2 bar; o th
erwise, yo u risk hav ing an accident.
- Do not drive faster than 50 mph (80 km/
h). You risk having an a ccident.
- Avoid fu ll-throttle acce le rat ion, heavy
braking, and fast corner ing. Yo u risk h av
ing an acc iden t.
- Never drive us ing more t han one spa re
whee l and tire. You risk having an acci
dent.
- No rma l su mmer or wi nte r tires m ust not
be mounted on the comp act spare whee l
rim.
- F or technical reasons, t he use of ti re
chains on the spare tire is not permitted .
If it is necessary to drive with tire chains,
the spare whee l must be mounted on the
front axle in the event of a flat in a rear
What do I do now? 249
tire. The newly available front whee l
m ust then be insta lled in place of the
rear whee l w ith the flat tire. Installing
the t ire cha in before mounting the whee l
and tire is recommended .
- Loose items in the passenger compart
ment can cause serious personal injury
during hard bra king or in a n accide nt.
Never store the spa re tire or jack and
too ls in t he passenger compa rtment.
Changing a wheel
Before changing a wheel
Observe the following precautions for your
own and your passenger's safety when chang
ing a wheel .
"' After you experience a t ire failure, p ull the
car we ll away from moving traffic and try to
reach
le vel ground before you stop¢ A.
"' All passengers should lea ve the car and
move to a safe location (for instance, behind
the guardrail) ¢ &, .
"' Engage the
park ing brak e to prevent your
veh icle from rolling unintentionally¢&, .
"' Move the
se lec tor lever to th e P position .
"' If you are towing a t ra iler : unhit ch the trail
er from you r vehicle.
"' Take the
jack ¢ page 248 and the spare tire
c::> page 248 out of the luggage compart
ment .
A WARNING
You or your passengers could be injured
while changing a wheel if you do not fo l-
l ow these safety precaut ions :
- If you have a flat tire, move a safe d is
tance off the road. Turn off the engine,
turn the emergency flashers on and use other warning devices to a le rt other mo
torists.
- Ma ke sure that passenge rs wait in a safe
place away from the vehicle and well
away from the road and traffic.
- To help prevent the vehicle from moving
-
suddenly and possib ly slipping off the ..,. •
•
Page 252 of 290

250 What do I do n ow ?
jack, always fully set the parking brake
and block the wheel diagonally opposite the wheel being changed with the fold
ing chocks or other objects . When one
front wheel is lifted off the ground, plac
ing the Automatic Transmiss ion in "P"
(Park) will
not prevent the vehicle from
moving.
- Before yo u change a wheel, be su re the
ground is leve l and firm. If necessa ry,
use a st urdy board under the jack.
- Always store the vehicle tool kit, the
jack * and the replaced ti re in the l uggage
compartment
r=>page 12 7.
(D Note
If you are chang ing the wheel on a steep
incline, use a rock or s imilar object to
bloc k the opposite wheel to prevent the
veh icle from mov ing.
@ Tips
Obey a ll laws.
Changing a wheel
When you change a wheel, follow these
quence described below step-by-step and in
exactly tha t order .
1. Remove the decorativ e wheel c over* or
the
wheel bol t cap s* . Fo r more details see
a lso
r=> page 250, Decorative wheel cov
ers
or ¢ page 251, Wheels with wheel
bolt caps.
2 . Loosen the wheel bo lts r=> page 251.
3 . Locate the proper mount ing point for the
jack and align the jack below that point
r=> page 252.
4 . Lift the car with the jack r=> page 252.
5. Remove the wheel with th e flat tire and
then i nstall the
spar e tire r=> page 253 .
6. Tighten all wheel bo lts light ly .
7 .
Low er the ve hicle w it h the jack.
8 . Use the wheel bolt wrench an d
firmly
tighte n all whee l bolts in a crisscross pa t
tern
r=> page 251.
9. Replace the decorative wheel c over* or
the
wheel bolt cap s*.
A WARNING
A lways read and follow all WARNINGS and
i nformation
r=> .& in Raising the vehicle on
page 252
and r=> page 254.
After changing a wheel
A wheel change is not complete without the
doing the following.
.. Always store the vehicle tool kit, the jack*,
and the replaced tire in the luggage com
partment
r=> page 127.
.,. Check the tire pressure of the spare tire as
soon as possible .
"' As soon as poss ible, have the
tighteni ng
torqu es
on all wheel bolts checked w ith a
t orque wrenc h. The correct tig hte ning tor
que is
90 ft lbs. (120 Nm).
.,. Have the flat tire
repl aced as soon as possi
b le.
(D Tips
- If
you not ice that the wheel bo lts ar e
corroded and difficult to turn while
changing a tire, they shou ld be rep laced
before you check the tightening torque.
- Dr ive at reduced speed until you have the
tightening torques checked .
Decorative wheel covers
Applies to vehicles: w ith decorative w hee l covers
The decorative wheel covers must be removed
first to access the wheel bolts .
Fig. 19 0 Cha nging a whee l: removing t he w heel cove r Ill>
Page 253 of 290

Removing
• Inse rt the hook provided with the veh icle
tool kit in the hole in the hub.
• Pull
off the decorative wheel cover
¢fig. 190 .
Wheels with wheel bolt caps
Appl ies to vehicles: with whee l bo lts w it h cap s
The caps must be removed first from the
wheel bolts before the bolts can be un
screwed .
Fig. 191 Changing a wheel: remov in g the wheel bo lt
caps
Removing
• Push the plastic clip provided w ith the vehi
cle tool kit over the whee l bolt cap until it
engages.
• Pull on the
plastic clip to remove the cap
¢fig . 191.
Refitting
• Place the caps over the wheel bolts and
push them back on.
The caps are to protec t and keep the wheel
bol ts clean.
What do I do now? 251
Loosening and tightening the wheel
, bolts
The wheel bolts must be loosened before rais
ing the vehicle.
Fig. 192 Changing a whee l: loosening the wheel bolts
Loosening
• Insta ll the wheel bolt wrench over the
wheel bolt and push it down as far as it will
go .
• Take tight hold of the
end of the wrench
handle and turn the wheel bolts
counter
clockwise
about one single turn in the direc
tion of arrow
¢fig . 192.
Tightening
• Install the wheel bolt wrench over the
wheel bo lt and push it down as far as it will
go.
• Take tight hold of the
end of the wrench
handle and turn each wheel bolt
clockwise
until it is seated .
.&_ WARNING
-Do not use force or hurry when chang ing
a wheel -you can cause the vehicle to slip
off the jack and cause serious personal
inj uries.
-Do not loosen the wheel bolts more than
one turn
befo re you raise the vehicle with
the jack . - Yo u risk an injury .
{D Tips
-Never use the hexagonal socket in the
hand le of the screwdr iver to loosen or
tighten the wheel bolts.
- If a wheel bolt is very tight, you may find
it easier to loosen by carefully pushing
Ill>
Page 254 of 290

252 What do I do now?
down on the end of the wheel bolt
wrench with
one foot only . As you do so,
hold on to the car to keep your balance
and take care not to slip.
Raising the vehicle
The vehicle must be li~ed with the jack first
before the wheel can be removed.
Fig. 193 Sill panels: mark ings
Fig. 194 Sill: posit ion ing t he veh icle jack
The location of the jack point is indicated by
an indentat io n on the underside of the vehicle
~fig.193 .
• Activate the parking brake to prevent the
vehicle from rolling unintentionally.
• Move the
selector lever to position P.
• Find the marking (imprint) on the sill that
is nearest the wheel that will be changed
¢ fig. 193. Behind the marking, there is a
lifting point on the sill for the vehicle jack.
• Turn the
vehicle jack located under the lift
ing point on the si ll to raise the jack until
the jaw
Q fig . 194 @ covers the notch on
the vehicle¢ &¢(D .
• Align the vehicle jack so the jaw@ covers
the notch and the base p late @ is flat on
the floor . The base plate@ must be
vertical
under the lifting point @. •
Insta ll the rod on the vehicle jack: Insert
the rod into the opening on the handwheel.
Turn the rod left or r ight to secure it.
• Continue raising the jack with the rod unti l
the wheel lifts off the ground slightly.
Position the vehicle jack
only under the desig
nated lifting points on the si ll
¢fig. 193.
There is exactly one location for each wheel.
The jack must not be positioned at any other location ¢ ,& ¢Ci) .
Soft ground under the jack can cause the ve
hicle to slip off the jack. Always place the jack
on firm ground. Use a flat, stable support if
necessary. Use a non -slip surface such as a
rubber mat on a
slippery surface such as tile .
.&, WARNING
-You or your passengers could be inju red
while changing a wheel if you do not fo l
low these safety precautions:
- Position the vehicle jack on ly at the
designated lifting points and align the
jack. Otherw ise, the vehicle jack could
slip and cause an injury if it does not
have sufficient hold on the vehicle.
-A soft or unstable surface under the jack may cause the vehicle to slip off
the jack. Always provide a firm base for
the jack on the ground. If ne cessa ry,
us e a sturdy board under the jack.
- On hard, slippery su rface (such as tiles)
u se a rubber mat or similar to prevent
the jack from slipping.
- To help prevent injury to yourself and
your passengers:
- Do not raise the vehicle until you are
sure the jack is securely engaged.
- Passengers must not remain in the ve
hicle when it is jacked up.
- Make sure that passengers wait in a
safe place away from the veh icle and
well away from t he road and traffic.
- Make sure jack position is correct, ad
ju st as necessary and then continue to
raise the jack. .,_
Page 255 of 290

CD Note
Do not lift the vehicle by the sill. Position
the vehicle jack only at the designated lift
ing points on the sill. Otherwise , your vehi
cle will be damaged.
Taking the wheel off/installing the spare
tire
Follow these instructions step -by -step for
changing the wheel.
Fig . 195 Ch ang ing a w hee l: us ing the sc rewdriver han
d le (with the blade removed) to turn t he bo lts
Fig . 196 Ch ang ing a w hee l: al ig nme nt pin inside t he
top hole
After you have loosened a ll wheel bolts and
ra ised the veh icle off the ground, remove and
replace the wheel as follows:
R emoving th e wheel
.. Remove the topmost wheel bo lt completely
with the
he xagonal sock et in the screwdriv
er handle (vehicle tool kit)
¢ fig. 195 and
set it as ide on a
clean surface.
.. Screw the threaded end of the
alig nm ent
pin from the tool kit hand -tight into the
empty bolt hole
¢ fig . 196.
.. Then remove the other wheel bo lts as de
scribed above.
What do I d o now ? 253
.. Take off the wheel leaving the alignment
pin in the bolt hole ¢(D.
Putting on th e spar e tire
.. Push the spare tire over the alignment p in.
.. Sc rew on the wheel bo lts and tighten them
slightly us ing the hexagonal socket .
.. Remove the alignment pin and insert and
tighten the rema ining wheel bolt slightly
like the rest.
.. Turn the jack hand le counter-clockwise to
lower the veh icle until the jack is fully re
leased .
.. Use the wheel bolt wrench to tighten all
wheel bo lts firm ly
¢page 251. Tighten
them
in a crisscross pattern, from one bolt
to the (approximately) opposite one, to keep
the wheel centered .
.. Perform the steps required after changing
the whee l¢
page 250, After changing o
wheel.
T he hexagonal socket makes it easier to re
move t he wheel bolts from the rim . Care
shou ld be taken when removing the reversib le
blade .
CD Note
When removin g or i nstalling the whee l,
the r im cou ld hit the brake rotor and dam
age the rotor. Work carefully and have a
second person to help you.
{l) Tips
- When mounting tires with unidirection al
tread de sign
make sure the tread pat
tern is po inted the right way
¢ page 254.
-The wheel bolts shou ld be clean and easy
to turn. Check for dirt and corrosion on
the mating surfaces of both the wheel
and the hub . Remove all d irt from these
surfaces befo re remounting the whee l.
- Do not use the hexagonal socket in the
sc rewd river handle to loosen or t ighten
t he whee l bolts .
Page 256 of 290

254 What do I do now? Tires with unidirectional tread design
Tires with unidirectional tread design must be
mounted with their tread pattern pointed in the right direction .
Using a spare tire w ith a tread pattern
intended for use in a specific direction
When using a spa re tire w ith a t read patte rn
i n tended fo r use in a specific direction, please
n ote t he followi ng:
- The direction of rotation is marked by a n
ar
row on the side of the tire .
-If the spare t ire has to be installed in the in
correct direction, use the spare tire only
tempora rily si nce the t ire will not be able to
achi eve its optimum perfo rma nce cha racter
i st ics w ith reg ard t o aquaplani ng, noise and
we ar.
- W e reco mmend t hat you pay pa rticular at
ten tion t o this fact during wet we ather and
t h at you a dju st you r spee d to m atc h ro ad
con ditions.
- R epl ace the fla t tire w ith a n ew one an d
have it ins talled o n your ve hicle as soon as
p oss ible to restore the handlin g ad vantages
of a uni direct io na l tire .
Notes on wheel changing
Please rea d the information c> page 238 , New
t ires and replacing tires and wheels
if you are
go ing t o use a spare tire which is d ifferent
from the tires on your ve hicle.
Afte r you chan ge a t ire :
-Check the tire pressure on the spare imme
diately after installation.
- Have the wheel bolt tightening torque
checked with a torque wrench as soon as possible by your authorized Audi dealer or
a qualified workshop .
- With steel and alloy wheel rims , the wheel
bolts are correctly tightened at a torque of
90 ft lbs . (120 Nm) .
- If you notice that the wheel bolts are cor
roded and difficult to turn while changing
a tire, they should be replaced before you
check the tightening torque . -
Replace the flat tire with a new one and
have it installed on your vehicle as soon as
possible. Remount the wheel cover .
Until then , drive with extra care and at re
duced speeds.
_& WARNING
-
- If yo u are going to e quip your ve hicl e
with tires o r rims which differ from those
which were facto ry installed, then be
sure to read the informati on
¢ page 238,
New tir es and replacing tires and
w he els .
- Always ma ke sure the damaged wheel o r
even a flat tire a nd the jack a nd tool kit
a re pro pe rly s ecu red in the luggage co m
p artm ent and are not lo ose in the pas
s en ger c ompa rtm en t.
- I n an acci dent or sudde n man euve r they
co uld fly forwa rd, inju ring anyone in the
ve hicl e.
- Always s to re damaged wh ee l, j ack and
t oo ls se cur ely in the l uggage co mpa rt
ment. Otherwise, in an accident or su d
de n maneuve r they co uld fly forwa rd,
causing inj ury to passe ngers in the ve hi
cle.
(D Note
Do not use comm erc ia lly availabl e tire
sea lants. O therwise, t he e lectr ical co mpo
n ents of t he ti re pressu re mo nitoring sys
tem * w ill no longe r work proper ly an d the
sensor fo r the tire pressure mo nitor ing
system* will have t o be replaced by a
q ualified wor ks ho p.
 1
1 2
2 3
3 4
4 5
5 6
6 7
7 8
8 9
9 10
10 11
11 12
12 13
13 14
14 15
15 16
16 17
17 18
18 19
19 20
20 21
21 22
22 23
23 24
24 25
25 26
26 27
27 28
28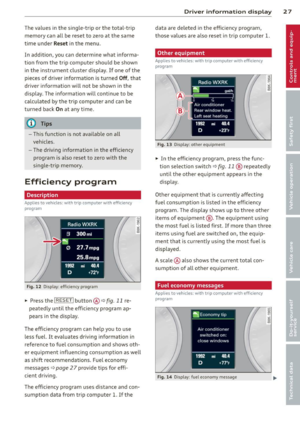 29
29 30
30 31
31 32
32 33
33 34
34 35
35 36
36 37
37 38
38 39
39 40
40 41
41 42
42 43
43 44
44 45
45 46
46 47
47 48
48 49
49 50
50 51
51 52
52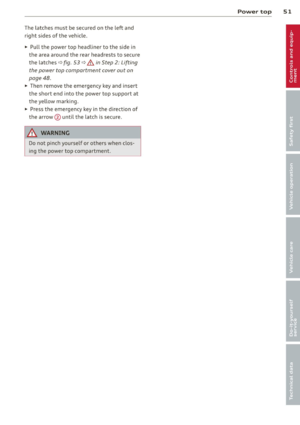 53
53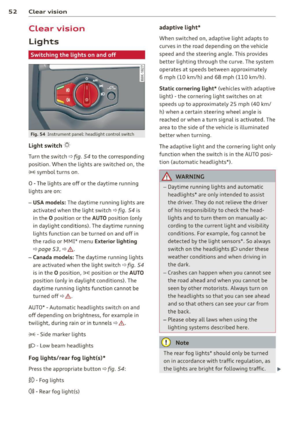 54
54 55
55 56
56 57
57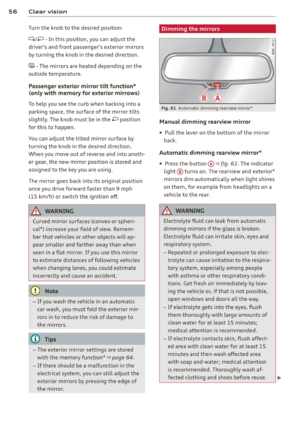 58
58 59
59 60
60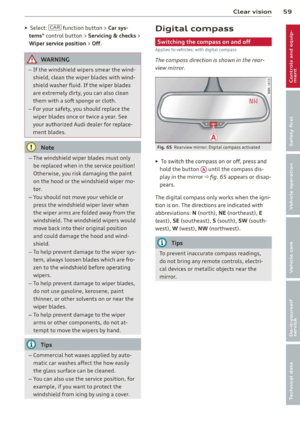 61
61 62
62 63
63 64
64 65
65 66
66 67
67 68
68 69
69 70
70 71
71 72
72 73
73 74
74 75
75 76
76 77
77 78
78 79
79 80
80 81
81 82
82 83
83 84
84 85
85 86
86 87
87 88
88 89
89 90
90 91
91 92
92 93
93 94
94 95
95 96
96 97
97 98
98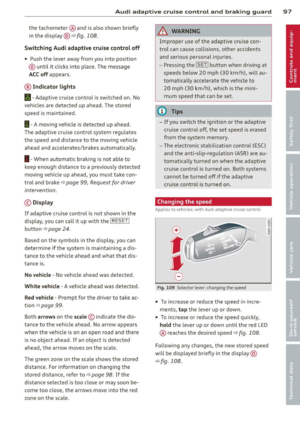 99
99 100
100 101
101 102
102 103
103 104
104 105
105 106
106 107
107 108
108 109
109 110
110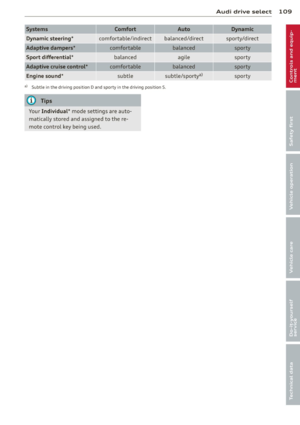 111
111 112
112 113
113 114
114 115
115 116
116 117
117 118
118 119
119 120
120 121
121 122
122 123
123 124
124 125
125 126
126 127
127 128
128 129
129 130
130 131
131 132
132 133
133 134
134 135
135 136
136 137
137 138
138 139
139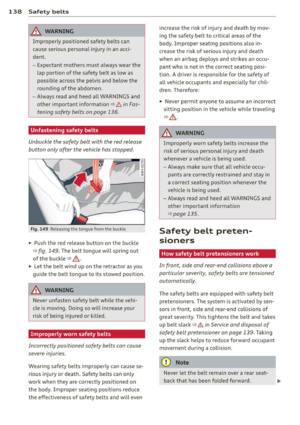 140
140 141
141 142
142 143
143 144
144 145
145 146
146 147
147 148
148 149
149 150
150 151
151 152
152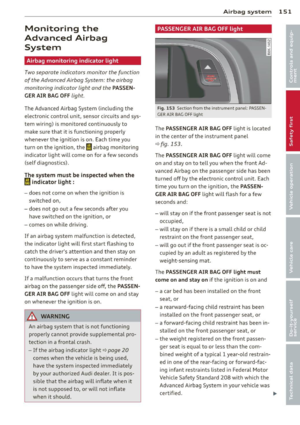 153
153 154
154 155
155 156
156 157
157 158
158 159
159 160
160 161
161 162
162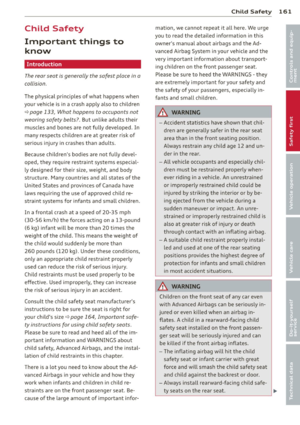 163
163 164
164 165
165 166
166 167
167 168
168 169
169 170
170 171
171 172
172 173
173 174
174 175
175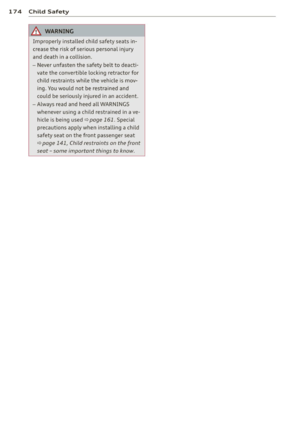 176
176 177
177 178
178 179
179 180
180 181
181 182
182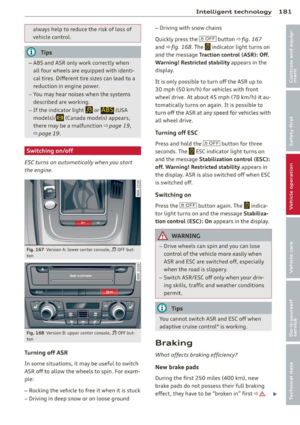 183
183 184
184 185
185 186
186 187
187 188
188 189
189 190
190 191
191 192
192 193
193 194
194 195
195 196
196 197
197 198
198 199
199 200
200 201
201 202
202 203
203 204
204 205
205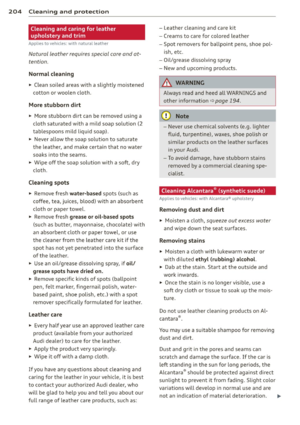 206
206 207
207 208
208 209
209 210
210 211
211 212
212 213
213 214
214 215
215 216
216 217
217 218
218 219
219 220
220 221
221 222
222 223
223 224
224 225
225 226
226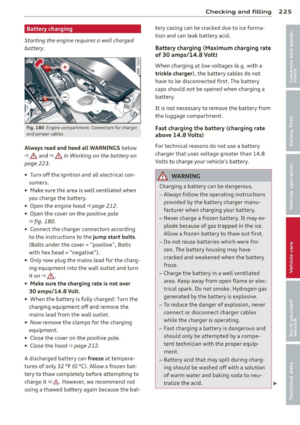 227
227 228
228 229
229 230
230 231
231 232
232 233
233 234
234 235
235 236
236 237
237 238
238 239
239 240
240 241
241 242
242 243
243 244
244 245
245 246
246 247
247 248
248 249
249 250
250 251
251 252
252 253
253 254
254 255
255 256
256 257
257 258
258 259
259 260
260 261
261 262
262 263
263 264
264 265
265 266
266 267
267 268
268 269
269 270
270 271
271 272
272 273
273 274
274 275
275 276
276 277
277 278
278 279
279 280
280 281
281 282
282 283
283 284
284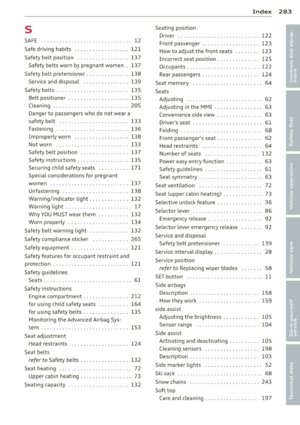 285
285 286
286 287
287 288
288 289
289