Page 225 of 267
JauneNoirNoir texte
5.25
ENG_UD20740_2
Eclairage intérieur : remplacement des lampes (X81 - Nissan)
ENG_NU_932-3_X81ph3_Renault_5
InterIOr LIGHtInG: changing bulbs (continued)
Door lights
Unclip light 10 (using a flat-blade
screwdriver or similar).
Turn the bulb holder a quarter of a turn
and take out the bulb.
Bulb type: W5W.
Luggage compartment light
Unclip light 11 by pressing the tabs on
each side (using a flat-blade screw -
driver or similar).
Disconnect the light. Press tab 12 to release the bulb holder
and gain access to bulb
13.
Bulb type: W5W.
10
11
1312
Page 226 of 267

practical advice ..................................... (up to the end of the DU)
fuses ..................................................... (up to the end of the DU)
5.26
ENG_UD24349_2
Fusibles (X81 - J81 - Renault)
ENG_NU_932-3_X81ph3_Renault_5
Jaune NoirNoir texte
Disconnect the fuse using tweezers 4.
To remove the fuse from the tweezers,
slide the fuse to the side.
Fuses
FuSeS
Fuse box 3
If an electrical component fails to op -
erate, check that the fuses are sound
before carrying out any other checks.
Open cover 1 then lift flap 2.
Refer to the fuse allocation label under
flap 2 to identify the fuses (see oppo -
site page).
It is not advisable to use the free fuse
locations.
Check the fuse in question
and replace it, if neces-
sary, by a fuse of the same
rating.
If a fuse is fitted where the rating is
too high, it may cause the electrical
circuit to overheat (risk of fire) in the
event of an item of equipment using
an excessive amount of current.
1
2
3
4
4
In accordance with local legislation
or as a precautionary measure:
Obtain an emergency kit containing
a set of spare bulbs and fuses from
an approved Dealer.
Page 227 of 267
JauneNoirNoir texte
5.27
ENG_UD24349_2
Fusibles (X81 - J81 - Renault)
ENG_NU_932-3_X81ph3_Renault_5
FuSeS (continued)
Allocation of fuses (DePenDInG On tHe eQuIPMent LeVeL)
numbers Allocation numbersAllocation numbersAllocation
ALIM
UCHElectrical management
unit/Engine immobiliserÉHazard warning lights/
IndicatorsëPassenger compartment
accessory socket
ÁNot usednAnti-lock Braking System
(ABS)FRear fog light
ÞInstrument panel/Remote
headlight adjustmentÌHorn
ðHeated door mirrors
ÅAir bags/Pretensioners
t
Air conditioning/Parking
proximity sensor/Reversing
light
hElectric windows/Electric
door mirrors
NDoor locking/unlocking
ZInterior lightingGFront fog lights/Instrument
panel
ßStop lights/Cruise control
ÏCommunication system/
Radio/Electric seats
ÆCigar lighter
CRear screen demisting/
Steering column lock
LLeft-hand dipped beam
headlight
YLeft-hand side light/Internal
control lightingfRear wiper/Main beam
headlightsTRight-hand dipped beam
headlight
VRight-hand side lights
Page 228 of 267
practical advice ...................................................... (current page)
RENAULT card battery ............................................. (up to the end of the DU)
5.28
ENG_UD20428_1
Cartes RENAULT : piles (X81 - J81 - Renault)
ENG_NU_932-3_X81ph3_Renault_5
RENAULT card: battery
renAuL t cArD: battery
replacing the battery
Pull firmly on emergency key 1.
Replace battery 2 in accordance with
the polarity denoted on the emergency
key (check that indicator light 3 lights
up properly by pressing a button on the
RENAULT card).
1
2
3
Do not throw away your
used batteries; give them to
an organisation responsible
for collecting and recycling
batteries.
The batteries are available from ap-
proved dealers. Their service life is
approximately two years. Check that
there is no dye on the battery: risk of
an incorrect electrical contact.
Page 229 of 267

batterytroubleshooting ............................... (up to the end of the DU)
practical advice ..................................... (up to the end of the DU)
5.29
ENG_UD20429_1
Batterie : dépannage (X81 - J81 - Renault)
ENG_NU_932-3_X81ph3_Renault_5
Battery
BA tter Y: troubleshooting
Handle the battery with care
as it contains sulphuric acid,
which must not come into
contact with eyes or skin. If
it does, wash the affected area with
plenty of cold water. If necessary,
consult a doctor.
Ensure that naked flames, red hot
objects and sparks do not come into
contact with the battery as there is a
risk of explosion.
The engine may be hot when car -
rying out operations in close prox -
imity. In addition, the engine cooling
fan can come on at any moment.
Risk of injury.
t o avoid all risk of sparks:
– Ensure that any electrical consumers
(courtesy lights, etc.) are switched
off before disconnecting or recon -
necting the battery.
– When charging, stop the charger
before connecting or disconnecting
the battery.
– Do not place metal objects on the
battery to avoid creating a short cir-
cuit between the terminals.
– Always wait at least one minute after
the engine has been switched off
before disconnecting a battery.
– Make sure that you reconnect the
battery terminals after refitting.
Page 230 of 267

5.30
ENG_UD20429_1
Batterie : dépannage (X81 - J81 - Renault)
ENG_NU_932-3_X81ph3_Renault_5
Jaune NoirNoir texte
BAtter Y: troubleshooting (continued)
connecting a battery charger
t he battery charger must be com -
patible with a battery with a nominal
voltage of 12 volts.
It is essential to disconnect both bat -
tery leads from the terminals (engine
stopped) starting with the negative
terminal.
Do not disconnect the battery when the
engine is running. Follow the instruc-
tions given by the manufacturer of
the battery charger you are using.
Only a fully charged and well-main -
tained battery will have a long and
useful life and enable you to start the
vehicle’s engine normally.
The battery must be kept clean and dry.
Have the battery’s charge status
checked regularly:
– Especially if you use your vehicle for
short journeys or for frequent driving
in town. –
When the exterior temperature drops
(in winter), the charge decreases.
In winter, only use electrical equip -
ment which is really necessary.
– Finally, you should understand that
the charge decreases naturally as a
result of certain permanent electrical
consumers such as the clock, after-
sales accessories, etc.
When a large number of accessories
are fitted to the vehicle, have them con-
nected to the + after ignition feed. In
this case, it is advisable to have your
vehicle fitted with a battery which has
an increased nominal capacity. Contact
an approved dealer. If your vehicle is to be left stationary
for a relatively long time, disconnect
the battery or have it recharged regu
-
larly, particularly during cold weather.
The equipment with a memory, radio
etc. will then have to be reprogrammed.
The battery must be stored in a cool dry
place, protected from frost.
Special procedures may be
required to charge some
batteries. Contact your ap -
proved dealer.
Avoid all risk of sparks which may
cause an immediate explosion, and
charge the battery in a well-venti -
lated area. Risk of serious injury.
Page 231 of 267

JauneNoirNoir texte
5.31
ENG_UD20429_1
Batterie : dépannage (X81 - J81 - Renault)
ENG_NU_932-3_X81ph3_Renault_5
BA tter Y: troubleshooting (continued)
Starting the vehicle using the
battery from another vehicle
If you have to use the battery from an-
other vehicle to start, obtain suitable
jump leads (with a large cross section)
from an approved dealer or, if you al -
ready have jump leads, ensure that
they are in perfect condition.
the two batteries must have an iden-
tical nominal voltage of 12 volts. The
battery supplying the current should
have a capacity (amp-hours, Ah) which
is at least the same as that of the dis-
charged battery.
Ensure that there is no risk of contact
between the two vehicles (risk of short
circuiting when the positive terminals
are connected) and that the discharged
battery is properly connected. Switch
off your vehicle ignition.
Start the engine of the vehicle supply -
ing the current and run it at an interme-
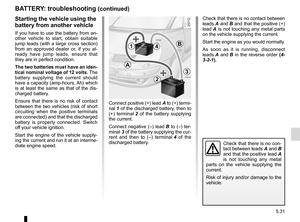
diate engine speed. Connect positive (+) lead A to (+) termi-
nal 1 of the discharged battery, then to
(+) terminal
2 of the battery supplying
the current.
Connect negative (–) lead B to (–) ter-
minal 3 of the battery supplying the cur-
rent and then to (–) terminal 4 of the
discharged battery.
Check that there is no contact between
leads A and B and that the positive (+)
lead A is not touching any metal parts
on the vehicle supplying the current.
Start the engine as you would normally.
As soon as it is running, disconnect
leads A and B in the reverse order (4-
3-2-1).
1
A
2
3
B4
Check that there is no con-
tact between leads A and B
and that the positive lead A
is not touching any metal
parts on the vehicle supplying the
current.
Risk of injury and/or damage to the
vehicle.
Page 232 of 267

wiper blades .......................................................... (current page)
practical advice ...................................................... (current page)
wipers blades .............................................................. (current page)
5.32
ENG_UD20430_1
Balais d’essuie-vitre (X81 - J81 - Renault)
ENG_NU_932-3_X81ph3_Renault_5
Wipers (replacing blades)
WInDScreen WIPer BLADeS
replacing windscreen wiper
blades 1
– Lift wiper arm 2;
– move blade 1 into a horizontal posi-
tion;
– slide blade 1 until catch 3 on the
wiper arm is released.
refitting
To refit the wiper blade, proceed in the
reverse order to removal. Make sure
that the blade is correctly locked in po-
sition.
Windscreen washer jets
These can be adjusted using a tool
such as a flat-blade screwdriver.
rear screen wiper blade 4
– Lift wiper arm 5 as far as it will go;
– pivot blade 4 until it is removed from
its hinge.
refitting
To refit the wiper blade, clip the blade
onto its hinge. Make sure that the blade
is correctly locked in position.
– In frosty weather, make
sure that the wiper blades
are not stuck by ice (risk of
motor overheating).
– Check the condition of the wiper
blades. Replace the wiper blades
as soon as they begin to lose ef-
ficiency (approximately once a
year).
1
23
4
5