Page 145 of 292

The exhaust gas aftertreatment requires a
reducing agent, Diesel
Exhaust Fluid (DEF), in
order to function correctly. G
Warning
If you open the DEF reservoir cap at high
t")
Diesel Exhaust Fluid (DEF)
The exhaust gas aftertreatment requires a
reducing agent, Diesel
Exhaust Fluid (DEF), in
order to function correctly. G
Warning
If you open the DEF reservoir cap at high
temperatures, ammonia vapors could be
released.
Ammonia vapors have
a pungent odor and are
particularly irritating for your skin, respiratory
organs and eyes. This may result in burning
eyes, nose and throat, as well as coughing and
watering eyes.
Do not inhale ammonia vapors. G
Warning
Avoid contact with DEF.
DEF is hazardous
to health. Do not allow DEF
to come into contact with your skin. Rinse
affected areas with plenty of clean water and
consult a doctor if necessary.
0040Environmental note
Dispose of DEF in an environmentally
responsible manner.
! Only use DEF in accordance with
ISO 22241 .
The exhaust gas aftertreatment
system may otherwise be damaged.
Observe the MB Specifications for Service
Products, Sheet No. 352.0.
Damage caused by the use of other
reducing agents will result in the loss of
your New Vehicle Limited Warranty
entitlements.
! If DEF comes into contact with a painted
or aluminum surface, wash the surface off
immediately with plenty of water.
! DEF is not a diesel additive and must not
be mixed with fuel in the tank. Even small
amounts of DEF can cause engine damage.
Damage resulting from adding DEF is not
covered by the New Vehicle Limited
Warranty. i
If the DEF level drops below the reserve
level, the second warning message
(Y page 116) appears and at this point, at
the latest, you
must add at least 2.0 US gal
(7.6 l) of DEF.
You will find further information on DEF in the
"Service products" section (Y page 155).
DEF filler neck in the engine
compartment X
Remove the key from the ignition lock.
X Close all
vehicle doors so that no ammonia
vapors can enter the vehicle.
i Do not inhale
any ammonia vapors which
may escape when you unscrew the tank
filler cap. Ammonia vapors have a pungent
odor. However, they are neither toxic nor
hazardous to health in this concentration. X
Turn tank filler cap 0046
counter-clockwise
and remove it.
X Only fill the tank via the filler neck until the
DEF level can be seen in the filler neck.
X Replace DEF tank filler cap 0046 on the filler
neck and turn clockwise.
You will hear a click when tank filler
cap 0046 is closed fully.
DEF filler neck on the right-hand vehicle
side X
Remove the key from the ignition lock.
X Close all vehicle doors so that no ammonia
vapors can enter the vehicle. Refueling
143
Operation Z
Page 146 of 292

i
Do not inhale
any ammonia vapors which
may escape when you unscrew the tank
filler cap. Ammonia vapors have a pungent
odor. However, they are neither toxic nor
hazardous to health in this concentration. DEF tank on the right-hand side of the vehicle
(example: Chassis Cab)
DEF tank filler cap
X
Remove tool 0086 for unlocking tank filler
cap 0047 from the
footwell on the co-driver's
side ( Y page 182).
X Pull cover 0088 up, turn 90° and release.
X Insert tool 0086 into hole 008A of tank filler
cap 0047.
X Turn tank filler cap 0047 counter-clockwise,
remove it and let it hang from retaining
strap 0046. Make sure that tool 0086 remains
in tank filler cap 0047 while doing so.
X Only fill the tank via the filler neck until the
DEF level can be seen in the filler neck.
X Replace tank filler cap 0047 and turn
clockwise. X
Pull tool 0086 out of tank filler cap 0047 and
stow with
the
vehicle tool kit in the footwell
on the co-driver's side.
X Pull cover 0088 up over hole 008A of tank filler
cap 0047, turn and release.
X Turn tank filler cap 0047.
If tank filler cap 0047 turns freely, the DEF
tank is closed. Transporting loads with the vehicle
Loading guidelines
G
Warning
Secure and position the load as described in
the loading guidelines. You or others could
otherwise be injured by the load slipping or
being thrown around in the event of sharp
braking, sudden changes in direction or on
poor road surfaces.
This also applies to seats
which have been removed if they remain in the
vehicle.
Even if you follow all loading guidelines, the
load increases the risk of injury in the event
of an accident. Observe the tips in the
"Securing a load" section. G
Warning
Do not allow the load, including passengers,
to exceed the permissible gross vehicle
weight or the
gross axle weight rating for your
vehicle.
If the gross axle weight rating or permissible
gross vehicle weight is exceeded during
transport, tire durability and road safety are
adversely affected. The vehicle's handling and
steering characteristics change noticeably.
Braking and stopping distances are
significantly longer.
The vehicle's driving, steering and braking
characteristics change as the gross vehicle
weight increases or when the center of gravity
is raised. 144
Transporting loads with the vehicle
Operation
Page 147 of 292

Always make sure that the distribution of the
load is correct and adapt your driving style
according to the load. G
Warning
If you have installed a roof carrier, the
vehicle’s handling, steering and braking
characteristics may change
due to the higher
center of gravity. This is the case particularly
if the roof carrier is laden. Adapt your driving
style according to the vehicle load.
Observe the manufacturer's installation
instructions. An incorrectly secured roof
carrier and/or load could come loose, fall off
and thereby endanger you or others.
Observe the maximum roof load and
maximum roof carrier load. Loads transported
on the roof must always be secured with
particular care.
Do not allow the load, including passengers,
to exceed the permissible gross vehicle
weight or the gross axle weight rating for your
vehicle. G
Warning
When using suitable load securing aids and
lashing material, always follow the
manufacturer's operating instructions, in
particular the notes on discard criteria
contained therein.
Load securing aids and lashing material may
not be used, for example, if:
R identification marks are
missing or illegible
R there are yarn breakages, damage to
bearing seams or other signs of tearing
R there are signs of shearing, deformation,
pinching or other damage
R there is damage to clamping or connecting
elements
Load securing aids and lashing material in this
condition are ready for discard and must be
replaced.
If you use load securing aids or lashing
materials that are ready for discard, the load
is not correctly secured and could cause serious injuries to you and others and cause
material damage.
G
Warning!
After an
accident, have a damaged cargo floor
or cargo area, lashing eyelets and lashing
material checked at a qualified specialist
workshop that has the necessary specialist
knowledge and tools to carry out the work
required. The cargo could otherwise be
insufficiently secured during the next
transport and could lead to serious injury to
you and other persons or material damage.
For this reason,
we recommend an authorized
Sprinter Dealer. In particular, all work relevant
to safety or on safety-related systems must
be carried out at a qualified specialist
workshop.
! If you are using a roof carrier, observe the
maximum roof load and maximum roof
carrier load.
You will find information about the maximum
roof load in the "Technical data" section
(Y page 283) and information about roof
carriers in the "Carrier systems" section
(Y page 149).
Before loading X
Tire pressure: check the
tire pressure and
correct if necessary ( Y page 281).
X Cargo floor: clean the cargo floor.
The cargo floor must be free from oil and
dust, dry and clean swept to prevent the
load from slipping.
X Place non-slip mats (anti-slip mats) on the
cargo floor if necessary.
! As soon as the non-slip mats show signs
of deformation or
develop squashed areas,
or traces of cracking/cutting, they can no
longer be used to secure a load and must
be replaced. Transporting loads with the vehicle
145
Operation Z
Page 148 of 292

During loading
X
Observe the gross axle weight rating and
permissible gross vehicle weight for your
vehicle.
! On passenger van versions with
maximum seating layout, the permissible
rear axle load
would be exceeded if the full
payload were to be loaded in the cargo
compartment.
i Bear in mind that the curb weight of the
vehicle is increased by installing optional
equipment and accessories.
X Observe the information about load
distribution ( Y page 146).
X Secure the load ( Y page 146). Always
observe the relevant national regulations.
Checks after loading X
Securing loads: check that the load is
secure before every
journey and at regular
intervals during a long journey, and correct
if necessary.
X Doors: close the sliding doors and rear
doors. G
Warning
Make sure that the sliding doors and rear
doors are always closed when the engine is
running.
Exhaust fumes could otherwise enter the
vehicle interior and poison you.
X Tire pressure: adjust the tire pressures
according to the vehicle load
(Y page 281).
X Driving style: adapt your driving style
according to the vehicle load. Load distribution
The overall center
of gravity of the load should
always be as low as possible, centered and
between the axles near the rear axle. !
Excessive loads on
individual points of the
cargo floor or on the load surface impair
vehicle handling characteristics and could
cause damage to the floor covering.
On crewbuses:
X Always transport loads in the cargo
compartment.
X Always place the load against the backrests
of the rear bench seat.
X Move large and heavy loads as far towards
the front of the vehicle as possible against
the rear bench seat. Stow the load flush
with the rear bench seat.
X Always additionally secure the load with
suitable load securing aids or tie down.
i Observe the following notes:
R Do not stack
loads higher than the upper
edge of the backrests.
R Transport loads behind seats that are not
occupied.
R If the rear bench seat is not occupied,
insert the seat belts crosswise into the
buckle of the opposite seat belt. Securing loads
General notes As the driver, you are responsible for ensuring
that the cargo is secured against sliding,
tipping, rolling or falling. This applies to
general traffic situations as well as evasive
maneuvers or full brake application and on
poor stretches of road.
If your load
is not secured in accordance with
applicable requirements and guidelines
regarding the securing of loads, you may be
liable to prosecution, depending on the local
legislation and the consequences of
inadequately secured loads.
You should therefore observe the respective
legal requirements for the relevant country.
Check that the load is secure before every
journey and at regular intervals during a long 146
Transporting loads with the vehicle
Operation
Page 149 of 292

journey, and correct an incorrectly or
inadequately secured load if necessary.
i
You can obtain information about
securing the load correctly from the
manufacturer of the load securing aids or
tie down for securing the load.
X Fill spaces between the load and the cargo
compartment walls or wheel arches (form-
locking). Use rigid
load securing aids, such
as wedges, wooden fixings or padding.
X Attach secured and stabilized loads in all
directions to the cargo tie-down points,
cargo tie-down rings
and loading rails in the
cargo compartment or on the load surface,
depending on the equipment in the vehicle.
Only use tie downs, such as lashing rods or
lashing nets and lashing straps, that have
been tested in accordance with current
standards (e.g. DIN EN).
Always use the cargo tie-down rings closest
to the load to secure it and pad sharp edges
for protection.
i Tie-downs which have been tested in
accordance with current standards (e.g.
DIN EN) can be obtained from specialist
firms or an authorized Sprinter Dealer.
Loads, and
heavy loads in particular, should
preferably be secured using the cargo tie-
down rings. Cargo tie-down points (example: Passenger Van)
0046
Cargo tie-down rings Cargo tie-down points (example: Cargo Van)
0046
Cargo tie-down rings
0047 Load rails G
Warning
You may not transport anyone in the cargo
compartment or on the load surface. Never
let more people
ride in the vehicle than there
are seat belts available. Make sure everyone
riding in the vehicle is correctly restrained
with a separate seat belt. Never use a seat
belt for more than one person at a time. Transporting loads with the vehicle
147
Operation Z
Page 150 of 292

G
Warning
Do not attempt to modify or repair the lashing
points, cargo tie-down
rings or tie downs. The
load or the cargo tie-down rings could work
loose and cause serious injury to you and
other people as well as material damage.
Spread the load evenly between the lashing
points or cargo tie-down rings.
Observe the loading guidelines.
i Secure loose loads with a tested lashing
net or a tarpaulin.
X Always fasten the lashing net or tarpaulin
to all available
cargo tie-down points. Make
sure that the retaining hooks are secured
against accidental opening.
! Observe the information
on the maximum
loading capacity of the lashing points.
If you use multiple lashing points to secure
a load, you should observe the maximum
loading capacity of the weakest lashing
point.
When you brake hard, for example, forces
apply that can be far higher than the weight
force of the transported load. Always use
multiple lashing points to distribute these
forces, and distribute the load equally
among them.
Information about the maximum loading
capacity of the cargo tie-down points can be
found in the "Technical data" section
(Y page 283).
i If your vehicle is equipped with loading
rails in the cargo floor, you should place
lashing rods directly in front of and behind
the load. The lashing rods directly absorb
the potential shifting forces. G
Warning
If you
tension the lashing straps between the
side walls, or between a side wall and the
cargo floor, the
maximum permissible load for
the loading rails or lashing points or eyelets
could be exceeded if the brakes are applied suddenly, if
the vehicle's direction is changed
abruptly or in the event of an accident.
The load would no longer be secured,
resulting in a risk of serious injury being
caused by the load slipping.
For this reason,
do not tension a lashing strap
between the side walls or between a side wall
and the cargo floor.
Only lashing rods are to be used between the
loading rails on the side walls. Observe the
operating instructions of the lashing rod
manufacturer.
i Securing loads on the cargo floor by
lashing them down is only recommended
for lightweight loads. Place non-slip mats
(anti-slip mats) on the cargo floor to
increase load security. G
Warning
Before releasing
the lashing straps, you must
make sure that
the load is standing firmly and
that it cannot tip over once the straps have
been removed. Otherwise, you or others could
be injured by the load slipping.
Installing/removing cargo tie-down
points for the loading rails X
To install: slide the cargo tie-down ring
through a recess
in the loading rail close to
the load until locking mechanism 0046
engages in the recess.
i When you pull locking mechanism 0046 up
and out of the recess, the cargo tie-down
ring is able to move within the loading rail. 148
Transporting loads with the vehicle
Operation
Page 151 of 292

Make sure that locking mechanism 0046 is
always engaged in a recess.
G
Warning
If not firmly anchored in the loading rail, the
cargo tie-down ring
may slip or be torn out of
the loading rail in the event of sudden braking.
The load would no longer be secured,
resulting in a risk of serious injury being
caused by the load slipping. For this reason,
always check the cargo tie-down ring for firm
seating after installing.
X Check the cargo tie-down ring for firm
seating.
X To remove:
pull locking
mechanism 0046 up
and pull the cargo tie-down ring towards
the locking mechanism and out of the
loading rail through a recess. Carrier systems
It is possible to install a roof carrier if your
vehicle is equipped
with securing rails on the
roof.
Special mountings (sliding blocks) are
available as accessories. These are available
from any authorized Sprinter Dealer. 0046
Securing rails G
Warning
If you have installed a roof carrier, the
vehicle’s handling, steering and braking
characteristics may change
due to the higher
center of gravity. This is the case particularly if the roof carrier is laden. Adapt your driving
style according to the vehicle load.
Observe the manufacturer's installation
instructions. An incorrectly secured roof
carrier and/or
load
could come loose, fall off
and thereby endanger you or others.
Observe the maximum roof load and
maximum roof carrier load. Loads transported
on the roof must always be secured with
particular care.
Do not allow the load, including passengers,
to exceed the permissible gross vehicle
weight or the gross axle weight rating for your
vehicle.
You can find information about the maximum
roof load in the "Technical data" section
(Y page 283).
! Make sure that:
R the roof rack mounting bolts are
tightened in the slot nuts provided with
a torque of 6.0 – 7.4 lb-ft(8 – 10 Nm).
R the bolts, when tightened, do not touch
the rails.
R the slot nuts are not located in the area
of the plastic caps.
R the slot nuts have the right cross-section.
R the mounting rails in the interior are free
of dirt.
R retighten the mounting bolts evenly after
approximately 300 miles (500 km).
We recommend that you only use roof
racks tested and approved by Sprinter.
These help avoid vehicle damage.
! If you would like to have the mounting
rails retrofitted, have them installed at a
qualified specialist workshop which has the
necessary specialist knowledge and tools
to carry out the work required. You could
otherwise damage the vehicle.
For this reason, we recommend an
authorized Sprinter Dealer. Transporting loads with the vehicle
149
Operation Z
Page 152 of 292

Towing a trailer
Notes on trailer towing Important safety notes
The trailer coupling is one of the most
important vehicle parts with regard to road
safety. The notes on operation, care and
maintenance issued by the manufacturer
should be observed.
G
Warning!
Improper equipment or driving technique
while driving with a trailer can cause you to
lose control of your vehicle.
Improper towing or failure to observe the
Operator's Manual can lead to vehicle
damage and/or serious
injuries. Observe the
following guidelines in order to guarantee safe
driving with trailers.
Contact an authorized Sprinter Dealer if you
require any explanation of the information
contained in the Operator's Manual.
General notes
R Install only an approved trailer coupling on
your vehicle.
Further information about availability and
installation of trailer couplings can be
obtained from any authorized Sprinter
Dealer.
R The bumpers of your vehicle are not
suitable for installing detachable trailer
couplings.
R Do not install rented trailer couplings or
other detachable trailer couplings to the
bumpers.
R To reduce the risk of damage to the ball
coupling when using a detachable trailer
coupling, remove the ball coupling from its
mounting when it is not needed.
Coupling up a trailer Observe the maximum permissible trailer
dimensions (width and length). Most federal states and all Canadian
provinces require by law:
R
safety chains between the towing vehicle
and the
trailer.
The chains should be cross-
wound under the trailer drawbar. They must
be fastened to the vehicle's trailer
coupling, not to the bumper or the axle.
Allow for enough play in the chains to
facilitate turning tight corners.
R a separate brake system for certain types
of trailer.
R a safety switch for braked trailers. Check
the specific legal requirements applicable
to your federal state.
If the trailer detaches from the towing
vehicle, the safety switch applies the
trailer's brakes.
i The vehicle's subharness has an electric
cable to the brake light indicator lamp. G
Warning
Follow the manufacturer's operating
instructions for the trailer tow hitch when
using a detachable trailer tow hitch.
Couple and decouple the trailer carefully. A
trailer which is incorrectly coupled to the
towing vehicle could break away. A correctly
coupled trailer must be positioned
horizontally behind the vehicle.
Ensure that the following weights are not
exceeded:
R the permissible noseweight
R the permissible trailer load
R the permissible rear
axle load of the towing
vehicle
R the permissible gross weight for both the
towing vehicle and the trailer
The permissible values, which must not be
exceeded, can be found in your vehicle
documents and on the trailer tow hitch type
plates for the trailer and the vehicle. Where
the values differ, the lowest is valid. 150
Transporting loads with the vehicle
Operation
 1
1 2
2 3
3 4
4 5
5 6
6 7
7 8
8 9
9 10
10 11
11 12
12 13
13 14
14 15
15 16
16 17
17 18
18 19
19 20
20 21
21 22
22 23
23 24
24 25
25 26
26 27
27 28
28 29
29 30
30 31
31 32
32 33
33 34
34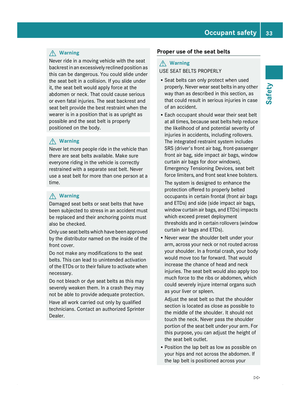 35
35 36
36 37
37 38
38 39
39 40
40 41
41 42
42 43
43 44
44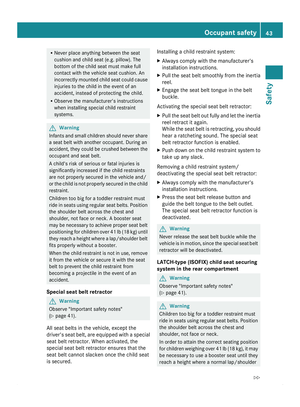 45
45 46
46 47
47 48
48 49
49 50
50 51
51 52
52 53
53 54
54 55
55 56
56 57
57 58
58 59
59 60
60 61
61 62
62 63
63 64
64 65
65 66
66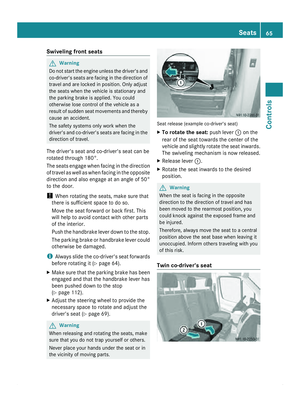 67
67 68
68 69
69 70
70 71
71 72
72 73
73 74
74 75
75 76
76 77
77 78
78 79
79 80
80 81
81 82
82 83
83 84
84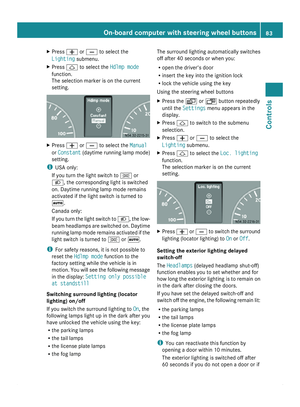 85
85 86
86 87
87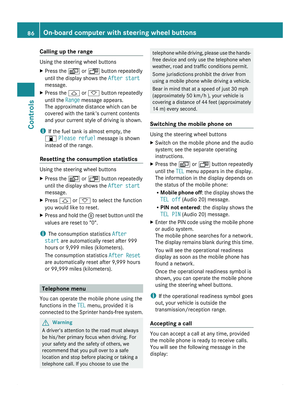 88
88 89
89 90
90 91
91 92
92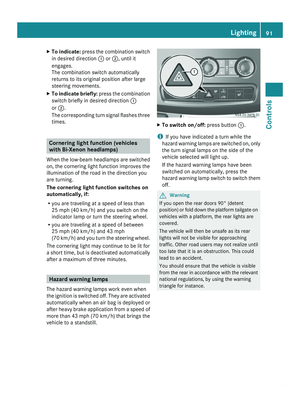 93
93 94
94 95
95 96
96 97
97 98
98 99
99 100
100 101
101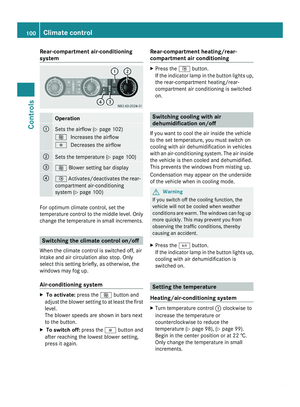 102
102 103
103 104
104 105
105 106
106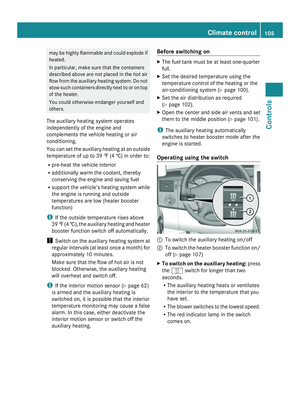 107
107 108
108 109
109 110
110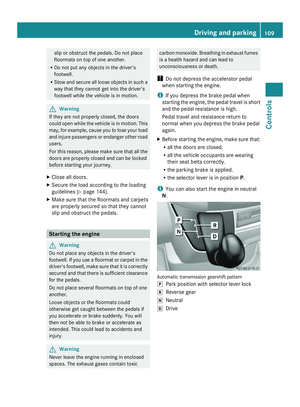 111
111 112
112 113
113 114
114 115
115 116
116 117
117 118
118 119
119 120
120 121
121 122
122 123
123 124
124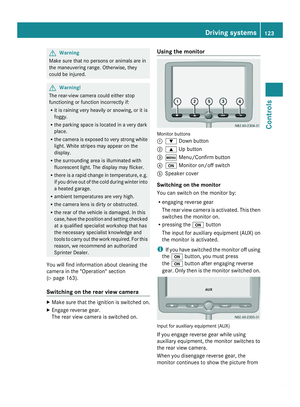 125
125 126
126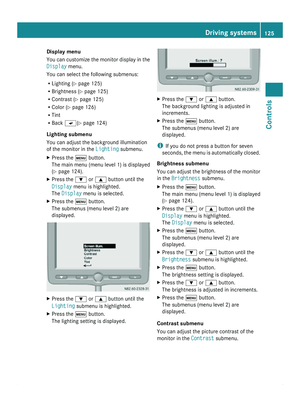 127
127 128
128 129
129 130
130 131
131 132
132 133
133 134
134 135
135 136
136 137
137 138
138 139
139 140
140 141
141 142
142 143
143 144
144 145
145 146
146 147
147 148
148 149
149 150
150 151
151 152
152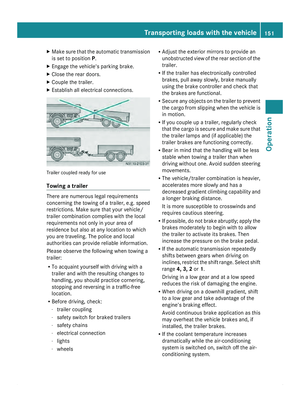 153
153 154
154 155
155 156
156 157
157 158
158 159
159 160
160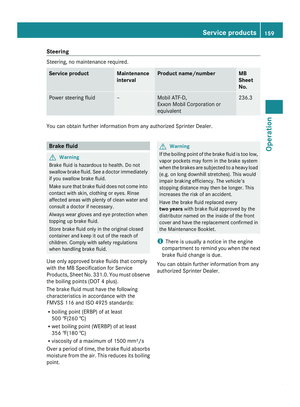 161
161 162
162 163
163 164
164 165
165 166
166 167
167 168
168 169
169 170
170 171
171 172
172 173
173 174
174 175
175 176
176 177
177 178
178 179
179 180
180 181
181 182
182 183
183 184
184 185
185 186
186 187
187 188
188 189
189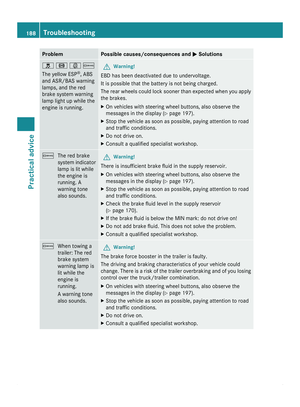 190
190 191
191 192
192 193
193 194
194 195
195 196
196 197
197 198
198 199
199 200
200 201
201 202
202 203
203 204
204 205
205 206
206 207
207 208
208 209
209 210
210 211
211 212
212 213
213 214
214 215
215 216
216 217
217 218
218 219
219 220
220 221
221 222
222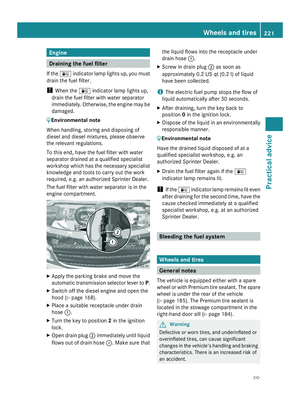 223
223 224
224 225
225 226
226 227
227 228
228 229
229 230
230 231
231 232
232 233
233 234
234 235
235 236
236 237
237 238
238 239
239 240
240 241
241 242
242 243
243 244
244 245
245 246
246 247
247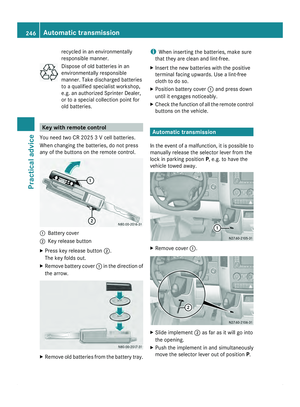 248
248 249
249 250
250 251
251 252
252 253
253 254
254 255
255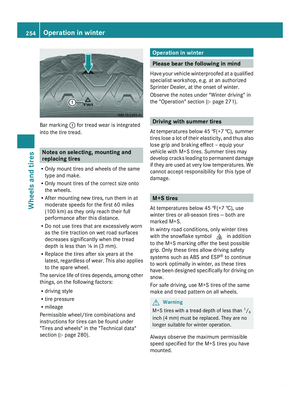 256
256 257
257 258
258 259
259 260
260 261
261 262
262 263
263 264
264 265
265 266
266 267
267 268
268 269
269 270
270 271
271 272
272 273
273 274
274 275
275 276
276 277
277 278
278 279
279 280
280 281
281 282
282 283
283 284
284 285
285 286
286 287
287 288
288 289
289 290
290 291
291