Page 129 of 292

X
Press the 003D or 003C button until the
format you want is highlighted.
X Press the 0093 button.
Your selected format is activated.
i The 16:9 format fills the entire monitor
screen. The rear view camera generates a
16:9 format. Regular video signals usually
require the 4:3 format.
i If you select 0056 and press the 0093
button, the monitor goes back to the main
menu (menu level 1).
Standard menu
You can set the video standard for the
monitor in the Standard menu.
X Press the 0093 button.
The main
menu
(menu level 1) is displayed
(Y page 124).
X Press the 003D or 003C button until the
Standard menu is highlighted.
X Press the 0093 button.
The submenu (menu level 2) is displayed.
i The current standard is marked with the
0050 symbol. X
Press the 003D or 003C button until the
required standard is highlighted.
X Press the 0093 button.
The selected standard is activated.
i The video signal from the rear view
camera uses the NTSC standard. Normal
video signals generally use the PAL
standard.
i If you select 0056 and press the 0093
button, the monitor goes back to the main
menu (menu level 1).
Menu language menu
You can set the language for the monitor
menus in the Menu language menu.
X Press the 0093 button.
The main
menu
(menu level 1) is displayed
(Y page 124).
X Press the 003D or 003C button until the
Menu language menu is highlighted.
X Press the 0093 button.
The submenu (menu level 2) is displayed.
i The current language is marked with the
0050 symbol.
X Press the 003D or 003C button until the
language you want is highlighted.
X Press the 0093 button.
The selected language is activated.
i If you select 0056 and press the 0093
button, the monitor goes back to the main
menu (menu level 1). Driving systems
127
Controls Z
Page 130 of 292

Factory setting menu
You can reset the monitor to the factory
settings in the
Factory setting menu.
X Press the 0093 button.
The main menu
(menu level 1) is displayed
(Y page 124).
X Press the 003D or 003C button until the
Factory setting menu is highlighted.
X Press the 0093 button.
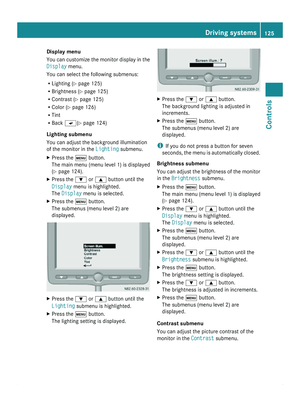
The monitor displays the following
message: X
Press the 003D or 003C button until the
required setting is highlighted.
R Yes : all settings are overwritten with the
factory settings.
R 0056: return to the main menu without
accepting the factory settings.
i If you select 0056 and press the 0093
button, the monitor goes back to the main
menu (menu level 1).
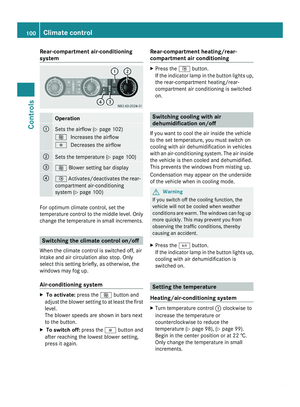
Switching off the monitor while driving If you drive faster than 6 mph (10 km/h)
, the
monitor switches off for safety reasons.
You will see the following message for seven
seconds until the monitor switches off. If the speed falls below 5 mph (8 km/h), the
monitor switches on again.
Features
Ashtray
Ashtray insert in the ashtray compartment in the
center console
X
Pull ashtray compartment 0046 out by
recess 0047.
X To open: fold cover 008A upwards.
X To remove the insert: hold the
ashtray by
the recesses on the left and right and pull
the insert out to empty it.
X To replace the insert: press it down into
the holder.128
Features
Controls
Page 131 of 292

Ashtrays in the passenger
compartment
Ashtrays on the left and right in the side trim panels
X
To open: fold out the ashtray.
X To remove the insert: press retaining
clip 0046 down and
remove the ashtray from
the trim.
X To replace the insert: insert the ashtray
down into the trim and close it. Cigarette lighter
G
Warning
Only hold the hot cigarette lighter by its knob.
Otherwise, you might burn yourself.
Make sure that children traveling in the
vehicle are not able to injure themselves on
the hot cigarette
lighter or cause a fire with it.Ashtray compartment in the center console X
Turn the key to position 1 in the ignition
lock.
X Press in cigarette lighter 0046.
The cigarette lighter will pop out
automatically when the heating element is
red-hot. G
Warning
Do not press the cigarette lighter in too
forcefully. The ashtray compartment could
close and your
fingers could become trapped. Stowage spaces and stowage
compartments
G
Warning
You should only load the stowage spaces in
such a way that the occupants cannot be
injured by objects being thrown around the
passenger compartment in the event of an
accident, braking or sudden change in
direction.
Therefore, do not carry heavy, bulky, pointed
or sharp-edged objects
in the stowage spaces
or stowage compartments.
Dashboard stowage compartment Example, right-hand side
G
Warning
Do not store objects in the stowage space
above the co-driver's air bag if they protrude
out of the stowage space. This ensures that
the co-driver's air bag can inflate fully. Features
129
Controls Z
Page 132 of 292

!
The right and left storage spaces may be
loaded with a maximum of 11 lbs (5 kg)
each.
Stowage compartment above the
windshield Example, left-hand side
0046
Stowage compartment
! The right and left storage spaces may be
loaded with a maximum of 5.5 lbs (2.5 kg)
each.
Stowage space above the headliner On vehicles with a partition, stowage
space 0046 can be loaded from the cargo
compartment.
!
The entire storage space may be loaded
with a maximum of 66 lbs (30 kg).
Do not place high, bulky loads in the
stowage space. You could otherwise
damage the headliner
in the event of sharp
braking. Stowage compartment in the center
console
Stowage compartment with lid above the center
console
X
To open: pull release handle 0047.
Lid 0046 swings up.
X To close: close lid 0046 and engage it.
The lid of the stowage compartment must
remain closed while the vehicle is in motion
to ensure that stowed objects are contained
safely.
Stowage compartment in the door You can use these stowage compartments to
store small, light items.
Stowage compartment under the twin
co-driver's seat
On vehicles with a twin co-driver's seat, the
stowage compartment is under the seat
cushion (
Y page 65).
You can use the stowage compartment to
safely store tools and other small parts. 130
Features
Controls
Page 133 of 292
Glove box
004A
Locked
004B Unlocked
008A Glove box handle
i You can lock and unlock the glove box
using the vehicle key.
X To open: pull glove box handle 008A in the
direction of the arrow. 0088
Card holder
0086 Pen holder
X To close: fold the cover up and press it until
it engages. Eyeglasses compartment in the
overhead control panel X
To open: press cover 0046 of the eyeglasses
compartment.
The eyeglasses compartment folds out.
X To close: press cover 0046
of the eyeglasses
compartment into the overhead control
panel until it engages.
Paper holder X
Press the top of paper holder 0046. Features
131
Controls Z
Page 134 of 292

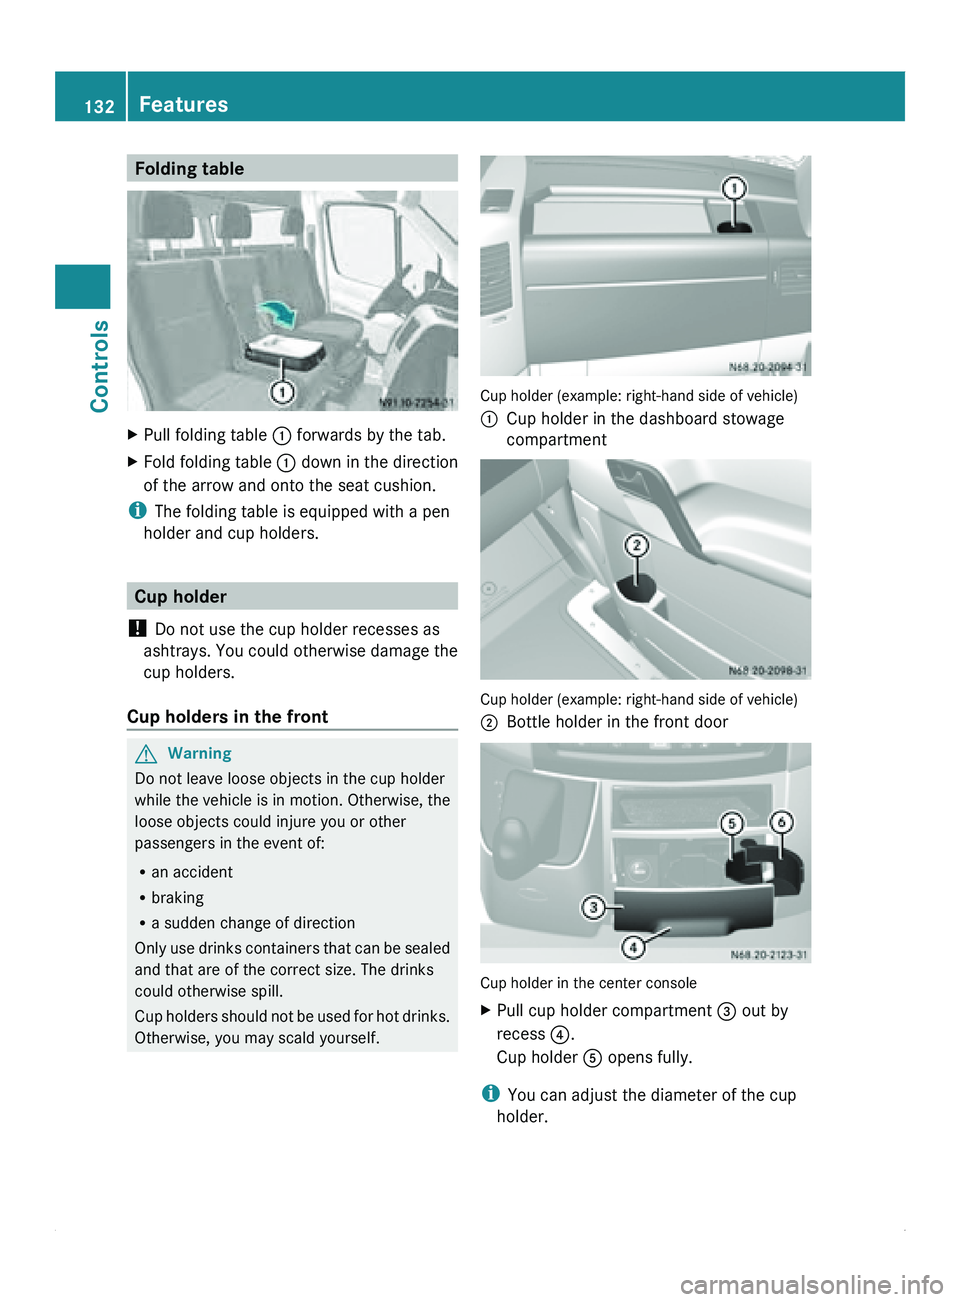
Folding table
X
Pull folding table 0046 forwards by the tab.
X Fold folding table 0046 down in the direction
of the arrow and onto the seat cushion.
i The folding table is equipped with a pen
holder and cup holders. Cup holder
! Do not use the cup holder recesses as
ashtrays. You could
otherwise damage the
cup holders.
Cup holders in the front G
Warning
Do not leave loose objects in the cup holder
while the vehicle is in motion. Otherwise, the
loose objects could injure you or other
passengers in the event of:
R an accident
R braking
R a sudden change of direction
Only use drinks
containers that can be sealed
and that are of the correct size. The drinks
could otherwise spill.
Cup holders should not be used for hot drinks.
Otherwise, you may scald yourself. Cup holder (example: right-hand side of vehicle)
0046
Cup holder in the dashboard stowage
compartment Cup holder (example: right-hand side of vehicle)
0047
Bottle holder in the front door Cup holder in the center console
X
Pull cup holder compartment 008A out by
recess
0088.
Cup holder 0086 opens fully.
i You can adjust the diameter of the cup
holder. 132
Features
Controls
Page 135 of 292

X
Place the beverage container in cup
holder 0086.
X Push clamping arm 0087 against the
container.
Cup holders in the rear X
Pull out cup holder 0046.G
Warning
Slide the cup holders back under the seats
before leaving the vehicle. You and others
could otherwise injure yourselves on the
protruding cup holders. Socket
The 12 V sockets for accessories are
R at the bottom of the center console
(12 V, 25 A)
R on the inside of the driver's seat frame
(12 V, 15 A)
R in the corner lining next to the rear doors
in the passenger compartment
(12 V, 15 A)
R in the cargo compartment next to the left
rear door (12 V, 15 A) Socket on the lower section of the center console
0046
12 V socket, 25 A
You can use the 12 V sockets (15 A) for
accessories with a maximum power
consumption of 180 W. You can connect
accessories with a maximum power
consumption of 300 W to the 12 V socket
(25 A) on the lower section of the center
console.
! Only use the 12 V socket (25 A) on the
center console for connecting the electric
air pump (premium tire sealant). You may
otherwise
damage the electrical systems of
the vehicle.
i The sockets are supplied with power even
when the key is removed from the ignition
lock. Please be aware that the battery may
become discharged if accessories, e.g. a
coolbox, remain connected while the
engine is not running. Communications
Electronic communications
equipment
G
Warning
Always pay attention to road and traffic
conditions.
Only operate electronic
equipment when road
and traffic conditions permit. Bear in mind
that at a speed of only 30 mph (approximately
50 km/h), your vehicle covers about 44 ft
(approximately 14 m) every second. Communications
133
Controls
Z
Page 136 of 292

A navigation system does not supply
information on the load-bearing capacity of
bridges or the overhead clearance of
underpasses.
The driver remains responsible for the safety
of the vehicle at all times.
Observe legal requirements.
Telephones, two-way
radios
and fax machines
without an exterior antenna could interfere
with the vehicle electronics and thus
compromise the operational safety of the
vehicle. There is an increased risk of accident.
Do not use this equipment while the vehicle
is in motion.
Failure to observe the Sprinter installation
specifications can result in the invalidation of
your vehicle's operating permit.
You will find information on retrofitting
electrical or electronic equipment in the
"Technical data" section ( Y page 277).Telephone
G
Warning
A driver's attention to the road must always
be his/her primary focus when driving. For
your safety and the safety of others, we
recommend that you pull over to a safe
location and stop before placing or taking a
telephone call. If you choose to use the
telephone while driving,
please use the hands-
free device and only use the telephone when
weather, road and traffic conditions permit.
Some jurisdictions prohibit the driver from
using a mobile phone while driving a vehicle.
Bear in mind that at a speed of just 30 mph
(approximately 50 km/h ), your vehicle is
covering a distance of 44 feet (approximately
14 m) every second. G
Warning
Excessive electromagnetic radiation may
constitute a health hazard to yourself and
others. Use of an exterior antenna gives consideration to scientific discussion
surrounding the
possible
health risk posed by
electromagnetic fields.
The exterior antenna should only be installed
at a qualified specialist workshop which has
the necessary specialist knowledge and tools
to carry out the work required. We
recommend that you use an authorized
Sprinter Dealer for this purpose. In particular,
work relevant to safety or on safety-related
systems must be carried out at a qualified
specialist workshop.
We recommend the use of an approved
exterior antenna for operating the mobile
phone. Only in this way can optimal mobile
phone reception quality in the vehicle be
ensured and mutual interference between the
vehicle electronics and mobile phones
minimized.
Observe the legal requirements for each
individual country.
The mobile phone fitting includes a hands-
free system integrated into the vehicle. The
microphone for the hands-free system is
installed in the overhead control panel or in
the overhead stowage compartment together
with the front interior light.
In order to use the hands-free system, you will
need a special bracket. The Sprinter range of
accessories includes brackets for various
mobile phone models.
i Mobile phone brackets which are
available from various manufacturers on
the open market are not compatible with
the Sprinter telephone system. You can
recognize suitable phone brackets for your
mobile, by the printed star and the B6 in the
part number on the rear of the phone
bracket.
Detailed instructions for use can be found in
the operating instructions for the mobile
phone bracket and in the separate operating
instructions for the mobile phone fittings.
i The mobile phone battery is charged
depending on the condition of charge 134
Communications
Controls