2012 MERCEDES-BENZ SLK ROADSTER set clock
[x] Cancel search: set clockPage 120 of 321
partment as well. The indicator lamp in the
á button goes out.
R Use the residual heat function if you want
to heat or ventilate the vehicle interior
when the ignition is switched off. The resid-
ual heat function can only be activated or
deactivated with the ignition switched off. Operating the climate control system
Switching climate control on/off
Important information i
When climate control is switched off, the
air supply and air circulation are also
switched off. Only select this setting
briefly. Otherwise, the windows may mist
up.
i Switch on climate control primarily using
the à button (Y page 118).
Activating/deactivating Air-conditioning system
X
To activate: turn airflow control
C(Y page 115) clockwise to the desired
position (except position 0).
X To deactivate: turn airflow control
C(Y page 115) anti-clockwise to position
0. THERMOTRONIC automatic climate con-
trol
X
Turn the key to position 2in the ignition
lock.
X To activate: press theÃbutton.
The indicator lamp in the Ãbutton lights
up. Airflow and air distribution are set to
automatic mode.
or
X Press the ^button.
The indicator lamp in the ^button goes
out. The previously selected settings come
into effect again.
X To switch off: press the^button.
The indicator lamp in the ^button lights
up. Activating/deactivating the cooling
with air dehumidification function
Important information The cooling with air dehumidification function
is only available when the engine is running.
The air inside the vehicle is cooled and dehu-
midified according to the temperature selec-
ted.
G
WARNING
If the "cooling with air dehumidification" func-
tion is deactivated, the air inside the vehicle
will not be cooled (during warm weather) or
dehumidified. The windows could mist up
more quickly. This may preven tyou from
observing the traffic conditions, thereby caus-
ing an accident.
Condensation may drip from the underside of
the vehicle when THERMOTRONIC is in cool-
ing mode. This is normal and not a sign that
there is a malfunction.
Depending on the equipment level, the con-
trol panel has either the Ábutton or the
¿ button.
i The cooling with air dehumidification
function uses refrigerant R134a. This cool- Operating the climate control system
117Climate control Z
Page 121 of 321
ant does no
tcontain chlorofluorocarbons,
and therefore does not damage the ozone
layer.
Activating/deactivating X
To switch on: press the¿orÁ but-
ton.
The indicator lamp in the ¿orÁ
button lights up.
X To deactivate: press the¿orÁ
button.
The indicator lamp in the ¿orÁ
button goes out. The cooling with air dehu-
midification function has a delayed switch-
off feature.
Problems with the cooling with air
dehumidification function When you press the
¿orÁ button, the
indicator lamp in the button flashes three
times or remains off. You can no longer switch
on the cooling with air dehumidification func-
tion.
X Consult a qualified specialist workshop. Setting climate control to automatic
mode
Only THERMOTRONIC automatic climate con-
trol features the "control climate control
automatically" function.
In automatic mode, the set temperature is
maintained automatically at a constant level.
The system automatically regulates the tem-
perature of the dispensed air, the airflow and
the air distribution.
Automatic mode will achieve optimal opera-
tion if cooling with air dehumidification is also
activated. If desired, cooling with air dehu-
midification can be deactivated. X
Turn the key to position 2in the ignition
lock.
X Set the desired temperature.
X To activate: press theÃbutton.
The indicator lamp in the Ãbutton lights
up. Automatic air distribution and airflow
are activated.
X To switch off: press the_button.
or
X Press the IorK button.
The indicator lamp in the Ãbutton goes
out. Setting the temperature
Air-conditioning system X
Turn the key to position 2in the ignition
lock.
X To increase/reduce: turn thumb-
wheel :clockwise or anti-clockwise
(Y page 115).
Only change the temperature setting in
small increments. Start at 22 †.
THERMOTRONIC automatic climate
control Different temperatures can be set for the
driver's and front-passenger sides.
X Turn the key to position 2in the ignition
lock.
X To increase/reduce: turn controls:and
B (Ypage 116) clockwise or anti-clock-
wise.
Only change the temperature setting in
small increments. Start at 22 †. 118
Operating the climate control systemClimate control
Page 122 of 321
Setting the air distribution
Air distribution settings Air-conditioning system
¯
Directs the airflow through the demis-
ter vents
O Directs the airflow through the foot-
well air vents
P Directs the airflow through the centre
and side air vents
i You can also activate several of the air
distribution settings simultaneously .In
order to do this, press several of the air
distribution buttons. The air is then routed
through different air vents.
THERMOTRONIC automatic climate con-
trol
P Directs the airflow through the centre
and side air vents
O Directs the airflow through the foot-
well air vents
S Directs the airflow through the centre
and side air vents and the footwell air
vents
¯ Directs the airflow through the demis-
ter vents
b Directs the airflow through the centre
and side air vents as well as the demis-
ter vents
a Directs the airflow through the foot-
well and demister vents
_ Directs the airflow through the demis-
ter, centre and side air vents as well as
the footwell air vents
i Regardless of the air distribution setting,
airflow is always directed through the side
air vents. You can only close the side air
vents, by fully closing the adjuster on the
side air vents (Y page 123). Air-conditioning system X
Turn the key to position 2in the ignition
lock.
X Press one or more of the P,O,
¯ buttons.
The corresponding indicator lamp comes
on.
THERMOTRONIC automatic climate
control X
Turn the key to position 2in the ignition
lock.
X Press the _button repeatedly until the
desired symbol appears in the display. Setting the airflow
Air-conditioning system X
Turn the key to position 2in the ignition
lock.
X To increase/reduce: turn thumbwheel
C clockwise or anti-clockwise
(Y page 115).
THERMOTRONIC automatic climate
control X
Turn the key to position 2in the ignition
lock.
X To increase/reduce: press theKor
I button. Switching the ZONE function on/off
This function is only available with the
THERMOTRONIC automatic climate control.
X To switch on: press theábutton.
The indicator lamp in the ábutton lights
up.
The temperature setting for the driver's
side is not adopted for the front-passenger
side. Operating the climate control system
119Climate control Z
Page 181 of 321
Useful information
i This Owner's Manual describes all models
and all standard and optional equipment
available to your vehicle at the time of pub-
lication of the Owner's Manual. Country-
specific deviations are possible. Please
note that your vehicle may not be equipped
with all features described. This also
applies to safety-relevan tsystems and
functions.
i Please read the information on qualified
specialist workshops (Y page 22).Important safety notes
You will find an illustration of the instrument
cluster in the "At a glance" section
(Y page 28). G
WARNING
Only use the on-board computer when road
and traffic conditions permit .You would oth-
erwise be distracted and unable to concen-
trate properly on driving, and could cause an
accident. G
WARNING
No messages will be displayed if either the
instrument cluster or the multifunction dis-
play is inoperative.
As a result, you will not be able to see infor-
mation about your driving conditions, such as
speed, outside temperature, warning and indi-
cator lamps, display messages or system fail-
ures. Driving characteristics may be impaired.
Adjust your driving style and vehicle speed
accordingly.
Contact a qualified specialist workshop
immediately. G
WARNING
The on-board computer only records and dis-
plays malfunctions and warnings from certain
systems. For this reason, you should always make sure that your vehicle is safe to use. You
could otherwise cause an accident by driving
an unsafe vehicle.
G
WARNING
The operating safety of your vehicle could be
impaired if maintenance work is carried out
incorrectly. This could cause you to lose con-
trol of your vehicle and cause an accident.
Moreover, the safety systems may no longer
be able to protect you or others as they are
designed to do.
Always have service work carried out at a
qualified specialist workshop. Displays and operation
Instrument cluster lighting
The brightness control knob is located on the
bottom left of the instrument cluster
(Y page 28).
X Turn the brightness control knob clockwise
or anti-clockwise.
Instrument cluster: if the light switch is set
to Ã, TorL, brightness control
takes ambient light conditions into account.
i The light sensor in the instrument cluster
automatically controls the brightness of
the multifunction display.
In daylight, the displays in the instrument
cluster are not illuminated.
Displays and switches in the vehicle
interior: if the light switch is set to Ã,
brightness control takes ambient light condi-
tions into account .Ifthe light switch is set to
T orL, brightness control does not
take ambient light conditions into account. Coolant temperature gauge
The coolant temperature gauge is in the
instrumentc lusteront he right-hand side. 178
Displays and operationOn-board computer and displays
Page 278 of 321
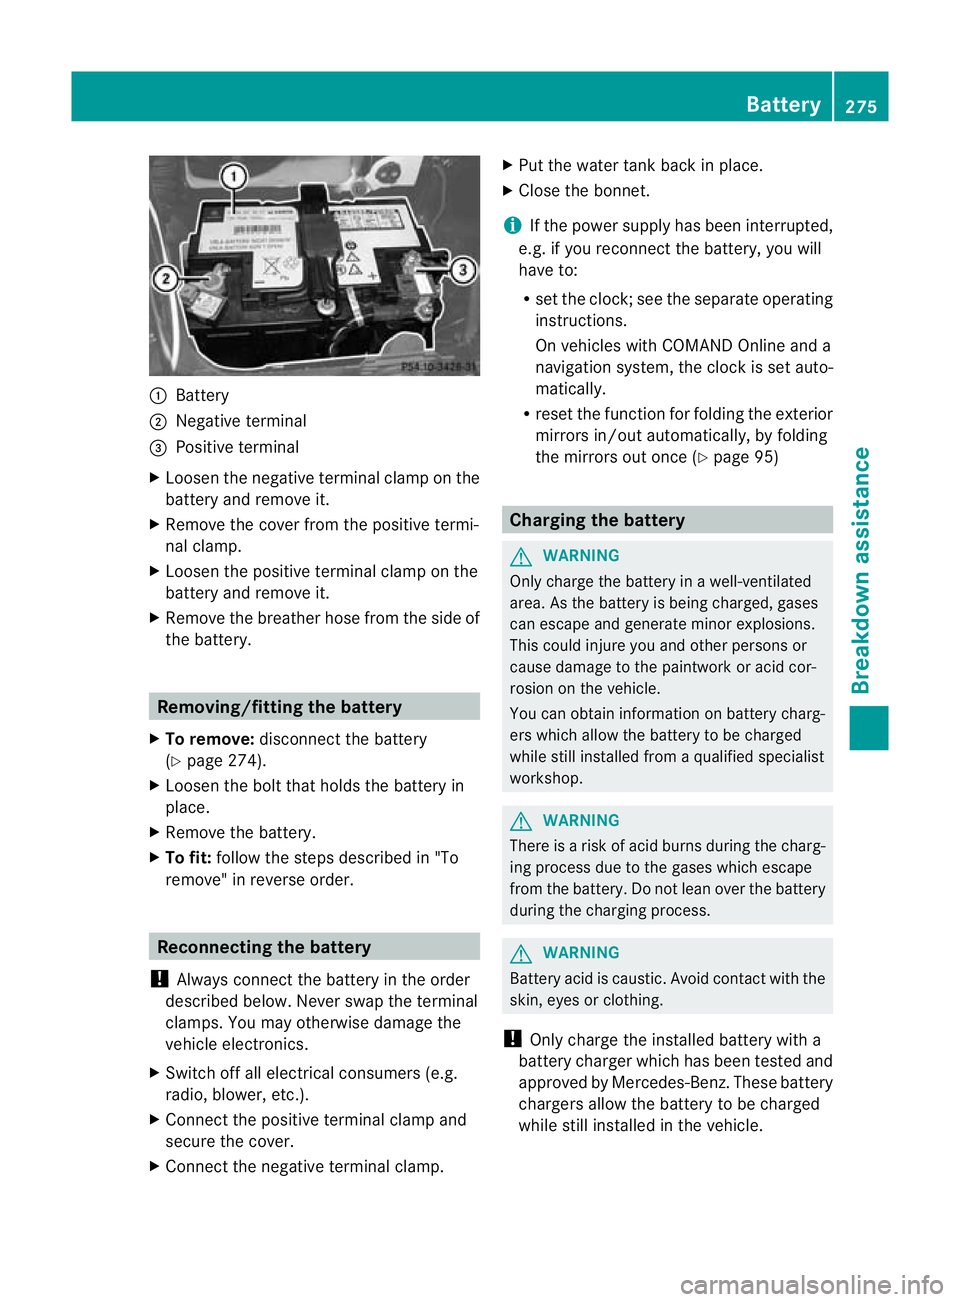
:
Battery
; Negative terminal
= Positive terminal
X Loosen the negative terminal clamp on the
battery and remove it.
X Remove the cover from the positive termi-
nal clamp.
X Loosen the positive terminal clamp on the
battery and remove it.
X Remove the breathe rhose from the side of
the battery. Removing/fitting the battery
X To remove: disconnect the battery
(Y page 274).
X Loosen the bolt that holds the battery in
place.
X Remove the battery.
X To fit: follow the steps described in "To
remove" in reverse order. Reconnecting the battery
! Always connect the battery in the order
described below. Never swap the terminal
clamps. You may otherwise damage the
vehicle electronics.
X Switch off all electrical consumers (e.g.
radio, blower, etc.).
X Connect the positive terminal clamp and
secure the cover.
X Connect the negative terminal clamp. X
Put the water tank back in place.
X Close the bonnet.
i If the power supply has been interrupted,
e.g. if you reconnect the battery, you will
have to:
R set the clock; see the separate operating
instructions.
On vehicles with COMAND Online and a
navigation system, the clock is set auto-
matically.
R reset the function for folding the exterior
mirrors in/out automatically, by folding
the mirrors out once (Y page 95) Charging the battery
G
WARNING
Only charge the battery in a well-ventilated
area. As the battery is being charged, gases
can escape and generate minor explosions.
This could injure you and other persons or
cause damage to the paintwork or acid cor-
rosion on the vehicle.
You can obtain information on battery charg-
ers which allow the battery to be charged
while still installed from a qualified specialist
workshop. G
WARNING
There is a risk of acid burns during the charg-
ing process due to the gases which escape
from the battery. Do not lean over the battery
during the charging process. G
WARNING
Battery acid is caustic. Avoid contact with the
skin, eyes or clothing.
! Only charge the installed battery with a
battery charger which has been tested and
approved by Mercedes-Benz. These battery
chargers allow the battery to be charged
while still installed in the vehicle. Battery
275Breakdown assistance Z
Page 283 of 321
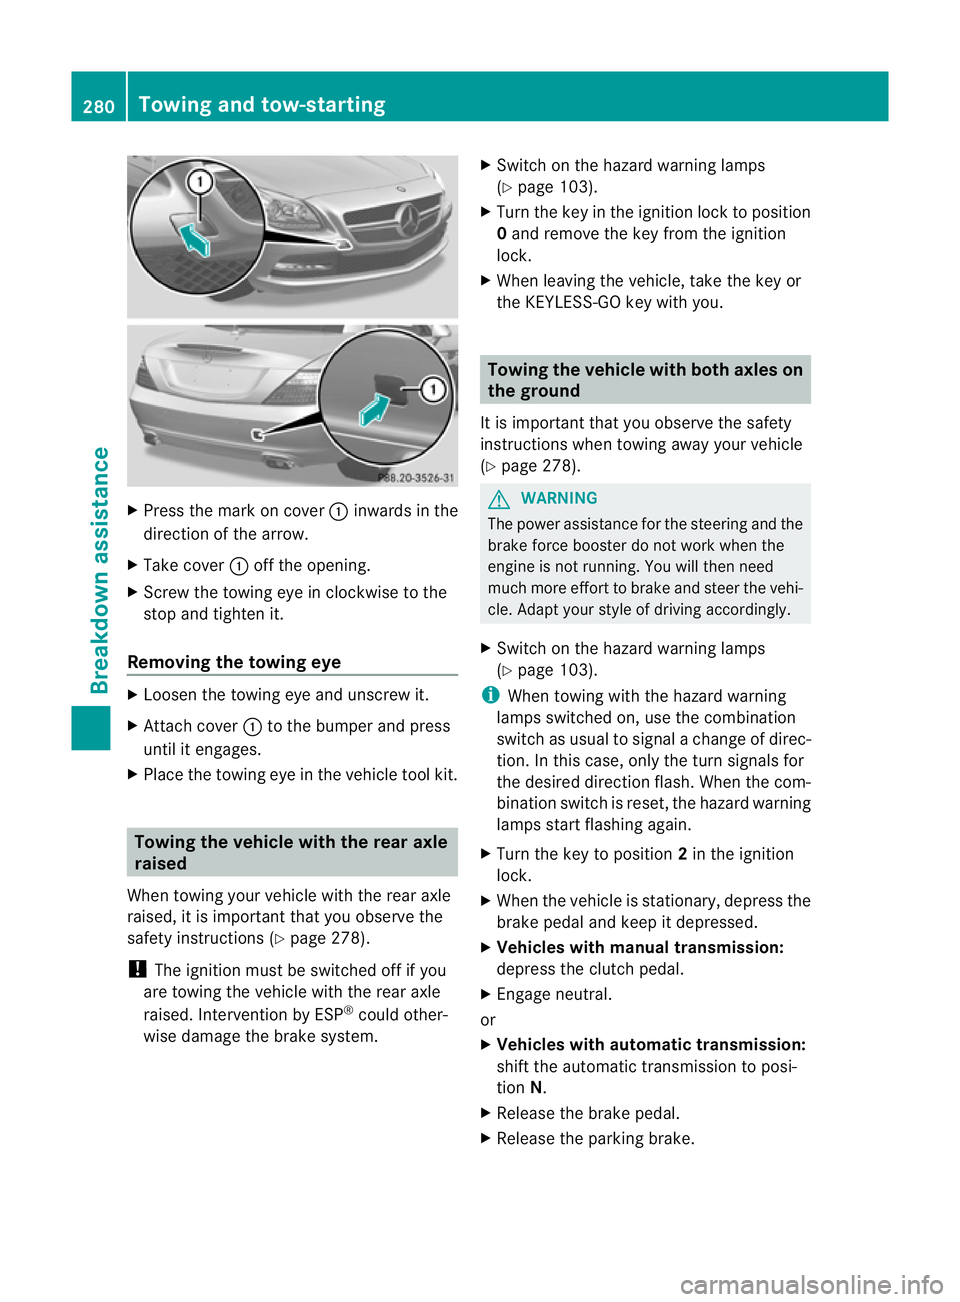
X
Press the mark on cover :inwards in the
direction of the arrow.
X Take cover :off the opening.
X Screw the towing eye in clockwise to the
stop and tighten it.
Removing the towing eye X
Loosen the towing eye and unscrew it.
X Attach cover :to the bumper and press
until it engages.
X Place the towing eye in the vehicle tool kit. Towing the vehicle with the rear axle
raised
When towing your vehicle with the rear axle
raised, it is importan tthat you observe the
safety instructions (Y page 278).
! The ignition must be switched off if you
are towing the vehicle with the rear axle
raised. Intervention by ESP ®
could other-
wise damage the brake system. X
Switch on the hazard warning lamps
(Y page 103).
X Turn the key in the ignition lock to position
0and remove the key from the ignition
lock.
X When leaving the vehicle, take the key or
the KEYLESS-GO key with you. Towing the vehicle with both axles on
the ground
It is important that you observe the safety
instructions when towing away your vehicle
(Y page 278). G
WARNING
The power assistance for the steering and the
brake force booster do not work when the
engine is not running. You will then need
much more effort to brake and steer the vehi-
cle. Adapt your style of driving accordingly.
X Switch on the hazard warning lamps
(Y page 103).
i When towing with the hazard warning
lamps switched on, use the combination
switch as usual to signal achange of direc-
tion. In this case, only the turn signals for
the desired direction flash. When the com-
bination switch is reset, the hazard warning
lamps start flashing again.
X Turn the key to position 2in the ignition
lock.
X When the vehicle is stationary, depress the
brake pedal and keep it depressed.
X Vehicles with manual transmission:
depress the clutch pedal.
X Engage neutral.
or
X Vehicles with automatic transmission:
shift the automatic transmission to posi-
tion N.
X Release the brake pedal.
X Release the parking brake. 280
Towing and tow-startingBreakdown assistance