2012 MERCEDES-BENZ SLK ROADSTER remote control
[x] Cancel search: remote controlPage 18 of 321
Refuelling
Fuelgauge ....................................... 28
Important safety notes ..................142
Refuelling proces s......................... 143
see Fuel
Releasing the parking loc kman-
ually (automatic transmission) ........142
Remote control Garage door opene r....................... 243
Programming (garage door
opener) .......................................... 243
Reserve (fuel tank)
see Fuel
Reserve fuel
Display message ............................ 212
Warning lamp ................................. 231
Residual heat (climate control) ........122
Restraint system see SRS (Supplemental Restraint
System)
Rev counter ........................................ 179
Reverse gear Engaging (automatic transmis-
sion) ............................................... 137
Engaging (manual transmission) ....136
Reversible floor (boot) ......................238
Reversing lamp Changing bulbs .............................. 109
Reversing lamps
Display message ............................ 210
Roof
Display message ............................ 221
Important safety notes ....................78
Opening/closing (with key) .............. 80
Opening/closing (with roof
switch) ............................................. 79
Problem (malfunction) .....................82
Relocking ......................................... 80
Roof carrier ........................................ 238
Roof lining and carpets (cleaning
instructions) ...................................... 258
Roof switch .......................................... 79
Route (navigation) see Route guidance (navigation)
Route guidance (navigation) ............184 S
Safety Childre ninthe vehicle ..................... 47
Child restraint systems ....................47
Safety systems
see Driving safety systems
Seat belt
Adjusting the driver's and front-
passenger sea tbelt ......................... 46
Belt force limiter .............................. 46
Belt tensione r.................................. 46
Cleaning ......................................... 258
Fastening ......................................... 45
Important safety guidelines .............44
Releasing ......................................... 46
Switching belt adjustment on/off
(on-board computer) ......................194
Warning lamp ................................. 224
Warning lamp (function) ................... 46
Seats
Adjusting (electrically). ....................90
Adjusting (manually )........................ 89
Adjusting the 4-way lumba rsup-
por t.................................................. 90
Adjusting the head restraint ............90
Cleaning the cover .........................258
Correct driver's seat position ........... 88
Important safety notes ....................89
Seat heating problem ......................91
Storing settings (memory func-
tion) ................................................. 96
Switching AIRSCARF on/off ............91
Switching sea theating on/off .........90
Sensors (cleaning instructions) .......257
Service see ASSYST PLUS service interval
display
Service Centre
see Qualified specialist workshop
Service menu (on-board computer) .190
Service products Brake fluid ..................................... 308
Coolant (engine) ............................ 308
Engine oil ....................................... 307
Fuel ................................................ 303
Important safety notes ..................303
Washer fluid .................................. .309 Index
15
Page 73 of 321
Problems with the key
Problem Possible causes/consequences and
M Solutions
You cannot lock or
unlock the vehicle
using the key. The key battery is discharged or nearly discharged.
X
Try again to lock/unlock the vehicle using the remote control
function of the key. Point the tip of the key at the driver's door
handle from close range and press the %/& button.
If this does not work:
X Check the key battery (Y page 69) and replace it if necessary
(Y page 69).
X Lock (Y page 73) or unlock (Y page 73) the vehicle using
the emergency key element. The key is faulty.
X
Lock (Y page 73) or unlock (Y page 73) the vehicle using
the emergency key element.
X Have the key checked at a qualified specialist workshop. You can no longer lock
or unlock the vehicle
using KEYLESS-GO. There is interference from a powerful source of radio waves.
X
Lock/unlock the vehicle using the remote control function of
the key. Point the tip of the key at the driver's door handle from
close range and press the %/& button. There is a fault with KEYLESS-GO.
X
Lock/unlock the vehicle using the remote control function of
the key. Point the tip of the key at the driver's door handle from
close range and press the %/& button.
X Have KEYLESS-GO checked at a qualified specialist workshop.
If this does not work:
X Check the key battery (Y page 69) and replace it if necessary
(Y page 69).
X Lock (Y page 73) or unlock (Y page 73) the vehicle using
the emergency key element. You have lost a key. X
Have the key deactivated at a qualified specialist workshop.
X Report the loss immediately to the vehicle insurers.
X If necessary, have the locks changed as well. You have lost the emer-
gency key element. X
Report the loss immediately to the vehicle insurers.
X If necessary, have the locks changed as well. 70
KeyOpening and closing
Page 246 of 321
Operating the mobile phone
You can operate the telephon
eusing the
6 and~ buttons on the multifunction
steering wheel. You can operate other mobile
phone functions via the on-board computer
(Y page 187).
When you remove the key from the ignition
lock, the mobile phone stays switched on.
However, you can no longer use the hands-
free system.
If you have an active call and would like to
take the key out of the ignition lock, first
remove the mobile phone from the bracket.
Otherwise, the call is ended.
i When using a bracket connected to the
mobile phone via Bluetooth ®
:ify ou wish to
continue a call in private mode, you will
need to perform the necessary steps on the
mobile phone. Information can be found in
the separate mobile phone operating
instructions. Garage door opener
Important safety notes The HomeLink
®
garage door opener integra-
ted in the rear-view mirror allows you to oper-
ate up to three different door and gate sys-
tems.
i The garage door opener is only available
for certain countries. Observe the legal
requirements for each individual country.
The HomeLink ®
garage door opener is
compatible with most European garage and
gate opener drives. More information on
HomeLink ®
and/or compatible products is
available from:
R any Mercedes-Benz Service Centre
R the HomeLink ®
hotline
(0) 08000 466 354 65 (free of charge) or
+49 (0) 6838 907 277 (charges apply)
R on the Internet at:
http://www.homelink.com Programming the integrated garage
door opener in the rear-view mirror Programming
G
WARNING
Only press the button on the integrated
garage door opener if there are no persons or
objects present within the sweep of the
garage door. Persons could otherwise be
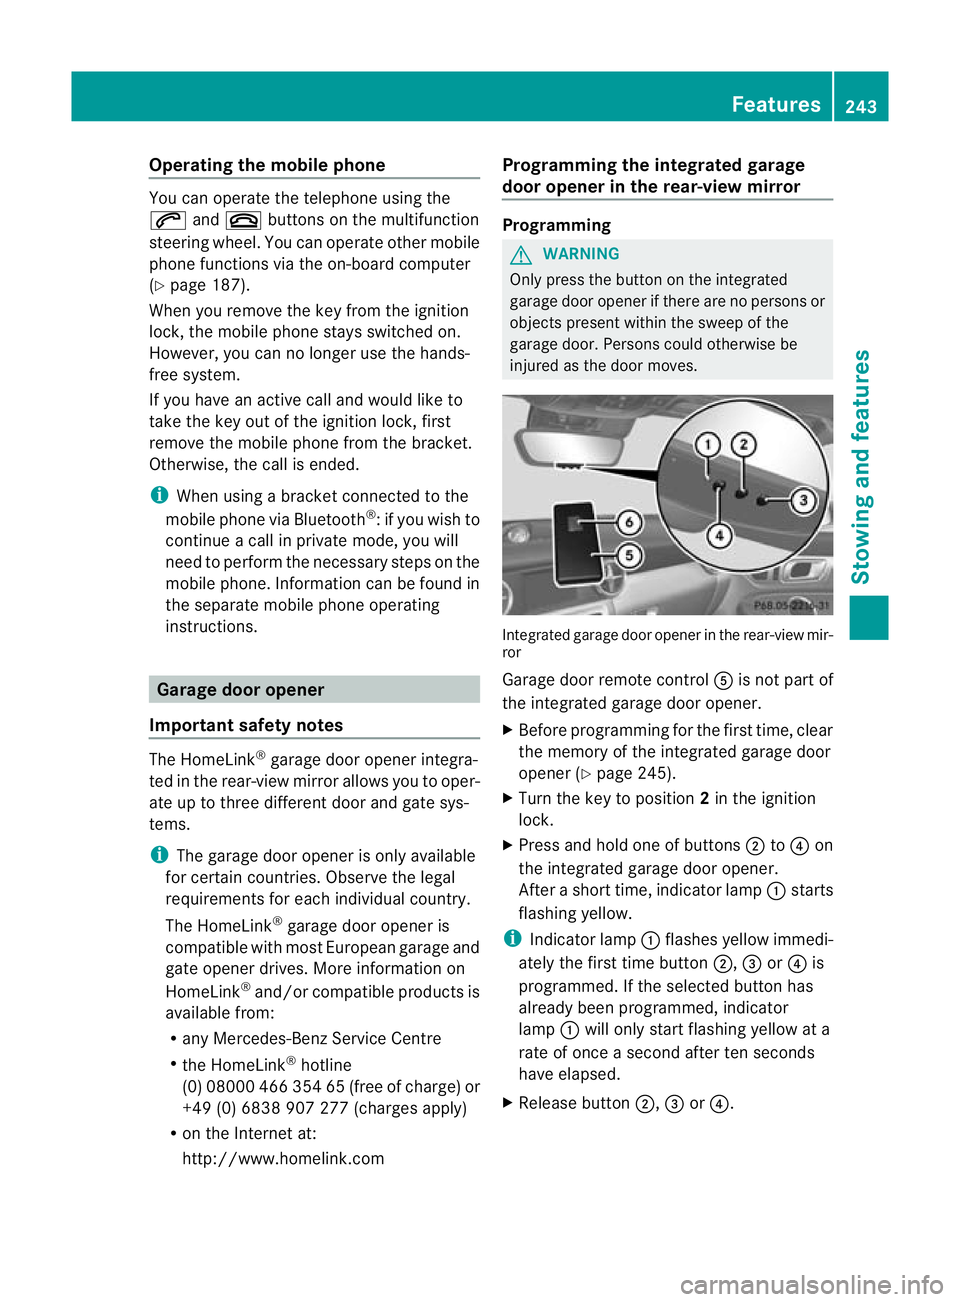
injured as the door moves. Integrated garage door opener in the rear-view mir-
ror
Garage door remote control
Ais not part of
the integrated garage door opener.
X Before programming for the first time, clear
the memory of the integrated garage door
opener (Y page 245).
X Turn the key to position 2in the ignition
lock.
X Press and hold one of buttons ;to? on
the integrated garage door opener.
After a short time, indicator lamp :starts
flashing yellow.
i Indicator lamp :flashes yellow immedi-
ately the first time button ;,=or? is
programmed. If the selected button has
already been programmed, indicator
lamp :will only start flashing yellow at a
rate of once a second after ten seconds
have elapsed.
X Release button ;,=or?. Features
243Stowing and features Z
Page 247 of 321
X
Point garage door remote control A
towards buttons ;to? on the rear-view
mirror at a distance of 5 to 20 cm.
i The required distance between remote
control Aand the integrated garage door
opener depends on the garage door drive
system. You might require several
attempts. You should test every position for
at least 25 seconds before trying another
position.
X Press and hold button Bon remot econtrol
A until indicator lamp :lights up green.
If indicator lamp :lights up green or
flashes, then programming has been suc-
cessful.
X Release button ;,=or? on the inte-
grated garage door opener and button B
on garage door remote control A.
If indicator lamp :lights up red:
X Repeat the programming procedure for the
corresponding button on the rear-view mir-
ror. When doing so, vary the distance
between remote control Aand the rear-
view mirror.
i If the indicator lamp flashes green after
successful programming, the garage door
system is using a rolling code. After pro-
gramming, you must synchronise the
garage door opener integrated in the rear-
view mirror with the receiver of the garage
door system.
Synchronising the rolling code
Your vehicle must be within reach of the
garage door or exterior gate drive. Make sure
that neither your vehicle nor any persons/
objects are present within the sweep of the
door or gate.
Observe the safety notes when performing
the rolling code synchronisation
(Y page 243). X
Turn the key to position 2in the ignition
lock.
X Press the programming button of the door
or gate drive (see the door or gate drive
operating instructions, e.g. under "Pro-
gramming of additional remote controls").
i Usually, you now have 30seconds to ini-
tiate the next step.
X Press previously programmed button ;,
= or? of the integrated garage door
opener until the door starts to move.
The rolling code synchronisation is then
complete.
Problems when programming
If you have problems when programming the
integrated garage door opener, please note
the following:
R Check the transmitter frequency of garage
door drive remote control A.This can usu-
ally be found on the back of the remote
control.
R Change the batteries in garage door remote
control A.This increases the likelihood
that remote control Awill send a strong
and precise signal to the integrated garage
door opener.
R When programming, hold remote control
A at varying distances and angles from the
button that you are programming. Try vari-
ous angles at a distance of between
5 and 30 cm or at the same angle but at
varying distances.
R If there is another remote control for the
same garage door drive, perform the pro-
gramming steps again using this remote
control. Before performing these steps,
make sure that new batteries have been
fitted in garage door drive remote control
A.
R Note that some remote controls transmit
only for a limited period (the indicator lamp
on the remote control goes out). Press but- 244
FeaturesStowing and features
Page 248 of 321
ton
Bon remote control Aagai nbefore
transmission ends.
R Align the aerial cable of the garage door
opener unit. This can improve signal recep-
tion/transmission.
Opening or closing the garage door Once programmed, the integrated garage
door opener will assume the function of the
garage door system's remote control. Please
also read the operating instructions for the
garage door system.
X Turn the key to position 2in the ignition
lock.
X Press button ;,=or? that you have
programmed to operate the garage door.
Garage door system with a fixed code: indi-
cator lamp :lights up green.
Garage door system with a rolling code:
indicator lamp :flashes green.
i The transmitter will transmit a signal for
as long as the button is pressed. The trans-
mission is halted after a maximum of ten
seconds and indicator lamp :flashes yel-
low. Press button ;,=or? again if nec-
essary.
Clearing the memory of the integrated
garage door opener in the rear-view mir-
ror X
Turn the key to position 2in the ignition
lock.
X Press buttons ;and ?.
The indicator lamp lights up yellow.
X Press and hold buttons ;and ?until the
indicator lamp turns green.
i Make sure that you clear the memory of
the integrated garage door opener before
selling the vehicle. Features
245Stowing and features Z