2012 MERCEDES-BENZ SLK ROADSTER rear view mirror
[x] Cancel search: rear view mirrorPage 14 of 321
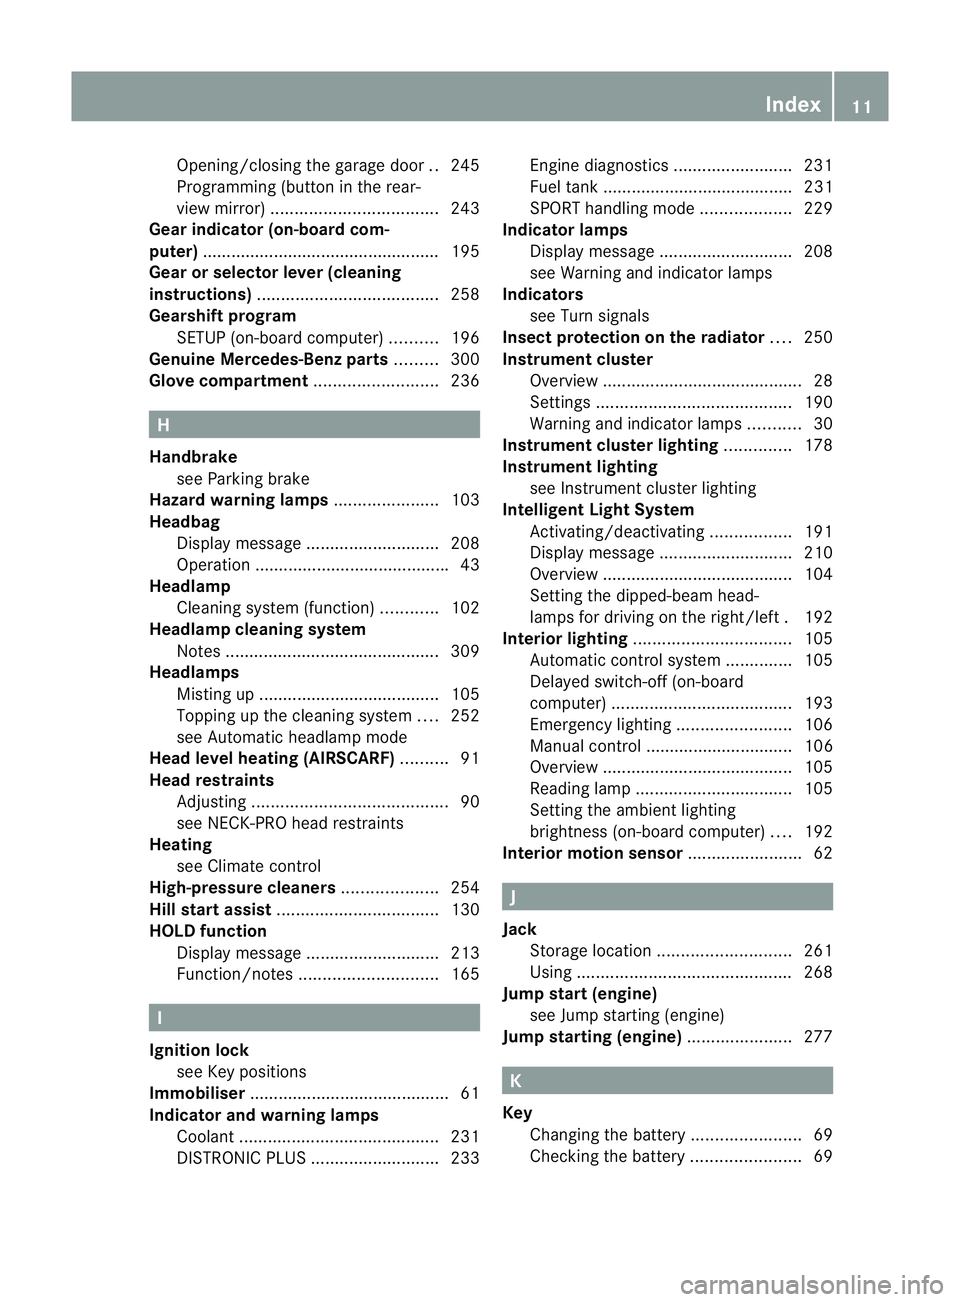
Opening/closing the garage door
..245
Programming (button in the rear-
view mirror) ................................... 243
Gear indicator (on-board com-
puter) ................................................. .195
Gear or selector lever (cleaning
instructions) ...................................... 258
Gearshift program SETUP (on-board computer) ..........196
Genuine Mercedes-Benz parts .........300
Glove compartment ..........................236 H
Handbrake see Parking brake
Hazard warning lamps ......................103
Headbag Display message ............................ 208
Operation ........................................ .43
Headlamp
Cleaning system (function) ............102
Headlamp cleaning system
Notes ............................................. 309
Headlamps
Misting up ...................................... 105
Topping up the cleaning system ....252
see Automatic headlamp mode
Head level heating (AIRSCARF) ..........91
Head restraints Adjusting ......................................... 90
see NECK-PR Ohead restraints
Heating
see Climate control
High-pressure cleaners ....................254
Hill start assist .................................. 130
HOLD function Display message ............................ 213
Function/notes ............................. 165 I
Ignition lock see Key positions
Immobiliser .......................................... 61
Indicator and warning lamps Coolant .......................................... 231
DISTRONI CPLUS ........................... 233Engine diagnostics
.........................231
Fuel tank ........................................ 231
SPORT handling mode ...................229
Indicator lamps
Display message ............................ 208
see Warning and indicator lamps
Indicators
see Turn signals
Insectp rotection on the radiator ....250
Instrument cluster Overview .......................................... 28
Settings ......................................... 190
Warning and indicator lamps ...........30
Instrument cluster lighting ..............178
Instrument lighting see Instrument cluster lighting
Intelligen tLight System
Activating/deactivatin g................. 191
Display message ............................ 210
Overview ........................................ 104
Setting the dipped-bea mhead-
lamps for driving on the right/left .192
Interior lighting ................................. 105
Automatic control system ..............105
Delayed switch-off (on-board
computer) ...................................... 193
Emergency lighting ........................106
Manual control ............................... 106
Overview ........................................ 105
Reading lamp ................................. 105
Setting the ambient lighting
brightness (on-board computer) ....192
Interior motion sensor ........................62 J
Jack Storage location ............................ 261
Using ............................................. 268
Jump start (engine)
see Jump starting (engine)
Jump starting (engine) ......................277 K
Key Changing the battery .......................69
Checking the battery .......................69 Index
11
Page 16 of 321
Main-beam headlamps
Changing bulbs .............................. 108
Display message ............................ 209
Switching on/off ........................... 103
Maintenance
see ASSYST PLUS service interval
display
Manual transmission
Engaging revers egear ................... 136
Gea rlever ...................................... 135
Pulling away ................................... 129
Shifting to neutra l.......................... 136
Shift recommendatio n................... 136
Starting the engine ........................129
Matt finish (cleaning instructions) ..255
Memory card (audio) .........................186
Memory function ................................. 96
Mercedes-Benz Service Centre see Qualified specialist workshop
Message memory (on-board com-
puter) ................................................. .199
Messages see Display messages
Mirrors
see Exterior mirrors
see Rear-view mirror
see Vanity mirror
Mobile phone
Frequencies ................................... 301
Installatio n..................................... 301
Menu (on-board computer) ............187
Notes/placing in the bracket ......... 242
Transmission output (maximum) .... 301
see Telephone
Modifying the programming (key) .....67
MOExtended run-flat system ...........272
Motorway mode ................................ 104
MP3 Operating ...................................... .186
see Separate operating instructions
Multifunction display
Function/notes ............................. 180
Permanent displa y......................... 191
Multifunction steering wheel
Operating the on-board computer .179
Overview .......................................... 31 N
Navigation Menu (on-board computer) ............184
On-board computer .......................184
see separate operating instructions
Neck level heating
see AIRSCARF
NECK-PRO head restraints
Operation ........................................ .43
Resetting after being triggered ........44
Notes on running in anew vehicle ..126 O
Occupant safety Childre ninthe vehicle ..................... 47
Important safety notes ....................38
Odometer ........................................... 183
see Total distance recorder
see Trip meter
Oil
see Engine oil
On-board computer
AMG menu ..................................... 195
Assistance menu ........................... 189
Audi omenu ................................... 186
Convenience submenu ..................194
Displaying a service message ........253
Display messages ..........................199
DISTRONI CPLUS ........................... 162
Factory setting submenu ...............195
Important safety notes ..................178
Instrument cluster submenu ..........190
Ligh tsubmenu ............................... 191
Menu overview .............................. 182
Message memory .......................... 199
Navigation menu ............................ 184
Operating vide oDVD ..................... 187
Operation ....................................... 179
RACETIMER ................................... 196
Service menu ................................. 190
Settings menu ............................... 190
Standard displa y............................ 183
Telephone menu ............................ 187
Trip menu ...................................... 183
Vehicle submenu ........................... 193 Index
13
Page 17 of 321
Operating safety
Diagnostics connection ...................22
Operating system
see On-board computer
Outside temperature display ...........179
Overhead control panel ......................34 P
Pain tcode .......................................... 302
Paintwork (cleaning instructions) ...255
Park Assist Parking Guidance ........................... 170
Parking ............................................... 146
Important safety notes ..................146
Parking brake ................................ 147
Position of exterior mirror, front-
passenger side ................................. 95
see PARKTRONIC
Parking aid
see Exterior mirrors
see PARKTRONIC
Parking brake
Display message ............................ 202
Electric parking brake ....................147
Parking Guidance
Display message ............................ 214
Important safety notes ..................170
Parking lamps
Changing bulbs .............................. 108
Display message ............................ 210
Switching on/off ........................... 100
Parking lamps (changing bulbs) ......108
PARKTRONIC Deactivating/activating .................169
Driving system ............................... 167
Function/notes ............................. 167
Important safety notes ..................167
Problem (fault) ............................... 170
Sensor range ................................. 167
Warning displa y............................. 168
PASSENGE RAIRBAG OFF warning
lamp ...................................................... 49
Petrol .................................................. 304
Phone see Telephone
Plastic trim (cleaning instructions) .257 Power windows
see Side windows
PRE-SAFE ®
(preventive occupant
safety system) Display message ............................ 206
Operation ........................................ .43
PRE-SAFE ®
Brake
Activating/deactivating .................189
Display message ............................ 207
Function/notes ................................ 59
Warning lamp ................................. 233
Preventive occupant safety sys-
tem
see PRE-SAFE ®
(preventive occu-
pant safety system)
Program selector button ..................138
Pulling away Automatic transmission .................130
Manual transmission ..................... .129 Q
Qualifie dspecialis tworkshop ...........22 R
RACETIMER (on-board computer) ....196
Radar sensor system Activating/deactivating .................194
Country overview ........................... 312
Display message ............................ 214
Radiator cover ................................... 250
Radio Selecting astation ......................... 186
see separate operating instructions
Reading lamp ..................................... 105
Rear foglamp Display message ............................ 210
Switching on/off ........................... 102
Rear lamps
see Lights
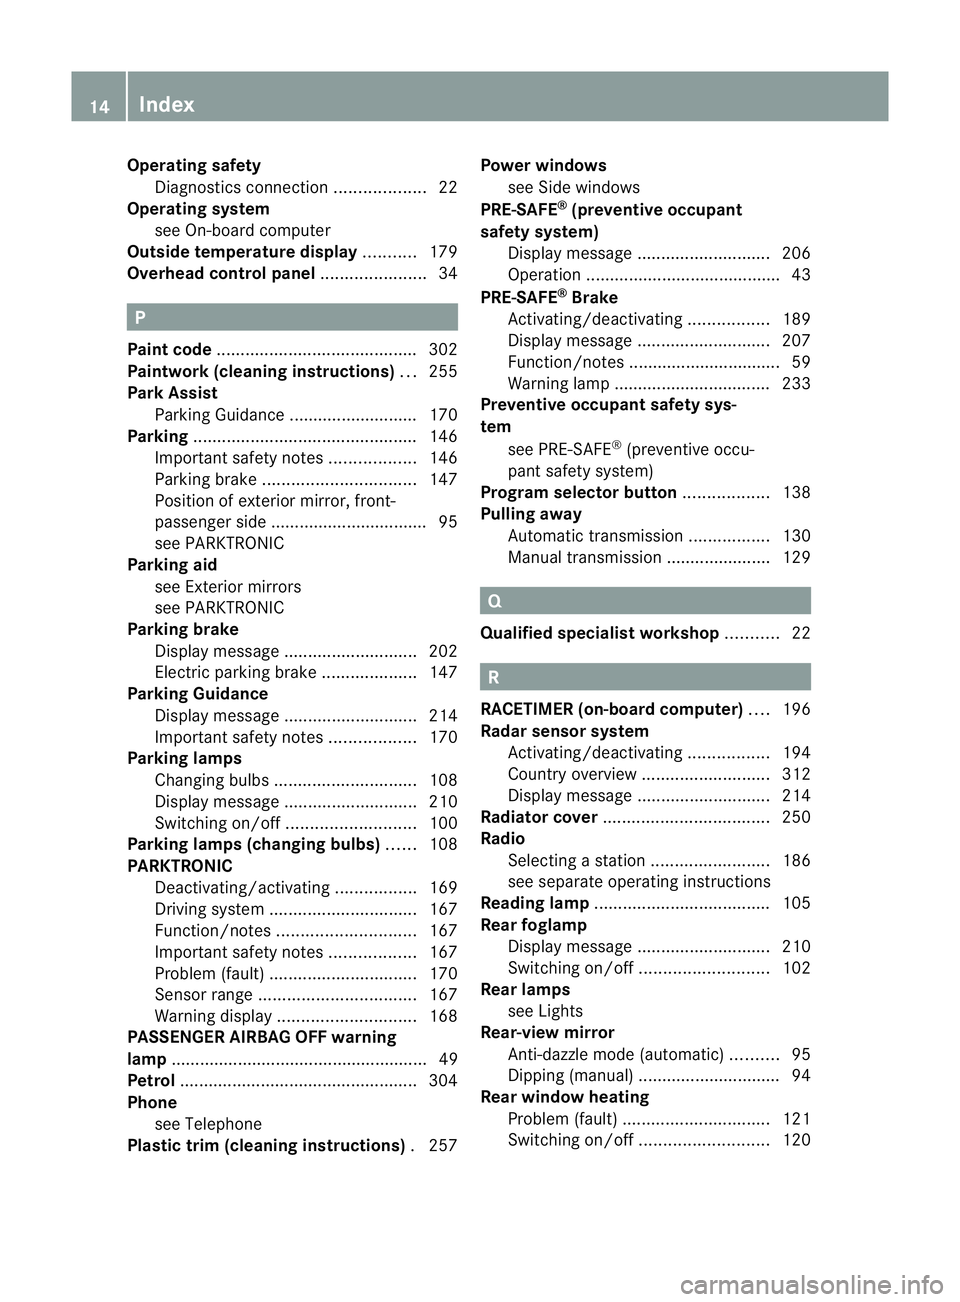
Rear-view mirror
Anti-dazzle mode (automatic) ..........95
Dipping (manual) .............................. 94
Rear window heating
Problem (fault) ............................... 121
Switching on/off ........................... 12014
Index
Page 37 of 321
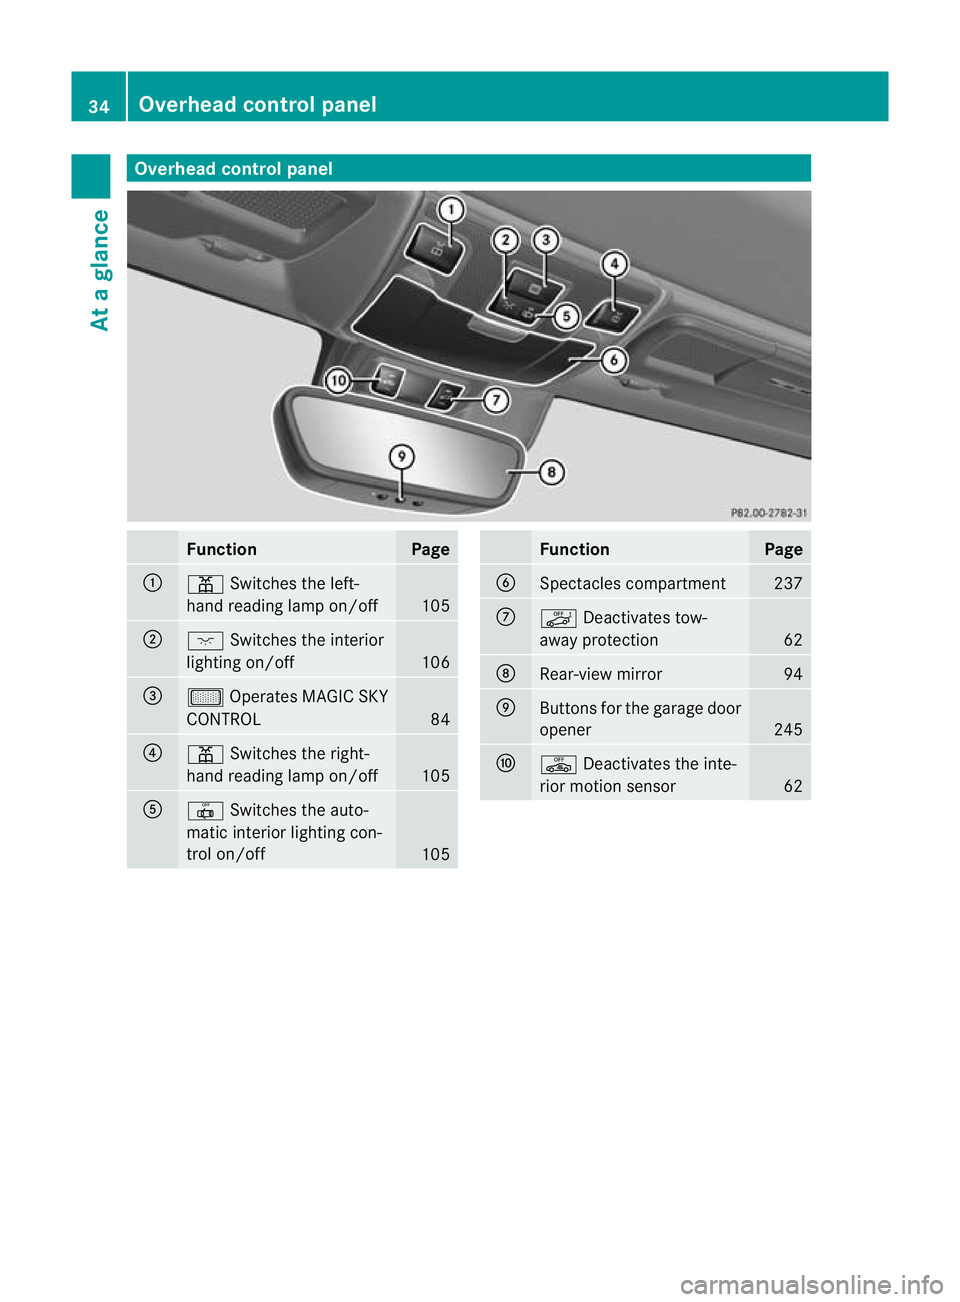
Overhea
dcontrol panel Function Page
:
p
Switches the left-
hand reading lamp on/off 105
;
c
Switches the interior
lighting on/off 106
=
µ
Operates MAGIC SKY
CONTROL 84
?
p
Switches the right-
hand reading lamp on/off 105
A
|
Switches the auto-
matic interior lighting con-
trol on/off 105 Function Page
B
Spectacles compartment 237
C
ë
Deactivates tow-
away protection 62
D
Rear-view mirror 94
E
Buttons for the garage door
opener 245
F
ê
Deactivates the inte-
rior motion sensor 6234
Overhea
dcontrol panelAt a glance
Page 91 of 321
Useful information
i This Owner's Manual describes all models
and all standard and optional equipment
available to your vehicle at the time of pub-
lication of the Owner's Manual. Country-
specific deviations are possible. Please
note that your vehicle may not be equipped
with all features described. This also
applies to safety-relevan tsystems and
functions.
i Please read the information on qualified
specialist workshops (Y page 22).Correct driver's sea
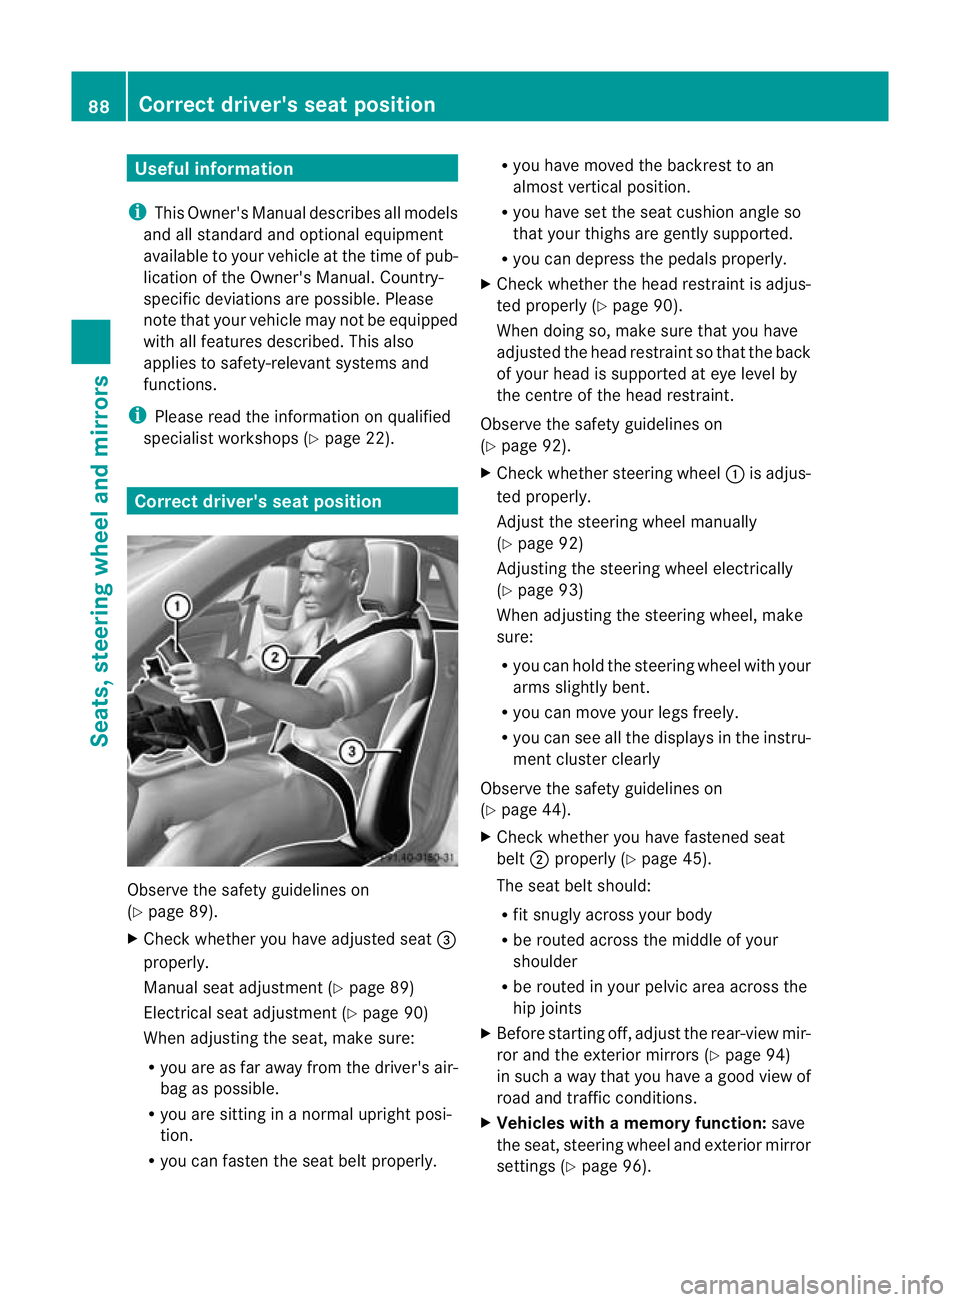
tposition Observe the safety guidelines on
(Y
page 89).
X Chec kwhether you have adjusted seat =
properly.
Manual seat adjustment (Y page 89)
Electrical seat adjustment (Y page 90)
When adjusting the seat, make sure:
R you are as far away from the driver's air-
bag as possible.
R you are sitting in a normal upright posi-
tion.
R you can fasten the seat belt properly. R
you have moved the backrest to an
almost vertical position.
R you have set the seat cushion angle so
that your thighs are gently supported.
R you can depress the pedals properly.
X Check whether the head restraint is adjus-
ted properly (Y page 90).
When doing so, make sure that you have
adjusted the head restraint so that the back
of your head is supported at eye level by
the centre of the head restraint.
Observe the safety guidelines on
(Y page 92).
X Check whether steering wheel :is adjus-
ted properly.
Adjust the steering wheel manually
(Y page 92)
Adjusting the steering wheel electrically
(Y page 93)
When adjusting the steering wheel, make
sure:
R you can hold the steering wheel with your
arms slightly bent.
R you can move your legs freely.
R you can see all the displays in the instru-
ment cluster clearly
Observe the safety guidelines on
(Y page 44).
X Check whether you have fastened seat
belt ;properly (Y page 45).
The seat belt should:
R fit snugly across your body
R be routed across the middle of your
shoulder
R be routed in your pelvic area across the
hip joints
X Before starting off, adjust the rear-view mir-
ror and the exterior mirrors (Y page 94)
in such a way that you have a good view of
road and traffic conditions.
X Vehicles with a memory function: save
the seat, steering wheel and exterior mirror
settings (Y page 96). 88
Correct driver's seat positionSeats, steering wheel and mirrors
Page 97 of 321
it easier to exit the vehicle and rescue the
occupants.
The crash-responsive EASY-EXIT feature is
only operational after an accident if the EASY-
EXIT/ENTRY feature is activated in the on-
board computer. Mirrors
Rear-view mirror
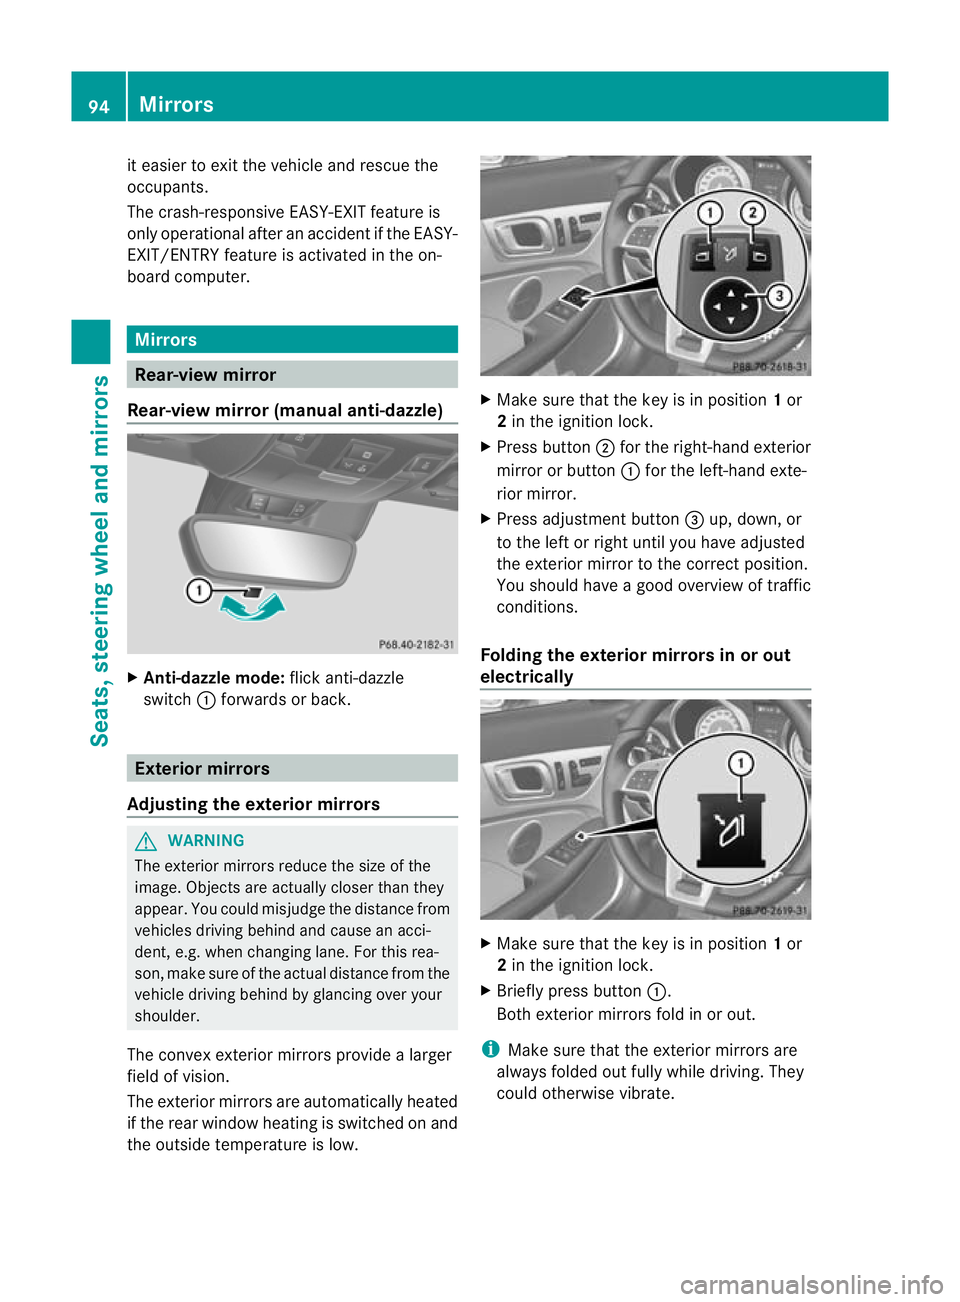
Rear-view mirror (manual anti-dazzle) X
Anti-dazzle mode: flick anti-dazzle
switch :forwards or back. Exterior mirrors
Adjusting the exterior mirrors G
WARNING
The exterior mirrors reduce the size of the
image. Objects are actually closer than they
appear. You could misjudge the distance from
vehicles driving behind and cause an acci-
dent, e.g. when changing lane. For this rea-
son, make sure of the actual distance fro mthe
vehicle driving behind by glancing over your
shoulder.
The convex exterior mirrors provide a larger
field of vision.
The exterior mirrors are automatically heated
if the rear window heating is switched on and
the outside temperature is low. X
Make sure that the key is in position 1or
2 in the ignition lock.
X Press button ;for the right-hand exterior
mirror or button :for the left-hand exte-
rior mirror.
X Press adjustment button =up, down, or
to the left or right until you have adjusted
the exterior mirror to the correct position.
You should have a good overview of traffic
conditions.
Folding the exterior mirrors in or out
electrically X
Make sure that the key is in position 1or
2 in the ignition lock.
X Briefly press button :.
Both exterior mirrors fold in or out.
i Make sure that the exterior mirrors are
always folded out fully while driving. They
could otherwise vibrate. 94
MirrorsSeats, steering wheel and mirrors
Page 98 of 321
Setting the exterior mirrors
If the battery has been disconnected or com-
pletely discharged, the exterior mirrors must
be reset. The exterior mirrors will otherwise
not fold in when you select the "Fold in mir-
rors when locking" function in the on-board
computer (Y page 195).
X Make sure that the key is in position 1in
the ignition lock.
X Briefly press button :.
Folding the exterior mirrors in or out
automatically If the "Fold in mirrors when locking" function
is activated in the on-board computer
(Y page 195):
R the exterior mirrors fold in automatically as
soon as you lock the vehicle from the out-
side.
R the exterior mirrors fold out again automat-
ically as soon as you unlock the vehicle and
then open the driver's or front-passenger
door.
i If the exterior mirrors have been folded in
manually, they do not fold out.
Exterior mirror out of position If an exterior mirror has been pushed out of
position, proceed as follows:
X
Vehicles without electrically folding
exterior mirrors: move the exterior mirror
into the correctp osition manually.
X Vehicles with electrically folding exte-
rior mirrors: press the mirror-folding but-
ton (Y page 94) repeatedly until you hear
the mirror engage in position.
The mirror housing is engaged again and
you can adjust the exterior mirrors as usual
(Y page 94). Automatic anti-dazzle mirrors
G
WARNING
If incident light from headlamps is prevented
from striking the sensor in the rear-view mir-
ror, for instance, by luggage piled too high in
the vehicle, the mirror's automatic anti-dazzle
function will not operate.
Incident light could then blind you. This may
distract you from the traffic conditions and,
as a result, you may cause an accident.
The rear-view mirror and the exterior mirror
on the driver's side automatically go into anti-
dazzle mode if the ignition is switched on and
incident light from headlamps strikes the sen-
sor in the rear-view mirror.
The mirrors do not go into anti-dazzle mode if
reverse gear is engaged or the interior lighting
is switched on. Parking position for the exterior mir-
ror on the front-passenger side
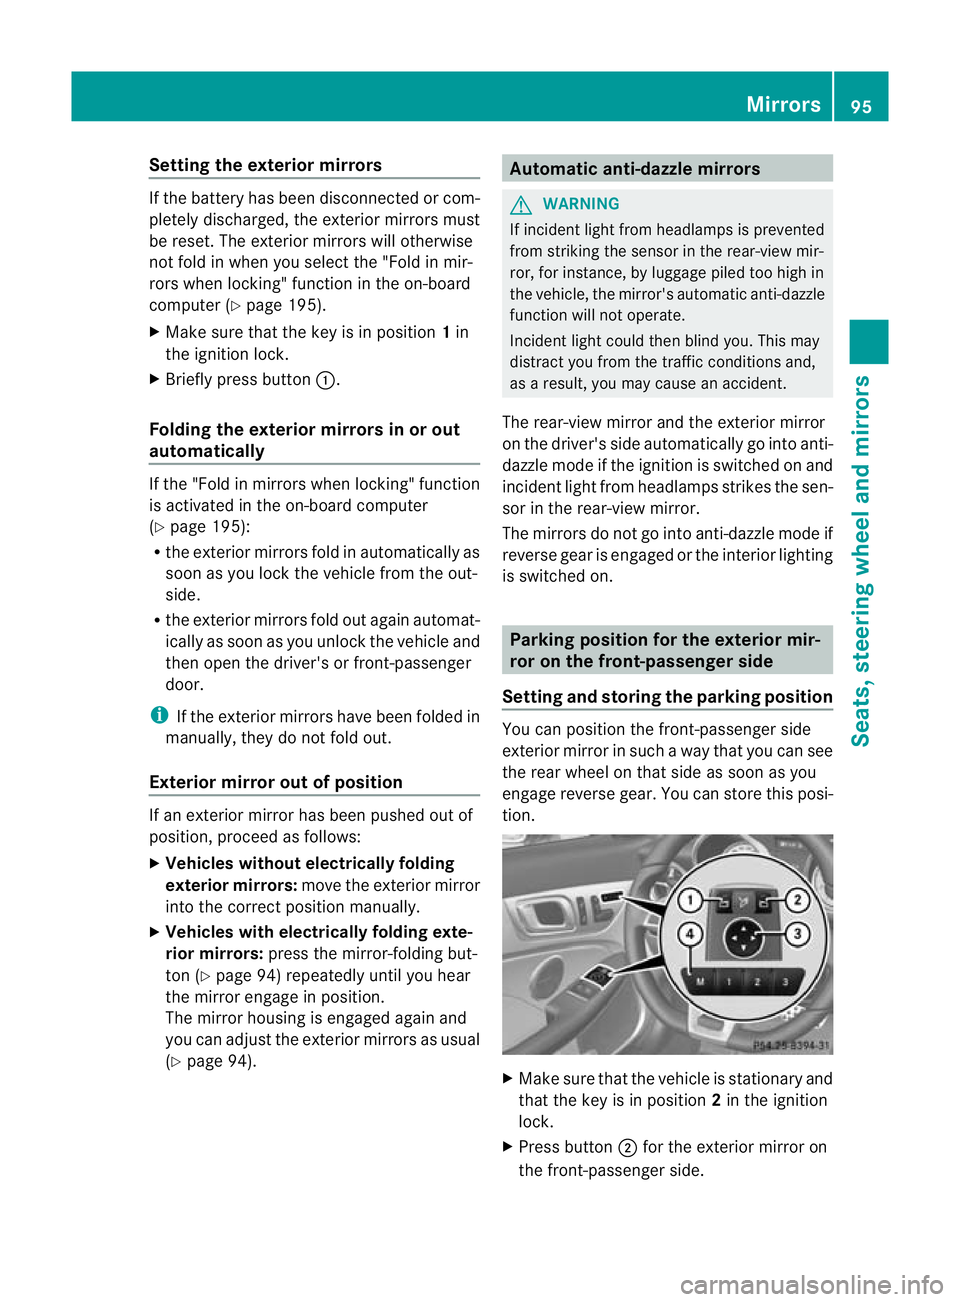
Setting and storing the parking position You can position the front-passenger side
exterior mirror in such a way that you can see
the rear wheel on that side as soon as you
engage reverse gear. You can store this posi-
tion.
X
Make sure that the vehicle is stationary and
that the key is in position 2in the ignition
lock.
X Press button ;for the exterior mirror on
the front-passenger side. Mirrors
95Seats, steering wheel and mirrors Z
Page 246 of 321
Operating the mobile phone
You can operate the telephon
eusing the
6 and~ buttons on the multifunction
steering wheel. You can operate other mobile
phone functions via the on-board computer
(Y page 187).
When you remove the key from the ignition
lock, the mobile phone stays switched on.
However, you can no longer use the hands-
free system.
If you have an active call and would like to
take the key out of the ignition lock, first
remove the mobile phone from the bracket.
Otherwise, the call is ended.
i When using a bracket connected to the
mobile phone via Bluetooth ®
:ify ou wish to
continue a call in private mode, you will
need to perform the necessary steps on the
mobile phone. Information can be found in
the separate mobile phone operating
instructions. Garage door opener
Important safety notes The HomeLink
®
garage door opener integra-
ted in the rear-view mirror allows you to oper-
ate up to three different door and gate sys-
tems.
i The garage door opener is only available
for certain countries. Observe the legal
requirements for each individual country.
The HomeLink ®
garage door opener is
compatible with most European garage and
gate opener drives. More information on
HomeLink ®
and/or compatible products is
available from:
R any Mercedes-Benz Service Centre
R the HomeLink ®
hotline
(0) 08000 466 354 65 (free of charge) or
+49 (0) 6838 907 277 (charges apply)
R on the Internet at:
http://www.homelink.com Programming the integrated garage
door opener in the rear-view mirror Programming
G
WARNING
Only press the button on the integrated
garage door opener if there are no persons or
objects present within the sweep of the
garage door. Persons could otherwise be
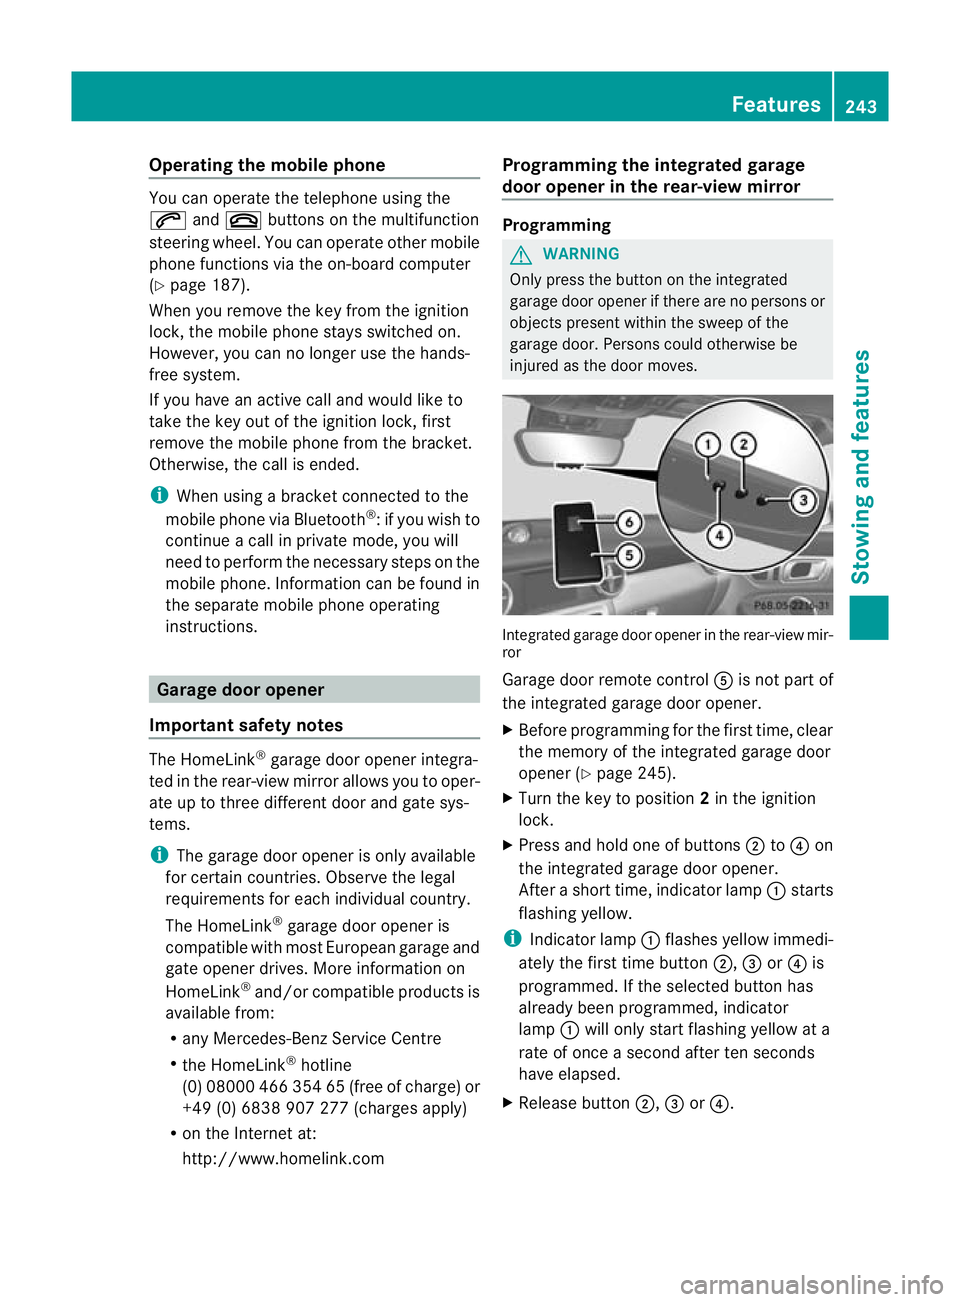
injured as the door moves. Integrated garage door opener in the rear-view mir-
ror
Garage door remote control
Ais not part of
the integrated garage door opener.
X Before programming for the first time, clear
the memory of the integrated garage door
opener (Y page 245).
X Turn the key to position 2in the ignition
lock.
X Press and hold one of buttons ;to? on
the integrated garage door opener.
After a short time, indicator lamp :starts
flashing yellow.
i Indicator lamp :flashes yellow immedi-
ately the first time button ;,=or? is
programmed. If the selected button has
already been programmed, indicator
lamp :will only start flashing yellow at a
rate of once a second after ten seconds
have elapsed.
X Release button ;,=or?. Features
243Stowing and features Z