2012 MERCEDES-BENZ SLK ROADSTER low beam
[x] Cancel search: low beamPage 9 of 321
C
Calling up a fault see Display messages
Capacities
see Technical data
Car
see Vehicle
Care
Automatic car wash .......................254
Carpets .......................................... 258
Display ........................................... 257
Exterior lighting ............................. 256
Gea rors electo rlever .................... 258
High-pressure cleaner .................... 254
Interior ........................................... 257
Matt paintwork .............................. 255
Notes ............................................. 253
Paint .............................................. 255
Plastic trim .................................... 257
Roof lining ...................................... 258
Seat bel t........................................ 258
Seat cover ..................................... 258
Sensors ......................................... 257
Steering wheel ............................... 258
Tai lpipes ....................................... 257
Trim pieces .................................... 258
Washing by hand ........................... 254
Wheels ........................................... 255
Windows ........................................ 256
Wiper blades .................................. 256
Wooden trim .................................. 258
Car key
see Key
Car wash (care) ................................. 254
CD player/CD changer(on-board
computer) .......................................... 186
Cell phone see Mobile phone
Central locking
Automatic locking (on-board com-
puter) ............................................. 193
Locking/unlocking (key ).................. 66
Centre console
Lowe rsection .................................. 33
Uppe rsection .................................. 32Changing bulbs
Dipped-bea mheadlamps ............... 108
Important safety notes ..................106
Main-beam headlamps ................... 108
Overview of bul btypes .................. 107
Parking lamps (front) .....................108
Removing/replacing the cover
(front wheel arch) .......................... 107
Reversing lamps ............................ 109
Standing lamps .............................. 108
Turn signals (front) ......................... 108
Children
In the vehicle ................................... 47
Restraint systems ............................ 47
Child seat
Automatic recognition .....................49
On the front-passenger sea t............ 48
Problem (malfunction) .....................51
Recommendations ...........................52
Suitable positions ............................ 51
Cigarette lighter ................................ 240
Cleaning Mirro rturn signal ........................... 256
Climate control
Air conditioning ............................. 115
Controlling automatically ...............118
Convenience opening/closing
(air-recirculatio nmode) ................. 121
Cooling with aird ehumidification..117
Demisting the windows .................. 120
Demisting the windscreen .............120
Important safety notes ..................114
Indicator lamp ................................ 118
Notes on using the air-condition-
ing system ..................................... 115
Notes on using THERMOTRONIC
automatic climate control ..............116
Overview of systems ......................114
Problems with cooling with air
dehumidification ............................ 118
Problem with the rear window
heating .......................................... 121
Setting the aird istribution.............119
Setting the airflow .........................119
Setting the airv ents...................... 122
Setting the temperature ................118
Switching air-recirculation mode
on/off ............................................ 1216
Index
Page 33 of 321
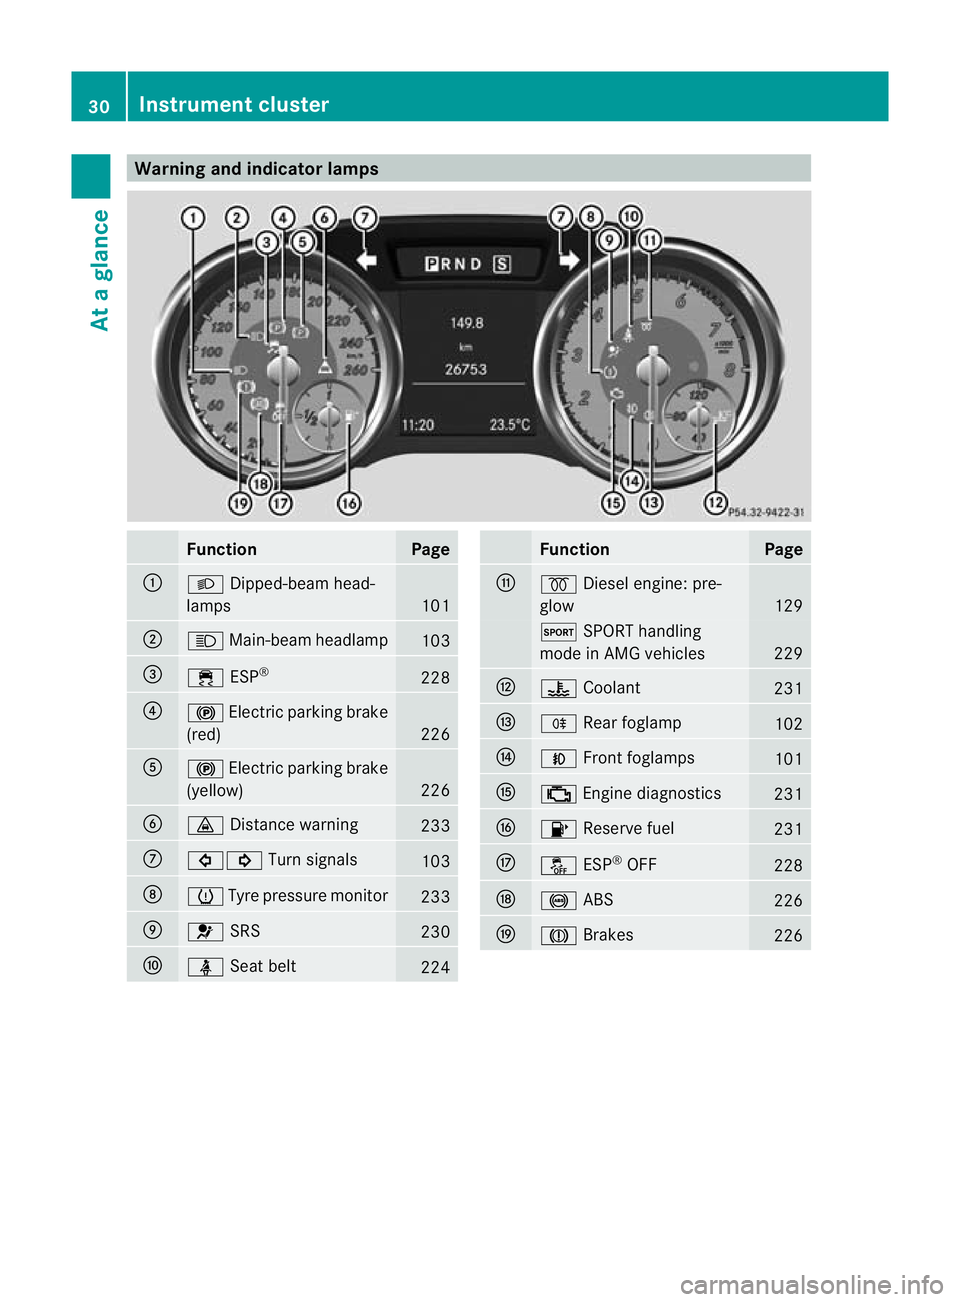
Warning and indicator lamps
Function Page
:
L
Dipped-bea mhead-
lamps 101
;
K
Main-beam headlamp 103
=
÷
ESP® 228
?
!
Electric parkin gbrake
(red) 226
A
!
Electric parking brake
(yellow) 226
B
·
Distance warning 233
C
#!
Turn signals 103
D
h
Tyre pressure monitor 233
E
6
SRS 230
F
ü
Seat belt 224 Function Page
G
%
Diesel engine: pre-
glow 129
M
SPORT handling
mode in AMG vehicles 229
H
?
Coolant 231
I
R
Rearf oglamp 102
J
N
Front foglamps 101
K
;
Engine diagnostics 231
L
8
Reserve fuel 231
M
å
ESP®
OFF 228
N
!
ABS 226
O
J
Brakes 22630
Instrument clusterAt a glance
Page 105 of 321
wise not be visible and you could endanger
yoursel
fand others.
X To switch on the foglamps: turn the key
in the ignition lock to position 2or start the
engine.
X Turn the light switch to T,Lor
Ã.
X Press the Nbutton.
The green Nindicator lamp in the instru-
ment cluster lights up.
X To switch off the front foglamps: press
the N button.
The green Nindicator lamp in the instru-
ment cluster goes out.
i If you switch the engine off (key in posi-
tion 1in the ignition lock) and then restart
it, the previous foglamp settings are
restored.
Rear foglamp X
To switch on the rear foglamp: turn the
key in the ignition lock to position 2or start
the engine.
X Turn the light switch to LorÃ.
X Press the Rbutton.
The yellow Rindicator lamp in the
instrument cluster lights up.
X To switch off the rear foglamp: press the
R button.
The yellow Rindicator lamp in the
instrument cluster goes out.
Vehicles with front foglamps :when the light
switch is in the Tposition, the rear fog-
lamp can only be switched on if the foglamps
(without dipped-beamh eadlamps) are
switched on.
i If you switch the engin eoff (key in posi-
tion 1in the ignition lock) and then restart
it, the previous rear foglamp settings are
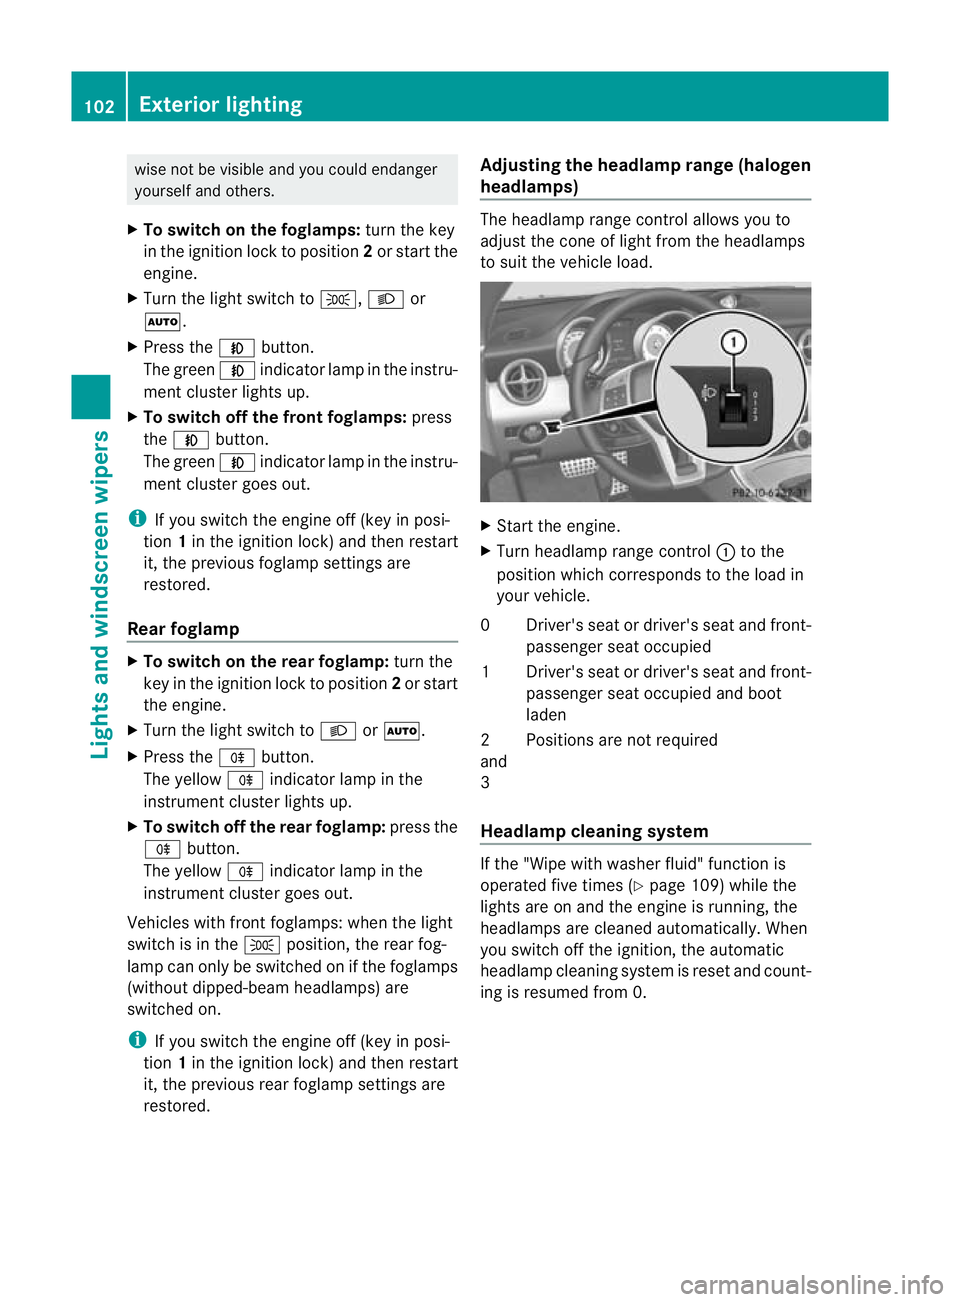
restored. Adjusting the headlamp range (halogen
headlamps) The headlamp range control allows you to
adjust the cone of light from the headlamps
to sui
tthe vehicle load. X
Start the engine.
X Turn headlamp range control :to the
position which corresponds to the load in
your vehicle.
0D river's seat or driver's seat and front-
passenger seat occupied
1D river's seat or driver's seat and front-
passenger seat occupied and boot
laden
2
and
3 Positions are not required
Headlamp cleaning system If the "Wipe with washer fluid" function is
operated five times (Y
page 109) while the
lights are on and the engine is running, the
headlamps are cleaned automatically.W hen
you switch off the ignition, the automatic
headlamp cleaning system is reset and count-
ing is resumed from 0. 102
Exterior lightingLights and windscreen wipers
Page 107 of 321
over 10 km/h again after a full brake appli-
cation.
i
The hazard warning lamps still operate if
the ignition is switched off. Intelligent Light System
Important notes The Intelligent Light System is a system that
adjusts the headlamps automatically to suit
the prevailing driving and weather conditions.
It offers advanced functions for improved illu-
mination of the road surface, e.g. depending
on the vehicle speed or weather conditions.
The system includes the active light function,
cornering light function, motorway mode and
extended range foglamps. The system is only
active when it is dark.
You can activate or deactivate the "Intelligent
Light System" using the on-board computer
(Y page 191).
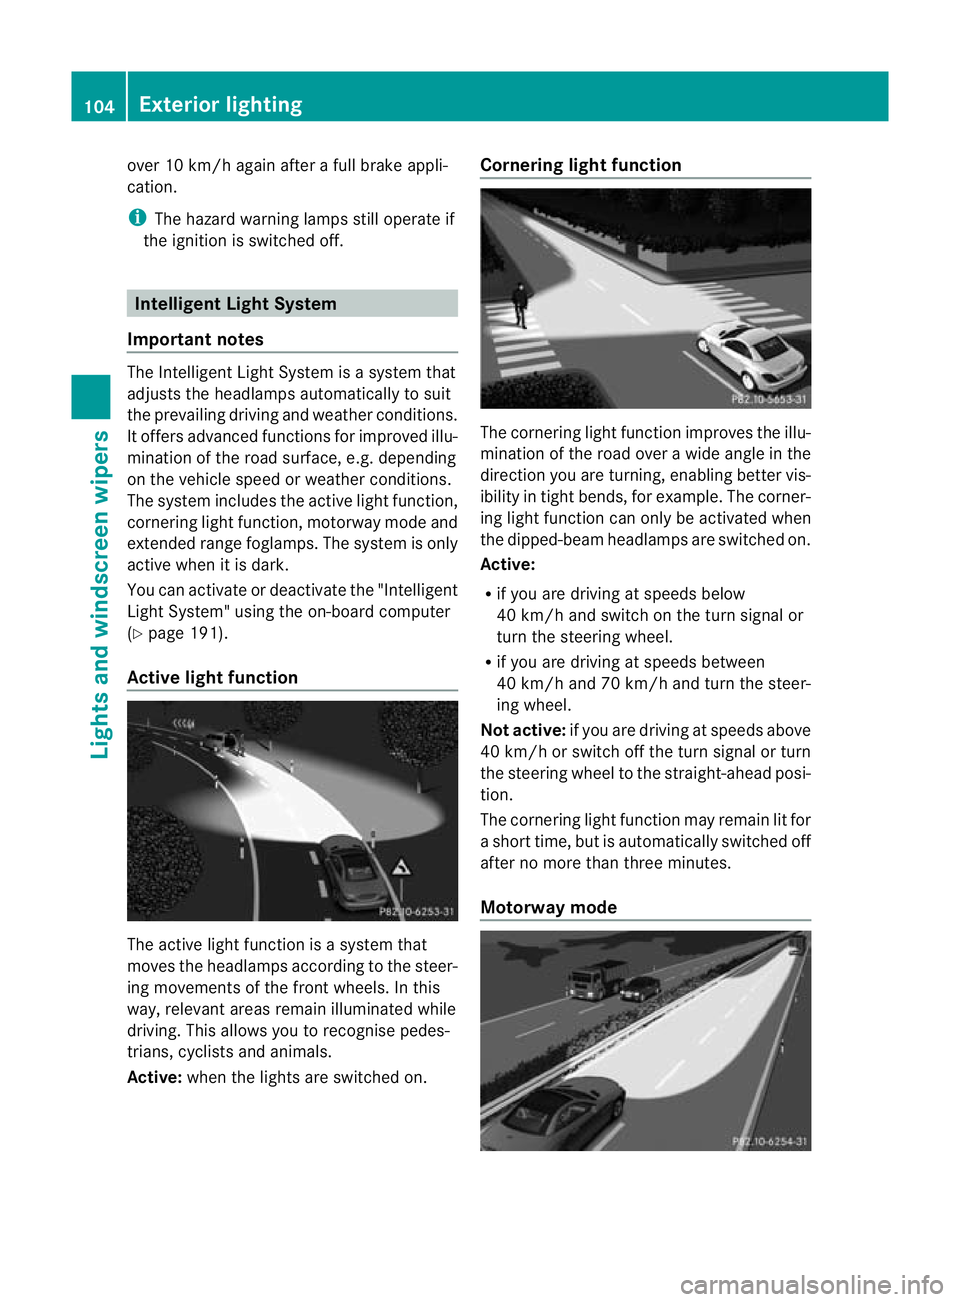
Active light function The active light function is a system that
moves the headlamps according to the steer-
ing movements of the front wheels. In this
way, relevant areas remain illuminated while
driving. This allows you to recognise pedes-
trians, cyclists and animals.
Active: when the lights are switched on. Cornering light function
The cornering light function improves the illu-
mination of the road over a wide angle in the
direction you are turning, enabling better vis-
ibility in tight bends, for example. The corner-
ing light function can only be activated when
the dipped-beam headlamps are switched on.
Active:
R
if you are driving at speeds below
40 km/h and switch on the turn signal or
turn the steering wheel.
R if you are driving at speeds between
40 km/h and 70 km/h and turn the steer-
ing wheel.
Not active: if you are driving at speeds above
40 km/h or switch off the turn signal or turn
the steering wheel to the straight-ahead posi-
tion.
The cornering light function may remain lit for
a short time, but is automatically switched off
after no more than three minutes.
Motorway mode 104
Exterior lightingLights and windscreen wipers
Page 108 of 321
Motorway mode increases the range of the
beam.
Active:
R if you are driving at speeds above
110 km/h and do not make any large steer-
ing movements for 1000 m
R if you are driving at speeds above
130 km/h
Not active: if you are driving at speeds below
80 km/h following activation.
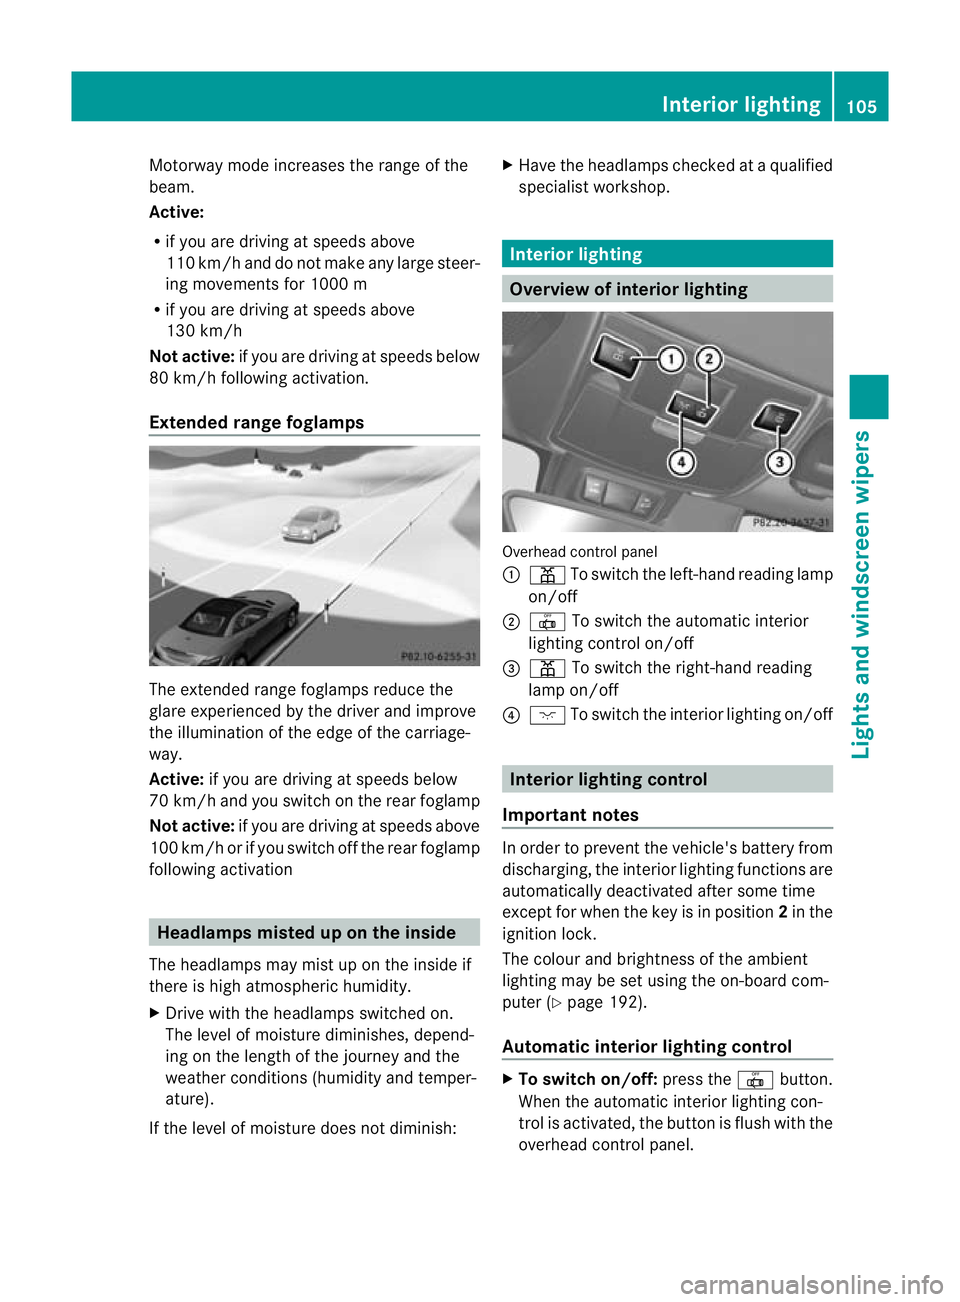
Extended range foglamps The extended range foglamps reduce the
glare experienced by the driver and improve
the illumination of the edge of the carriage-
way.
Active: if you are driving at speeds below
70 km/h and you switch on the rear foglamp
Not active: if you are driving at speeds above
100 km/h or if you switch off the rear foglamp
following activation Headlamps misted up on the inside
The headlamps may mist up on the inside if
there is high atmospheric humidity.
X Drive with the headlamps switched on.
The level of moisture diminishes, depend-
ing on the length of the journey and the
weather conditions (humidity and temper-
ature).
If the level of moisture does not diminish: X
Have the headlamps checked at a qualified
specialist workshop. Interior lighting
Overview of interior lighting
Overhead control panel
:
p To switch the left-hand reading lamp
on/off
; | To switch the automatic interior
lighting control on/off
= p To switch the right-hand reading
lamp on/off
? c To switch the interior lighting on/off Interior lighting control
Important notes In order to prevent the vehicle's battery from
discharging, the interior lighting functions are
automatically deactivated after some time
except for when the key is in position
2in the
ignition lock.
The colour and brightness of the ambient
lighting may be set using the on-board com-
puter (Y page 192).
Automatic interior lighting control X
To switch on/off: press the|button.
When the automatic interior lighting con-
trol is activated, the button is flush with the
overhead control panel. Interior lighting
105Lights and windscreen wipers Z
Page 110 of 321
eye protection and gloves when you are
changing them. Overview of bulb replacement
–bulbs
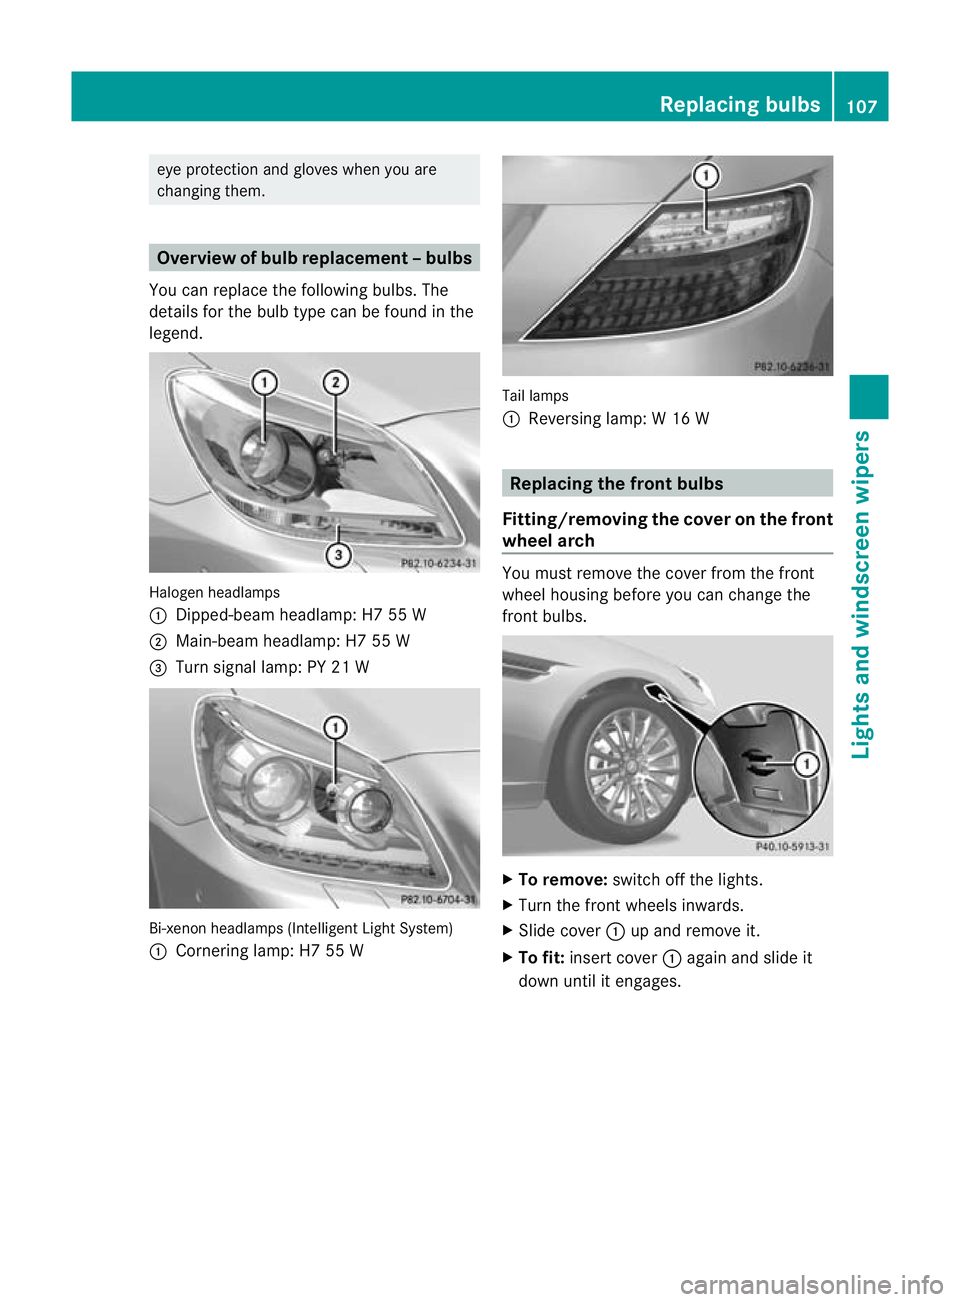
You can replace the following bulbs. The
details for the bulb type can be found in the
legend. Halogen headlamps
:
Dipped-bea mheadlamp: H7 55 W
; Main-beam headlamp: H7 55 W
= Turn signal lamp: PY 21 W Bi-xenon headlamps (Intelligent Light System)
: Cornering lamp: H7 55 W Tail lamps
:
Reversing lamp: W 16 W Replacing the front bulbs
Fitting/removing the cover on the front
wheel arch You must remove the cover from the front
wheel housing before you can change the
fron
tbulbs. X
To remove: switch off the lights.
X Turn the fron twheels inwards.
X Slide cover :up and remove it.
X To fit: insert cover :again and slide it
down until it engages. Replacing bulbs
107Lights and windscreen wipers Z
Page 194 of 321
X
Press the abutton to confirm.
X Press the :or9 button to select the
Display unit Speed-/odometer func-
tion.
You will see the selected setting: km or
miles .
X Press the abutton to save the setting.
Switching the additional speedometer
on/off
Only vehicles with manual transmission have
this function.
i Vehicles for the United Kingdom: this
function is not available.
The Dig. speedom [mph]: function allows
you to choose whether the status area in the
multifunction display always shows the speed
in mph instead of the outside temperature.
X Press the =or; button on the steer-
ing wheel to select the Settings menu.
X Press the :or9 button to select the
Inst. cluster submenu.
X Press the abutton to confirm.
X Press :or9 to select the Dig. speedo [mph]: function.
You will see the selected setting: on or
off .
X Press the abutton to save the setting.
Selecting the permanent display function
Only vehicles with automatic transmission
have this function.
i Vehicles for the United Kingdom: this
function is not available.
The Permanent display: function allows
you to choose whether the multifunction dis-
play always shows the outside temperature
or the speed in mph.
X Press the =or; button on the steer-
ing wheel to select the Settings menu.
X Press the :or9 button to select the
Inst. cluster submenu.
X Press the abutton to confirm. X
Press :or9 to select the Perma‐ nent display function.
You will see the selected setting: outside temperature or
Dig. speedom [mph] .
X Press the abutton to save the setting.
Lights Switching the daytime driving lights on/
off
If you have activated the
Daytime driving lights: function and the light switch is in the
à position, the daytime driving lights are
automatically switched on when the engine is
running. Depending on light conditions, the
side lamps and the dipped-beam headlamps
will additionally light up.
X Switch off the engine.
X Press the =or; button on the steer-
ing wheel to select the Settings menu.
X Press the :or9 button to select the
Light submenu.
X Press the abutton to confirm.
X Press the :or9 button to select the
Daytime driving lights function.
You will see the selected setting: on or
off .
X Press the abutton to save the setting.
Switching the Intelligent Light System
on/off
If you activate the Intell. Light Sys‐ tem: function, you activat
ethe following
functions:
R motorway mode
R active light function
R cornering light function
R extended range foglamps
X Press the =or; button on the steer-
ing wheel to select the Settings menu.
X Press the :or9 button to select the
Light submenu.
X Press the abutton to confirm. Menus and submenus
191On-board computer and displays Z
Page 195 of 321
X
Press the :or9 button to select the
Intell. Light System: function.
You will see the selected setting: on or
off .
X Press the abutton to save the setting.
If you set the dipped-beam headlamps for
driving on the right/left (Y page 192), the
multifunction display shows the Intell.Light System: System inoperative
Inactive for left-side traffic or
Intell. Light System: System inoper‐
ative Inactive for right-side traf‐
fic display message instead of the
Intell.Light System function in the
Light sub-
menu.
Setting the dipped-beam headlamps for
driving on the left/right
This function is only available on vehicles with
the Intelligent Light System.
You can use this function to switch between
symmetrical beam and asymmetrical dipped
beam (Y page 100).
If you set the dipped-beam headlamps for
driving on the right/left, then motorway
mode and the extended range foglamps are
not available.
X Press the =or; button on the steer-
ing wheel to select the Settings menu.
X Press the :or9 button to select the
Light submenu.
X Press the abutton to confirm.
X Press :or9 to select the Dipped beams Setting for function.
You will see the selected setting: Right-side traffic or
Left-side traffic .
X Press the abutton to save the setting.
When you change the setting, conversion
does not take place until the next time the
vehicle is stationary.
You can also have the dipped-beam head-
lamps set for driving on the right or left at a
qualified specialist workshop. Setting the brightness of the ambient
lighting
X
Press the =or; button on the steer-
ing wheel to select the Settings menu.
X Press the :or9 button to select the
Light submenu.
X Press the abutton to confirm.
X Press the :or9 button to select
Ambient light .
You will see the selected setting.
X Press the abutton to confirm.
X Press the :or9 button to adjust the
brightness to any level from Off to
Level 5 (bright).
X Press the aor% button to save the
setting.
Activating/deactivating the surround
lighting and exterior lighting delayed
switch-off
If you have activated the Surround light‐ ing function and the light switch is set to
Ã, the following functions are activated
when it is dark:
R Surround lighting: the exterior lighting
remains lit for 40 secondsafter unlocking
with the key. The exterior lighting switches
off when you open the driver's door.
R Exterior lighting delayed switch-off: the
exterior lighting remains lit for 60seconds
after the engine is switched off. If you close
all the doors, the exterior lighting goes off
after 15 seconds.
If you activate the Surround lighting: function, the following light up depending on
the vehicle's equipment:
R
side lamps
R foglamps
R dipped-beam headlamps
R daytime driving lights
X Press the =or; button on the steer-
ing wheel to select the Settings menu.
X Press the :or9 button to select the
Light submenu.192
Menus and submenusOn-board computer and displays