2012 MERCEDES-BENZ SLK ROADSTER buttons
[x] Cancel search: buttonsPage 37 of 321
Overhea
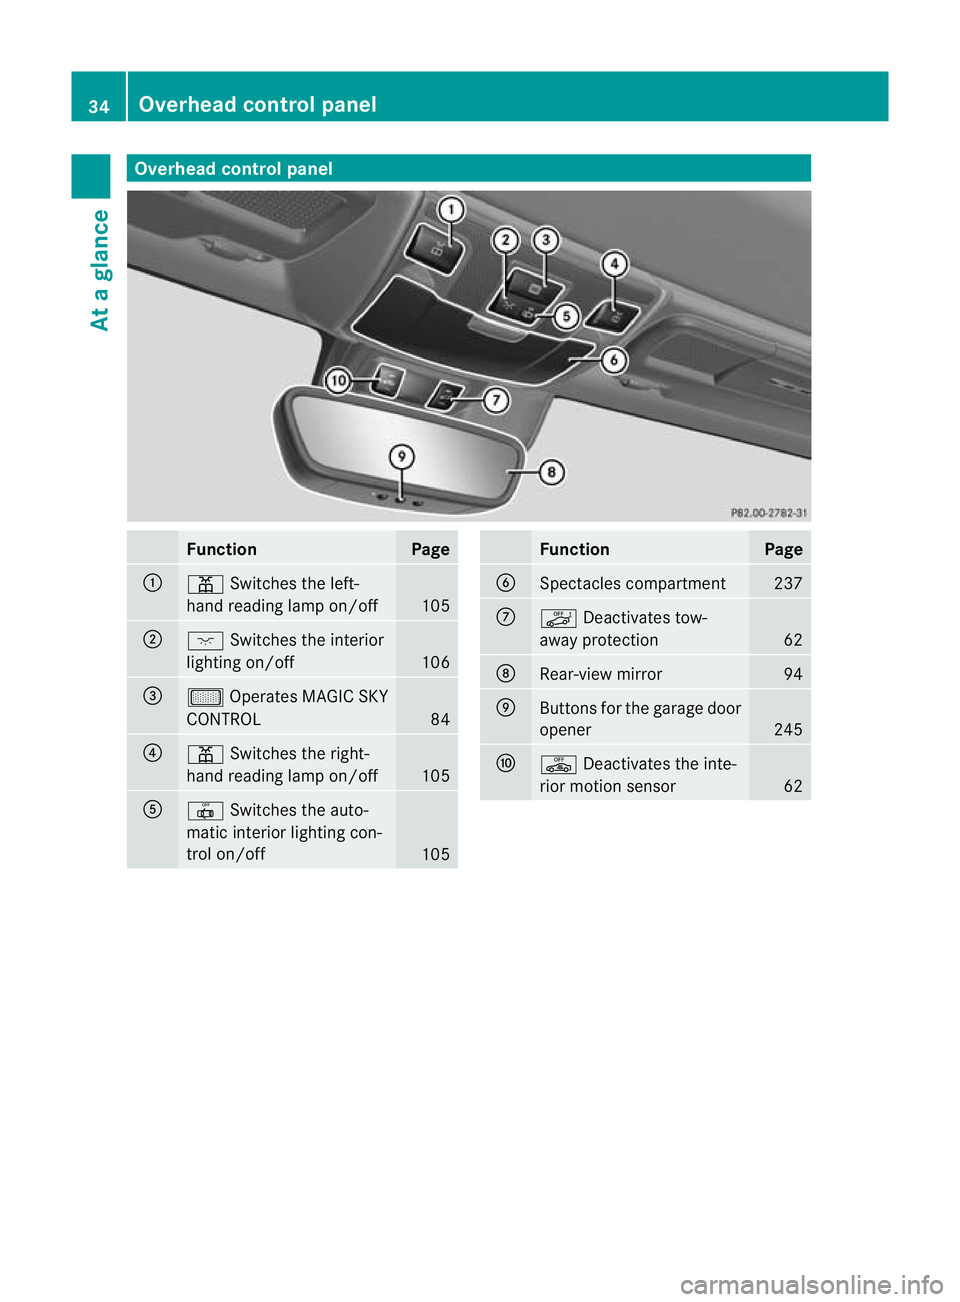
dcontrol panel Function Page
:
p
Switches the left-
hand reading lamp on/off 105
;
c
Switches the interior
lighting on/off 106
=
µ
Operates MAGIC SKY
CONTROL 84
?
p
Switches the right-
hand reading lamp on/off 105
A
|
Switches the auto-
matic interior lighting con-
trol on/off 105 Function Page
B
Spectacles compartment 237
C
ë
Deactivates tow-
away protection 62
D
Rear-view mirror 94
E
Buttons for the garage door
opener 245
F
ê
Deactivates the inte-
rior motion sensor 6234
Overhea
dcontrol panelAt a glance
Page 70 of 321
When it is dark, the surround lighting also
comes on if it is activated in the on-board
computer (Y page 192).
You can also set an audible signal to confirm
that the vehicle has been locked. The audible
signal can be activated and deactivated using
the on-board computer (Y page 193).
X To unlock centrally: press the%but-
ton.
If you do not open the vehicle within approx-
imately 40 seconds of unlocking:
R the vehicle is locked again.
R the anti-theft system is primed again.
X To lock centrally: press the&button. KEYLESS-GO
Important notes on the use of KEYLESS-
GO R
Do not keep the KEYLESS-GO key together
with:
- electronic devices, e.g. a mobile phone
or another key
- metallic objects, e.g. coins or metal foil
This can affect the functionality of KEY-
LESS-GO.
R Bear in mind that the engine can be started
by any of the vehicle occupants if there is
a KEYLESS-GO key in the vehicle.
Locking and unlocking centrally You can start, lock or unlock the vehicle using
KEYLESS-GO. To do this, you only need carry
the key with you. You can combine the KEY-
LESS-GO functions with those of a conven-
tional key, e.g. using KEYLESS-GO to unlock
and pressing the &button to lock.
When locking or unlocking with KEYLESS-GO,
the distance between the key and the corre-
sponding door handle must not be greater
than 1 m. KEYLESS-GO checks whether a valid key is in
the vehicle by periodically establishing a radio
connection between the vehicle and the key.
This happens:
R when the external door handles are
touched
R when starting the engine
R while the vehicle is in motion X
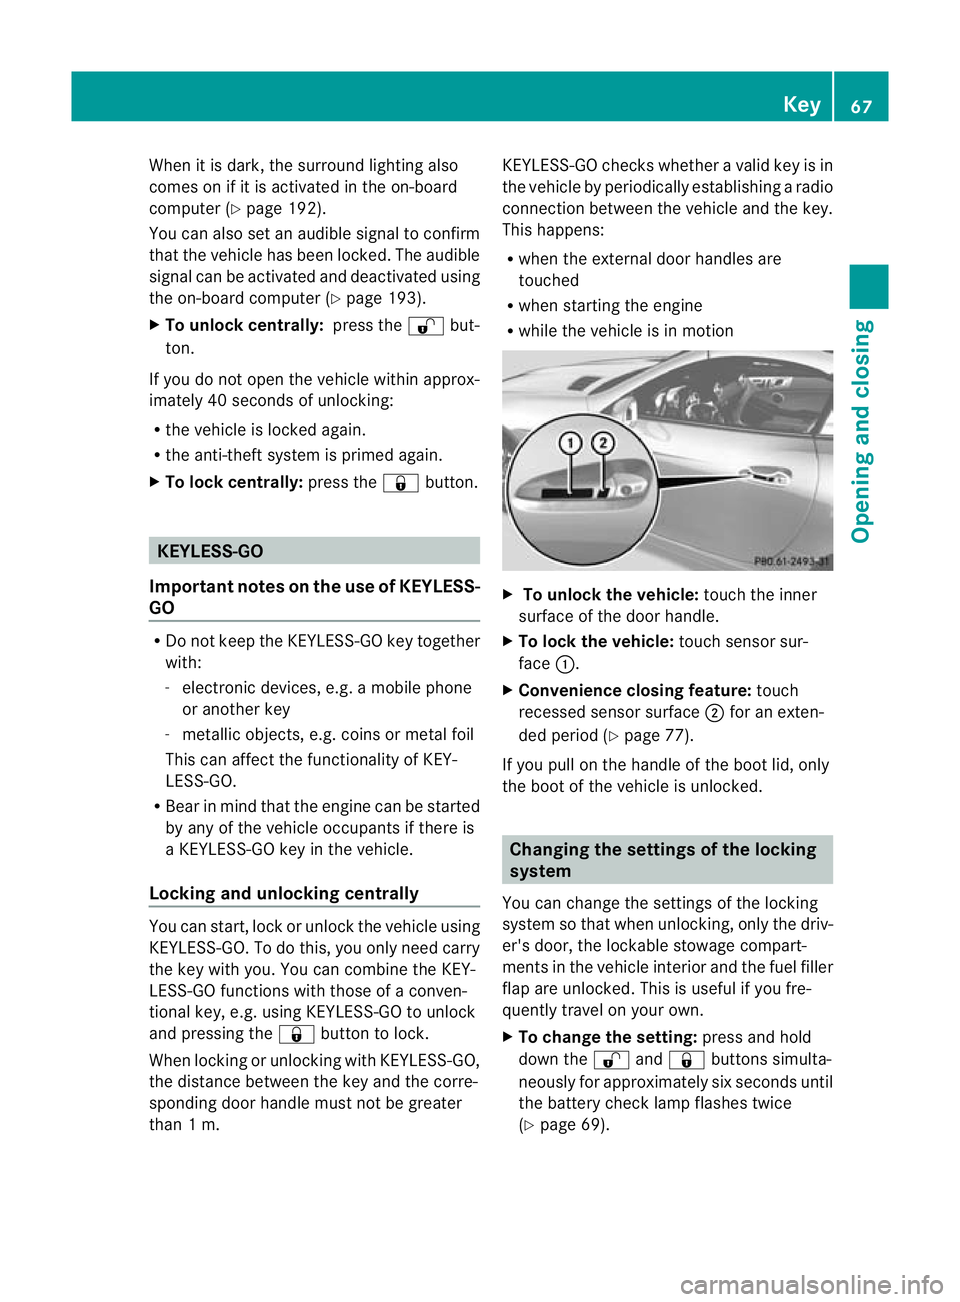
To unlock the vehicle: touch the inner
surface of the door handle.
X To lock the vehicle: touch sensor sur-
face :.
X Convenience closing feature: touch
recessed sensor surface ;for an exten-
ded period (Y page 77).
If you pull on the handle of the boot lid, only
the boot of the vehicle is unlocked. Changing the settings of the locking
system
You can change the settings of the locking
system so that when unlocking, only the driv-
er's door, the lockable stowage compart-
ments in the vehicle interior and the fuel filler
flap are unlocked. This is useful if you fre-
quently travel on your own.
X To change the setting: press and hold
down the %and& buttons simulta-
neously for approximately six seconds until
the battery check lamp flashes twice
(Y page 69). Key
67Opening and closing Z
Page 71 of 321
i
If the setting of the locking system is
changed within the signal range of the vehi-
cle, pressing the &or% button locks
or unlocks the vehicle.
The key now functions as follows:
X To unlock the driver's door: press the
% button once.
X To unlockc entrally:press the %but-
ton twice.
X To lock centrally: press the&button.
The KEYLESS-GO function is changed as fol-
lows:
X To unlock the driver's door: touch the
inner surface of the door handle on the
driver's door.
X To unlock centrally: touch the inner sur-
face of the front-passenger door handle.
X To lock centrally: touch the outersensor
surface on one of the door handles. Restoring factor
ysettings
X Press the %and& buttons simulta-
neously for approximately six seconds until
the battery check lamp flashes twice. Emergency key element
General notes If the vehicle can no longer be locked or
unlocked with the key, use the emergency
key element.
If you use the emergency key element to
unlock and open the driver's door or the boot
lid, the anti-thef talarm system will be trig-
gered (Y page 61).
There are several ways to tur noff the alarm:
X To turn the alarm off with the key: press
the % or& button on the key.
or
X Insert the key into the ignition lock.
or X
To deactivate the alarm with KEYLESS-
GO: press the Start/Stop button in the igni-
tion lock. The key must be in the vehicle.
or
X Lock or unlock the vehicle using KEYLESS-
GO. The key must be outside the vehicle.
If you unlock the vehicle using the emergency
key element, the fuel filler flap will not be
unlocked automatically.
X To unlock the fuel filler flap: insert the
key in the ignition lock.
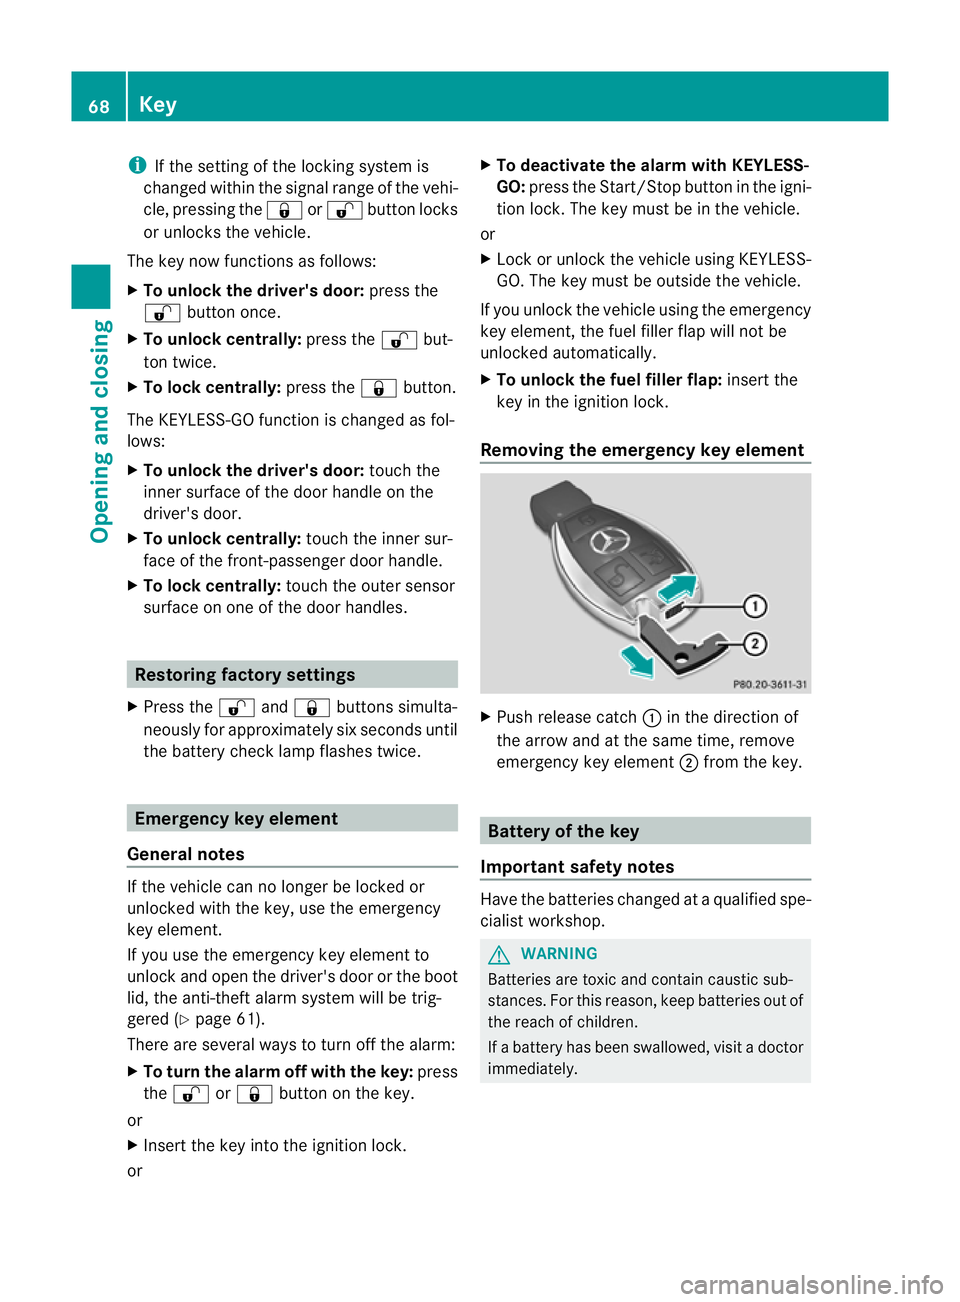
Removing the emergency key element X
Push release catch :in the direction of
the arrow and at the same time, remove
emergency key element ;from the key. Battery of the key
Important safety notes Have the batteries changed at a qualified spe-
cialist workshop. G
WARNING
Batteries are toxic and contain caustic sub-
stances. For this reason, keep batteries out of
the reach of children.
If a battery has been swallowed, visi tadoctor
immediately. 68
KeyOpening and closing
Page 72 of 321
H
Environmental note Batteries contain pollutants.
It is illegal to dispose of them
with the household rubbish.
They must be collected sep-
arately and disposed of in an
environmentally responsible
recycling system.
Dispose of batteries in an
environmentally responsible
manner
.Take discharged
batteries to a qualified spe-
cialis tworkshop or to a col-
lection point for used batter-
ies.
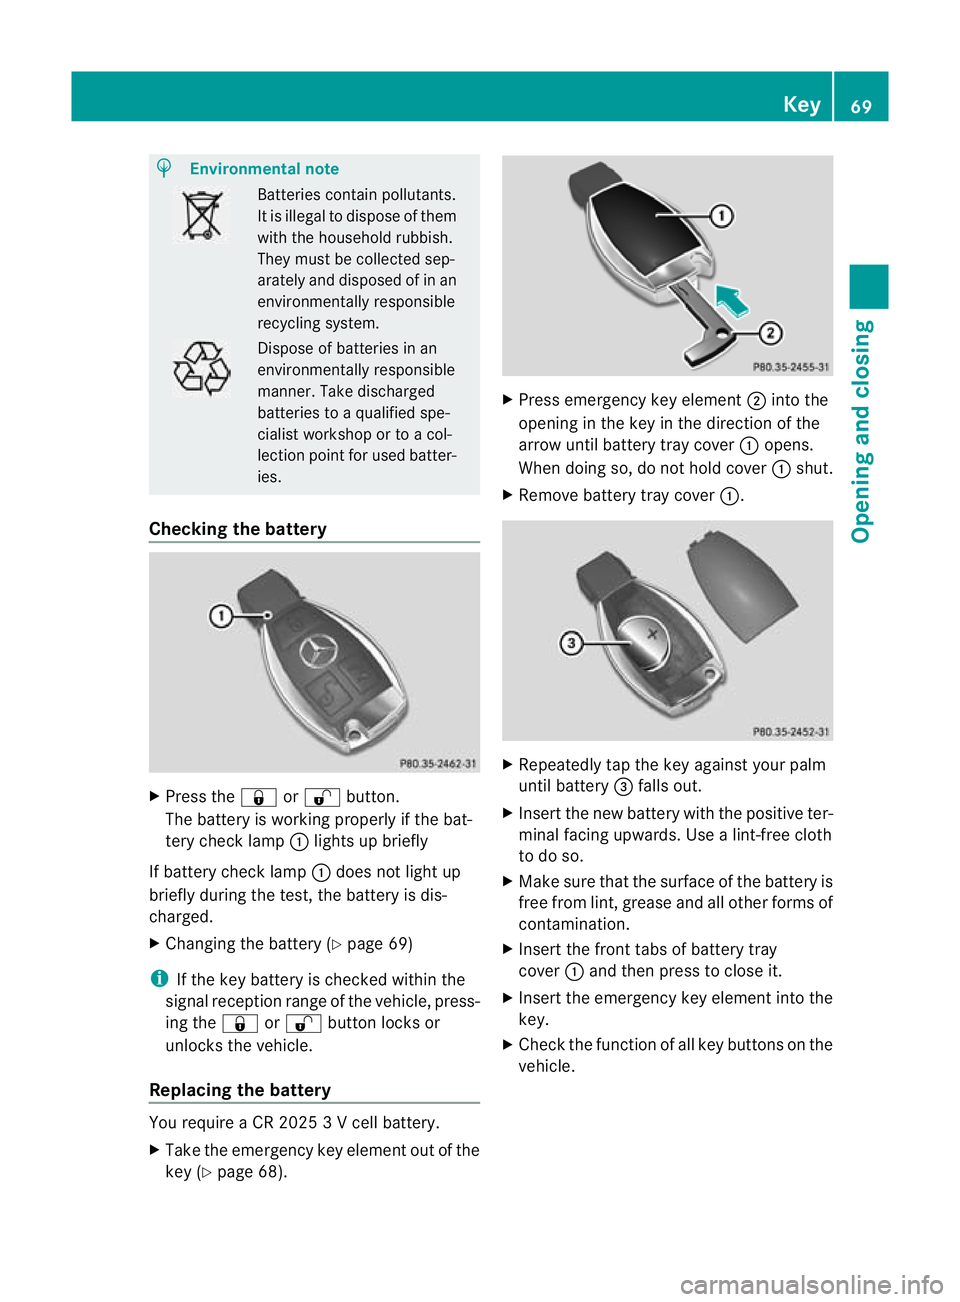
Checking the battery X
Press the &or% button.
The battery is working properly if the bat-
tery check lamp :lights up briefly
If battery check lamp :does not light up
briefly during the test, the battery is dis-
charged.
X Changing the battery (Y page 69)
i If the key battery is checked within the
signal reception range of the vehicle, press-
ing the &or% button locks or
unlocks the vehicle.
Replacing the battery You require a CR 2025 3 V cell battery.
X
Take the emergency key element out of the
key (Y page 68). X
Press emergency key element ;into the
opening in the key in the direction of the
arrow until battery tray cover :opens.
When doing so, do not hold cover :shut.
X Remove battery tray cover :. X
Repeatedly tap the key against your palm
until battery =falls out.
X Insert the new battery with the positive ter-
minal facing upwards. Use a lint-free cloth
to do so.
X Make sure that the surface of the battery is
free from lint, grease and all other forms of
contamination.
X Insert the front tabs of battery tray
cover :and then press to close it.
X Insert the emergency key element into the
key.
X Check the function of all key buttons on the
vehicle. Key
69Opening and closing Z
Page 75 of 321
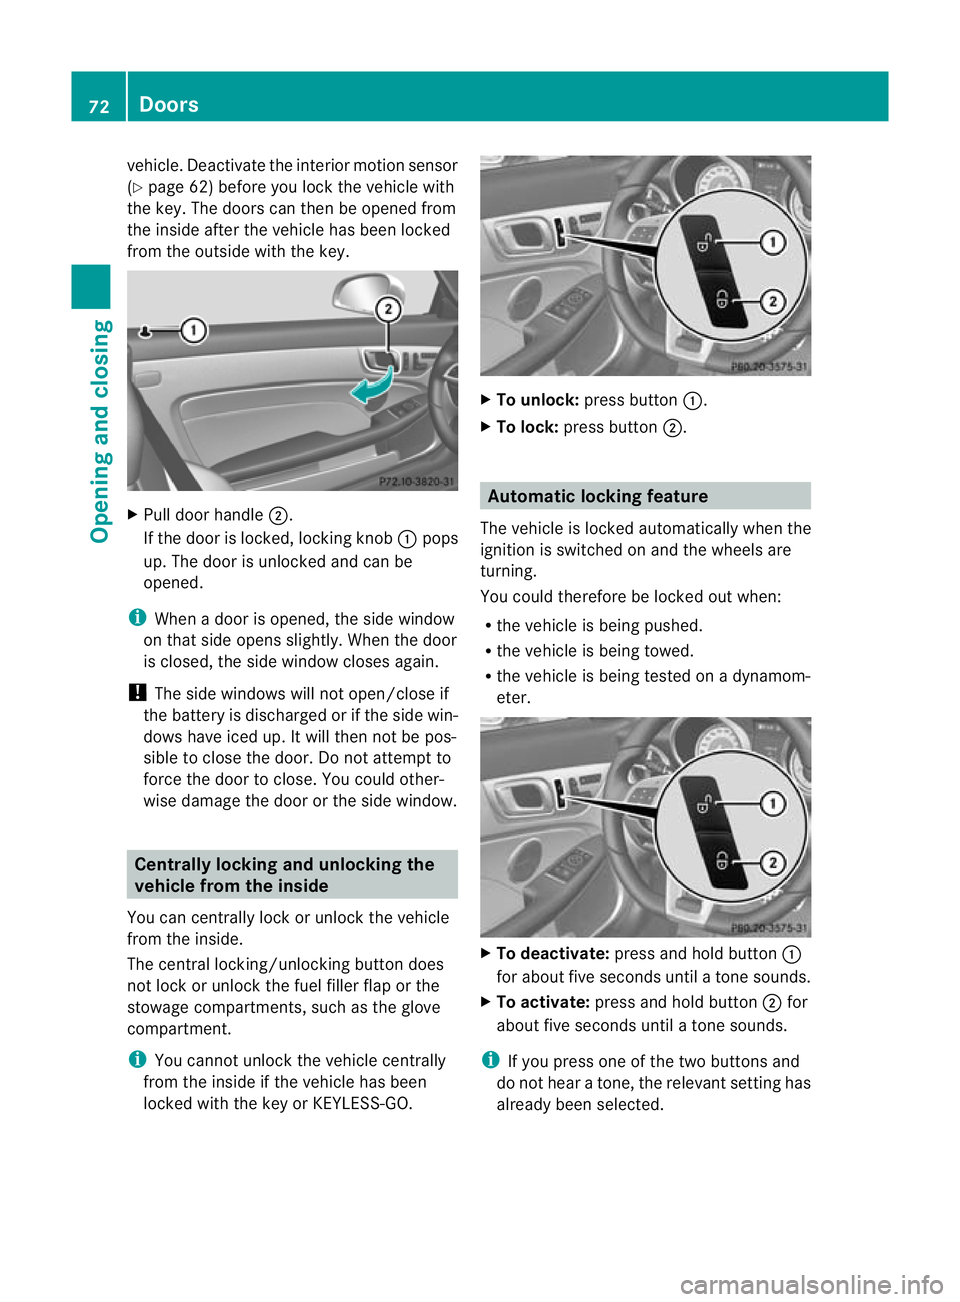
vehicle. Deactivate the interior motion sensor
(Y
page 62) before you lock the vehicle with
the key. The doors can then be opened from
the inside after the vehicle has been locked
from the outside with the key. X
Pull door handle ;.
If the door is locked, locking knob :pops
up. The door is unlocked and can be
opened.
i When a door is opened, the side window
on that side opens slightly .When the door
is closed, the side window closes again.
! The side windows will not open/close if
the battery is discharged or if the side win-
dows have iced up. It will then not be pos-
sible to close the door. Do not attempt to
force the door to close. You could other-
wise damage the door or the side window. Centrally locking and unlocking the
vehicle from the inside
You can centrally lock or unlock the vehicle
from the inside.
The central locking/unlocking button does
not lock or unlock the fuel filler flap or the
stowage compartments, such as the glove
compartment.
i You cannot unlock the vehicle centrally
from the inside if the vehicle has been
locked with the key or KEYLESS-GO. X
To unlock: press button :.
X To lock: press button ;. Automatic locking feature
The vehicle is locked automatically when the
ignition is switched on and the wheels are
turning.
You could therefore be locked out when:
R the vehicle is being pushed.
R the vehicle is being towed.
R the vehicle is being tested on a dynamom-
eter. X
To deactivate: press and hold button :
for about five seconds until a tone sounds.
X To activate: press and hold button ;for
about five seconds until a tone sounds.
i If you press one of the two buttons and
do not hear a tone, the relevant setting has
already been selected. 72
DoorsOpening and closing
Page 86 of 321
Fitting and removing the draught stop
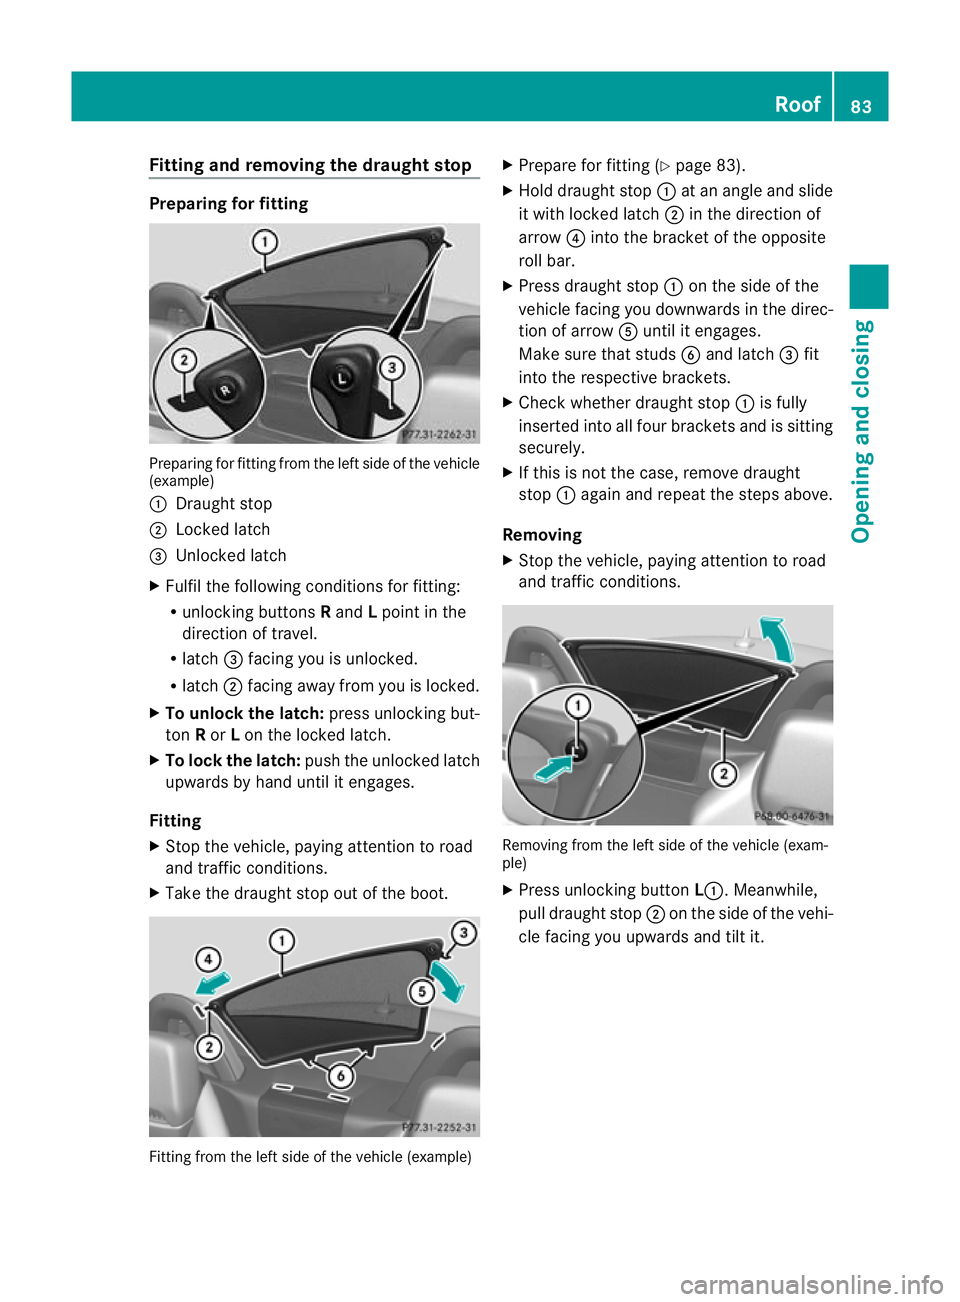
Preparing for fitting
Preparing for fitting from the lef
tside of the vehicle
(example)
: Draught stop
; Locked latch
= Unlocked latch
X Fulfil the following conditions for fitting:
R unlocking buttons Rand Lpoint in the
direction of travel.
R latch =facing you is unlocked.
R latch ;facing away from you is locked.
X To unlock the latch: press unlocking but-
ton Ror Lon the locked latch.
X To lock th elatch: push the unlocked latch
upwards by hand until it engages.
Fitting
X Stop the vehicle, paying attention to road
and traffic conditions.
X Take the draugh tstop ou tofthe boot. Fitting from the left side of the vehicle (example) X
Prepare for fitting (Y page 83).
X Hold draught stop :at an angle and slide
it with locked latch ;in the direction of
arrow ?into the bracket of the opposite
roll bar.
X Press draught stop :on the side of the
vehicle facing you downwards in the direc-
tion of arrow Auntil it engages.
Make sure that studs Band latch =fit
into the respective brackets.
X Check whether draught stop :is fully
inserted into all four brackets and is sitting
securely.
X If this is not the case, remove draught
stop :again and repeat the steps above.
Removing
X Stop the vehicle, paying attention to road
and traffic conditions. Removing from the left side of the vehicle (exam-
ple)
X
Press unlocking button L:.Meanwhile,
pull draught stop ;on the side of the vehi-
cle facing you upwards and tilt it. Roof
83Opening and closing Z
Page 96 of 321
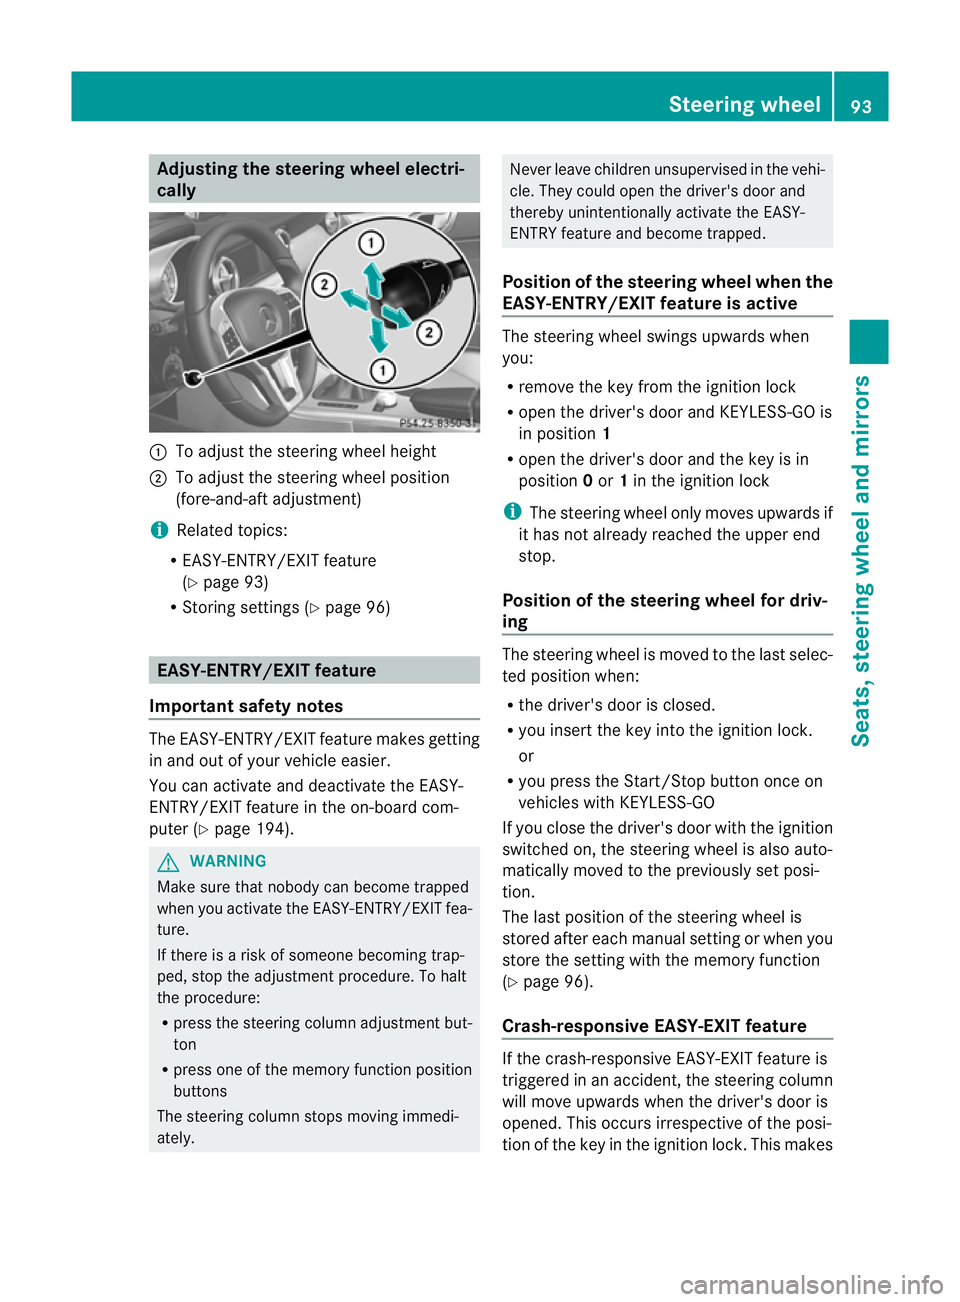
Adjusting the steering wheel electri-
cally :
To adjust the steering wheel height
; To adjust the steering wheel position
(fore-and-aft adjustment)
i Related topics:
R EASY-ENTRY/EXIT feature
(Y page 93)
R Storing settings (Y page 96) EASY-ENTRY/EXIT feature
Important safety notes The EASY-ENTRY/EXIT feature makes getting
in and out of your vehicle easier.
You can activate and deactivate the EASY-
ENTRY/EXIT feature in the on-board com-
puter (Y page 194). G
WARNING
Make sure that nobody can become trapped
when you activate the EASY-ENTRY/EXIT fea-
ture.
If there is a risk of someone becoming trap-
ped, stop the adjustmen tprocedure. To halt
the procedure:
R press the steering colum nadjustment but-
ton
R press one of the memory function position
buttons
The steering column stops moving immedi-
ately. Never leave children unsupervised in the vehi-
cle. They could open the driver's door and
thereby unintentionally activate the EASY-
ENTRY feature and become trapped.
Position of the steering wheel when the
EASY-ENTRY/EXIT feature is active The steering wheel swings upwards when
you:
R
remove the key from the ignition lock
R open the driver's door and KEYLESS-GO is
in position 1
R open the driver's door and the key is in
position 0or 1in the ignition lock
i The steering wheel only moves upwards if
it has not already reached the upper end
stop.
Position of the steering wheel for driv-
ing The steering wheel is moved to the last selec-
ted position when:
R
the driver's door is closed.
R you insert the key int othe ignition lock.
or
R you press the Start/Stop button once on
vehicles with KEYLESS-GO
If you close the driver's door with the ignition
switched on, the steering wheel is also auto-
matically moved to the previously set posi-
tion.
The last position of the steering wheel is
stored after each manual setting or when you
store the setting with the memory function
(Y page 96).
Crash-responsive EASY-EXIT feature If the crash-responsive EASY-EXIT feature is
triggered in an accident, the steering column
will move upwards when the driver's door is
opened. This occurs irrespective of the posi-
tion of the key in the ignition lock. This makes Steering wheel
93Seats, steering wheel and mirrors Z
Page 100 of 321
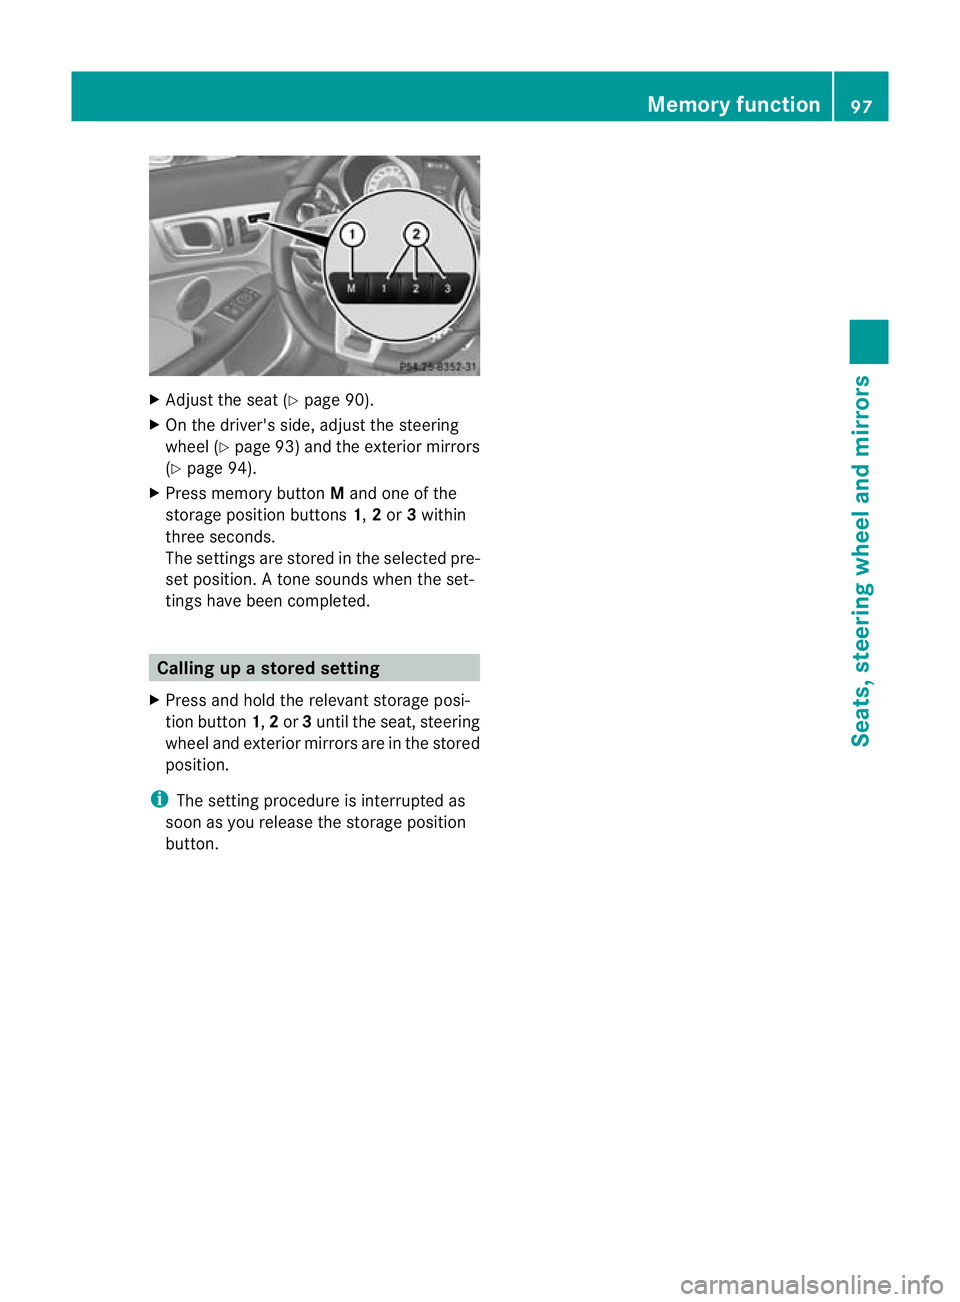
X
Adjust the sea t(Ypage 90).
X On the driver's side, adjust the steering
wheel (Y page 93) and the exterior mirrors
(Y page 94).
X Press memory button Mand one of the
storage position buttons 1,2or 3within
three seconds.
The settings are stored in the selected pre-
set position .Atone sounds when the set-
tings have been completed. Calling up
astore dsetting
X Press and hold the relevant storage posi-
tio nb utton 1,2or 3until the seat, steering
wheel and exterio rmirrors are in the stored
position.
i The setting procedure is interrupted as
soon as you release the storage position
button. Memory function
97Seats, steering wheel and mirrors Z