2012 MERCEDES-BENZ SLK ROADSTER fuses
[x] Cancel search: fusesPage 12 of 321
Running-in tips ..............................
.126
Snow chains .................................. 289
Symmetrical dipped bea m............. 100
Tyr egrip ........................................ 150
Wet road surface ........................... 149
DVD audio (on-board computer) ......186
Dynamic handling package Function/notes ............................. 164 E
EASY-ENTRY feature Activating/deactivating .................194
Function/notes ................................ 93
EASY-EXIT feature
Crash-responsive ............................. 93
Function/notes ................................ 93
Switching on/off ........................... 194
EBD (electronic brake force distri-
bution)
Display message ............................ 202
Function/notes ................................ 59
ECO start/stop function
Deactivating/activating .................132
General information .......................131
Important safety notes ..................130
Electrical fuses
see Fuses
Electronic brake force distribution
see EBD (electronic brake force
distribution)
Electronic Brake force Distribution
see EBD (Electronic Brake force
Distribution)
Electronic Stability Program
see ESP ®
(Electroni cStability Program)
Electronic Traction System
see ETS (Electronic Traction System)
Emergenc ykey
Unlocking the driver's door ..............73
Emergency key element
Function/notes ................................ 68
Locking vehicle ................................ 73
Emergency release
Driver's door .................................... 73Emergency spare wheel
Inflating the collapsible spare
wheel ............................................. 270
Notes/data .................................... 297
Storage location ............................ 262
Stowing .......................................... 262
Emergency unlocking
Boot ................................................. 75
Vehicle ............................................. 73
Engine
Display message ............................ 211
ECO start/stop function ................130
Engine number ............................... 303
Jump-starting ................................. 277
Running irregularl y......................... 134
Starting problems ..........................134
Starting the engine with the key ....129
Starting with KEYLESS GO .............129
Stopping ........................................ 146
Tow-starting (vehicle) ..................... 281
Warning lamp (engine diagnos-
tics) ............................................... 231
Engine electronics
Notes ............................................. 301
Problem (fault) ............................... 134
Engine oil
Additives ........................................ 308
Checking the oil level ..................... 250
Checking the oil level using the
dipstick .......................................... 250
Display message ............................ 212
Filling capacity ............................... 307
Notes about oil grades ................... 307
Notes on oil level/consumption ....250
Temperature (on-board computer) .195
Topping up ..................................... 250
Viscosity ........................................ 308
Environmental protection
Note ................................................ .20
Returning an end-of-life vehicle .......20
ESP ®
(Electronic Stability Pro-
gram) AMG menu (on-board computer) ...196
Deactivating/activating (AMG
vehicles) .......................................... 57
Deactivating/activating (notes;
except AMG vehicles) ......................56
Display message ............................ 200 Index
9
Page 13 of 321
ETS
.................................................. 56
Function/notes ................................ 56
Important safety guidelines .............56
Warning lamp ................................. 228
ETS (Electronic Traction System) ....... 56
Exhaus ttail pipe (cleaning instruc-
tions) .................................................. 257
Exterior lighting see Lights
Exterior mirrors
Adjusting ......................................... 94
Anti-dazzle mode (automatic) ..........95
Folding in/ou t(automatically) .........95
Folding in/ou t(electrically) .............94
Folding in whe nlocking (on-board
computer) ...................................... 195
Out of position (troubleshooting) .....95
Parking position ............................... 95
Resetting ......................................... 95
Storing settings (memory func-
tion) ................................................. 96F
Fatigue Assist see ATTENTION ASSIST
Faul tmessage
see Display messages
Filler cap
see Fuel filler flap
Fire extinguisher ............................... 260
First-aid kit ......................................... 260
Flat tyre Changing a wheel/fitting the
spare wheel ................................... 266
MOExtended run-fla tsystem ......... 272
Preparing the vehicle .....................263
Raising the vehicle .........................268
TIREFIT kit ...................................... 263
see Emergency spare wheel
Floormat ............................................ .246
Foglamps Extended range .............................. 105
Switching on/off ........................... 101
Frequencies
Garage door opene r....................... 246
Mobile phone ................................. 301
Two-way radio ................................ 301 Front foglamps
Display message ............................ 210
Fron twindscreen
see Windscreen
Fuel
Additives ........................................ 305
Consumption statistic s.................. 183
Displaying the current consump-
tion ................................................ 183
Displaying the range ......................183
Fuel gauge ....................................... 28
Grade (petrol) ................................ 304
Important safety notes ..................303
Notes about consumption .............306
Notes for AMG vehicles .................304
Problem (malfunction) ...................145
Quality (diesel )............................... 305
Refuelling ...................................... .142
Tank content/reserve fuel .............304
Fuel filler flap Opening/closing .......143
Fuel level Calling up the range (on-board
computer) ...................................... 183
Gauge .............................................. 28
Fuel reserve
see Fuel
Fuel tank
Capacity ........................................ 304
Problem (malfunction) ...................145
Fuse allocation chart (vehicle tool
kit) ...................................................... 261
Fuses Allocation chart ............................. 282
Before changing ............................. 282
Fuse box in the boot ......................282
Fuse box in the engine compart-
ment .............................................. 282
Important safety notes ..................281 G
Garage door opener Clearing the memory .....................245
Frequencies ................................... 246
Notes ............................................. 24310
Index
Page 163 of 321
DISTRONIC PLUS must also never be oper-
ated, activated or deactivated by a passenger
or fro
moutside the vehicle.
DISTRONIC PLUS does not replace the elec-
tric parking brake and must not be used for
parking.
The DISTRONIC PLUS braking effect is can-
celled and the vehicle can start moving if:
R DISTRONIC PLUS is deactivated using the
cruise control lever.
R you accelerate.
R there is a malfunction in the system or an
interruption in the power supply, e.g .bat-
tery failure.
R the electrical system in the engine com-
partment, the battery or the fuses are tam-
pered with.
R the battery is disconnected.
If you wish to leave th evehicle or park it,
deactivate DISTRONIC PLUS and secure the
vehicle against rolling away.
If DISTRONIC PLUS detects that the vehicle
in fron tis stopping, it brakes your vehicle until
it is stationary.
Once your vehicle is stationary, it remains
stationary and you do not need to depress the
brake.
i After a time, the electric parking brake
secures the vehicle and relieves the service
brake.
i Depending on the specified minimum dis-
tance, your vehicle will come to a standstill
at a sufficient distance behind the vehicle
in front.T he specified minimum distance is
set using the control on the cruise control
lever. The electric parking brake secures the vehicle
automatically if DISTRONIC PLUS is activated
and:
R
the driver's door is open and the driver's
seat belt is unfastened.
R the engine is switched off, unless it is auto-
matically switched off by the ECO start/
stop function.
R the bonnet is opened.
R a system fault occurs.
R the power supply is not sufficient.
If the vehicle electronics are malfunctioning,
the multifunction display may also show a
warning message.
Brake immediately X
Immediately depress the brake pedal firmly
until the warning message in the multifunc-
tion display goes out. DISTRONIC PLUS is
deactivated.
Select Park (P) X
Shift the transmission to position Pto pre-
vent the vehicle from rolling away.
DISTRONIC PLUS is deactivated. The warn-
ing message in the multifunction display
disappears.
The horn will also sound at regular intervals if
DISTRONIC PLUS is activated and you:
R switch the engine off, open the driver's
door and take off your seat belt
R open the bonnet
The sounding of the horn alerts you to the fact
that the vehicle has been parked while DIS-
TRONIC PLUS is still activated. The sound
becomes louder if you attempt to lock the
vehicle. The vehicle is not locked until DIS-
TRONIC PLUS is deactivated.
i If the engine has been switched off, it
cannot be started again until DISTRONIC
PLUS has been deactivated. 160
Driving systemsDriving and parking
Page 169 of 321
G
WARNING
The vehicle's brakes are applied when the
HOLD function is activated. For this reason,
deactivate the HOLD function if the vehicle is
to be set in motion by other means (e.g. in a
car wash or by towing).
Deactivating the HOLD function The HOLD function is deactivated automati-
cally if:
R you accelerate. On vehicles with automatic
transmission: only when the transmission
is in position Dor R.
R you shift the transmission to position Pon
vehicles with automatic transmission.
R you apply the brakes again with a certain
amount of pressure until ëdisappears
from the multifunction display.
R you secure the vehicle using the electric
parking brake.
R you activate DISTRONIC PLUS.
i After a time, the electric parking brake
secures the vehicle and relieves the service
brake. G
WARNING
Never get out of the vehicle when the HOLD
function is activated.
The HOLD function must never be operated
or deactivated by a passenger or from outside
the vehicle.
The HOLD function does not replace the elec-
tric parking brake and must not be used for
parking.
The braking effect of the HOLD function is
cancelled and the vehicle could roll away if:
R the HOLD function is deactivated by
depressing the accelerator peda lorthe
brake pedal.
R there is a malfunction in the system or an
interruption in the power supply, e.g. bat-
tery failure. R
the electrical system in the engine com-
partment, the battery or the fuses are tam-
pered with.
R the battery is disconnected.
If you leave the vehicle or park it, deactivate
the HOLD function and secure the vehicle
against rolling away.
The electric parking brake secures the vehicle
automatically if the HOLD function is activa-
ted and:
R the driver's door is open and the driver's
seat belt is unfastened.
R the engine is switched off, unless it is auto-
matically switched off by the ECO start/
stop function.
R the bonnet is opened.
R a system fault occurs.
R the power supply is not sufficient.
If the vehicle electronics are malfunctioning,
the multifunction display may also show a
warning message.
Brake immediately X
Immediately depress the brake pedal firmly
until the warning message in the multifunc-
tion display goes out. This deactivates the
HOLD function.
In vehicles with automatic transmission:
Select Park (P) .
X Move the selector lever to Pto prevent the
vehicle from rolling away.
The HOLD function is deactivated. The
warning message in the multifunction dis-
play disappears.
Ah orn will also sound at regular intervals if
the HOLD function is activated and you:
R switch the engine off, open the driver's
door and take off your seat belt
R open the bonnet
The sounding of the horn alerts you to the fact
that the vehicle has been parked while the
HOLD function is still activated. If you attempt
to lock the vehicle, the tone becomes louder. 166
Driving systemsDriving and parking
Page 244 of 321
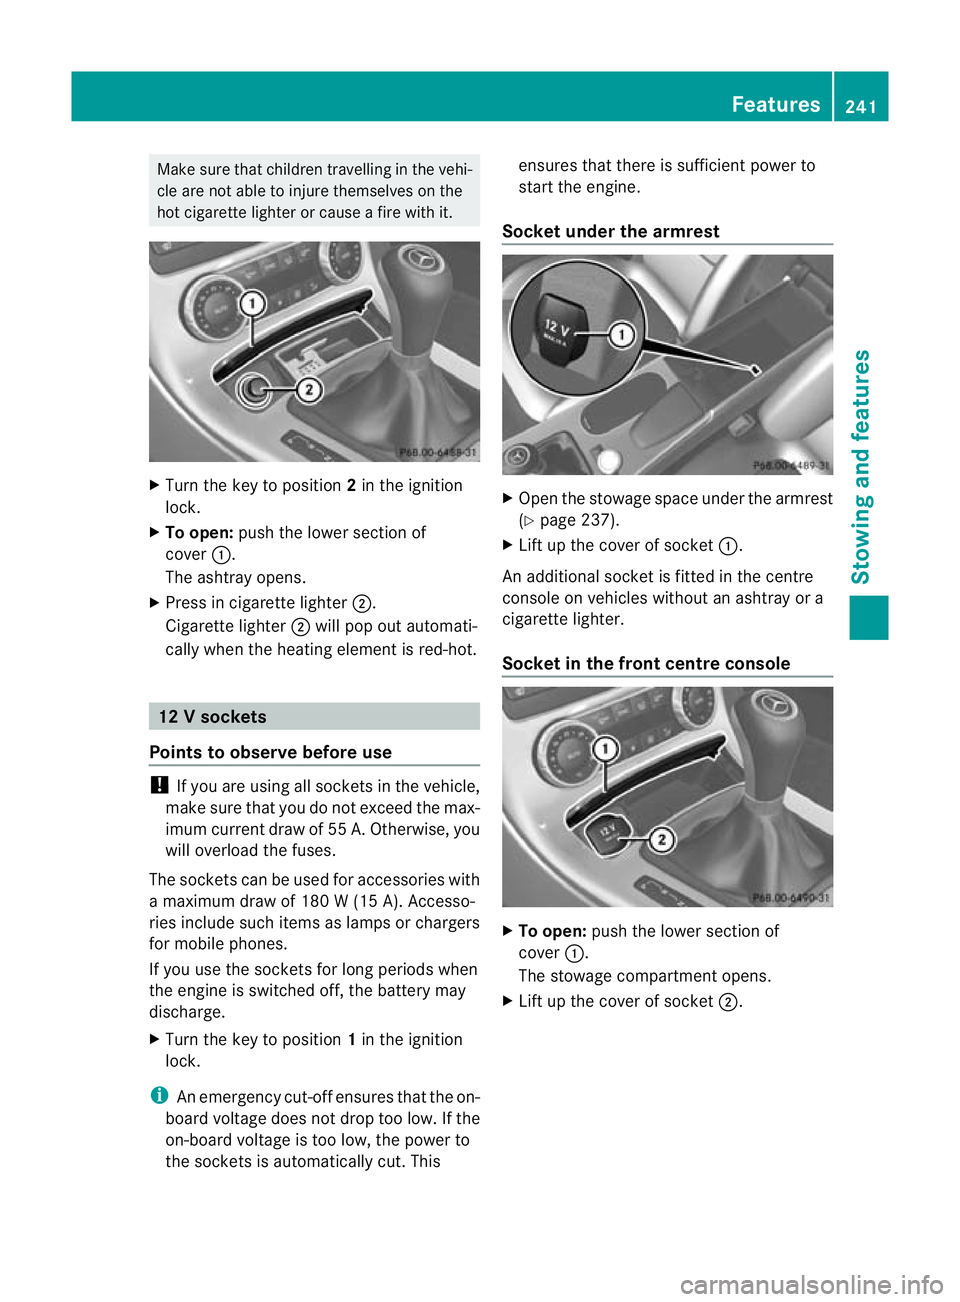
Make sure that children travelling in the vehi-
cle are not able to injure themselves on the
hot cigarette lighter or cause a fire with it. X
Turn the key to position 2in the ignition
lock.
X To open: push the lower section of
cover :.
The ashtray opens.
X Press in cigarette lighter ;.
Cigarette lighter ;will pop out automati-
cally when the heating element is red-hot. 12
Vsockets
Points to observe before use !
If you are using all sockets in the vehicle,
make sure that you do no texceed the max-
imu mcurren tdraw of 55 A. Otherwise, you
will overload the fuses.
The sockets can be used for accessories with
a maximum draw of 180 W (15 A). Accesso-
ries include such items as lamps or chargers
for mobile phones.
If you use the sockets for long periods when
the engine is switched off, the battery may
discharge.
X Turn the key to position 1in the ignition
lock.
i An emergency cut-off ensures that the on-
board voltage does not drop too low.Ift he
on-board voltage is too low, the power to
the sockets is automatically cut. This ensures that there is sufficient power to
start the engine.
Socket under the armrest X
Open the stowage space under the armrest
(Y page 237).
X Lift up the cover of socket :.
An additional socket is fitted in the centre
console on vehicles without an ashtray or a
cigarette lighter.
Socket in the front centre console X
To open: push the lower section of
cover :.
The stowage compartmento pens.
X Lift up the cover of socket ;. Features
241Stowing and features Z
Page 262 of 321
Useful information
............................260
Where will I find...? ...........................260
Flat tyre ............................................. 263
Battery ............................................... 273
Jump-starting .................................... 277
Towing and tow-starting ..................278
Electrical fuses ................................. 281 259Breakdown assistance
Page 284 of 321
Transporting the vehicle
The towing eye can be used to pull the vehicle
onto a trailer or transporter for transporting
purposes.
X Vehicles with manual transmission:
shift to neutral.
X Vehicles with automatic transmission:
tur nthe key to position 2in the ignition
lock.
X Move the selector lever to N.
As soon as the vehicle is loaded:
X Prevent the vehicle from rolling away by
applying the parking brake.
X Vehicles with manual transmission:
shift to first gear or reverse gear.
X Vehicles with automatic transmission:
move the selector lever to P.
X Turn the key in the ignition lock to position
0 and remove the key from the ignition
lock.
X Secure the vehicle.
! Only lash the vehicle down by the wheels
or wheel rims, not by parts of the vehicle
such as axle or steering components. Oth-
erwise, the vehicle could be damaged. Tow-starting (emergency engine
starting)
When tow-starting, it is important that you
observe the safety instructions (Y page 278)
and the legal requirements in each respective
country.
! Vehicles with automatic transmission
must not be tow-started. The transmission
may otherwise be damaged.
You can find information on "Jump-starting"
at (Y page 277). Before tow-starting the following conditions
must be fulfilled:
R
the battery is connected.
R the engine has cooled down.
R the catalytic converters have cooled down.
X Switch on the hazard warning lamps
(Y page 103).
X Fit the towing eye (Y page 279).
X Secure the rigid towing bar or the towing
rope.
X Depress and hold the brake pedal.
X Turn the key to position 2in the ignition
lock.
X Depress the clutch pedal and keep it
depressed.
X Engage neutral.
X Release the brake pedal.
X Tow-start the vehicle.
X Engage second gear.
X Release the clutch pedal slowly;d o not
depress the accelerator pedal while doing
so.
The engine is started.
X Depress the clutch pedal and shift to neu-
tral.
X Stop at a suitable place.
X Depress the parking brake.
X Remove the rigid towing bar or towing rope.
X Remove the towing eye (Y page 280).
X Switch off the hazard warning lamps. Electrical fuses
Important safety notes
G
WARNING
Only use fuses that have been approved for
Mercedes-Benz vehicles and which have the
correct fuse rating for the systems con-
cerned. Do not attempt to repair or bridge
faulty fuses. Using fuses which have not been
approved or attempting to repair or bridge
faulty fuses could cause the fuse to be over- Electrical fuses
281Breakdown assistance
Z
Page 285 of 321
loaded and result in a fire. Have the cause
traced and rectified at a qualified specialist
workshop.
The fuses in your vehicle serve to close down
faulty circuits. If afuse blows, all the compo-
nents on the circuit and their functions stop
operating.
Blown fuses must be replace dwith fuses of
the same rating, which you can recognise by
the colour and fuse rating. The fuse ratings
are listed in the fuse allocation chart.
If the newly inserted fuse also blows, have the
cause traced and rectified at a qualified spe-
cialist workshop, e.g. a Mercedes-Benz
Service Centre.
! Only use fuses that have been approved
for Mercedes-Ben zvehicles and which
have the correct fuse rating for the system
concerned. Otherwise, components or sys-
tems could be damaged. Before replacing a fuse
X Park the vehicle and apply the electric park-
ing brake.
X Switch off all electrical consumers.
X Remove the key from the ignition lock.
The fuses are located in various fuse boxes:
R fuse box in the engine compartment on the
left-hand side of the vehicle, when viewed
in the direction of travel
R fuse box in the boot behind the partition
trim
The fuse allocation chart is located in the
vehicle tool kit (Y page 261) in the stowage
compartment under the boot floor. Fuse box in the engine compartment
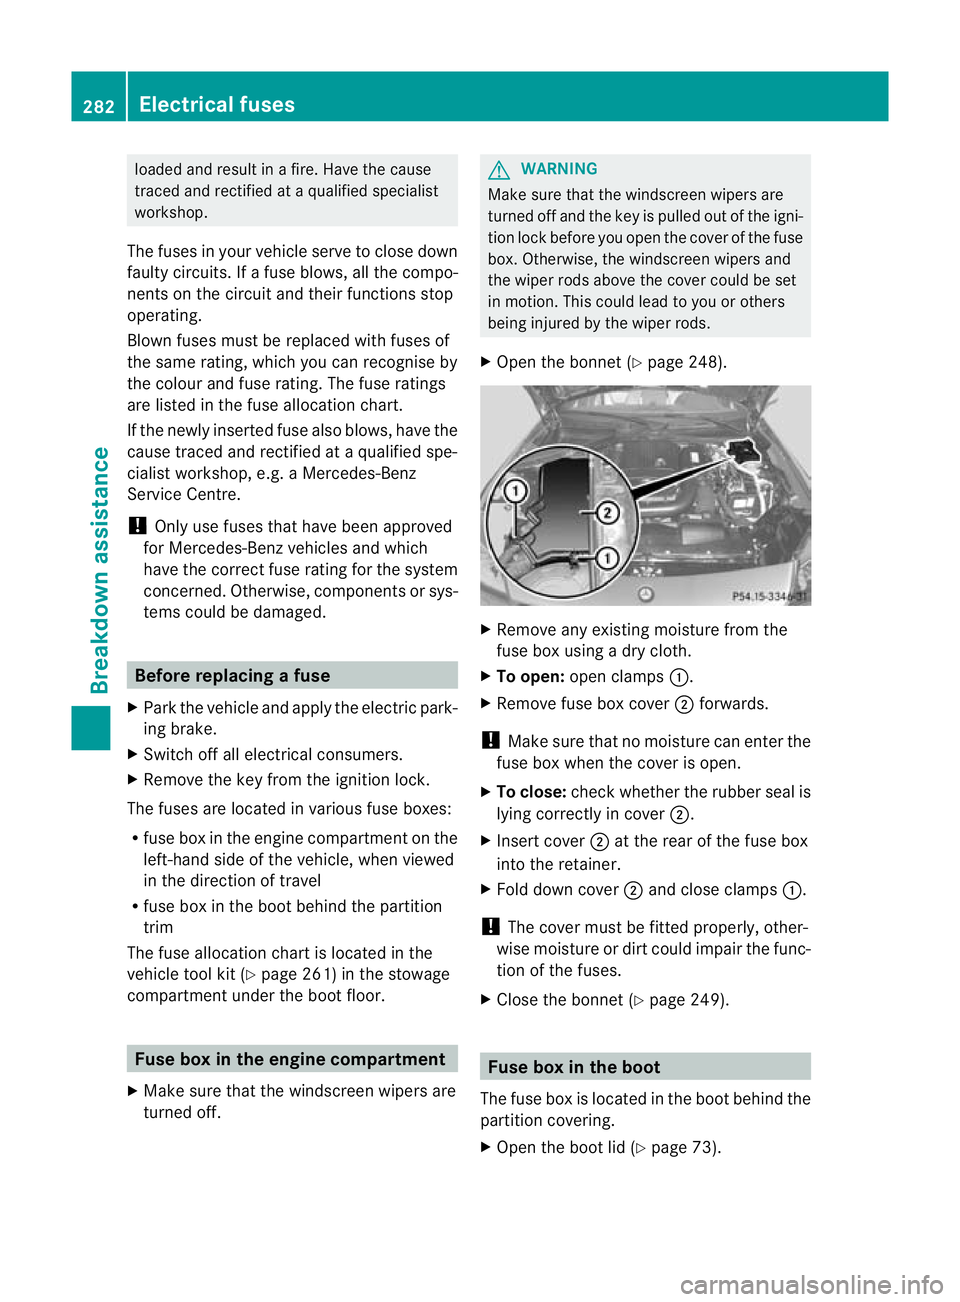
X Make sure that the windscreen wipers are
turned off. G
WARNING
Make sure that the windscreen wipers are
turned off and the key is pulled out of the igni-
tion lock before you open the cover of the fuse
box. Otherwise, the windscreen wipers and
the wiper rods above the cover could be set
in motion .This could lead to you or others
being injured by the wiper rods.
X Open the bonnet (Y page 248). X
Remove any existing moisture from the
fuse box using a dry cloth.
X To open: open clamps :.
X Remove fuse box cover ;forwards.
! Make sure that no moisture can enter the
fuse box when the cover is open.
X To close: check whether the rubber seal is
lying correctly in cover ;.
X Insert cover ;at the rear of the fuse box
into the retainer.
X Fold down cover ;and close clamps :.
! The cover must be fitted properly, other-
wise moisture or dirt could impair the func-
tion of the fuses.
X Close the bonnet (Y page 249). Fuse box in the boot
The fuse box is located in the boot behind the
partition covering.
X Open the boot lid (Y page 73).282
Electrical fusesBreakdown assistance