2012 MERCEDES-BENZ SLK ROADSTER oil temperature
[x] Cancel search: oil temperaturePage 12 of 321
Running-in tips ..............................
.126
Snow chains .................................. 289
Symmetrical dipped bea m............. 100
Tyr egrip ........................................ 150
Wet road surface ........................... 149
DVD audio (on-board computer) ......186
Dynamic handling package Function/notes ............................. 164 E
EASY-ENTRY feature Activating/deactivating .................194
Function/notes ................................ 93
EASY-EXIT feature
Crash-responsive ............................. 93
Function/notes ................................ 93
Switching on/off ........................... 194
EBD (electronic brake force distri-
bution)
Display message ............................ 202
Function/notes ................................ 59
ECO start/stop function
Deactivating/activating .................132
General information .......................131
Important safety notes ..................130
Electrical fuses
see Fuses
Electronic brake force distribution
see EBD (electronic brake force
distribution)
Electronic Brake force Distribution
see EBD (Electronic Brake force
Distribution)
Electronic Stability Program
see ESP ®
(Electroni cStability Program)
Electronic Traction System
see ETS (Electronic Traction System)
Emergenc ykey
Unlocking the driver's door ..............73
Emergency key element
Function/notes ................................ 68
Locking vehicle ................................ 73
Emergency release
Driver's door .................................... 73Emergency spare wheel
Inflating the collapsible spare
wheel ............................................. 270
Notes/data .................................... 297
Storage location ............................ 262
Stowing .......................................... 262
Emergency unlocking
Boot ................................................. 75
Vehicle ............................................. 73
Engine
Display message ............................ 211
ECO start/stop function ................130
Engine number ............................... 303
Jump-starting ................................. 277
Running irregularl y......................... 134
Starting problems ..........................134
Starting the engine with the key ....129
Starting with KEYLESS GO .............129
Stopping ........................................ 146
Tow-starting (vehicle) ..................... 281
Warning lamp (engine diagnos-
tics) ............................................... 231
Engine electronics
Notes ............................................. 301
Problem (fault) ............................... 134
Engine oil
Additives ........................................ 308
Checking the oil level ..................... 250
Checking the oil level using the
dipstick .......................................... 250
Display message ............................ 212
Filling capacity ............................... 307
Notes about oil grades ................... 307
Notes on oil level/consumption ....250
Temperature (on-board computer) .195
Topping up ..................................... 250
Viscosity ........................................ 308
Environmental protection
Note ................................................ .20
Returning an end-of-life vehicle .......20
ESP ®
(Electronic Stability Pro-
gram) AMG menu (on-board computer) ...196
Deactivating/activating (AMG
vehicles) .......................................... 57
Deactivating/activating (notes;
except AMG vehicles) ......................56
Display message ............................ 200 Index
9
Page 20 of 321
Summer opening
see Convenience opening feature
Summer tyres .................................... 288
Sun visor ............................................ 240
Supplement Restraint System see SRS (Supplemental Restraint
System)
Surround lighting (on-board com-
puter) ................................................. .192
Switching off the alarm (ATA) ............61 T
Tail lamps Display message ............................ 209
see Lights
Tank
see Fuel tank
Technical data
Notes ............................................. 300
Tyres/wheels ................................. 295
Vehicle data ................................... 310
Telephone
Accepting acall............................. 188
Display message ............................ 221
Menu (on-board computer) ............187
Number from the phone book ....... .188
Redialling ....................................... 188
Rejecting/ending acall................. 188
Telephone compartment ................237
Temperature
Coolant .......................................... 178
Coolant (on-board computer) ......... 195
Engine oil (on-board computer) ...... 195
Outside temperature ..................... .179
Setting (climate control) ................118
TEMPOMAT
Function/notes ............................. 151
Theft-deterrent system
ATA (Anti-Theft Alarm system) .........61
Immobiliser ...................................... 61
Time
see Separate Owner' smanual
Timing (RACETIMER) .........................196
TIREFIT kit .......................................... 263
Total distance recorder ....................183
Tow-away protection ..........................62Towing
Important safety notes ..................278
With the rear axle raised ................280
Towing away
Fitting the towing eye. ...................279
Removing the towing eye. ..............280
With both axles on the ground .......280
Tow-starting
Emergency engine starting ............281
Fitting the towing eye. ...................279
Important safety notes ..................278
Removing the towing eye. ..............280
Transmission
see Automatic transmission
see Manual transmission
Transporting the vehicle ..................281
Trim pieces (cleaning instructions) .258
Trip computer (on-board com-
puter) ................................................. .183
Trip meter Calling up ....................................... 183
Resetting (on-board computer) ......184
Trip odometer
see Trip meter
Turn signals
Changing bulbs (front) ...................108
Switching on/off ........................... 103
Two-way radio
Frequencies ................................... 301
Installatio n..................................... 301
Transmission output (maximum) .... 301
Type identification plate
see Vehicle identification plate
Tyre pressure
Calling up (on-board computer) .....292
Display message ............................ 217
Not reached (TIREFIT) ....................265
Pressure loss warning ....................291
Reached (TIREFIT) ..........................265
Recommended ............................... 289
Tyre pressure monitor
Function/notes ............................. 292
Restarting ...................................... 293
Warning lamp ................................. 233
Tyres
Checking ........................................ 287
Direction of rotatio n...................... 295 Index
17
Page 130 of 321
not be able to brake, declutch or accelerate
as intended. This could lead to accidents and
injury. G
WARNING
Do not change down for additional engine
braking on a slippery roa dsurface. This could
cause the drive wheels to lose their grip and
the vehicle could skid. This could cause you
to lose control of your vehicle and cause an
accident.
! Warm up the engine quickly. Do no tuse
the engine's full performance until it has
reached operating temperature.
Only set the automatic transmission to the
respective drive positions when the vehicle
is stationary.
Where possible, avoid spinning the drive
wheels when pulling away on slippery
roads. Otherwise, you could damage the
drive train.
! AMG vehicles: at low engine oil temper-
atures (below +20 †), the maximum
engine speed is restricted in order to pro-
tect the engine. To protect the engine and
maintain smooth engine operation, avoid
driving at full throttle when the engine is
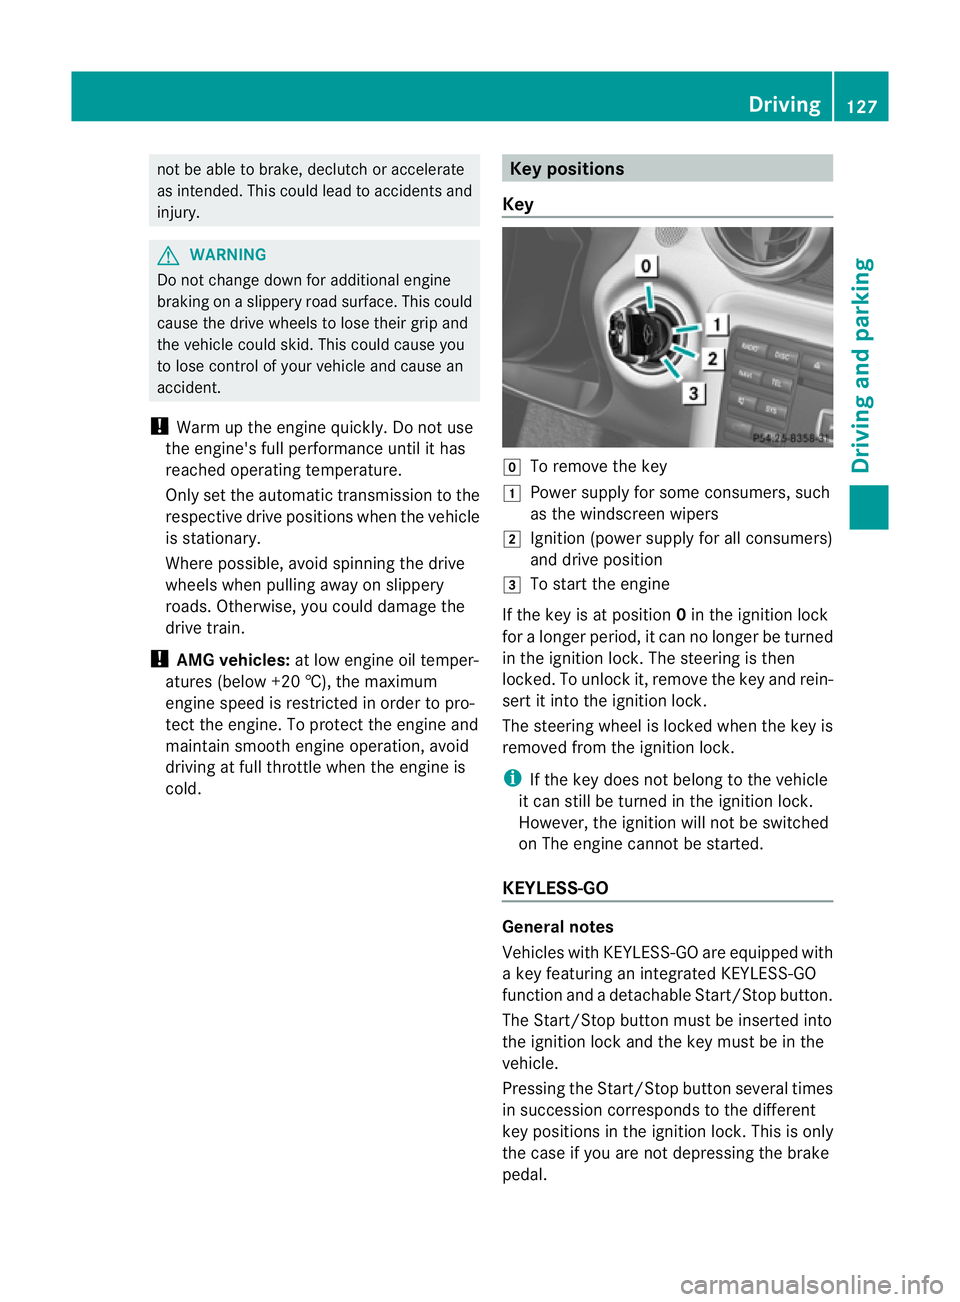
cold. Key positions
Key g
To remove the key
1 Power supply for some consumers, such
as the windscreen wipers
2 Ignition (power supply for all consumers)
and drive position
3 To start the engine
If the key is at position 0in the ignition lock
for a longer period, it can no longer be turned
in the ignition lock. The steering is then
locked. To unlock it, remove the key and rein-
sert it into the ignition lock.
The steering wheel is locked when the key is
removed from the ignition lock.
i If the key does not belong to the vehicle
it can still be turned in the ignition lock.
However, the ignition will not be switched
on The engine cannot be started.
KEYLESS-GO General notes
Vehicles with KEYLESS-GO are equipped with
a key featuring an integrated KEYLESS-GO
function and a detachable Start/Stop button.
The Start/Stop button must be inserted into
the ignition lock and the key must be in the
vehicle.
Pressing the Start/Stop button several times
in succession corresponds to the different
key positions in the ignition lock. This is only
the case if you are not depressing the brake
pedal. Driving
127Driving and parking Z
Page 198 of 321
X
Press the :or9 button to select the
Belt adjustment function.
You will see the selected setting: on or
off .
X Press the abutton to save the setting.
Switching the fold in mirrors when lock-
ing function on/off
If you switch on the Fold mirrors in when
locking: function, the exterior mirrors fold
in when you lock the vehicle. When you
unlock the vehicle and then open a door, the
exterior mirrors fold out again.
If you have switched the function on and you
fold the exterior mirrors in using the button
on the door (Y page 94), they will not fold out
automatically. The exterior mirrors can then
only be folded out using the button on the
door.
X Press the =or; button on the steer-
ing wheel to select the Settings menu.
X Press the :or9 button to select the
Convenience submenu.
X Press the abutton to confirm.
X Press the :or9 button to select the
Fold mirrors in when locking: func-
tion.
You will see the selected setting: on or
off .
X Press the abutton to save the setting.
Resetting to factor ysettings For safety reasons, no
tall functions are reset:
the Limit speed (winter tyres) function
in permanent SPEEDTRONIC can only be set
in the Vehicle submenu. If you want to reset
the Daytime driving lights function in
the Light submenu, you must tur
nthe key in
the ignition lock to position 1.
X Press the =or; button on the steer-
ing wheel to select the Settings menu.
X Press the :or9 button to select the
Factory setting submenu.X
Press the abutton to confirm.
The Reset all settings? message
appears.
X Press the :or9 button to select
No or
Yes .
X Press the abutton to confirm the selec-
tion.
If you have selected Yes , the multifunction
display shows a confirmation message. AMG menu in AMG vehicles
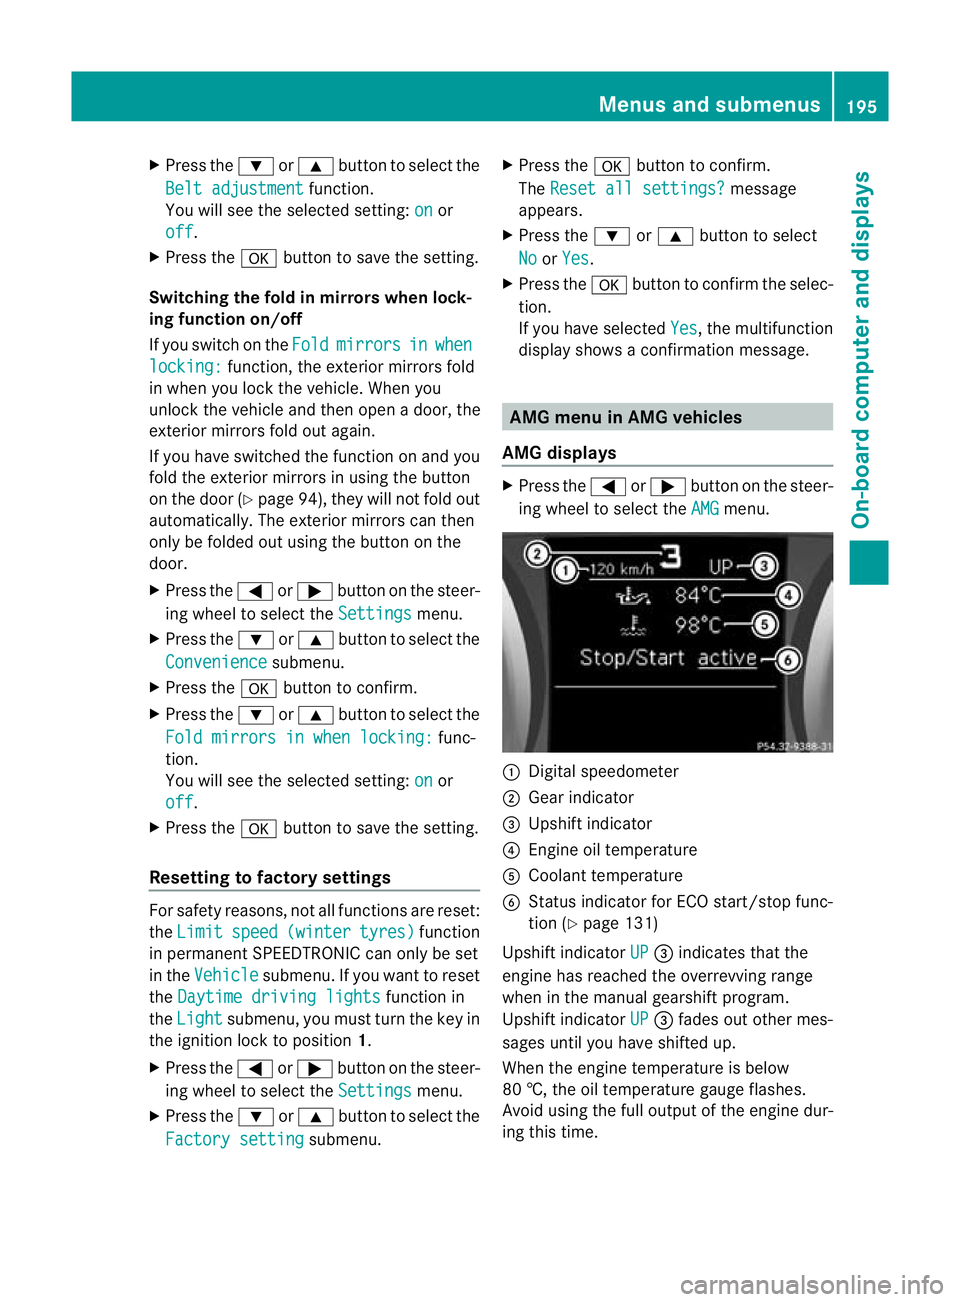
AMG displays X
Press the =or; button on the steer-
ing wheel to select the AMG menu.
:
Digital speedometer
; Gear indicator
= Upshift indicator
? Engine oil temperature
A Coolant temperature
B Status indicator for ECO start/stop func-
tion (Y page 131)
Upshift indicator UP =
indicates that the
engine has reached the overrevving range
when in the manual gearshift program.
Upshift indicator UP =
fades out other mes-
sages until you have shifted up.
When the engine temperature is below
80 †, the oil temperature gauge flashes.
Avoid using the full output of the engine dur-
ing this time. Menus and submenus
195On-board computer and displays Z
Page 253 of 321
X
Lower the bonnet and let it fall from a
heightofa pproximately 20 cm.
X Check that the bonnet has engaged prop-
erly.
If the bonnet can be raised slightly, it is not
properly engaged. Open it again and close
it with a little more force. Radiator
i Vehicles with adiesel engine: do not
cover the radiator. Do not use thermal
mats, insect protection covers or anything
similar. Doing so can cause the Onboard
Diagnostics System to display inaccurate
values. Some of these values are legally
required and must be correct. Engine oil
Notes on oil level Depending on driving style, the vehicle con-
sumes up to 0.
8lof oil per 1,000 km .The oil
consumption may be higher than this when
the vehicle is new or if you frequently drive at
high engine speeds.
AMG vehicles: before operation on race
tracks, check the oil level and (Y page 250)
top up if necessary (Y page 250). Race track
operation is only permitted with a maximum
engine oil level.
Depending on the engine, the oil dipstick may
be installed at a different location.
When checking the oil level:
R park the vehicle on a level surface.
R the engine should be switched off for
approximately five minutes if the engine is
at normal operating temperature.
R if the engine is not at normal operating
temperature, e.g. if the engine was only
started briefly: wait about 30 minutes
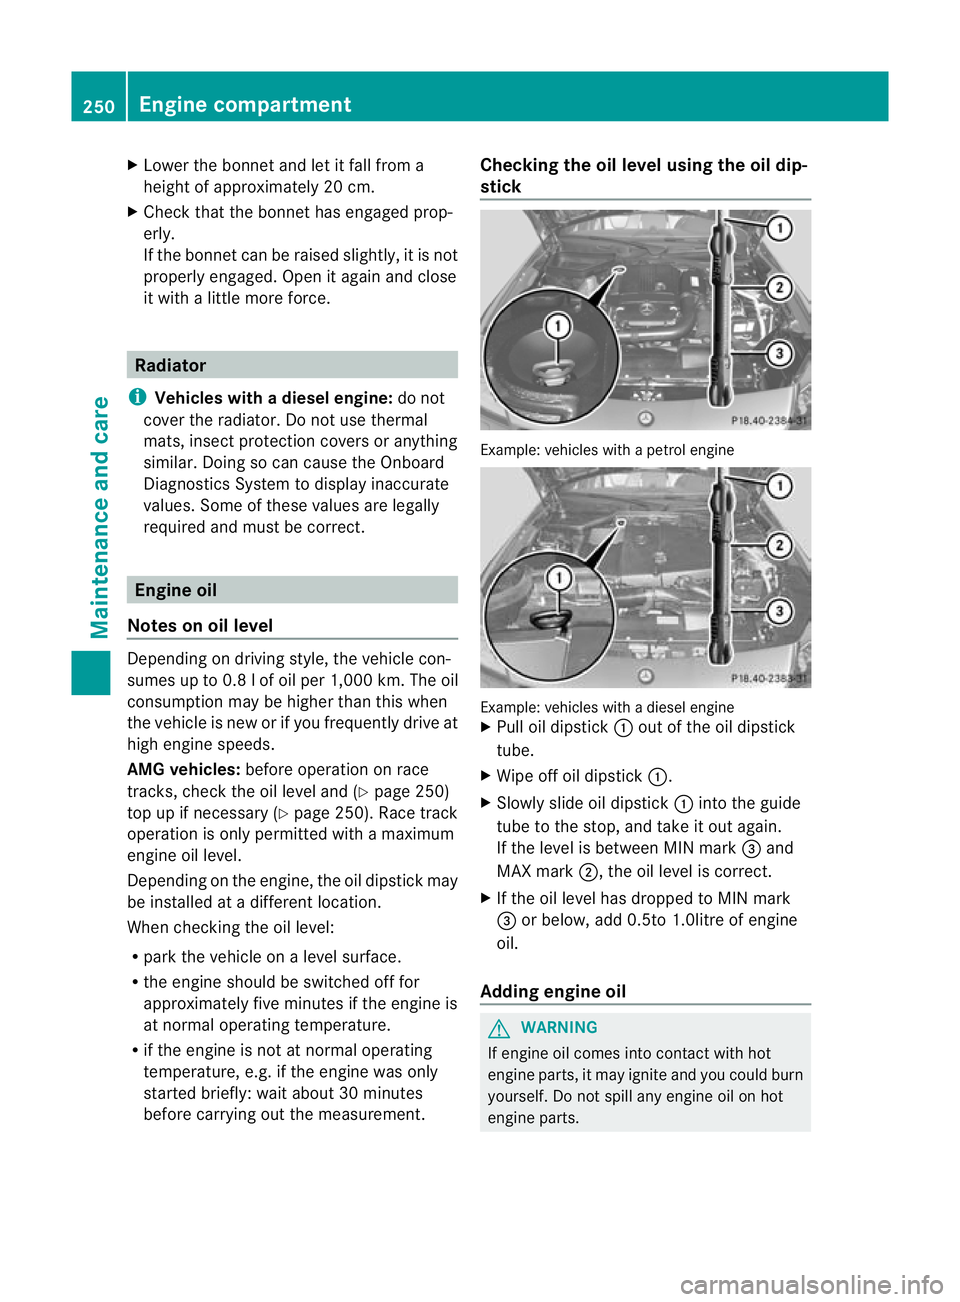
before carrying out the measurement. Checking the oil level using the oil dip-
stick
Example: vehicles with a petrol engine
Example: vehicles with a diesel engine
X
Pull oil dipstick :out of the oil dipstick
tube.
X Wipe off oil dipstick :.
X Slowly slide oil dipstick :into the guide
tube to the stop, and take it out again.
If the level is between MIN mark =and
MAX mark ;, the oil level is correct.
X If the oil level has dropped to MIN mark
= or below, add 0.5to 1.0litre of engine
oil.
Adding engine oil G
WARNING
If engine oil comes into contact with hot
engine parts, it may ignite and you could burn
yourself. Do not spill any engine oil on hot
engine parts. 250
Engine compartmentMaintenance and care
Page 254 of 321
H
Environmental note
When topping up the oil, take care not to spill
any. If oil enters the soil or waterways, it is
harmful to the environment.
! Only use engine oils and oil filters that
have been approved for vehicles with a
service system. You can obtain a list of the
engine oils and oil filters tested and
approved in accordance with the
Mercedes-Benz Specifications for Service
Products at any Mercedes-Benz Service
Centre.
Damage to the engine or exhaust system is
caused by the following:
R using engine oils and oil filters that have
not been specifically approved for the
service system
R changing the engine oil and oil filter after
missing the change interval required by
the service system
R using engine oil additives
! Do not add too much oil. Topping up with
too much engine oil can result in damage
to the engine or to the catalytic converter.
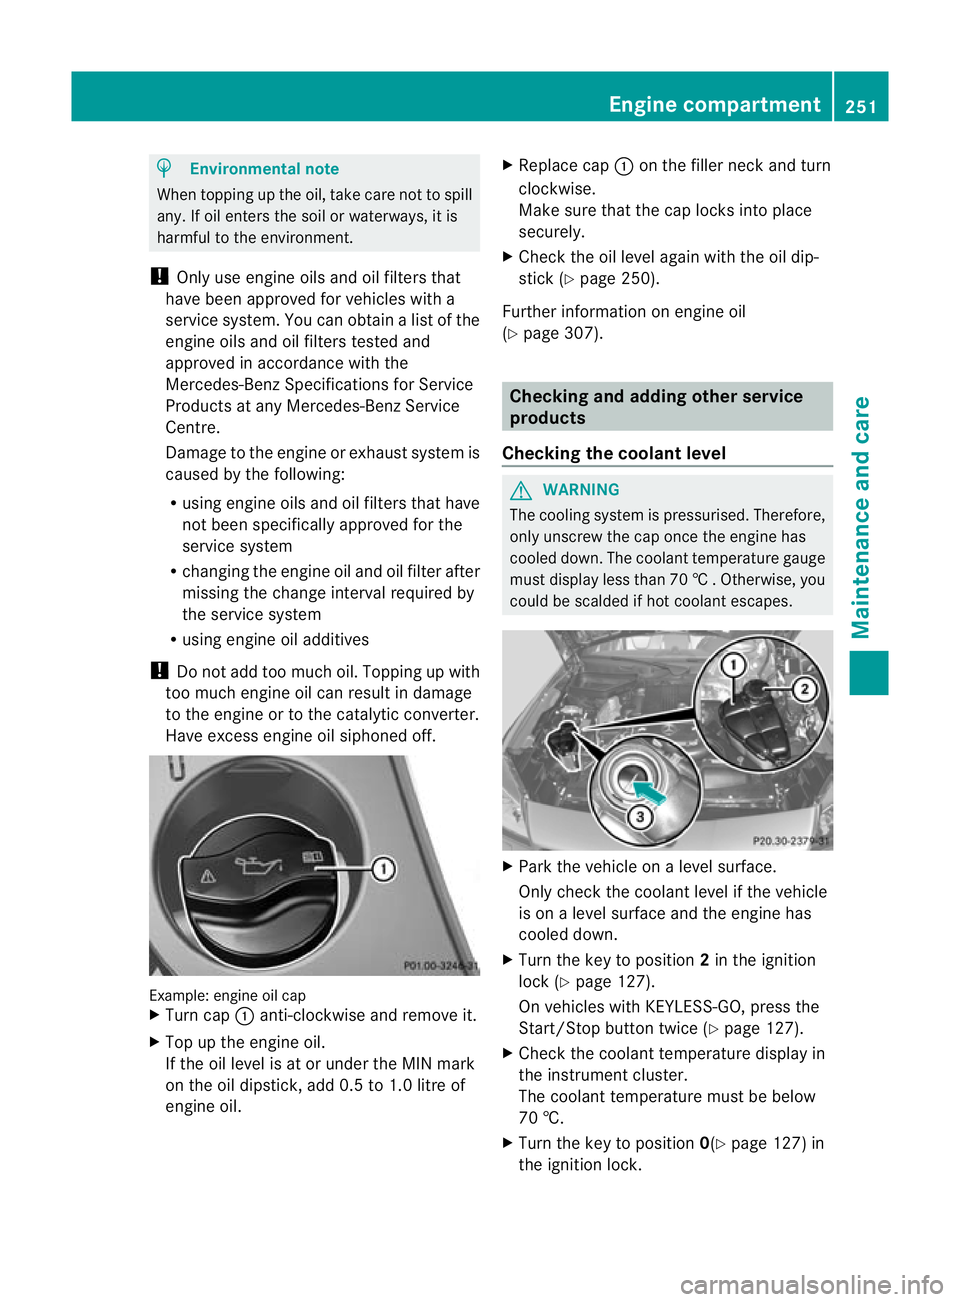
Have excess engine oil siphoned off. Example: engine oil cap
X
Turn cap :anti-clockwise and remove it.
X Top up the engine oil.
If the oil level is at or under the MIN mark
on the oil dipstick, add 0.5 to 1.0 litre of
engine oil. X
Replace cap :on the filler neck and turn
clockwise.
Make sure that the cap locks into place
securely.
X Chec kthe oil level again with the oil dip-
stick (Y page 250).
Further information on engine oil
(Y page 307). Checking and adding other service
products
Checking the coolant level G
WARNING
The cooling system is pressurised. Therefore,
only unscrew the cap once the engine has
cooled down. The coolant temperature gauge
must display less than 70 †.Otherwise, you
could be scalded if hot coolant escapes. X
Park the vehicle on a level surface.
Only check the coolant level if the vehicle
is on a level surface and the engine has
cooled down.
X Turn the key to position 2in the ignition
lock (Y page 127).
On vehicles with KEYLESS-GO, press the
Start/Stop button twice (Y page 127).
X Check the coolant temperature display in
the instrument cluster.
The coolant temperature must be below
70 †.
X Turn the key to position 0(Ypage 127) in
the ignition lock. Engine compartment
251Maintenance and care Z
Page 261 of 321
!
Do not allow cosmetics, insect repellent
or sunscreen to come in contact with the
plastic trim. This maintains the high-quality
look of the surfaces.
X Wipe the plastic trim with a damp, lint-free
cloth, e.g. a microfibre cloth.
X Heavy soiling: use car care and cleaning
products recommended and approved by
Mercedes-Benz.
The surface may change colour tempora-
rily. Wait until the surface is dry again.
Cleaning the steering wheel and gear or
selector lever X
Thoroughly wipe with a damp cloth or use
leather care agents that have been recom-
mended and approved by Mercedes-Benz.
Cleaning wooden trim and trim ele-
ments X
Wipe the wooden trim and trim pieces with
a damp, lint-free cloth, e.g. a microfibre
cloth.
X Heavy soiling: use car care and cleaning
products recommended and approved by
Mercedes-Benz.
! Do not use solvent-based cleaning agents
such as tar remover, wheel cleaners, pol-
ishes or waxes. There is otherwise a risk of
damaging the surface.
Cleaning the seat covers !
Do not use microfibre cloths to clean gen-
uine leather, artificial leather or
Alcantara® covers. If used often, these can
damage the cover.
! Observe the following when cleaning:
R clean genuine leather covers carefully
with a damp cloth and then wipe the cov-
ers down with a dry cloth. Make sure that
the leather does not become soaked. It
may otherwise become rough and
cracked. Only use leather care agents that have been tested and approved by
Mercedes-Benz.Y
ou can obtain these
from a qualified specialist workshop.
R clean artificial leather covers with a cloth
moistened with a solution containing 1%
detergent (e.g. washing-up liquid).
R clean cloth covers with a microfibre cloth
moistened with a solution containing 1%
detergent (e.g. washing-up liquid). Rub
carefully and always wipe entire seat sec-
tions to avoid leaving visible lines. Leave
the seat to dry afterwards. Cleaning
results depend on the type of dirt and
how long it has been there.
R clean Alcantara® covers with a damp
cloth. Make sure that you wipe entire
seat sections to avoid leaving visible
lines.
i Note that regular care is essential to
make sure that the appearance and com-
fort of the covers are retained over time.
Cleaning the seat belts X
Use clean, lukewarm water and soap solu-
tion.
! Do not clean the seat belts using chemical
cleaning agents. Do not dry the seat belts
at temperatures above 80 † or in direct
sunlight.
Cleaning the roof lining and carpets X
Roof lining: use a soft brush or a cleaning
agent recommended and approved by
Mercedes-Benz to remove heavy soiling.
X Carpets: use the carpet and textile clean-
ing agents recommended and approved by
Mercedes-Benz. 258
CareMaintenance and care
Page 308 of 321
If only regular unleaded petrol with an
octane rating of 91 RON/82.5 MON or
loweri s available, you must have the vehi-
cle adapted to this fuel at a qualified spe-
cialist workshop.
i E10 fuel contains up to 10% bioethanol.
Your vehicle is E10-compatible. You can
refuel your vehicle using E10 fuel.
SLK 350 BlueEFFICIENCY
! Only refuel using premium-grade sulphur-
free unleaded petrol with at least 95 RON/
85 MON that conforms to European stand-
ard EN 228 or an equivalent specification.
You could otherwise impair engine output
or damage the emission control system.
i In some countries, the available petrol
may not be sufficiently low in sulphur. This
fuel can temporarily produce unpleasant
odours, especially on short journeys. As
soon as sulphur-free fuel (sulphur content
<10p pm) is used for refuelling, the odours
are reduced.
Additives
! Do not refuel with low grade fuel and do
not use fuel additives that have not been
tested and approved for Mercedes-Benz
vehicles. Otherwise the fuel system could
malfunction or be damaged.
One of the major problems with low-grade
fuel is the creation of carbon deposits during
the process of burning fuel. Mercedes-Benz
recommends that you use fuel brands that
have additives.
If you use fuels without these additives for a
longer period of time, there may be a build-up
of carbon deposits. These will form especially
on the inlet valves and in the combustion
chamber.
This could lead to engine running problems,
e.g.:
R longer engine warm-up phase
R uneven idle
R engine noise R
misfiring
R loss of power
In areas where petrol with the required addi-
tives is not available, carbon deposits can
build up. In this case, Mercedes-Benz recom-
mends the use of additives that have been
approved for Mercedes-Benz vehicles; see
http://bevo.mercedes-benz.com.
Consult a Mercedes-Benz Service Centre to
view a list of approved products. Observe the
instructions for use in the product descrip-
tion.
Do not mix other fuel additives with fuel. This
causes unnecessary costs and could damage
the engine.
Diesel (EN 590) Fuel grade
G
WARNING
Do not use petrol to refuel vehicles with a die-
sel engine. Do not mix diesel with petrol. This
would result in damage to the fuel system and
engine, which could lead to a vehicle fire.
! When refuelling, only use diesel fuel that
conform stothe European standard EN 590
or is of equivalent quality. Fuel that does
not conform to EN 590 can lead to
increased wear as well as damage to the
engine and exhaust system.
! Do not use the following:
R marine diesel
R heating oil
R bio-diesel
R vegetable oil
R petrol
R paraffin
R kerosene
Do not mix these fuels with diesel fuels and
do not use any special additives. Other-
wise, this can lead to damage to the engine.
This excludes flow improver; see "Low out-
side temperatures". Service products and capacities
305Technical data Z