2012 MERCEDES-BENZ SLK ROADSTER change wheel
[x] Cancel search: change wheelPage 9 of 321
C
Calling up a fault see Display messages
Capacities
see Technical data
Car
see Vehicle
Care
Automatic car wash .......................254
Carpets .......................................... 258
Display ........................................... 257
Exterior lighting ............................. 256
Gea rors electo rlever .................... 258
High-pressure cleaner .................... 254
Interior ........................................... 257
Matt paintwork .............................. 255
Notes ............................................. 253
Paint .............................................. 255
Plastic trim .................................... 257
Roof lining ...................................... 258
Seat bel t........................................ 258
Seat cover ..................................... 258
Sensors ......................................... 257
Steering wheel ............................... 258
Tai lpipes ....................................... 257
Trim pieces .................................... 258
Washing by hand ........................... 254
Wheels ........................................... 255
Windows ........................................ 256
Wiper blades .................................. 256
Wooden trim .................................. 258
Car key
see Key
Car wash (care) ................................. 254
CD player/CD changer(on-board
computer) .......................................... 186
Cell phone see Mobile phone
Central locking
Automatic locking (on-board com-
puter) ............................................. 193
Locking/unlocking (key ).................. 66
Centre console
Lowe rsection .................................. 33
Uppe rsection .................................. 32Changing bulbs
Dipped-bea mheadlamps ............... 108
Important safety notes ..................106
Main-beam headlamps ................... 108
Overview of bul btypes .................. 107
Parking lamps (front) .....................108
Removing/replacing the cover
(front wheel arch) .......................... 107
Reversing lamps ............................ 109
Standing lamps .............................. 108
Turn signals (front) ......................... 108
Children
In the vehicle ................................... 47
Restraint systems ............................ 47
Child seat
Automatic recognition .....................49
On the front-passenger sea t............ 48
Problem (malfunction) .....................51
Recommendations ...........................52
Suitable positions ............................ 51
Cigarette lighter ................................ 240
Cleaning Mirro rturn signal ........................... 256
Climate control
Air conditioning ............................. 115
Controlling automatically ...............118
Convenience opening/closing
(air-recirculatio nmode) ................. 121
Cooling with aird ehumidification..117
Demisting the windows .................. 120
Demisting the windscreen .............120
Important safety notes ..................114
Indicator lamp ................................ 118
Notes on using the air-condition-
ing system ..................................... 115
Notes on using THERMOTRONIC
automatic climate control ..............116
Overview of systems ......................114
Problems with cooling with air
dehumidification ............................ 118
Problem with the rear window
heating .......................................... 121
Setting the aird istribution.............119
Setting the airflow .........................119
Setting the airv ents...................... 122
Setting the temperature ................118
Switching air-recirculation mode
on/off ............................................ 1216
Index
Page 110 of 321
eye protection and gloves when you are
changing them. Overview of bulb replacement
–bulbs
You can replace the following bulbs. The
details for the bulb type can be found in the
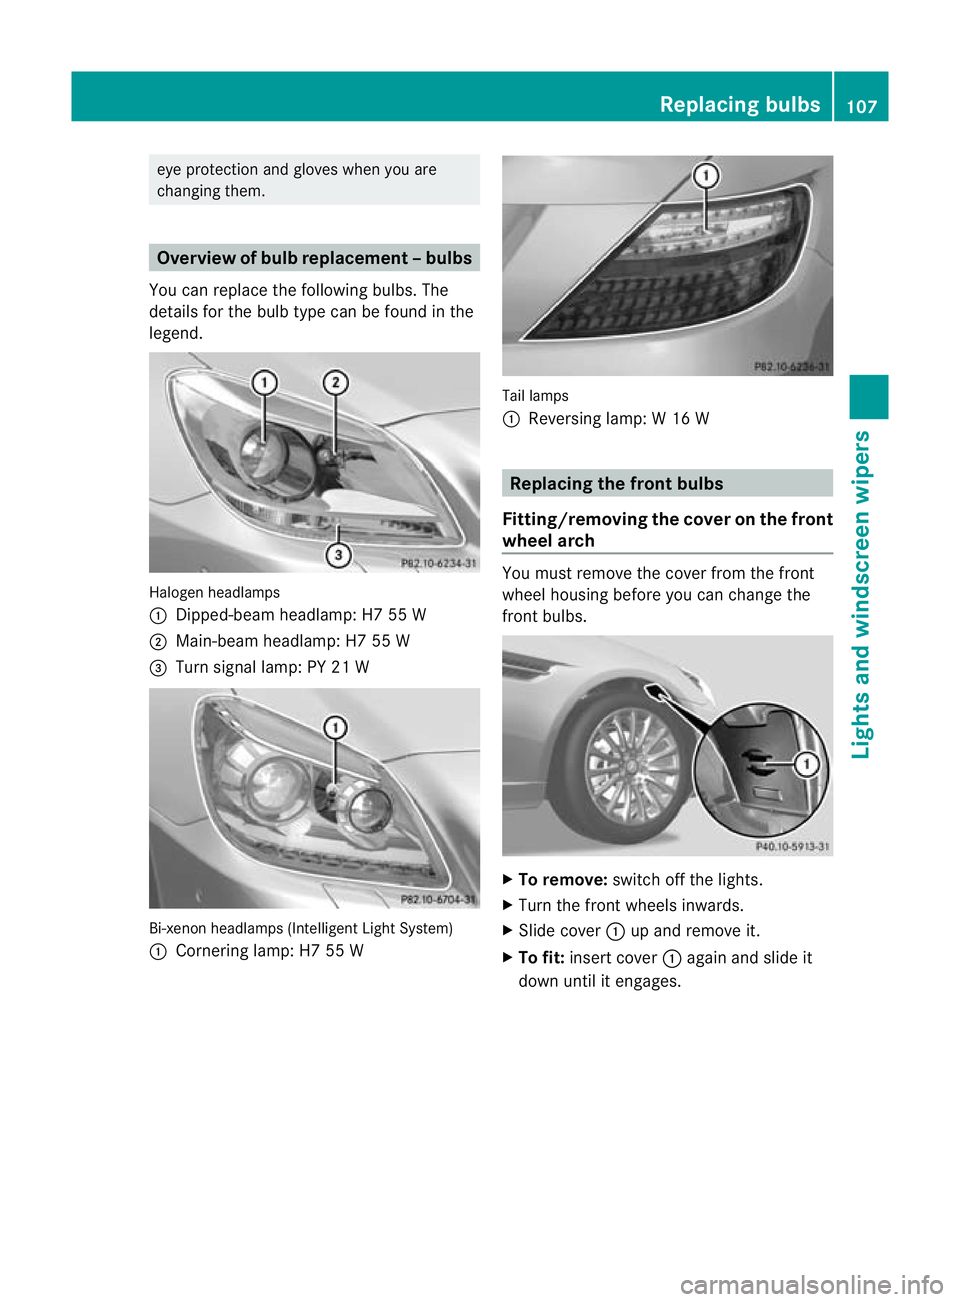
legend. Halogen headlamps
:
Dipped-bea mheadlamp: H7 55 W
; Main-beam headlamp: H7 55 W
= Turn signal lamp: PY 21 W Bi-xenon headlamps (Intelligent Light System)
: Cornering lamp: H7 55 W Tail lamps
:
Reversing lamp: W 16 W Replacing the front bulbs
Fitting/removing the cover on the front
wheel arch You must remove the cover from the front
wheel housing before you can change the
fron
tbulbs. X
To remove: switch off the lights.
X Turn the fron twheels inwards.
X Slide cover :up and remove it.
X To fit: insert cover :again and slide it
down until it engages. Replacing bulbs
107Lights and windscreen wipers Z
Page 111 of 321
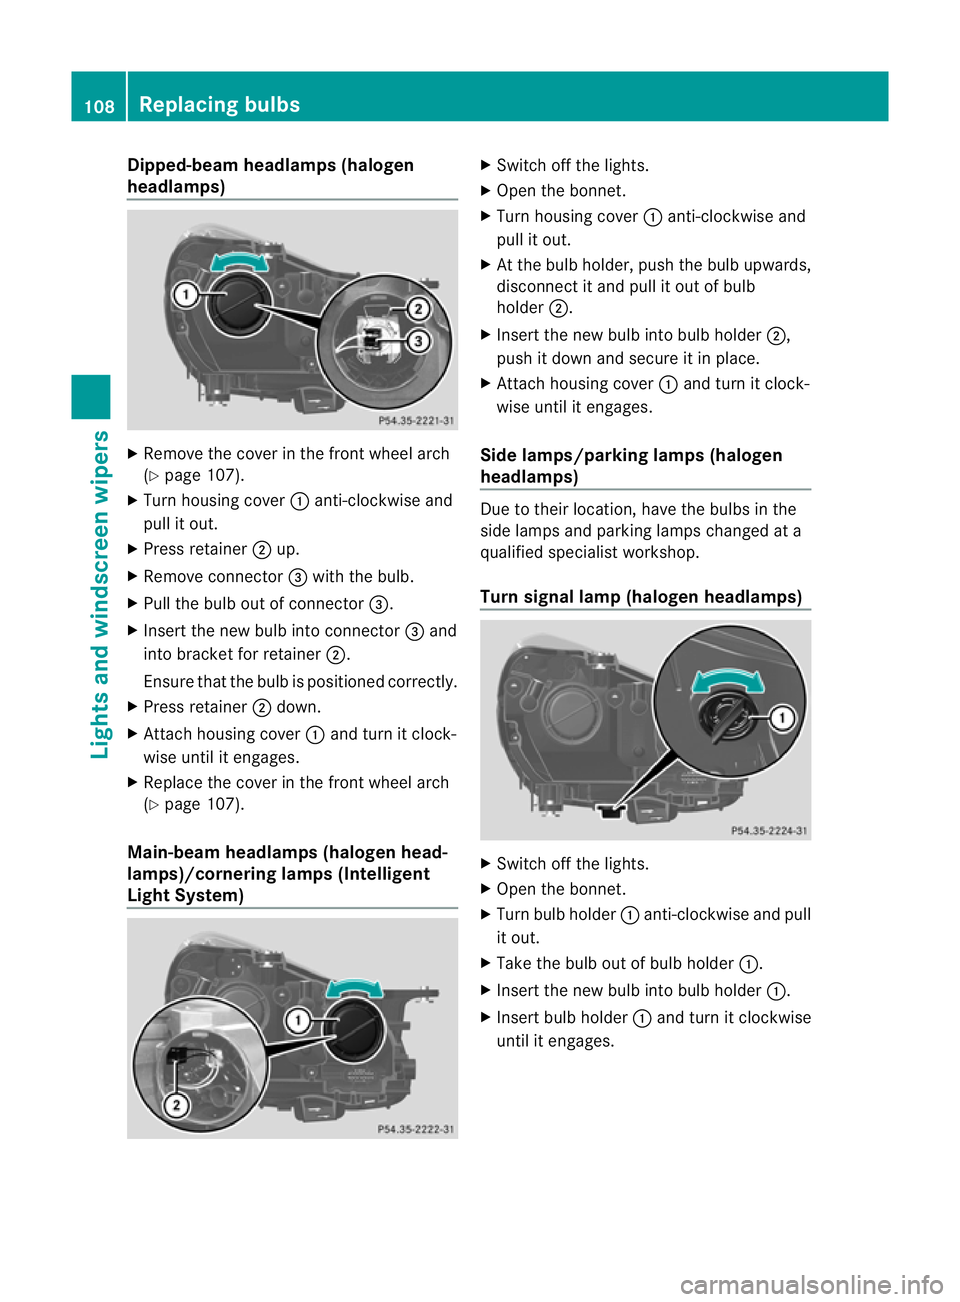
Dipped-beam headlamps (halogen
headlamps)
X
Remove the cover in the front wheel arch
(Y page 107).
X Tur nhousing cover :anti-clockwise and
pull it out.
X Press retainer ;up.
X Remove connector =with the bulb.
X Pull the bulb out of connector =.
X Insert the new bulb into connector =and
into bracket for retainer ;.
Ensure that the bulb is positioned correctly.
X Press retainer ;down.
X Attach housing cover :and turn it clock-
wise until it engages.
X Replace the cover in the front wheel arch
(Y page 107).
Main-beam headlamps (halogen head-
lamps)/cornering lamps (Intelligent
Light System) X
Switch off the lights.
X Open the bonnet.
X Turn housing cover :anti-clockwise and
pull it out.
X At the bulb holder, push the bulb upwards,
disconnect it and pull it out of bulb
holder ;.
X Insert the new bulb into bulb holder ;,
push it down and secure it in place.
X Attach housing cover :and turn it clock-
wise until it engages.
Side lamps/parking lamps( halogen
headlamps) Due to their location, have the bulbs in the
side lamps and parking lamps changed at a
qualified specialist workshop.
Turn signal lamp (halogen headlamps) X
Switch off the lights.
X Open the bonnet.
X Turn bulb holder :anti-clockwise and pull
it out.
X Take the bulb out of bulb holder :.
X Insert the new bulb into bulb holder :.
X Insert bulb holder :and turn it clockwise
until it engages. 108
Replacing bulbsLights and windscreen wipers
Page 121 of 321
ant does no
tcontain chlorofluorocarbons,
and therefore does not damage the ozone
layer.
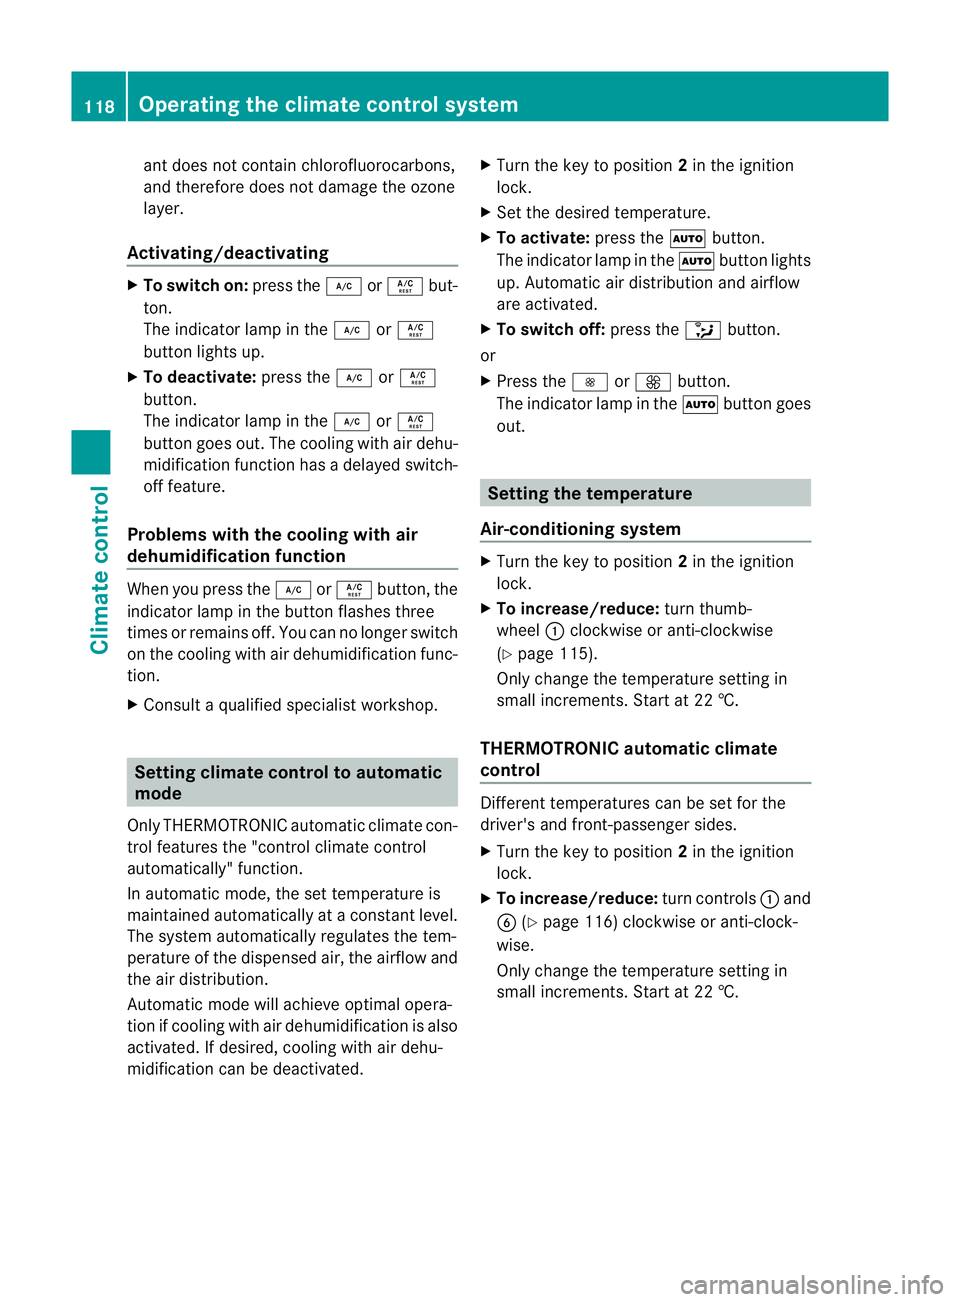
Activating/deactivating X
To switch on: press the¿orÁ but-
ton.
The indicator lamp in the ¿orÁ
button lights up.
X To deactivate: press the¿orÁ
button.
The indicator lamp in the ¿orÁ
button goes out. The cooling with air dehu-
midification function has a delayed switch-
off feature.
Problems with the cooling with air
dehumidification function When you press the
¿orÁ button, the
indicator lamp in the button flashes three
times or remains off. You can no longer switch
on the cooling with air dehumidification func-
tion.
X Consult a qualified specialist workshop. Setting climate control to automatic
mode
Only THERMOTRONIC automatic climate con-
trol features the "control climate control
automatically" function.
In automatic mode, the set temperature is
maintained automatically at a constant level.
The system automatically regulates the tem-
perature of the dispensed air, the airflow and
the air distribution.
Automatic mode will achieve optimal opera-
tion if cooling with air dehumidification is also
activated. If desired, cooling with air dehu-
midification can be deactivated. X
Turn the key to position 2in the ignition
lock.
X Set the desired temperature.
X To activate: press theÃbutton.
The indicator lamp in the Ãbutton lights
up. Automatic air distribution and airflow
are activated.
X To switch off: press the_button.
or
X Press the IorK button.
The indicator lamp in the Ãbutton goes
out. Setting the temperature
Air-conditioning system X
Turn the key to position 2in the ignition
lock.
X To increase/reduce: turn thumb-
wheel :clockwise or anti-clockwise
(Y page 115).
Only change the temperature setting in
small increments. Start at 22 †.
THERMOTRONIC automatic climate
control Different temperatures can be set for the
driver's and front-passenger sides.
X Turn the key to position 2in the ignition
lock.
X To increase/reduce: turn controls:and
B (Ypage 116) clockwise or anti-clock-
wise.
Only change the temperature setting in
small increments. Start at 22 †. 118
Operating the climate control systemClimate control
Page 130 of 321
not be able to brake, declutch or accelerate
as intended. This could lead to accidents and
injury. G
WARNING
Do not change down for additional engine
braking on a slippery roa dsurface. This could
cause the drive wheels to lose their grip and
the vehicle could skid. This could cause you
to lose control of your vehicle and cause an
accident.
! Warm up the engine quickly. Do no tuse
the engine's full performance until it has
reached operating temperature.
Only set the automatic transmission to the
respective drive positions when the vehicle
is stationary.
Where possible, avoid spinning the drive
wheels when pulling away on slippery
roads. Otherwise, you could damage the
drive train.
! AMG vehicles: at low engine oil temper-
atures (below +20 †), the maximum
engine speed is restricted in order to pro-
tect the engine. To protect the engine and
maintain smooth engine operation, avoid
driving at full throttle when the engine is
cold. Key positions
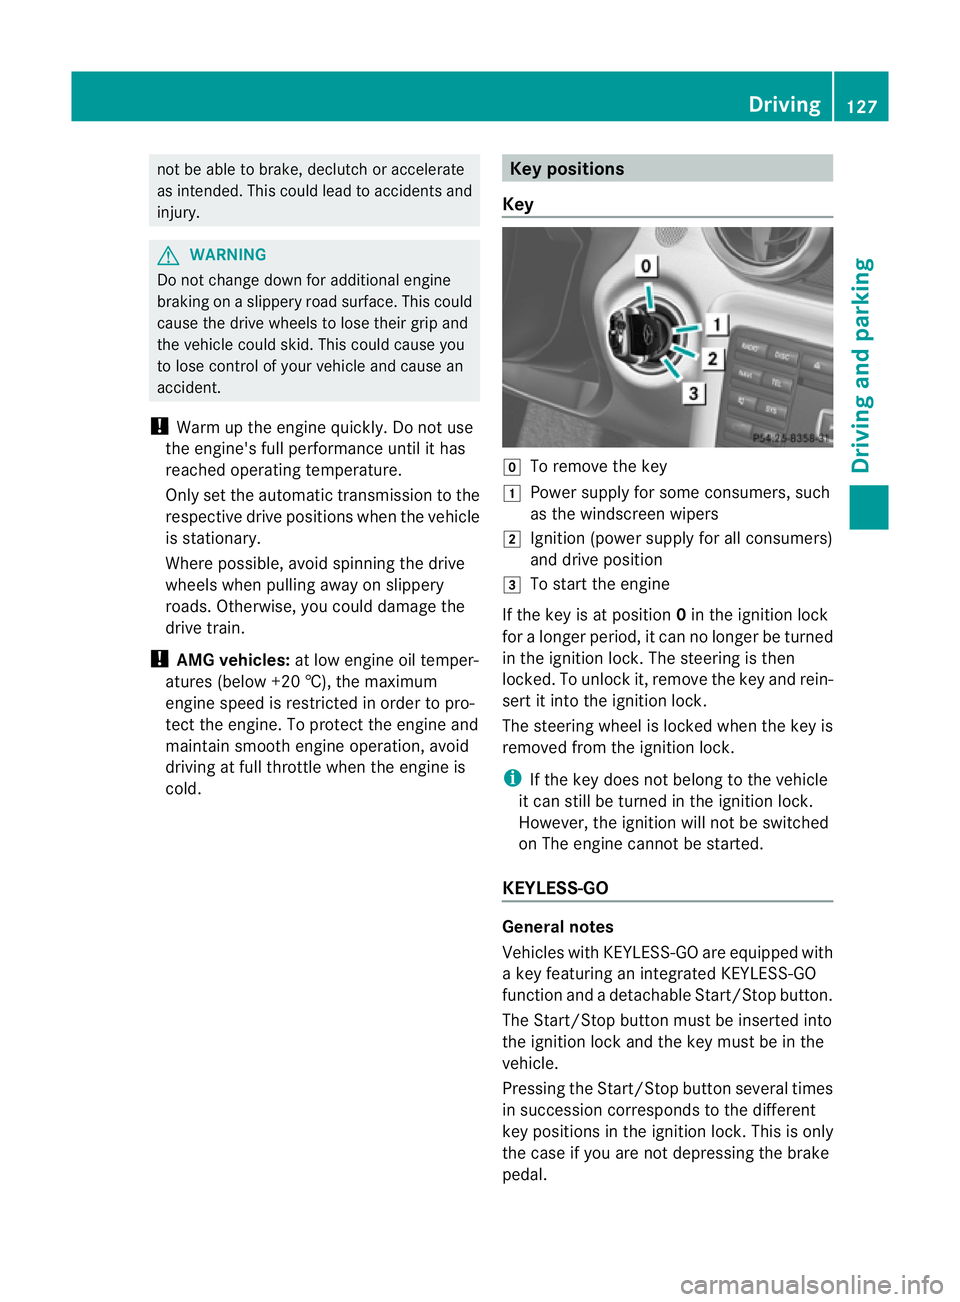
Key g
To remove the key
1 Power supply for some consumers, such
as the windscreen wipers
2 Ignition (power supply for all consumers)
and drive position
3 To start the engine
If the key is at position 0in the ignition lock
for a longer period, it can no longer be turned
in the ignition lock. The steering is then
locked. To unlock it, remove the key and rein-
sert it into the ignition lock.
The steering wheel is locked when the key is
removed from the ignition lock.
i If the key does not belong to the vehicle
it can still be turned in the ignition lock.
However, the ignition will not be switched
on The engine cannot be started.
KEYLESS-GO General notes
Vehicles with KEYLESS-GO are equipped with
a key featuring an integrated KEYLESS-GO
function and a detachable Start/Stop button.
The Start/Stop button must be inserted into
the ignition lock and the key must be in the
vehicle.
Pressing the Start/Stop button several times
in succession corresponds to the different
key positions in the ignition lock. This is only
the case if you are not depressing the brake
pedal. Driving
127Driving and parking Z
Page 132 of 321
Manual transmission
X
Depress the brake pedal and keep it
depressed.
X Fully depress the clutch pedal.
X Shift to neutral N.
i You can only start the engine when the
clutch pedal is fully depressed.
Automatic transmission X
Shift the transmission to position P.
The transmission position display in the
multifunction display shows P.
i You can also start the engine when the
transmission is in position N.
Starting procedure with the key i
To start the engine using the key instead
of KEYLESS-GO, pullt he Start/Stop button
out of the ignition lock.
X To start a petrol engine: turn the key to
position 3in the ignition lock
(Y page 127) and release it as soon as the
engine is running.
X To startad iesel engine: turn the key to
position 2in the ignition lock
(Y page 127).
The % preglow indicator lamp in the
instrumen tcluster lights up.
X When the %preglow indicator lamp
goes out, tur nthe key to position 3
(Y page 127) and release it as soon as the
engine is running.
i You can start the engine without preglow
if the engine is warm.
i Vehicles with automatic transmis-
sion: you can also use the touch-start func-
tion. To do this, turn the key to position 3
(Y page 127) and release it immediately.
The engine then starts automatically. Using KEYLESS-GO to startt
he engine G
WARNING
You rvehicle can be started using a valid KEY-
LESS-GO key. For this reason, children should
never be left unsupervised in the vehicle.
Always take the key with you when leaving the
vehicle, even if you are only leaving it for a
short time.
i The Start/Stop button can be used to
start the vehicle manually without inserting
the key into the ignition lock. The key must
be in the vehicle and the Start/Stop button
must be inserted in the ignition lock. This
mode for starting the engine operates inde-
pendently of the ECO start/stop automatic
engine start function.
X Depress the brake pedal and keep it
depressed.
X To star tapetrol engine: press the Start/
Stop button (Y page 127) once.
The engine starts.
X To start adiesel engine: press the Start/
Stop button (Y page 127) once.
Preglow is activated and the engine starts. Pulling away
Manual transmission X
Depress the brake pedal and keep it
depressed.
X Fully depress the clutch pedal.
X Shift to either first gear or reverse gear R.
X Release the electric parking brake
(Y page 147).
X Release the brake pedal.
X Slowly release the clutch pedal and gently
depress the accelerato rpedal.
! Change gear in good time and avoid spin-
ning the wheels. Otherwise, you could dam-
age the vehicle. Driving
129Driving and parking Z
Page 138 of 321
Problem Possible causes/consequences and
M Solutions
The coolant tempera-
ture display is showing
more than 120 †. The
coolant warning lamp
may also be lit and a
warning tone may
sound. The coolant level is too low. The coolant is too hot and the engine
is no longer being cooled sufficiently.
X Stop as soon as possible and allow the engine and the coolant
to cool down.
X Check the coolant level (Y page 251). Observe the warning
notes as you do so and top up the coolant if necessary. If the coolant level is correct, the engine radiator fan may be faulty.
The coolant is too hot and the engine is no longer being cooled
sufficiently.
X If the coolant temperature is less than 120 †, you can continue
driving to the nearest qualified specialist workshop.
X Avoid heavy loads on the engine as you do so, e.g. driving on
mountain roads and stop-start traffic. Manual transmission
Important safety notes
G
WARNING
The movement of the pedals must not be
impaired in any way. Do not keep any objects
in the driver's footwell. Make sure that floor-
mats or carpets are correctly secured and
that there is sufficient clearance for the ped-
als.
Do not place several floormats on top of one
another. G
WARNING
Do not change down for additional engine
braking on a slippery road surface. This could
cause the drive wheels to lose their grip and
the vehicle could skid. This could cause you
to lose control of your vehicle and cause an
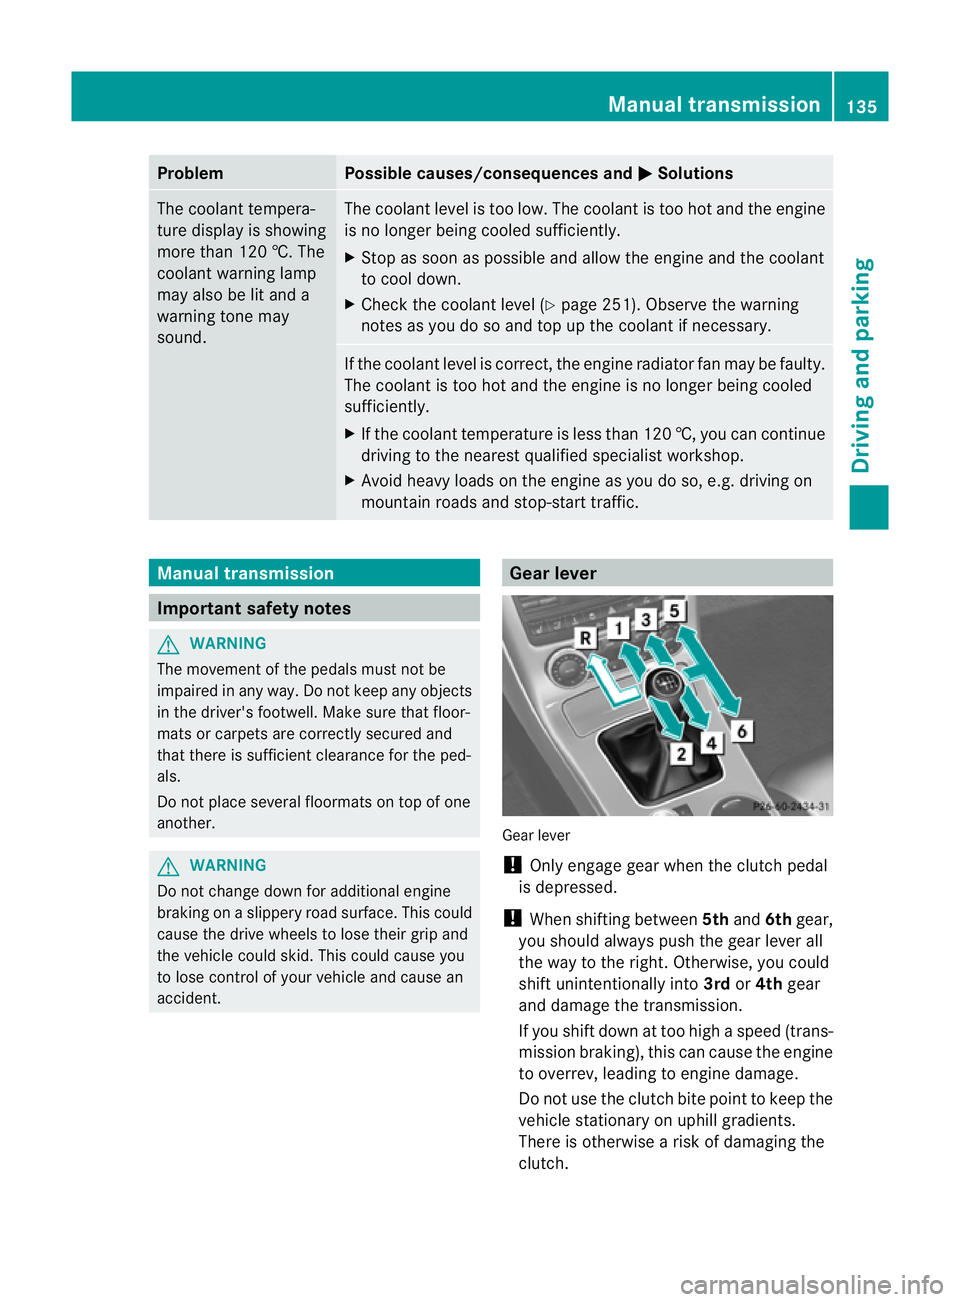
accident. Gear lever
Gear lever
!
Only engage gear when the clutch pedal
is depressed.
! When shifting between 5thand 6thgear,
you should always push the gear lever all
the way to the right. Otherwise, you could
shift unintentionally into 3rdor4th gear
and damage the transmission.
If you shift down at too high a speed (trans-
mission braking), this can cause the engine
to overrev, leading to engine damage.
Do not use the clutch bite point to keep the
vehicle stationary on uphill gradients.
There is otherwise a risk of damaging the
clutch. Manual transmission
135Driving and parking Z
Page 139 of 321
Neutral N with ECO start/stop func-
tion activated
In neutral N, the engine is switched off if the
vehicle speed is below a certai nthreshold and
the clutch pedal is not depressed.
For further information on the ECO start/stop
function, see (Y page 131). Engaging reverse gear
! Only shift into reverse gear Rwhen the
vehicle is stationary. Otherwise, you could
damage the transmission.
i The ECO start/stop function is not avail-
able when reverse gear is engaged.
For further information on the ECO start/
stop function, see (Y page 131).
X Move the gear lever firmly to the left
beyond the point of resistance and then
forwards. Shift recommendation
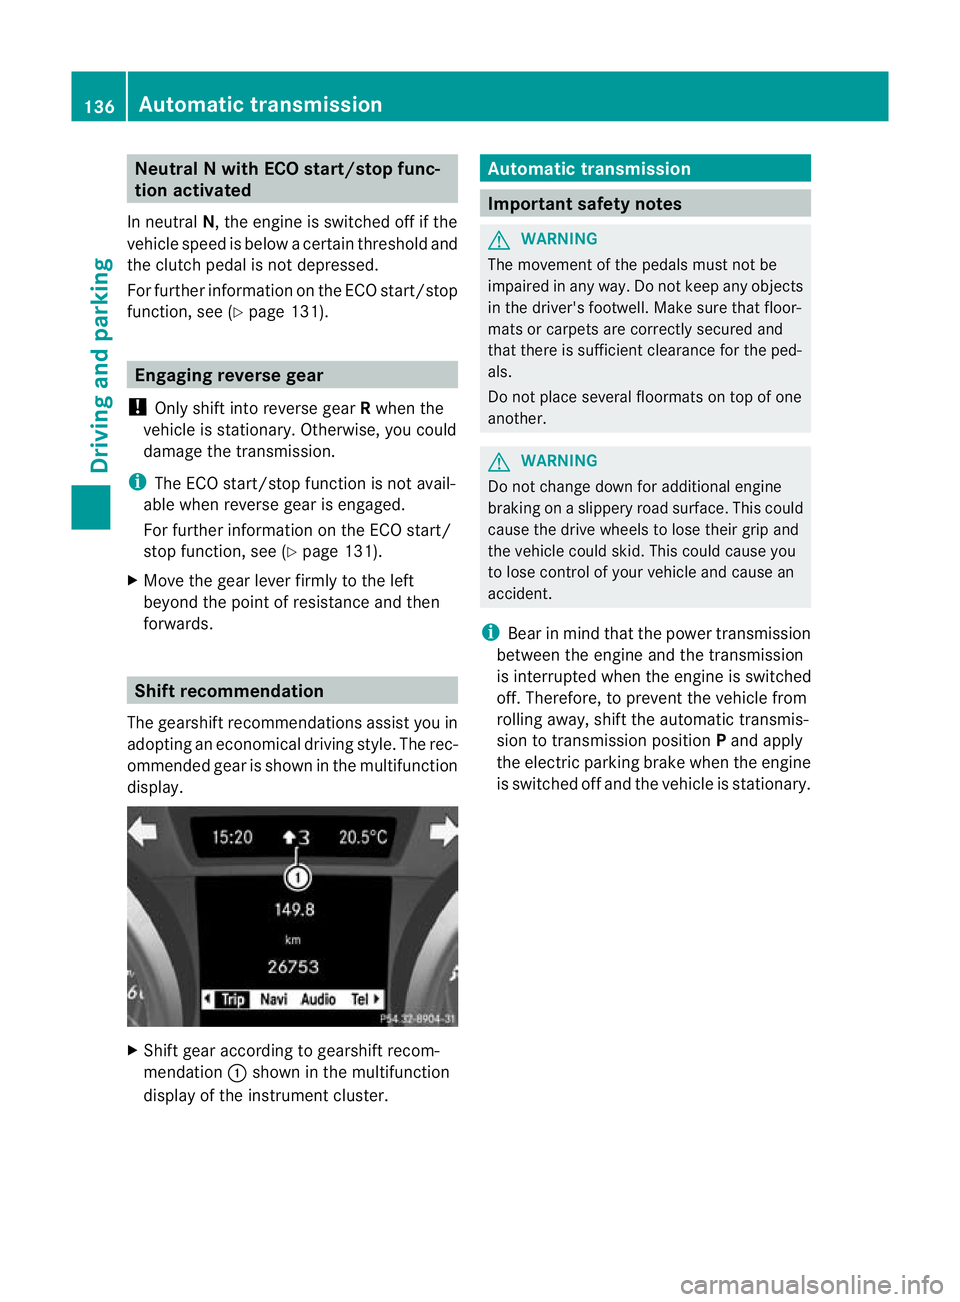
The gearshift recommendations assist you in
adopting an economical driving style. The rec-
ommended gear is shown in the multifunction
display. X
Shift gear according to gearshift recom-
mendation :shown in the multifunction
display of the instrumentc luster. Automatic transmission
Important safety notes
G
WARNING
The movemen tofthe pedals must not be
impaired in any way.D o not keep any objects
in the driver's footwell. Make sure that floor-
mats or carpets are correctly secured and
that there is sufficient clearance for the ped-
als.
Do not place several floormats on top of one
another. G
WARNING
Do not change down for additional engine
braking on a slippery road surface. This could
cause the drive wheels to lose their grip and
the vehicle could skid. This could cause you
to lose control of your vehicle and cause an
accident.
i Bear in mind that the power transmission
between the engine and the transmission
is interrupted when the engine is switched
off. Therefore, to prevent the vehicle from
rolling away, shift the automatic transmis-
sion to transmission position Pand apply
the electric parking brake when the engine
is switched off and the vehicle is stationary. 136
Automatic transmissionDriving and parking