2012 MERCEDES-BENZ SLK ROADSTER spare wheel
[x] Cancel search: spare wheelPage 10 of 321
Switching on/of
f........................... 117
Switching residual hea ton/off ......122
Switching the rear window heat-
ing on/off ...................................... 120
Switching the ZONE function on/
off .................................................. 119
THERMOTRONIC (2-zone) auto-
matic climate control .....................116
Cockpit
Overview .......................................... 26
see Instrument cluster
Collapsible emergency spare
wheel
see Emergency spare wheel
COMAND Online
see separate operating instructions
Combination switch ..........................103
Constant headlamp mode see Daytime driving lamps
Consumption statistics (on-board
computer) .......................................... 183
Convenience closing feature ..............77
Convenience opening/closing (air-
recirculation mode) ........................... 121
Convenience opening feature see Side windows
Coolan t(engine)
Checkin gthe level ......................... 251
Display message ............................ 211
Notes ............................................. 308
Temperature (on-board computer) .195
Temperature gauge ........................ 178
Warning lamp ................................. 231
Cooling
see Climate control
Cornering light function
Function/notes ............................. 104
Cornering light function (display
message) ............................................ 208
Crash-responsive emergency light-
ing ....................................................... 106
Cruise control Cruise control leve r....................... 151
Deactivating ................................... 153
Display message ............................ 217
Driving system ............................... 151
Important safety notes ..................151LIM indicator lamp
.........................151
Selecting ........................................ 152
Setting aspeed .............................. 153
Storing and maintaining current
speed ............................................. 152
Cup holder ......................................... 239 D
Dashboard see Cockpit
Data
see Technical data
Daytime driving lights
Display message ............................ 210
Switching on/off (on-board com-
puter) ............................................. 191
Switching on/off (switch) ..............101
Dealership
see Qualified specialist workshop
Delaye dswitch-off
Exterio rlighting (on-board com-
puter )............................................. 192
Interior lighting .............................. 193
Diagnostics connection ......................22
Diesel ................................................. .305
Diesel particle filter ..........................148
Digital speedometer .........................184
Dipped-beam headlamps Changing bulbs .............................. 108
Display message ............................ 208
Setting for driving abroad (sym-
metrical) ........................................ 100
Setting for driving on the right/
left ................................................. 192
Switching on/off ........................... 101
Display (cleaning instructions) ........257
Display message General information .......................199
Hiding (on-board computer) ...........199
KEYLESS-GO .................................. 222
Display messages
ASSYST PLUS service interval dis-
play................................................ 252
Calling up (on-board computer) .....199
Driving systems ............................. 213
Engine ............................................ 211
Key ................................................ 222 Index
7
Page 12 of 321
Running-in tips ..............................
.126
Snow chains .................................. 289
Symmetrical dipped bea m............. 100
Tyr egrip ........................................ 150
Wet road surface ........................... 149
DVD audio (on-board computer) ......186
Dynamic handling package Function/notes ............................. 164 E
EASY-ENTRY feature Activating/deactivating .................194
Function/notes ................................ 93
EASY-EXIT feature
Crash-responsive ............................. 93
Function/notes ................................ 93
Switching on/off ........................... 194
EBD (electronic brake force distri-
bution)
Display message ............................ 202
Function/notes ................................ 59
ECO start/stop function
Deactivating/activating .................132
General information .......................131
Important safety notes ..................130
Electrical fuses
see Fuses
Electronic brake force distribution
see EBD (electronic brake force
distribution)
Electronic Brake force Distribution
see EBD (Electronic Brake force
Distribution)
Electronic Stability Program
see ESP ®
(Electroni cStability Program)
Electronic Traction System
see ETS (Electronic Traction System)
Emergenc ykey
Unlocking the driver's door ..............73
Emergency key element
Function/notes ................................ 68
Locking vehicle ................................ 73
Emergency release
Driver's door .................................... 73Emergency spare wheel
Inflating the collapsible spare
wheel ............................................. 270
Notes/data .................................... 297
Storage location ............................ 262
Stowing .......................................... 262
Emergency unlocking
Boot ................................................. 75
Vehicle ............................................. 73
Engine
Display message ............................ 211
ECO start/stop function ................130
Engine number ............................... 303
Jump-starting ................................. 277
Running irregularl y......................... 134
Starting problems ..........................134
Starting the engine with the key ....129
Starting with KEYLESS GO .............129
Stopping ........................................ 146
Tow-starting (vehicle) ..................... 281
Warning lamp (engine diagnos-
tics) ............................................... 231
Engine electronics
Notes ............................................. 301
Problem (fault) ............................... 134
Engine oil
Additives ........................................ 308
Checking the oil level ..................... 250
Checking the oil level using the
dipstick .......................................... 250
Display message ............................ 212
Filling capacity ............................... 307
Notes about oil grades ................... 307
Notes on oil level/consumption ....250
Temperature (on-board computer) .195
Topping up ..................................... 250
Viscosity ........................................ 308
Environmental protection
Note ................................................ .20
Returning an end-of-life vehicle .......20
ESP ®
(Electronic Stability Pro-
gram) AMG menu (on-board computer) ...196
Deactivating/activating (AMG
vehicles) .......................................... 57
Deactivating/activating (notes;
except AMG vehicles) ......................56
Display message ............................ 200 Index
9
Page 13 of 321
ETS
.................................................. 56
Function/notes ................................ 56
Important safety guidelines .............56
Warning lamp ................................. 228
ETS (Electronic Traction System) ....... 56
Exhaus ttail pipe (cleaning instruc-
tions) .................................................. 257
Exterior lighting see Lights
Exterior mirrors
Adjusting ......................................... 94
Anti-dazzle mode (automatic) ..........95
Folding in/ou t(automatically) .........95
Folding in/ou t(electrically) .............94
Folding in whe nlocking (on-board
computer) ...................................... 195
Out of position (troubleshooting) .....95
Parking position ............................... 95
Resetting ......................................... 95
Storing settings (memory func-
tion) ................................................. 96F
Fatigue Assist see ATTENTION ASSIST
Faul tmessage
see Display messages
Filler cap
see Fuel filler flap
Fire extinguisher ............................... 260
First-aid kit ......................................... 260
Flat tyre Changing a wheel/fitting the
spare wheel ................................... 266
MOExtended run-fla tsystem ......... 272
Preparing the vehicle .....................263
Raising the vehicle .........................268
TIREFIT kit ...................................... 263
see Emergency spare wheel
Floormat ............................................ .246
Foglamps Extended range .............................. 105
Switching on/off ........................... 101
Frequencies
Garage door opene r....................... 246
Mobile phone ................................. 301
Two-way radio ................................ 301 Front foglamps
Display message ............................ 210
Fron twindscreen
see Windscreen
Fuel
Additives ........................................ 305
Consumption statistic s.................. 183
Displaying the current consump-
tion ................................................ 183
Displaying the range ......................183
Fuel gauge ....................................... 28
Grade (petrol) ................................ 304
Important safety notes ..................303
Notes about consumption .............306
Notes for AMG vehicles .................304
Problem (malfunction) ...................145
Quality (diesel )............................... 305
Refuelling ...................................... .142
Tank content/reserve fuel .............304
Fuel filler flap Opening/closing .......143
Fuel level Calling up the range (on-board
computer) ...................................... 183
Gauge .............................................. 28
Fuel reserve
see Fuel
Fuel tank
Capacity ........................................ 304
Problem (malfunction) ...................145
Fuse allocation chart (vehicle tool
kit) ...................................................... 261
Fuses Allocation chart ............................. 282
Before changing ............................. 282
Fuse box in the boot ......................282
Fuse box in the engine compart-
ment .............................................. 282
Important safety notes ..................281 G
Garage door opener Clearing the memory .....................245
Frequencies ................................... 246
Notes ............................................. 24310
Index
Page 19 of 321
Settings
Factory (on-board computer) .........195
On-board computer .......................190
Setting the air distribution ...............119
Setting the airflow ............................119
SETUP (on-board computer) .............196
Short journeys (diesel particle fil-
ter) ...................................................... 148
Sidebag ................................................ 42
Side windows Convenience closing ........................77
Important safety notes ....................75
Opening/closing (front) ...................76
Opening/closing all. ........................76
Problem (malfunction) .....................78
resetting .......................................... 77
Snow chains ...................................... 289
Socket Centre console .............................. 241
Points to observe before use .........241
Under the armrest .........................241
Spare wheel
Storage location ............................ 262
Storing ........................................... 262
see Emergency spare wheel
Specialist workshop ............................ 22
Spectacles compartment .................237
Speed, controlling see Cruise control
Spee dLimit Assist
Activating/deactivating the warn-
ing function .................................... 189
Displayin g...................................... 189
Display message ............................ 213
Display message in the multifunc-
tion displa y.................................... 175
Important safety notes ..................174
Speedometer
Activating/deactivating the addi-
tional speedometer ........................191
Digita l............................................ 184
In the Instrument cluster .................28
Segments ...................................... 179
Selecting the unit of measure-
ment .............................................. 190
see Instrument cluster SPEEDTRONIC
Deactivating variabl e..................... 155
Display message ............................ 216
Function/notes ............................. 153
Important safety notes ..................153
LIM indicator lamp .........................154
Permanent ..................................... 156
Selecting ........................................ 154
Storing the current spee d.............. 155
Variabl e......................................... 154
SPORT handling mode
Activating/deactivating (AMG
vehicles) .......................................... 57
Warning lamp ................................. 229
SRS (Supplemental Restraint Sys-
tem)
Display message ............................ 207
Introduction ..................................... 39
Warning lamp ................................. 230
Warning lamp (function) ................... 39
Starting (engine) ................................ 128
Station see Radio
Steering (display message) ..............221
Steering wheel Adjusting (electrically). ....................93
Adjusting (manually). .......................92
Button overview ............................... 31
Cleaning ......................................... 258
Gearshift paddles ........................... 139
Important safety notes ....................92
Storing settings (memory func-
tion) ................................................. 96
Steering wheel gearshift paddles ....139
Stopwatch (RACETIMER) ................... 196
Stowage areas ................................... 236
Stowage compartment Spectacles compartment ...............237
Stowage compartments
Armrest (front) ............................... 237
Armrest (under) ............................. 237
Centre console .............................. 237
Cuph older..................................... 239
Door ............................................... 238
Glove compartment .......................236
Important safety information .........236
Luggage net ................................... 238
Rea rwall........................................ 23816
Index
Page 174 of 321
might therefore issue steering instructions
too soon. This may lead to a collision. For this
reason, you should avoid using Parking Guid-
ance in such situations. G
WARNING
Make sure that no persons or animals are in
the manoeuvring range. Otherwise, they
could be injured.
When PARKTRONIC is deactivated, Parking
Guidance is also unavailable.
Use Parking Guidance for parking spaces:
R that are parallel to the directio noftravel
R that are on straight roads, not bends
R that are on the same level as the road, i.e.
not on the pavement, for example. Parking
Guidance may not detect flat kerbs
Parking tips:
R on narrow roads, drive as closely as possi-
ble pastt he parking space.
R parking spaces that are littered, overgrown
or partially occupied by trailer drawbars
might be identified incorrectly or not at all.
R snowfall or heavy rain may lead to a parking
space being measured inaccurately.
R pay attention to the PARKTRONIC
(Y page 168) warning messages during the
parking procedure.
R when transporting a load which protrudes
from your vehicle, you must not use Parking
Guidance.
R never use Parking Guidance with snow
chains or an emergency spare wheel fitted.
R make sure that the tyre pressures are
always correct.T his hasadirec teffect on
the steering instructions.
R the way you rvehicle is positioned in the
parking space after parkin gis dependent
on various factors. These include the posi-
tion and shape of the vehicles parked in
front and behind it and the conditions of the
location. In some cases, Parking Guidance
may guide you too far or not far enough into
a parking space. In some cases, it may also lead you across or onto the kerb. If neces-
sary, cancel the parking procedure with
Parking Guidance.
! If unavoidable, you should drive over
obstacles such as kerbs slowly and not at
a sharp angle. Otherwise, you may damage
the wheels or tyres.
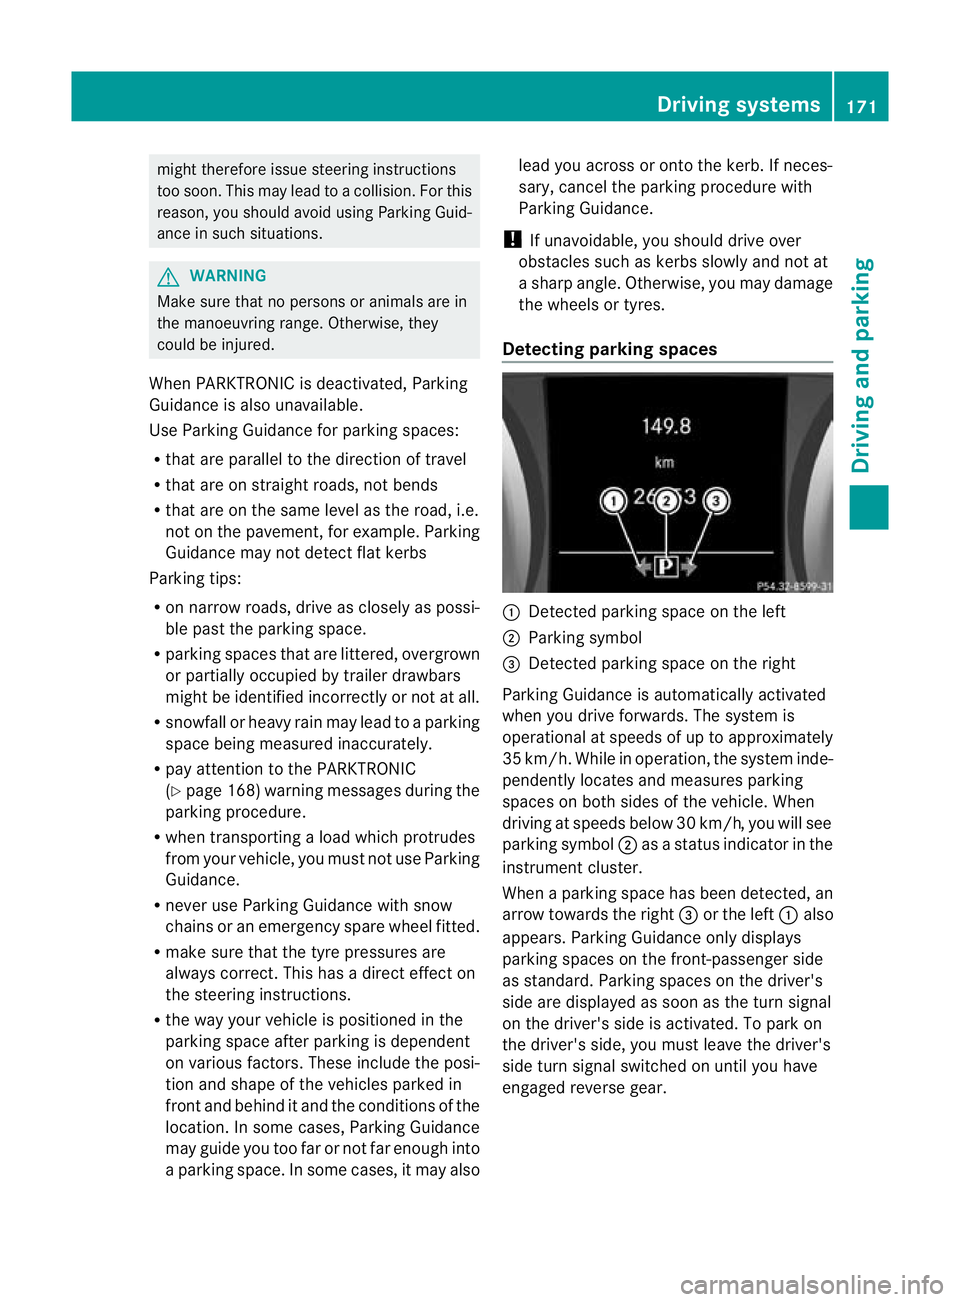
Detecting parking spaces :
Detected parking space on the left
; Parking symbol
= Detected parking space on the right
Parking Guidance is automatically activated
when you drive forwards. The system is
operational at speeds of up to approximately
35 km/h. While in operation, the system inde-
pendently locates and measures parking
spaces on both sides of the vehicle. When
driving at speeds below 30 km/h, you will see
parking symbol ;as a status indicator in the
instrument cluster.
When a parking space has been detected, an
arrow towards the right =or the left :also
appears. Parking Guidance only displays
parking spaces on the front-passenger side
as standard. Parking spaces on the driver's
side are displayed as soon as the turn signal
on the driver's side is activated. To park on
the driver's side, you must leave the driver's
side turn signal switched on until you have
engaged reverse gear. Driving systems
171Driving and parking Z
Page 264 of 321
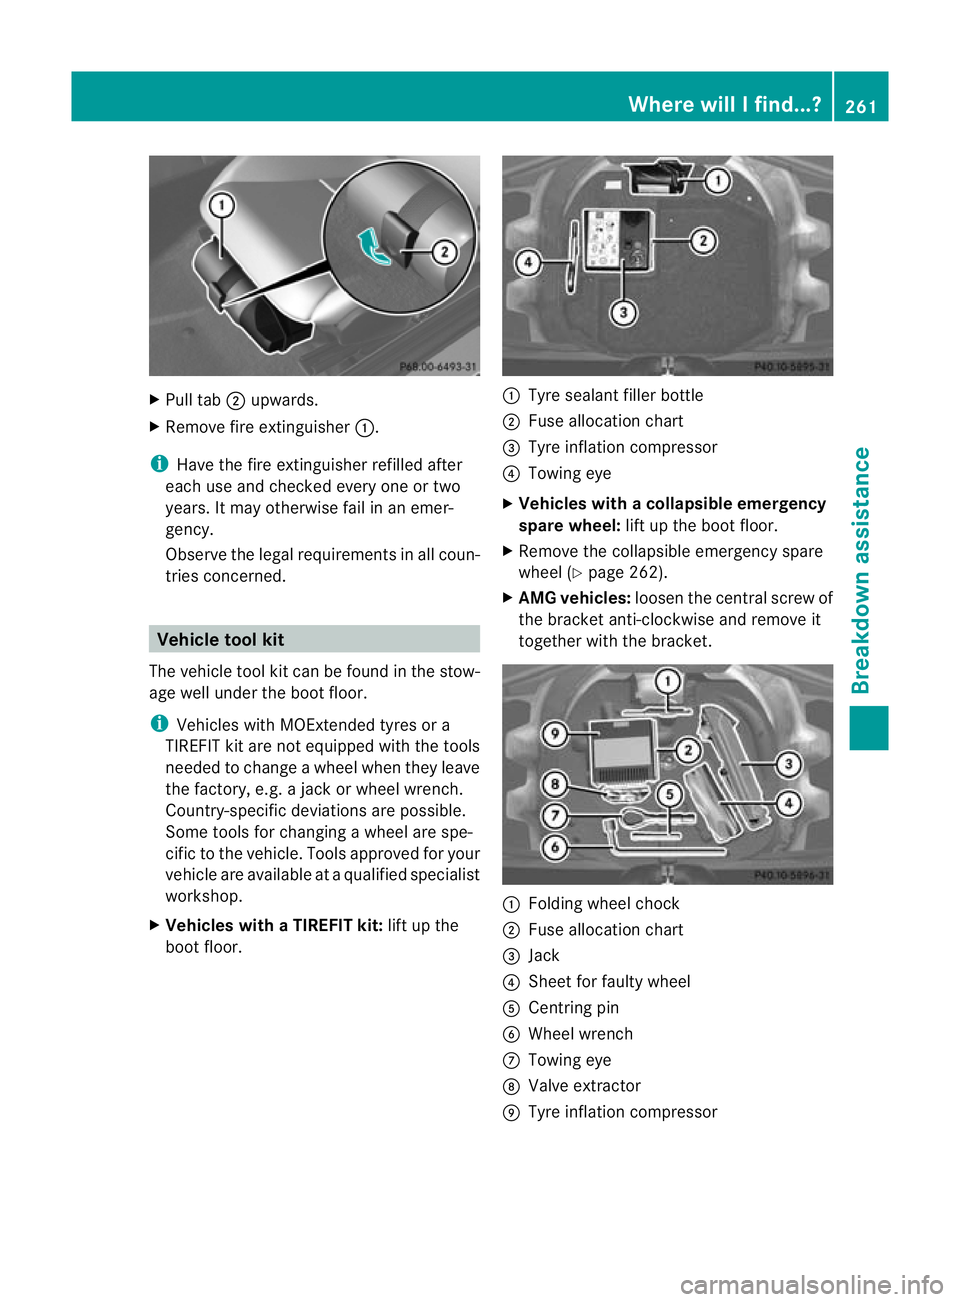
X
Pull tab ;upwards.
X Remove fire extinguisher :.
i Have the fire extinguisher refilled after
each use and checked every one or two
years. It may otherwise fail in an emer-
gency.
Observe the legal requirement sinall coun-
tries concerned. Vehicle tool kit
The vehicle tool kit can be found in the stow-
age well under the boot floor.
i Vehicles with MOExtended tyres or a
TIREFIT kit are not equipped with the tools
needed to change a wheel when they leave
the factory, e.g. a jack or wheel wrench.
Country-specific deviations are possible.
Some tools for changing awheel are spe-
cific to the vehicle. Tools approved for your
vehicle are available at a qualified specialist
workshop.
X Vehicles with a TIREFIT kit: lift up the
boot floor. :
Tyre sealant filler bottle
; Fuse allocation chart
= Tyre inflation compressor
? Towing eye
X Vehicles with acollapsible emergency
spare wheel: lift up the boot floor.
X Remove the collapsible emergency spare
wheel (Y page 262).
X AMG vehicles: loosenthe central screw of
the bracket anti-clockwise and remove it
together with the bracket. :
Folding wheel chock
; Fuse allocation chart
= Jack
? Sheet for faulty wheel
A Centring pin
B Wheel wrench
C Towing eye
D Valve extractor
E Tyre inflation compressor Where will I find...?
261Breakdown assistance
Page 265 of 321
Collapsible emergency spare wheel
Removing the collapsible emergency
spare wheel The collapsible emergency spare wheel can
be found in the stowage well unde rthe boot
floor.
AMG vehicles: the collapsible emergency
spare wheel is packed in a bag and secured
to a bracket in the boot. Example
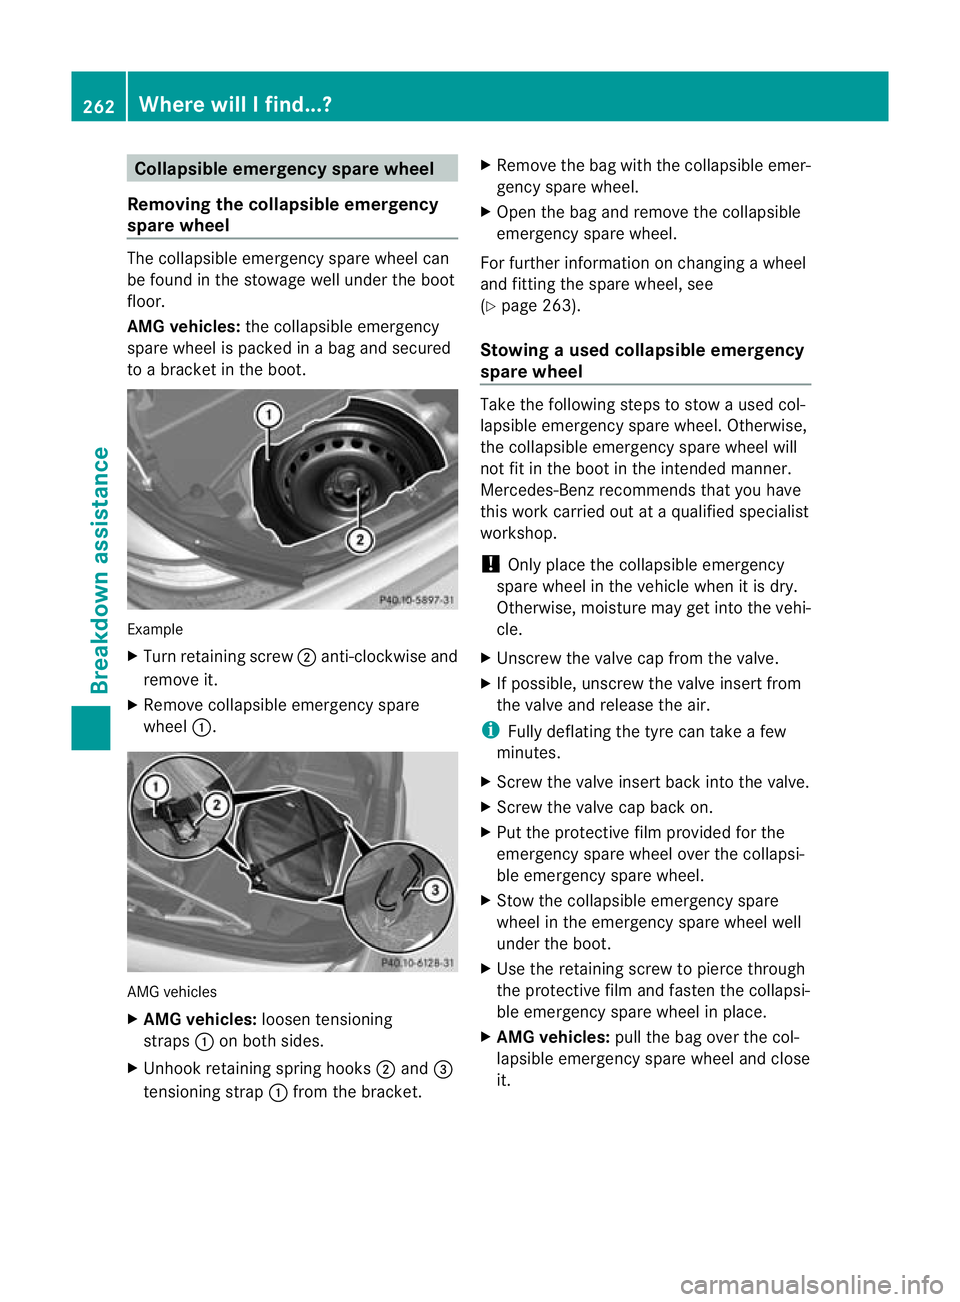
X
Turn retaining screw ;anti-clockwise and
remove it.
X Remove collapsible emergency spare
wheel :. AMG vehicles
X
AMG vehicles: loosen tensioning
straps :on both sides.
X Unhook retaining spring hooks ;and =
tensioning strap :from the bracket. X
Remove the bag with the collapsible emer-
gency spare wheel.
X Open the bag and remove the collapsible
emergency spare wheel.
For further information on changing a wheel
and fitting the spare wheel, see
(Y page 263).
Stowing aused collapsible emergency
spare wheel Take the following steps to stow a used col-
lapsible emergency spare wheel. Otherwise,
the collapsible emergency spare wheel will
not fit in the boot in the intended manner.
Mercedes-Benz recommends that you have
this work carried out at a qualified specialist
workshop.
!
Only place the collapsible emergency
spare wheel in the vehicle when it is dry.
Otherwise, moisture may get into the vehi-
cle.
X Unscrew the valve cap from the valve.
X If possible, unscrew the valve insert from
the valve and release the air.
i Fully deflating the tyre can take a few
minutes.
X Screw the valve insert back into the valve.
X Screw the valve cap back on.
X Put the protective film provided for the
emergency spare wheel over the collapsi-
ble emergency spare wheel.
X Stow the collapsible emergency spare
wheel in the emergency spare wheel well
under the boot.
X Use the retaining screw to pierce through
the protective film and fasten the collapsi-
ble emergency spare wheel in place.
X AMG vehicles: pull the bag over the col-
lapsible emergency spare wheel and close
it. 262
Where will I find...?Breakdown assistance
Page 266 of 321
X
Place the bag with the collapsible emer-
gency spare wheel in the boot.
X Hook in the retaining strap carabiners and
lash the collapsible emergenc yspare wheel
to the bracket. Flat tyre
Preparing the vehicle
Your vehicle may be equipped with:
R a TIREFIT kit
R an emergency spare wheel
R MOExtended tyres (tyres with run-flat char-
acteristics) (Y page 272)
i Vehicle preparation is not necessary on
vehicles with MOExtended tyres.
i Vehicles with MOExtended tyres are not
equipped with a TIREFIT kit at the factory.
It is therefore recommended that you addi-
tionally equip your vehicle with a TIREFIT kit
if you fit tyres that do not feature run-flat
characteristics, e.g. winter tyres. A TIREFIT
kit can be obtained from a Mercedes-Benz
Service Centre.
X Stop the vehicle as far away as possible
from traffic on solid, non-slippery and level
ground.
X Switch on the hazard warning lamps.
X Apply the electric parkin gbrake manually
(Y page 147).
X Bring the front wheels into the straight-
ahead position.
X Vehicles with manual transmission:
engage first or reverse gear.
X Vehicles with automatic transmission:
move the selector leve rtoP.
X Switch off the engine. X
Vehicles without KEYLESS-GO: remove
the key from the ignition lock.
X Vehicles with KEYLESS-GO: open the
driver's door.
The on-board electronics have status 0,
which is the same as the key having been
removed.
X Vehicles with KEYLESS-GO: remove the
Start/Stop button from the ignition lock
(Y page 127).
X All occupants must get out of the vehicle.
Make sure that they are not endangered as
they do so.
X Make sure that no one is near the danger
area whilst a wheel is being changed. Any-
one who is not directly assisting in the
wheel change should, for example, stand
behind the barrier.
X Get out of the vehicle. Pay attention to traf-
fic conditions when doing so.
X Close the driver's door.
X Place the warning triangle (Y page 260) a
suitable distance away.O bserve legal
requirements. TIREFIT kit
Using the TIREFIT kit TIREFIT is a tyre sealant.
You can use TIREFIT to seal punctures of up
to 4 mm, particularly those in the tyre tread.
You can use TIREFIT at outside temperatures
down to
Ò20 †. G
WARNING
In the following situations, the tyre sealant is
unable to provide sufficient breakdown assis-
tance, as it is unable to seal the tyre properly:
R there are cuts or punctures in the tyre
larger than those mentioned above.
R the wheel rim is damaged.
R you have driven at very low tyre pressures
or on a flat tyre. Flat tyre
263Breakdown assistance
Z