2012 MERCEDES-BENZ SLK ROADSTER coolant level
[x] Cancel search: coolant levelPage 14 of 321
Opening/closing the garage door
..245
Programming (button in the rear-
view mirror) ................................... 243
Gear indicator (on-board com-
puter) ................................................. .195
Gear or selector lever (cleaning
instructions) ...................................... 258
Gearshift program SETUP (on-board computer) ..........196
Genuine Mercedes-Benz parts .........300
Glove compartment ..........................236 H
Handbrake see Parking brake
Hazard warning lamps ......................103
Headbag Display message ............................ 208
Operation ........................................ .43
Headlamp
Cleaning system (function) ............102
Headlamp cleaning system
Notes ............................................. 309
Headlamps
Misting up ...................................... 105
Topping up the cleaning system ....252
see Automatic headlamp mode
Head level heating (AIRSCARF) ..........91
Head restraints Adjusting ......................................... 90
see NECK-PR Ohead restraints
Heating
see Climate control
High-pressure cleaners ....................254
Hill start assist .................................. 130
HOLD function Display message ............................ 213
Function/notes ............................. 165 I
Ignition lock see Key positions
Immobiliser .......................................... 61
Indicator and warning lamps Coolant .......................................... 231
DISTRONI CPLUS ........................... 233Engine diagnostics
.........................231
Fuel tank ........................................ 231
SPORT handling mode ...................229
Indicator lamps
Display message ............................ 208
see Warning and indicator lamps
Indicators
see Turn signals
Insectp rotection on the radiator ....250
Instrument cluster Overview .......................................... 28
Settings ......................................... 190
Warning and indicator lamps ...........30
Instrument cluster lighting ..............178
Instrument lighting see Instrument cluster lighting
Intelligen tLight System
Activating/deactivatin g................. 191
Display message ............................ 210
Overview ........................................ 104
Setting the dipped-bea mhead-
lamps for driving on the right/left .192
Interior lighting ................................. 105
Automatic control system ..............105
Delayed switch-off (on-board
computer) ...................................... 193
Emergency lighting ........................106
Manual control ............................... 106
Overview ........................................ 105
Reading lamp ................................. 105
Setting the ambient lighting
brightness (on-board computer) ....192
Interior motion sensor ........................62 J
Jack Storage location ............................ 261
Using ............................................. 268
Jump start (engine)
see Jump starting (engine)
Jump starting (engine) ......................277 K
Key Changing the battery .......................69
Checking the battery .......................69 Index
11
Page 125 of 321
X
Convenience closing feature: press and
hold the gbutton until the side win-
dows are closed.
The indicator lamp in the gbutton lights
up. Air-recirculation mode is activated.
X Convenience opening feature: press and
hold the gbutton until the side win-
dows are opened. The side windows move
back to their original positions.
The indicator lamp in the gbutton goes
out .Air-recirculation mode is deactivated.
i If you open the side windows manually
after closing them with the convenience
closing feature, they will remain in this posi-
tion when opened using the convenience
opening feature. Activating/deactivating the residual
heat function
It is possible to make use of the residual heat
of the engine to continue heating the station-
ary vehicle for up to 30 minutes after the
engine has been switched off .The heating
time depends on the temperature that has
been set.
Depending on the equipment level, the con-
trol panel has either the Ìbutton or the
Á button.
i The blower will run at a low speed regard-
less of the airflow setting.
i If you activate the residual heat function
at high temperatures, only the ventilation
will be activated. The blower runs at
medium speed.
X Turn the key to position 0in the ignition
lock or remove it.
X To switch on: press theÌorÁ but-
ton.
The indicator lamp in the ÌorÁ
button lights up. X
To deactivate: press theÌorÁ
button.
The indicator lamp in the ÌorÁ
button goes out.
i Residual heat is deactivated automati-
cally:
R after about 30 minutes
R when the ignition is switched on
R if the battery voltage drops
R if the coolant temperature is too low Adjusting the air vents
Important safety notes
G
WARNING
Very hot or very cold air can flow from the air
vents.T his could cause burns or frostbite to
bare skin in the immediate vicinity of the
vents.K eep bare skin away from these air
outlets. If necessary, direct the airflow away
to a different area of the vehicle interior.
In order to ensure the direct flow of fresh air
through the air vents into the vehicle interior,
please observe the following notes:
R keep the air inlet grille on the bonnet and
in the engine compartment on the front-
passenger side free of blockages, such as
ice, snow or leaves.
R never cover the vents or ventilation grilles
in the vehicle interior.
i You can move the adjuster sfor the air
vents vertically or horizontally, to set the
direction of the airflow.
i Optimal climate control function is ach-
ieved by opening the air vents fully and set-
ting the adjusters to the middle position. 122
Adjusting the air ventsClimate control
Page 138 of 321
Problem Possible causes/consequences and
M Solutions
The coolant tempera-
ture display is showing
more than 120 †. The
coolant warning lamp
may also be lit and a
warning tone may
sound. The coolant level is too low. The coolant is too hot and the engine
is no longer being cooled sufficiently.
X Stop as soon as possible and allow the engine and the coolant
to cool down.
X Check the coolant level (Y page 251). Observe the warning
notes as you do so and top up the coolant if necessary. If the coolant level is correct, the engine radiator fan may be faulty.
The coolant is too hot and the engine is no longer being cooled
sufficiently.
X If the coolant temperature is less than 120 †, you can continue
driving to the nearest qualified specialist workshop.
X Avoid heavy loads on the engine as you do so, e.g. driving on
mountain roads and stop-start traffic. Manual transmission
Important safety notes
G
WARNING
The movement of the pedals must not be
impaired in any way. Do not keep any objects
in the driver's footwell. Make sure that floor-
mats or carpets are correctly secured and
that there is sufficient clearance for the ped-
als.
Do not place several floormats on top of one
another. G
WARNING
Do not change down for additional engine
braking on a slippery road surface. This could
cause the drive wheels to lose their grip and
the vehicle could skid. This could cause you
to lose control of your vehicle and cause an
accident. Gear lever
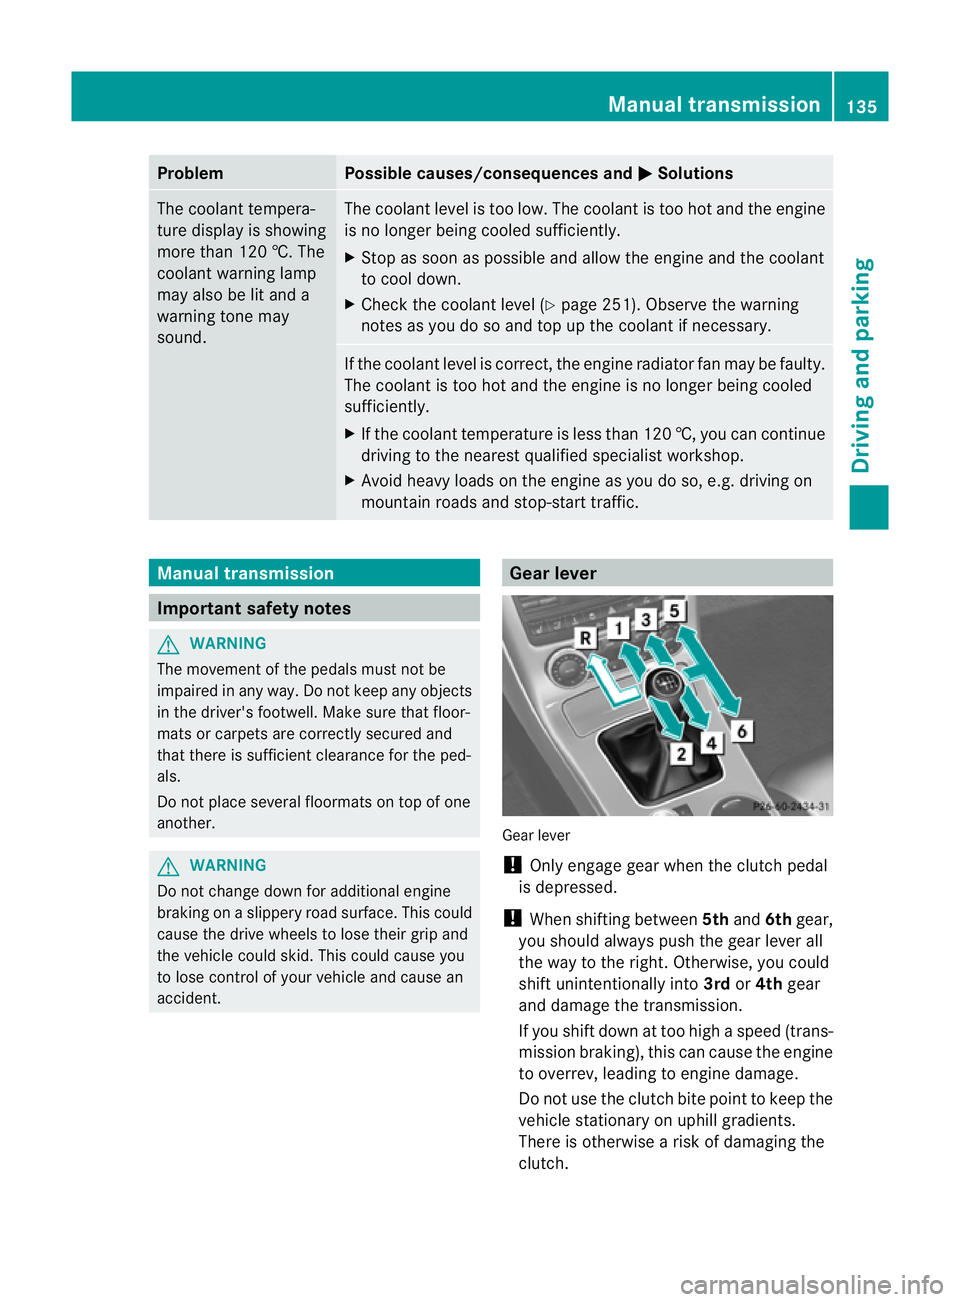
Gear lever
!
Only engage gear when the clutch pedal
is depressed.
! When shifting between 5thand 6thgear,
you should always push the gear lever all
the way to the right. Otherwise, you could
shift unintentionally into 3rdor4th gear
and damage the transmission.
If you shift down at too high a speed (trans-
mission braking), this can cause the engine
to overrev, leading to engine damage.
Do not use the clutch bite point to keep the
vehicle stationary on uphill gradients.
There is otherwise a risk of damaging the
clutch. Manual transmission
135Driving and parking Z
Page 214 of 321
Display messages Possible causes/consequences and
M Solutions
b
Malfunction See
Owner's Manual The exterio
rlighting is faulty.
X Visit a qualified specialist workshop. b
AUTO
lights inoper‐
ative The light sensor is faulty.
X
Visit a qualified specialist workshop. b
Switch off lights The lights are still switched on when you leave the vehicle. A
warning tone also sounds.
X
Turn the light switch to Ã.Engine
Displa
ymessages Possible causes/consequences and
M Solutions
+
Top
up coolant See
Owner's Manual The coolant level is too low.
X
Top up the coolant, observing the warning notes when doing so
(Y page 251).
X If the coolant needs topping up more often than usual, have the
engine coolant system checked at a qualified specialist work-
shop. ? The fan motor is faulty.
X
If the coolant temperature is below 120 †, you can continue
driving to the nearest qualified specialist workshop.
X Avoid heavy loads on the engine as you do so, e.g .driving in
mountainous terrain and stop-start traffic. ?
Coolant Stop vehi‐
cle Switch engine
off The coolant is too hot.
X
Stop the vehicle immediately, paying attention to road and traf-
fic conditions, and switch off the engine.
X Make sure that the air supply to the engine radiator is not
blocked, e.g. by frozen slush.
X Waitu ntil the display message disappears before restarting the
engine .The engine may otherwise be damaged.
X Pay attention to the coolant temperature display.
X If the temperature increases again, visit a qualified specialist
workshop immediately. Display messages
211On-board computer and displays Z
Page 234 of 321
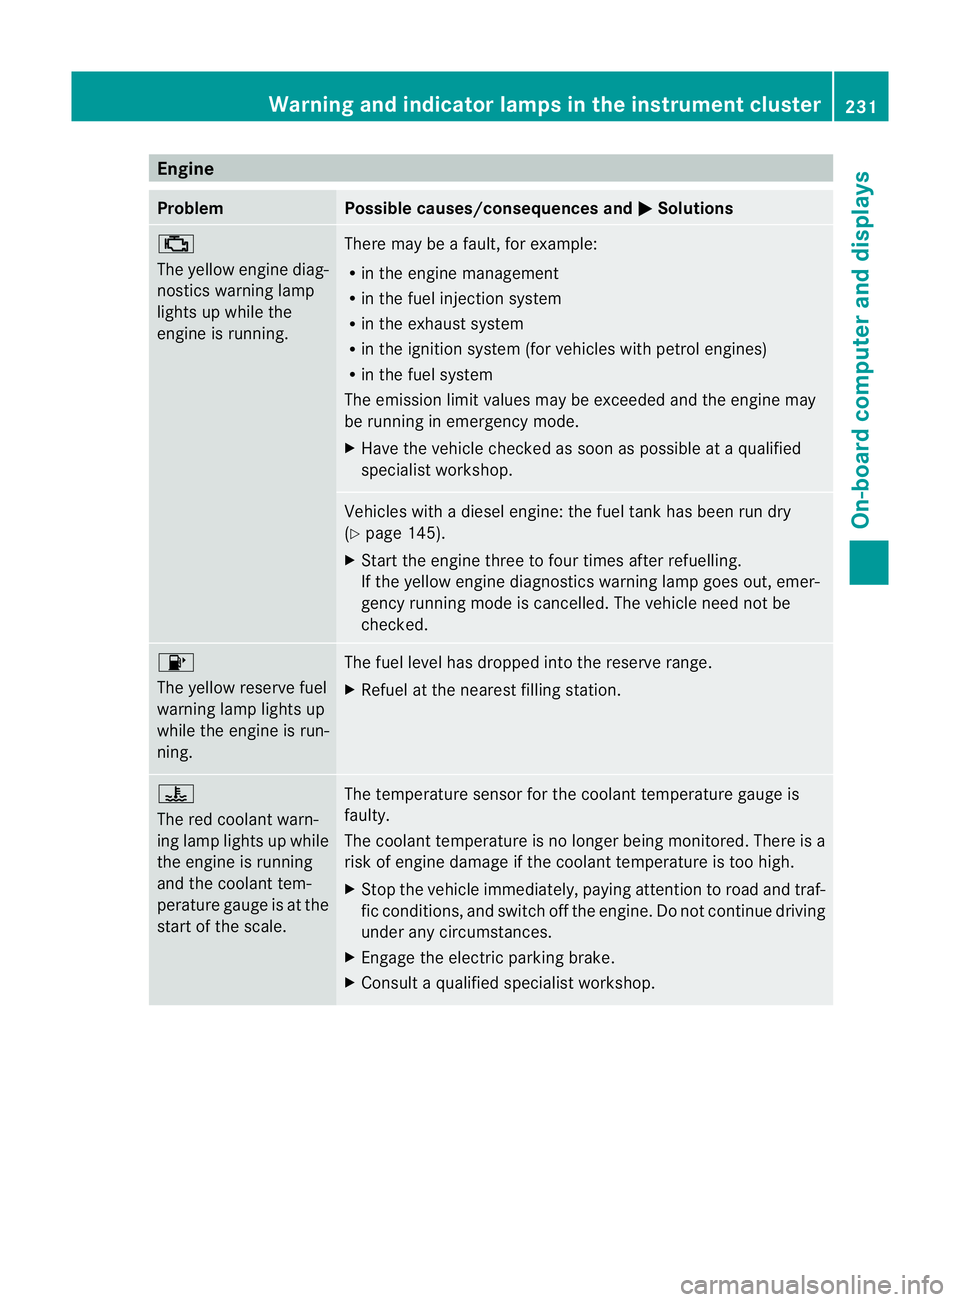
Engine
Problem Possible causes/consequences and
M Solutions
;
The yellow engine diag-
nostics warning lamp
lights up while the
engine is running.
There may be a fault, for example:
R in the engine management
R in the fuel injection system
R in the exhaust system
R in the ignition system (for vehicles with petrol engines)
R in the fuel system
The emission limit values may be exceeded and the engin emay
be running in emergency mode.
X Have the vehicle checked as soon as possible at a qualified
specialist workshop. Vehicles with a diesel engine: the fuel tan
khas been run dry
(Y page 145).
X Start the engine three to four times after refuelling.
If the yellow engine diagnostics warning lamp goes out, emer-
gency running mode is cancelled. The vehicle need no tbe
checked. 8
The yellow reserve fuel
warning lamp lights up
while the engine is run-
ning.
The fuel level has dropped into the reserve range.
X
Refuel at the nearest filling station. ?
The red coolant warn-
ing lamp lights up while
the engine is running
and the coolant tem-
perature gauge is at the
star toft he scale. The temperature sensor for the coolant temperature gauge is
faulty.
The coolant temperature is no longer being monitored. There is a
risk of engine damage if the coolant temperature is too high.
X Stop the vehicle immediately, paying attention to road and traf-
fic conditions, and switch off the engine. Do not continue driving
under any circumstances.
X Engage the electric parking brake.
X Consult a qualified specialist workshop. Warning and indicator lamps in the instrument cluster
231On-board computer and displays Z
Page 235 of 321
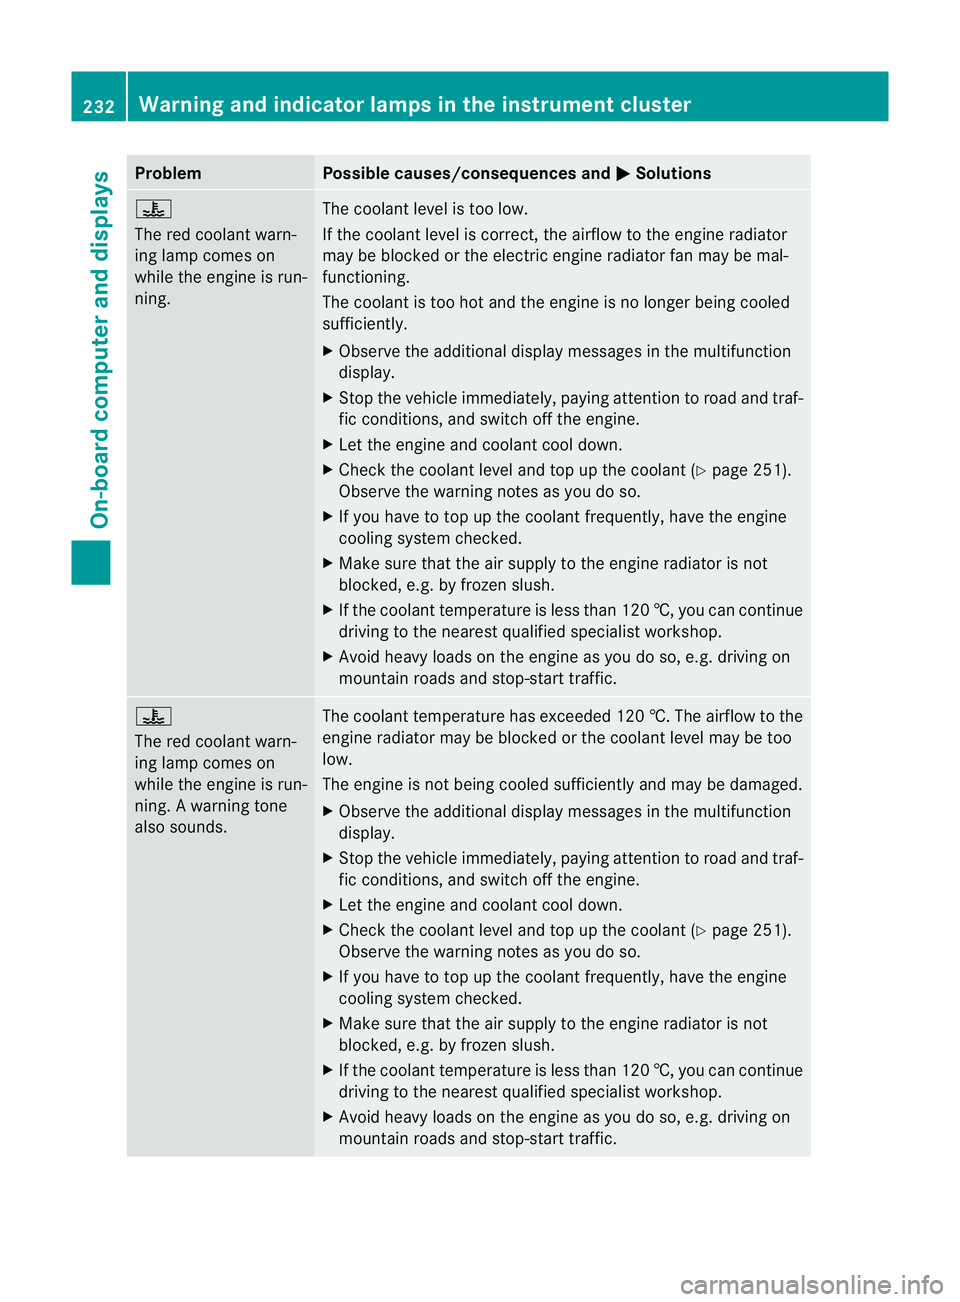
Problem Possible causes/consequences and
M Solutions
?
The red coolant warn-
ing lamp comes on
while the engine is run-
ning.
The coolant level is too low.
If the coolant level is correct, the airflow to the engine radiator
may be blocked or the electric engine radiator fan may be mal-
functioning.
The coolant is too hot and the engine is no longer being cooled
sufficiently.
X
Observe the additional display messages in the multifunction
display.
X Stop the vehicle immediately, paying attention to road and traf-
fic conditions, and switch off the engine.
X Let the engine and coolant cool down.
X Check the coolant level and top up the coolant (Y page 251).
Observe the warning notes as you do so.
X If you have to top up the coolant frequently, have the engine
cooling system checked.
X Make sure that the air supply to the engine radiator is not
blocked, e.g. by frozen slush.
X If the coolant temperature is less than 120 †, you can continue
driving to the nearest qualified specialist workshop.
X Avoid heavy loads on the engine as you do so, e.g. driving on
mountain roads and stop-start traffic. ?
The red coolant warn-
ing lamp comes on
while the engine is run-
ning. A warning tone
also sounds.
The coolant temperature has exceeded 120 †. The airflow to the
engine radiator may be blocked or the coolant level may be too
low.
The engine is not being cooled sufficiently and may be damaged.
X Observe the additional display messages in the multifunction
display.
X Stop the vehicle immediately, paying attention to road and traf-
fic conditions, and switch off the engine.
X Let the engine and coolant cool down.
X Check the coolant level and top up the coolant (Y page 251).
Observe the warning notes as you do so.
X If you have to top up the coolant frequently, have the engine
cooling system checked.
X Make sure that the air supply to the engine radiator is not
blocked, e.g. by frozen slush.
X If the coolant temperature is less than 120 †, you can continue
driving to the nearest qualified specialist workshop.
X Avoid heavy loads on the engine as you do so, e.g. driving on
mountain roads and stop-start traffic. 232
Warning and indicator lamps in the instrument clusterOn-board computer and displays
Page 254 of 321
H
Environmental note
When topping up the oil, take care not to spill
any. If oil enters the soil or waterways, it is
harmful to the environment.
! Only use engine oils and oil filters that
have been approved for vehicles with a
service system. You can obtain a list of the
engine oils and oil filters tested and
approved in accordance with the
Mercedes-Benz Specifications for Service
Products at any Mercedes-Benz Service
Centre.
Damage to the engine or exhaust system is
caused by the following:
R using engine oils and oil filters that have
not been specifically approved for the
service system
R changing the engine oil and oil filter after
missing the change interval required by
the service system
R using engine oil additives
! Do not add too much oil. Topping up with
too much engine oil can result in damage
to the engine or to the catalytic converter.
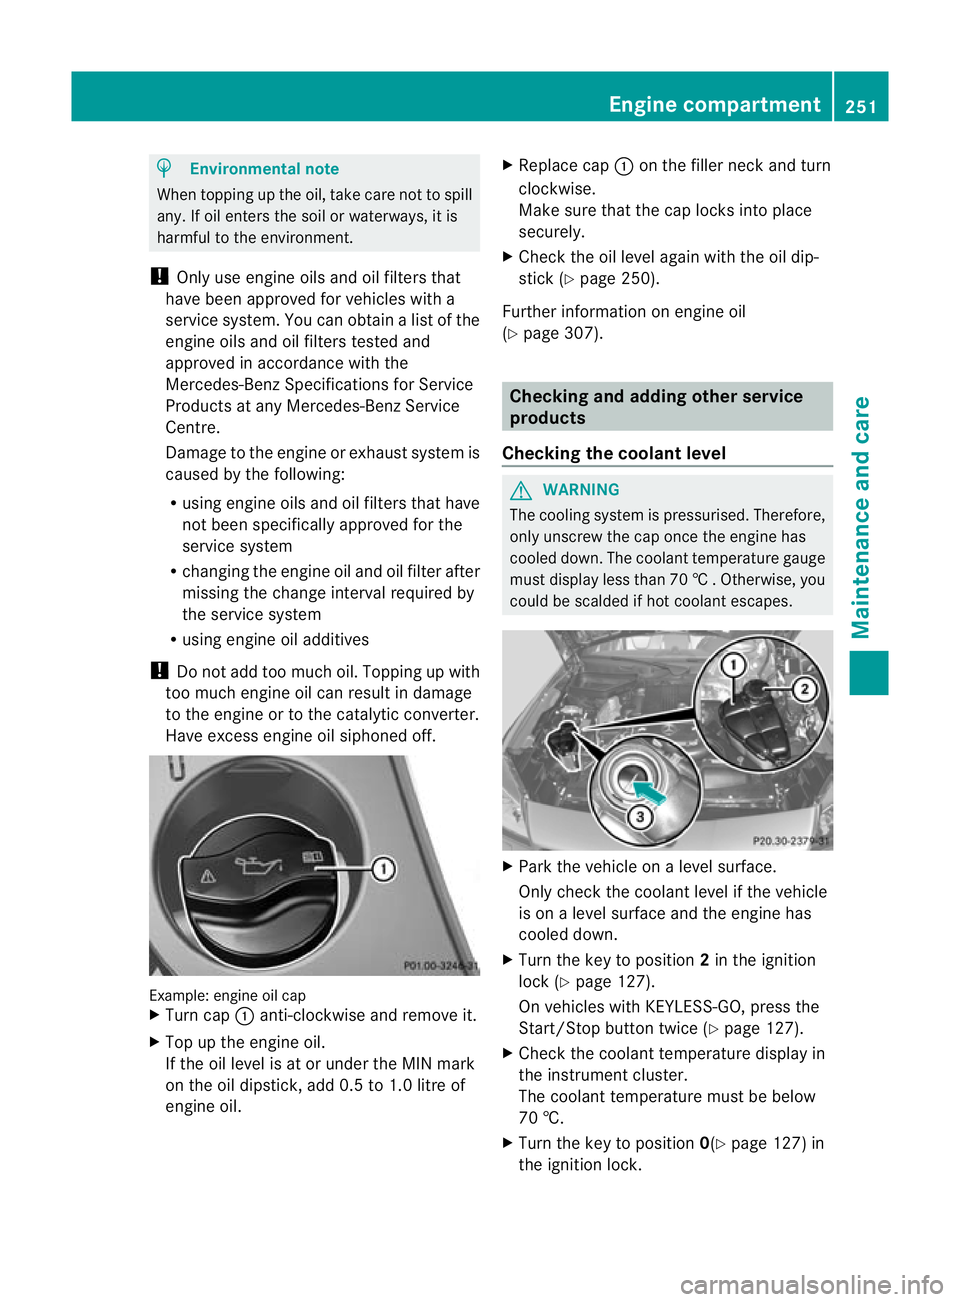
Have excess engine oil siphoned off. Example: engine oil cap
X
Turn cap :anti-clockwise and remove it.
X Top up the engine oil.
If the oil level is at or under the MIN mark
on the oil dipstick, add 0.5 to 1.0 litre of
engine oil. X
Replace cap :on the filler neck and turn
clockwise.
Make sure that the cap locks into place
securely.
X Chec kthe oil level again with the oil dip-
stick (Y page 250).
Further information on engine oil
(Y page 307). Checking and adding other service
products
Checking the coolant level G
WARNING
The cooling system is pressurised. Therefore,
only unscrew the cap once the engine has
cooled down. The coolant temperature gauge
must display less than 70 †.Otherwise, you
could be scalded if hot coolant escapes. X
Park the vehicle on a level surface.
Only check the coolant level if the vehicle
is on a level surface and the engine has
cooled down.
X Turn the key to position 2in the ignition
lock (Y page 127).
On vehicles with KEYLESS-GO, press the
Start/Stop button twice (Y page 127).
X Check the coolant temperature display in
the instrument cluster.
The coolant temperature must be below
70 †.
X Turn the key to position 0(Ypage 127) in
the ignition lock. Engine compartment
251Maintenance and care Z
Page 255 of 321
X
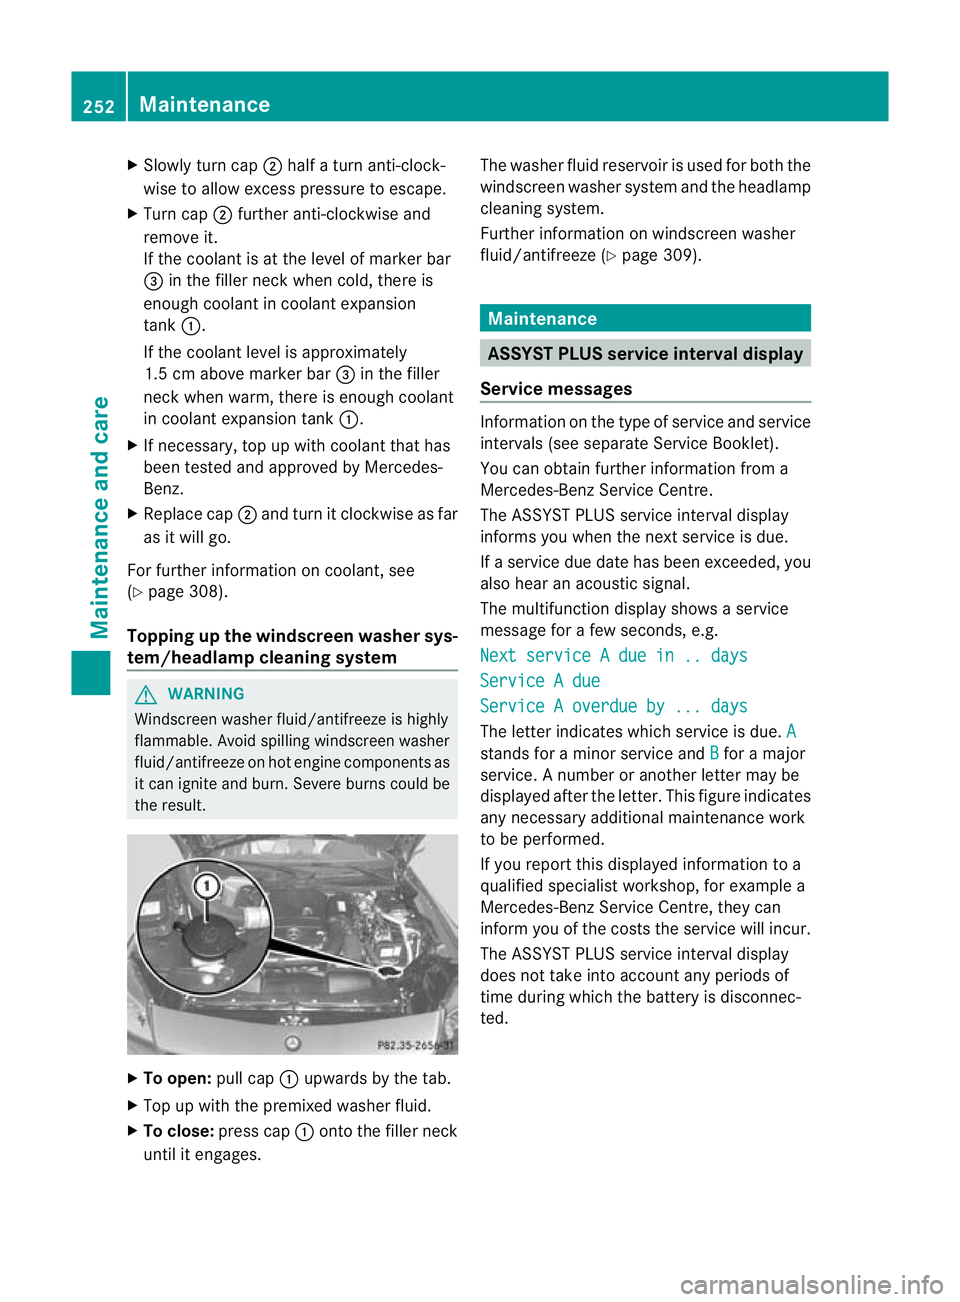
Slowly turn cap ;half a turn anti-clock-
wise to allow excess pressure to escape.
X Turn cap ;further anti-clockwise and
remove it.
If the coolant is at the level of marker bar
= in the fille rneck when cold, there is
enough coolant in coolant expansion
tank :.
If the coolant level is approximately
1.5 cm above marker bar =in the filler
neckw hen warm, there is enough coolant
in coolant expansion tank :.
X If necessary, top up with coolant that has
been tested and approved by Mercedes-
Benz.
X Replace cap ;and turn it clockwise as far
as it will go.
For further information on coolant, see
(Y page 308).
Topping up the windscreen washer sys-
tem/headlampc leaning systemG
WARNING
Windscreen washer fluid/antifreeze is highly
flammable. Avoid spilling windscreen washer
fluid/antifreeze on hot engine components as
it can ignite and burn. Severe burns could be
the result. X
To open: pull cap:upwards by the tab.
X Top up with the premixed washer fluid.
X To close: press cap :onto the filler neck
until it engages. The washer fluid reservoir is used for both the
windscreen washer syste mand the headlamp
cleaning system.
Further informatio nonwindscreen washer
fluid/antifreeze (Y page 309). Maintenance
ASSYST PLUS service interval display
Service messages Information on the type of service and service
intervals (see separate Service Booklet).
You can obtain further information from a
Mercedes-Benz Service Centre.
The ASSYST PLUS service interval display
informs you when the nex tservice is due.
If a service due date has been exceeded, you
also hear an acoustic signal.
The multifunction display shows a service
message for a few seconds, e.g.
Next service A due in .. days Service A due
Service A overdue by ... days
The letter indicates which service is due.
A stands for a minor service and
B for a major
service. A number or another letter may be
displayed after the letter. This figure indicates
any necessary additional maintenance work
to be performed.
If you report this displayed information to a
qualified specialist workshop, for example a
Mercedes-Benz Service Centre, they can
infor myou of the costs the service will incur.
The ASSYST PLUS service interval display
does not take into account any periods of
time during which the battery is disconnec-
ted. 252
MaintenanceMaintenance and care