2012 MERCEDES-BENZ SLK ROADSTER driver seat adjustment
[x] Cancel search: driver seat adjustmentPage 18 of 321
Refuelling
Fuelgauge ....................................... 28
Important safety notes ..................142
Refuelling proces s......................... 143
see Fuel
Releasing the parking loc kman-
ually (automatic transmission) ........142
Remote control Garage door opene r....................... 243
Programming (garage door
opener) .......................................... 243
Reserve (fuel tank)
see Fuel
Reserve fuel
Display message ............................ 212
Warning lamp ................................. 231
Residual heat (climate control) ........122
Restraint system see SRS (Supplemental Restraint
System)
Rev counter ........................................ 179
Reverse gear Engaging (automatic transmis-
sion) ............................................... 137
Engaging (manual transmission) ....136
Reversible floor (boot) ......................238
Reversing lamp Changing bulbs .............................. 109
Reversing lamps
Display message ............................ 210
Roof
Display message ............................ 221
Important safety notes ....................78
Opening/closing (with key) .............. 80
Opening/closing (with roof
switch) ............................................. 79
Problem (malfunction) .....................82
Relocking ......................................... 80
Roof carrier ........................................ 238
Roof lining and carpets (cleaning
instructions) ...................................... 258
Roof switch .......................................... 79
Route (navigation) see Route guidance (navigation)
Route guidance (navigation) ............184 S
Safety Childre ninthe vehicle ..................... 47
Child restraint systems ....................47
Safety systems
see Driving safety systems
Seat belt
Adjusting the driver's and front-
passenger sea tbelt ......................... 46
Belt force limiter .............................. 46
Belt tensione r.................................. 46
Cleaning ......................................... 258
Fastening ......................................... 45
Important safety guidelines .............44
Releasing ......................................... 46
Switching belt adjustment on/off
(on-board computer) ......................194
Warning lamp ................................. 224
Warning lamp (function) ................... 46
Seats
Adjusting (electrically). ....................90
Adjusting (manually )........................ 89
Adjusting the 4-way lumba rsup-
por t.................................................. 90
Adjusting the head restraint ............90
Cleaning the cover .........................258
Correct driver's seat position ........... 88
Important safety notes ....................89
Seat heating problem ......................91
Storing settings (memory func-
tion) ................................................. 96
Switching AIRSCARF on/off ............91
Switching sea theating on/off .........90
Sensors (cleaning instructions) .......257
Service see ASSYST PLUS service interval
display
Service Centre
see Qualified specialist workshop
Service menu (on-board computer) .190
Service products Brake fluid ..................................... 308
Coolant (engine) ............................ 308
Engine oil ....................................... 307
Fuel ................................................ 303
Important safety notes ..................303
Washer fluid .................................. .309 Index
15
Page 46 of 321
Headbags
Headbags enhance the level of protection for
the head, but not the chest or arms, of the
vehicle occupants in the front of the vehicle
on the side on which the impact occurs.
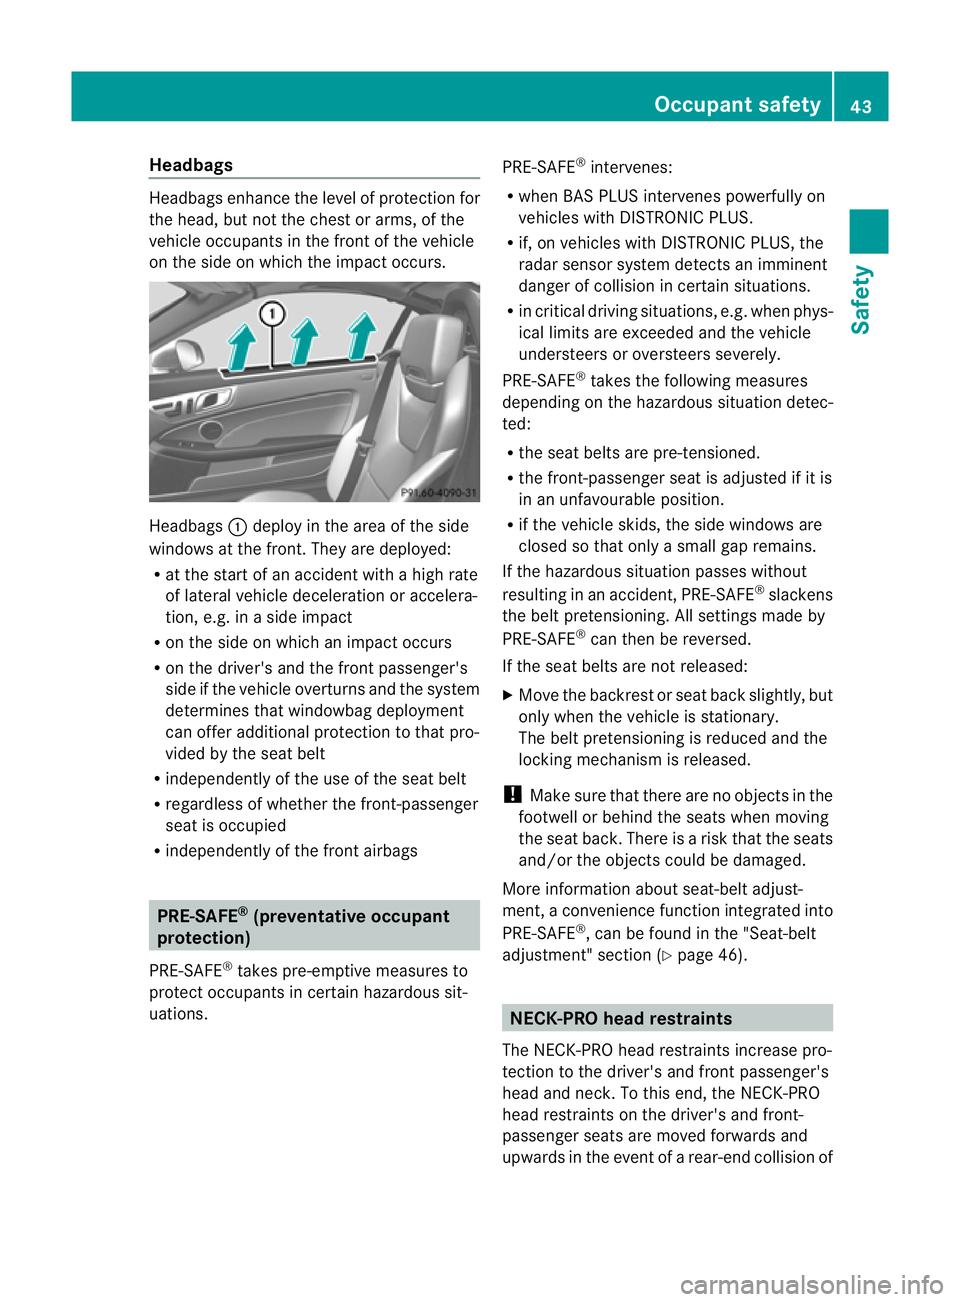
Headbags
:deploy in the area of the side
windows at the front. They are deployed:
R at the start of an accident with a high rate
of lateral vehicle deceleratio noraccelera-
tion, e.g. in a side impact
R on the side on which an impact occurs
R on the driver's and the front passenger's
side if the vehicle overturns and the system
determines that windowbag deployment
can offer additional protection to that pro-
vided by the sea tbelt
R independently of the use of the seat belt
R regardless of whether the front-passenger
seat is occupied
R independently of the fron tairbags PRE-SAFE
®
(preventative occupant
protection)
PRE-SAFE ®
takes pre-emptive measure sto
protect occupants in certain hazardous sit-
uations. PRE-SAFE
®
intervenes:
R when BAS PLUS intervenes powerfully on
vehicles with DISTRONIC PLUS.
R if, on vehicles with DISTRONIC PLUS, the
radar senso rsystem detects an imminent
danger of collision in certain situations.
R in critical driving situations, e.g. when phys-
ical limits are exceeded and the vehicle
understeers or oversteers severely.
PRE-SAFE ®
takes the following measures
depending on the hazardous situation detec-
ted:
R the seat belts are pre-tensioned.
R the front-passenger seat is adjusted if it is
in an unfavourable position.
R if the vehicle skids, the side windows are
closed so that only a small gap remains.
If the hazardous situation passes without
resulting in an accident, PRE-SAFE ®
slackens
the belt pretensioning. Al lsettings made by
PRE-SAFE ®
can then be reversed.
If the seat belts are not released:
X Move the backrest or seat back slightly, but
only when the vehicle is stationary.
The belt pretensioning is reduced and the
locking mechanism is released.
! Make sure that there are no objects in the
footwell or behind the seats when moving
the seat back. There is a risk that the seats
and/or the objects could be damaged.
More information about seat-belt adjust-
ment ,aconvenience function integrated into
PRE-SAFE ®
, can be found in the "Seat-belt
adjustment" section (Y page 46). NECK-PRO head restraints
The NECK-PRO head restraints increase pro-
tection to the driver's and front passenger's
head and neck.T o this end, the NECK-PRO
head restraints on the driver's and front-
passenger seats are moved forwards and
upwards in the event of a rear-end collision of Occupant safety
43Safety Z
Page 49 of 321
X
Adjust the seat and move the backrest to
an almos tvertical position (Y page 88).
X Pull the seat belt smoothly through belt
loop :.
X Without twisting it, guide the shoulder sec-
tion of the seat belt across the middle of
your shoulder and the lap section across
your hips.
X Engage belt tongue ;in buckle =.
Seat-belt adjustment:ifn ecessary, the
driver's and front-passenger seat belts
automatically adjust to the upper body
(Y page 46).
X If necessary, pull upwards on the shoulder
section of the seat belt to tighten the belt
across your body.
For more information about releasing the seat
belt with release button ?, see "Releasing
seat belts" (Y page 46).
Seat belt adjustment The seat-belt adjustment function adjusts the
driver's and front-passenger seat belt to the
upper body of the occupants.
The belt strap is tightened slightly when:
R
you engage the belt tongue in the belt
buckle and you then turn the key to position
2in the ignition lock.
R the key is in position 2in the ignition lock
and you then engage the belt tongue in the
buckle.
The seat-belt adjustment will apply a certain
tightening force if any slack is detected
between the occupan tand the sea tbelt. Do
not hold on to the seat belt tightly while it is
adjusting. You can switch the seat-belt
adjustment on and off in the on-board com-
puter (Y page 194).
The seat-belt adjustment is an integral part of
the PRE-SAFE ®
convenience function. More
information about PRE-SAFE ®
can be found
in the "PRE-SAFE ®
(preventative occupant
protection)" section (Y page 43). Releasing seat belts X
Press release button ?(Ypage 45) and
guide belt tongue ;back towards belt
loop :.
! Make sure that the seat belt is fully rolled
up. Otherwise, the seat belt or belt tongue
will be trapped in the door or in the seat
mechanism. This could damage the door,
the door trim panel and the seat belt. Dam-
aged seat belts can no longer fulfil their
protective function and must be replaced.
Visit a qualified specialist workshop.
Belt warning for driver and front
passenger The
7 seat belt warning lamp in the instru-
ment cluster is a reminder for all occupants
to fasten their seat belts. It may light up con-
tinuously or flash. In addition, there may be a
warning tone.
The 7 seat belt warning lamp goes out and
the warning tone ceases when the driver and
the fron tpassenger have fastened their seat
belt.
For certain countries only: regardless of
whether the driver and th efront passenger
have fastened their seat belts, the 7seat
beltw arning lamp lights up for six seconds
after the engine is started. It then goes out if
the driver and the fron tpassenger have fas-
tened their seat belts.
i For more information on the 7seat
belt warning lamp, see "Warning and indi-
cator lamps in the instrumen tcluster, seat
belt" (Y page 224).
Belt tensioners, belt force limiters The seat belts are fitted with belt tensioners.
The belt tensioners tighten the seat belts in
an accident, pulling the mclose against the
body.
Belt tensioners do not correct incorrect seat
positions or incorrectly fastened seat belts. 46
Occupant safetySafety
Page 91 of 321
Useful information
i This Owner's Manual describes all models
and all standard and optional equipment
available to your vehicle at the time of pub-
lication of the Owner's Manual. Country-
specific deviations are possible. Please
note that your vehicle may not be equipped
with all features described. This also
applies to safety-relevan tsystems and
functions.
i Please read the information on qualified
specialist workshops (Y page 22).Correct driver's sea
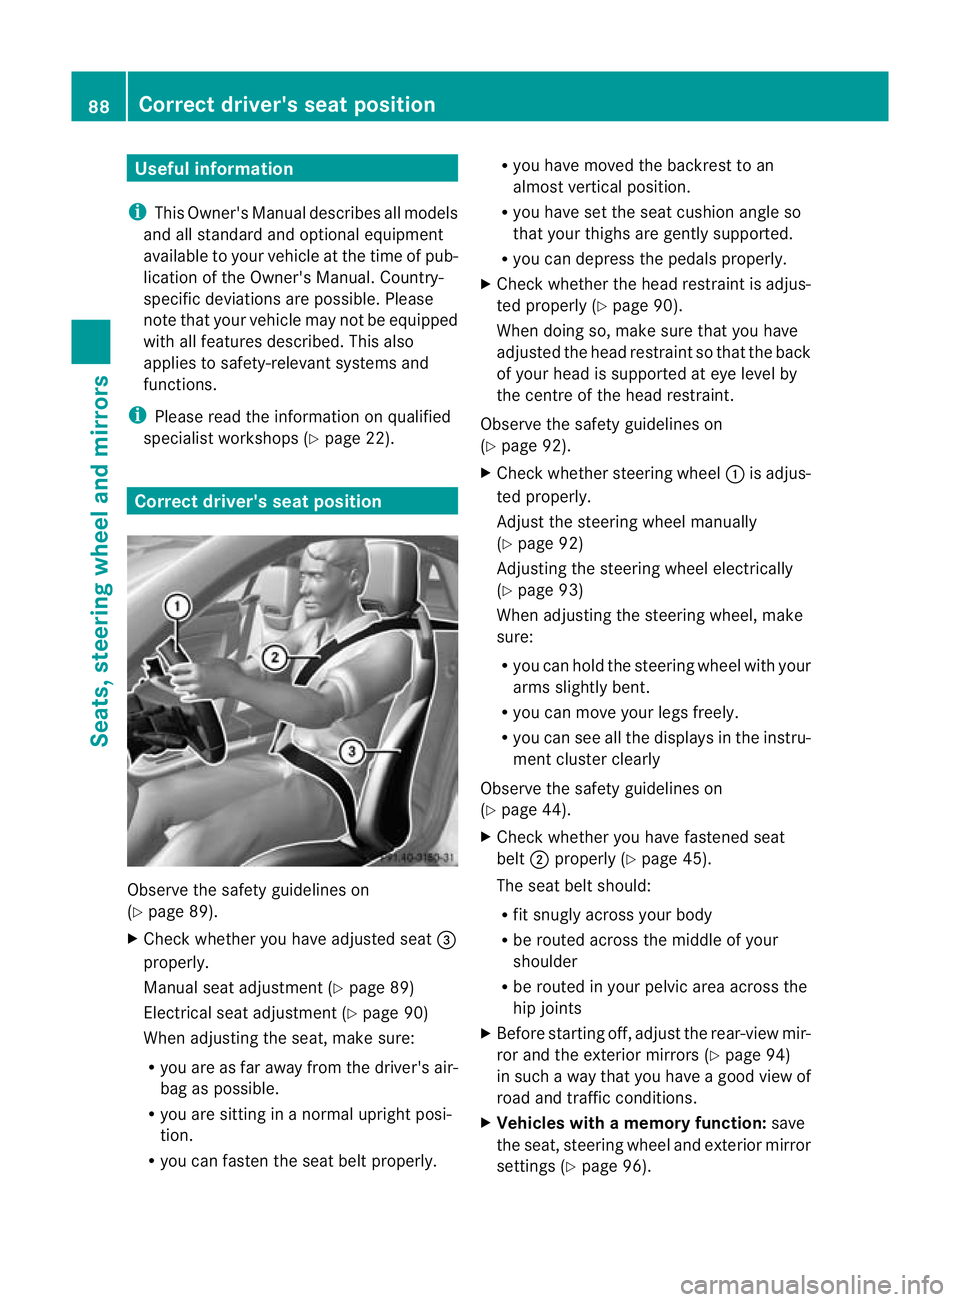
tposition Observe the safety guidelines on
(Y
page 89).
X Chec kwhether you have adjusted seat =
properly.
Manual seat adjustment (Y page 89)
Electrical seat adjustment (Y page 90)
When adjusting the seat, make sure:
R you are as far away from the driver's air-
bag as possible.
R you are sitting in a normal upright posi-
tion.
R you can fasten the seat belt properly. R
you have moved the backrest to an
almost vertical position.
R you have set the seat cushion angle so
that your thighs are gently supported.
R you can depress the pedals properly.
X Check whether the head restraint is adjus-
ted properly (Y page 90).
When doing so, make sure that you have
adjusted the head restraint so that the back
of your head is supported at eye level by
the centre of the head restraint.
Observe the safety guidelines on
(Y page 92).
X Check whether steering wheel :is adjus-
ted properly.
Adjust the steering wheel manually
(Y page 92)
Adjusting the steering wheel electrically
(Y page 93)
When adjusting the steering wheel, make
sure:
R you can hold the steering wheel with your
arms slightly bent.
R you can move your legs freely.
R you can see all the displays in the instru-
ment cluster clearly
Observe the safety guidelines on
(Y page 44).
X Check whether you have fastened seat
belt ;properly (Y page 45).
The seat belt should:
R fit snugly across your body
R be routed across the middle of your
shoulder
R be routed in your pelvic area across the
hip joints
X Before starting off, adjust the rear-view mir-
ror and the exterior mirrors (Y page 94)
in such a way that you have a good view of
road and traffic conditions.
X Vehicles with a memory function: save
the seat, steering wheel and exterior mirror
settings (Y page 96). 88
Correct driver's seat positionSeats, steering wheel and mirrors
Page 92 of 321
Seats
Important safety notes
G
WARNING
The seats can still be adjusted when there is
no key in the ignition lock. For this reason,
children should never be left unsupervised in
the vehicle. They could adjust the seats and
become trapped. G
WARNING
Only adjust the driver's seat when the vehicle
is stationary. You will otherwise be distracted
from the road and traffic conditions and you
could lose control of the vehicle as a result of
the seat moving. This could cause an acci-
dent. G
WARNING
Make sure that nobody can become trapped
when adjusting the seats.
Observe the notes on airbags.
Secure children as recommended; see the
"Children in the vehicle" section. G
WARNING
Make sure that the back of your head is sup-
ported at eye level by the central area of the
head restraint .Ifyour head is not supported
correctly by the head restraint, you could suf-
fer a severe neck injury in the event of an
accident .Never drive if the head restraints are
not engaged and set correctly.
! To avoid damage to the seats and the seat
heating, observe the following information:
R do not spill any liquids on the seats. If
liquid is spilled on the seats, dry them as
soon as possible.
R if the seat covers are damp or wet, do not
switch on the seat heating. The seat
heating should also not to be used to dry
the seats.
R clean the seat covers as recommended;
see the "Interior care" section. R
do not transport heavy loads on the
seats. Do not place sharp objects on the
seat cushions, e.g. knives, nails or tools.
The seats should only be occupied by
passengers, if possible.
R when the seat heating is in operation, do
not cover the seats with insulating mate-
rials, e.g. blankets, coats, bags, seat cov-
ers, child seats or booster seats.
! Make sure that there are no objects in the
footwell or behind the seats when moving
the seat back. There is a risk that the seats
and/or the objects could be damaged.
i The head restraints are fitted with the
NECK-PRO system (Y page 43). For this
reason, it is not possible to remove the
head restraints from the seats.
For more information, contact a qualified
specialist workshop. Adjusting the seats manually
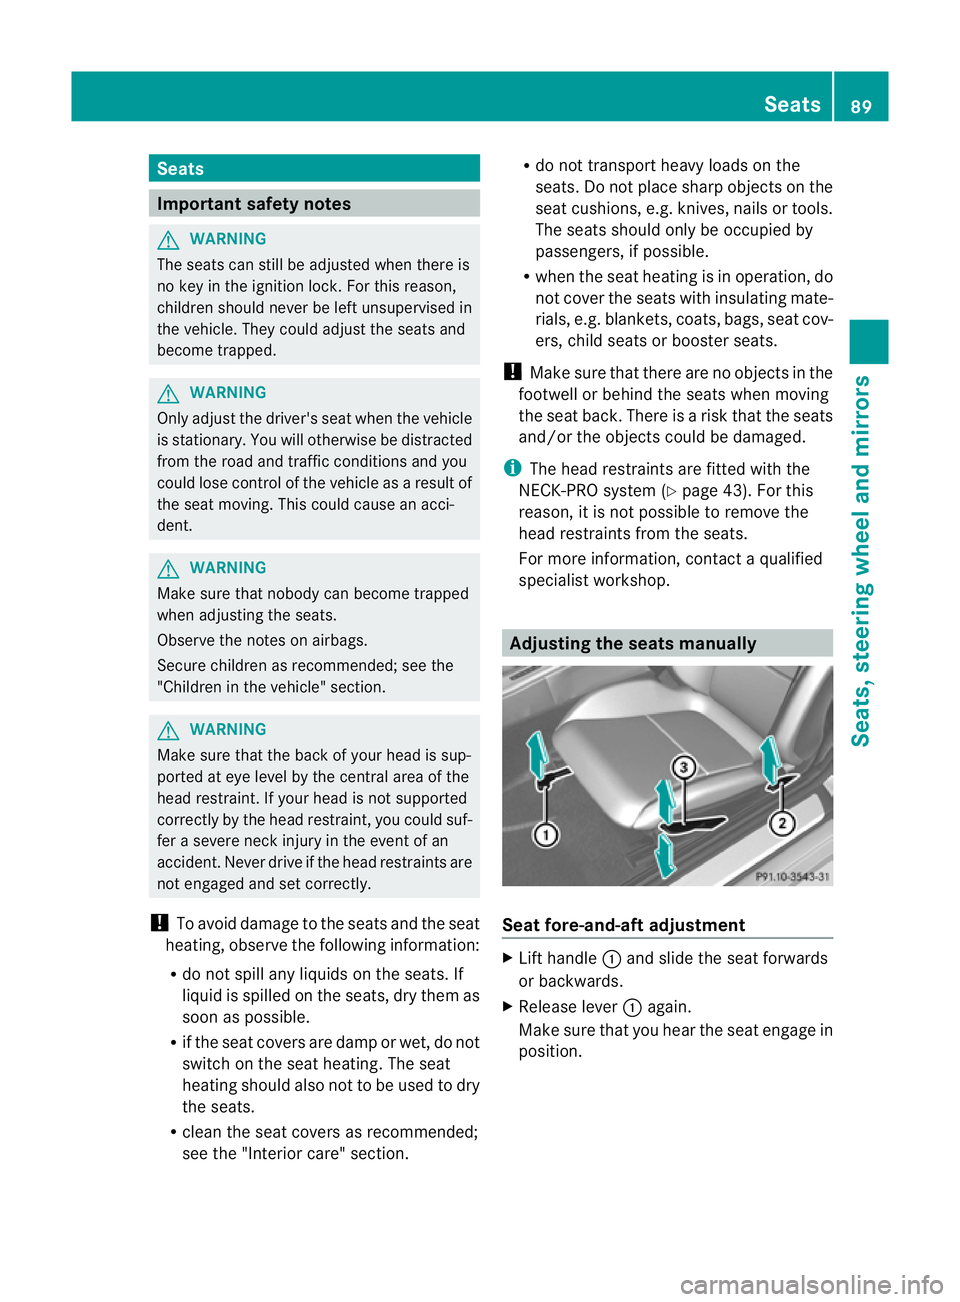
Seat fore-and-aft adjustment
X
Lift handle :and slide the seat forwards
or backwards.
X Release lever :again.
Make sure that you hear the seat engage in
position. Seats
89Seats, steering wheel and mirrors Z
Page 96 of 321
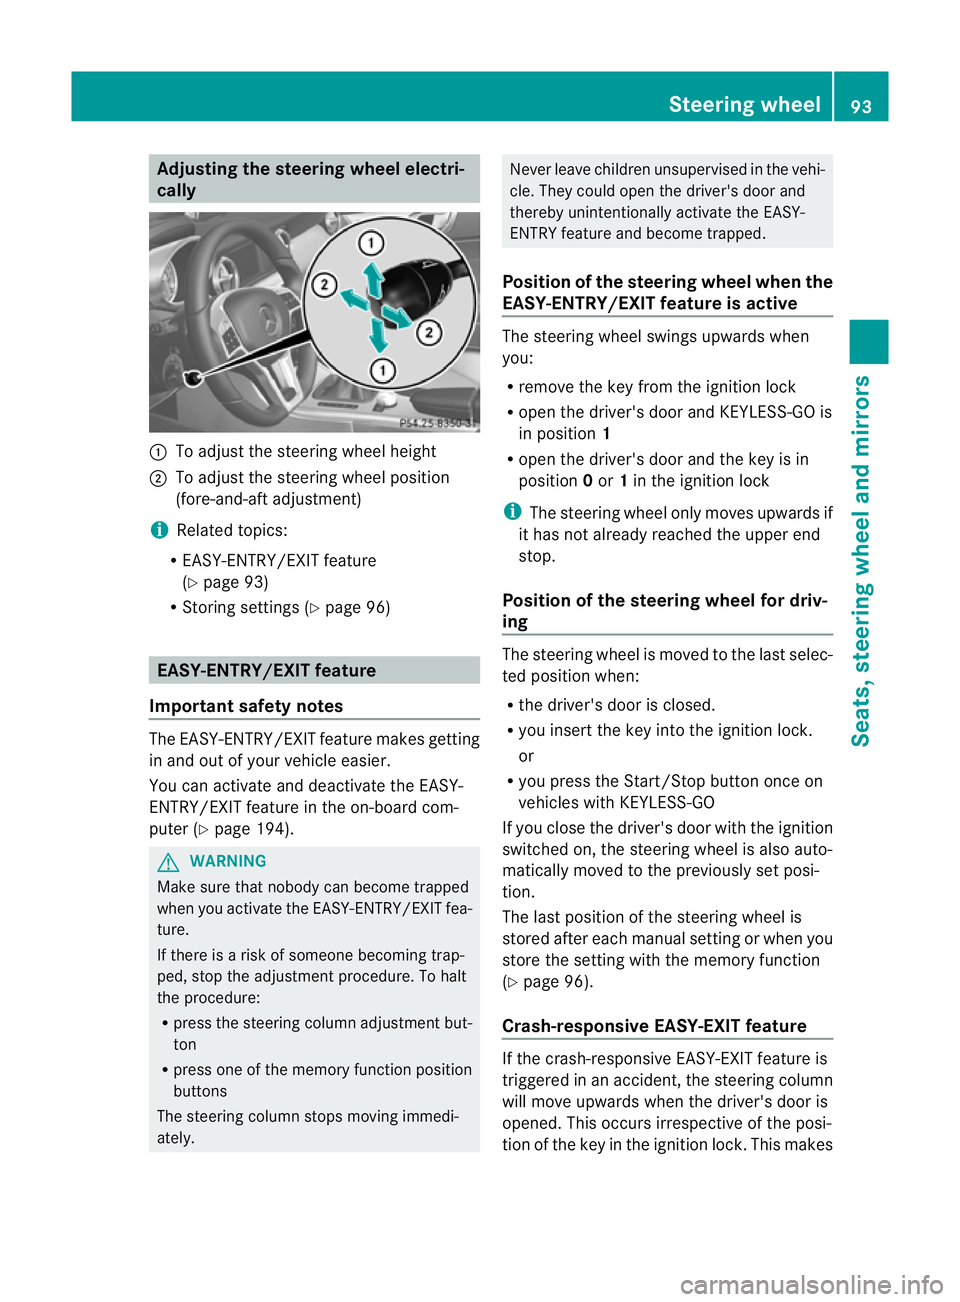
Adjusting the steering wheel electri-
cally :
To adjust the steering wheel height
; To adjust the steering wheel position
(fore-and-aft adjustment)
i Related topics:
R EASY-ENTRY/EXIT feature
(Y page 93)
R Storing settings (Y page 96) EASY-ENTRY/EXIT feature
Important safety notes The EASY-ENTRY/EXIT feature makes getting
in and out of your vehicle easier.
You can activate and deactivate the EASY-
ENTRY/EXIT feature in the on-board com-
puter (Y page 194). G
WARNING
Make sure that nobody can become trapped
when you activate the EASY-ENTRY/EXIT fea-
ture.
If there is a risk of someone becoming trap-
ped, stop the adjustmen tprocedure. To halt
the procedure:
R press the steering colum nadjustment but-
ton
R press one of the memory function position
buttons
The steering column stops moving immedi-
ately. Never leave children unsupervised in the vehi-
cle. They could open the driver's door and
thereby unintentionally activate the EASY-
ENTRY feature and become trapped.
Position of the steering wheel when the
EASY-ENTRY/EXIT feature is active The steering wheel swings upwards when
you:
R
remove the key from the ignition lock
R open the driver's door and KEYLESS-GO is
in position 1
R open the driver's door and the key is in
position 0or 1in the ignition lock
i The steering wheel only moves upwards if
it has not already reached the upper end
stop.
Position of the steering wheel for driv-
ing The steering wheel is moved to the last selec-
ted position when:
R
the driver's door is closed.
R you insert the key int othe ignition lock.
or
R you press the Start/Stop button once on
vehicles with KEYLESS-GO
If you close the driver's door with the ignition
switched on, the steering wheel is also auto-
matically moved to the previously set posi-
tion.
The last position of the steering wheel is
stored after each manual setting or when you
store the setting with the memory function
(Y page 96).
Crash-responsive EASY-EXIT feature If the crash-responsive EASY-EXIT feature is
triggered in an accident, the steering column
will move upwards when the driver's door is
opened. This occurs irrespective of the posi-
tion of the key in the ignition lock. This makes Steering wheel
93Seats, steering wheel and mirrors Z
Page 99 of 321
X
Engage reverse gear.
The exterior mirror on the front-passenger
side moves to the prese tparking position.
X Use adjustment button =to adjust the
exterior mirror .You should see the rear
wheel and the kerb in the exterior mirror.
The parking position is stored.
i If you shift the transmission to another
position, the exterior mirror on the front-
passenger side returns to the driving posi-
tion.
You can also store the parking position
using memory button M?.
X With the key in position 2in the igni-
tion lock and with the exterior mirror
on the front-passenger side activated,
use adjustmen tbutton =to adjust the
exterio rmirror. You should see the
rear wheel and the kerb in the exterior
mirror on the front-passenger side.
X Press memory button M? and one of
the arrows on adjustment button =
within three seconds.
The parking position is stored if the
exterior mirror does not move.
Calling up astore dparking position set-
ting X
Tur nthe key to position 2in the ignition
lock.
X Adjust the exterior mirror on the front-
passenger side with the corresponding but-
ton (Y page 94).
X Engage reverse gear.
The exterior mirror on the front-passenger
side moves to the stored parking position. The exterior mirror on the front-passenger
side moves back to its original position:
R
as soon as you exceed a speed of
10 km/h
R about ten seconds after you have disen-
gaged reverse gear
R if you press button :for the exterior mir-
ror on the driver's side Memory function
Storing settings
With the memory function, you can store up
to three different settings, e.g. for three dif-
ferent people.
The following settings are stored as a single
memory preset:
R seat and backrest position
R driver's side: steering wheel position
R driver's side: position of the exterior mir-
rors on the driver's and front-passenger
sides G
WARNING
The memory function can still be used when
the key has been removed. For this reason,
children should never be left unsupervised in
the vehicle. They could otherwise become
trapped when adjusting the seat or the steer-
ing wheel. G
WARNING
Only use the memory function on the driver's
side when the vehicle is stationary. Other-
wise, you could be distracted from the traffic
conditions by the steering wheel and seat
moving of their own accord, and as a result
cause an accident. 96
Memory functionSeats, steering wheel and mirrors