2012 MERCEDES-BENZ SLK ROADSTER fuel consumption
[x] Cancel search: fuel consumptionPage 13 of 321
ETS
.................................................. 56
Function/notes ................................ 56
Important safety guidelines .............56
Warning lamp ................................. 228
ETS (Electronic Traction System) ....... 56
Exhaus ttail pipe (cleaning instruc-
tions) .................................................. 257
Exterior lighting see Lights
Exterior mirrors
Adjusting ......................................... 94
Anti-dazzle mode (automatic) ..........95
Folding in/ou t(automatically) .........95
Folding in/ou t(electrically) .............94
Folding in whe nlocking (on-board
computer) ...................................... 195
Out of position (troubleshooting) .....95
Parking position ............................... 95
Resetting ......................................... 95
Storing settings (memory func-
tion) ................................................. 96F
Fatigue Assist see ATTENTION ASSIST
Faul tmessage
see Display messages
Filler cap
see Fuel filler flap
Fire extinguisher ............................... 260
First-aid kit ......................................... 260
Flat tyre Changing a wheel/fitting the
spare wheel ................................... 266
MOExtended run-fla tsystem ......... 272
Preparing the vehicle .....................263
Raising the vehicle .........................268
TIREFIT kit ...................................... 263
see Emergency spare wheel
Floormat ............................................ .246
Foglamps Extended range .............................. 105
Switching on/off ........................... 101
Frequencies
Garage door opene r....................... 246
Mobile phone ................................. 301
Two-way radio ................................ 301 Front foglamps
Display message ............................ 210
Fron twindscreen
see Windscreen
Fuel
Additives ........................................ 305
Consumption statistic s.................. 183
Displaying the current consump-
tion ................................................ 183
Displaying the range ......................183
Fuel gauge ....................................... 28
Grade (petrol) ................................ 304
Important safety notes ..................303
Notes about consumption .............306
Notes for AMG vehicles .................304
Problem (malfunction) ...................145
Quality (diesel )............................... 305
Refuelling ...................................... .142
Tank content/reserve fuel .............304
Fuel filler flap Opening/closing .......143
Fuel level Calling up the range (on-board
computer) ...................................... 183
Gauge .............................................. 28
Fuel reserve
see Fuel
Fuel tank
Capacity ........................................ 304
Problem (malfunction) ...................145
Fuse allocation chart (vehicle tool
kit) ...................................................... 261
Fuses Allocation chart ............................. 282
Before changing ............................. 282
Fuse box in the boot ......................282
Fuse box in the engine compart-
ment .............................................. 282
Important safety notes ..................281 G
Garage door opener Clearing the memory .....................245
Frequencies ................................... 246
Notes ............................................. 24310
Index
Page 23 of 321
Protection of the environment
Notes
H
Environmental note
Daimler's declared policy is one of compre-
hensive environmental protection.
Our objectives are to use the natural resour-
ces which form the basis of our existence on
this planet sparingly and in a manner which
takes the requirements of both nature and
humanity into consideration.
You too can help to protect the environment
by operating your vehicle in an environmen-
tally-responsible manner.
Fuel consumption and the rate of engine,
transmission, brake and tyre wear depend on
the following factors:
R operating conditions of your vehicle
R your personal driving style
You can influence both factors. Therefore,
please bear the following in mind:
Operating conditions:
R avoid short trips, as these increase fuel
consumption.
R observe the correct tyre pressure.
R do not carry any unnecessary weight in the
vehicle.
R monitor the vehicle's fuel consumption.
R remove the roof rack once you no longer
need it.
R a regularly serviced vehicle will contribute
to environmental protection. You should
therefore adhere to the service intervals.
R all maintenance work should be carried out
at a qualified specialist workshop.
Personal driving style:
R do not depress the accelerator pedal when
starting the engine.
R do not warm up the engine when the vehicle
is stationary.
R drive carefully and maintain a safe distance
from the vehicle in front.
R avoid frequent, sudden acceleration. R
change gear in good time and use each gear
only up to Ôof its maximum engine speed.
R switch off the engine in stationary traffic. Returning an end-of-life vehicle
Mercedes-Benz will take back your
Mercedes-Benz to dispose of it in an environ-
mentally responsible manner, in accordance
with the European Union (EU) End of Life
Vehicles Directive.
The End of Life Vehicles Directive applies to
vehicles with a gross vehicle weight of up to
3.5 t, in accordance with national regulations.
For several years, Mercedes-Benz has been
meeting all the legal requirements for a
design which allows for recycling and re-use.
There is a network of return points and dis-
assembly plants which can recycle your vehi-
cle in an environmentally-responsible man-
ner. The options for recycling vehicles and
parts are constantly being developed and
improved. This means that your Mercedes-
Benz will also continue to meet even the
increased recycling quotas in the future in
good time. You can obtain further information
from your national Mercedes-Benz homepage
or your national hotline number. Vehicle equipment
This Owner's Manual describes all models
and all standard and optional equipment of
your vehicle available at the time of publica-
tion of the Owner's Manual. Country-specific
deviations are possible. Please note that your
vehicle may not be equipped with all features
described. This is also the case for systems
and functions relevant to safety. The equip-
ment in your vehicle may therefore differ from
that shown in the descriptions and illustra-
tions.
All the systems found in your vehicle are listed
in the original purchase agreement of your
vehicle. 20
Introduction
Page 141 of 321
R
the positio nofthe accelerator pedal
R the road speed Driving tips
Accelerator pedal position Your style of driving influences how the auto-
matic transmission shifts gear:
R
little throttle: early upshifts
R more throttle: late upshifts
Double-clutch function When shifting down, the double-clutch func-
tion is active regardless of the currently selec-
ted drive program. The double-clutch function
reduces load change reactions and is condu-
cive to a sporty driving style. The sound gen-
erated by the double-clutchf
unction depends
on the drive program selected.
Kickdown Use kickdown for maximum acceleration.
X
Depress the accelerato rpedal beyond the
pressure point.
The transmission shifts to a lower gear
depending on the engine speed.
X Ease off the accelerator pedal once the
desired speed is reached.
The automatic transmission shifts back up. Program selector button
General notes The program selector button allows you to
choose between differen tdriving character-
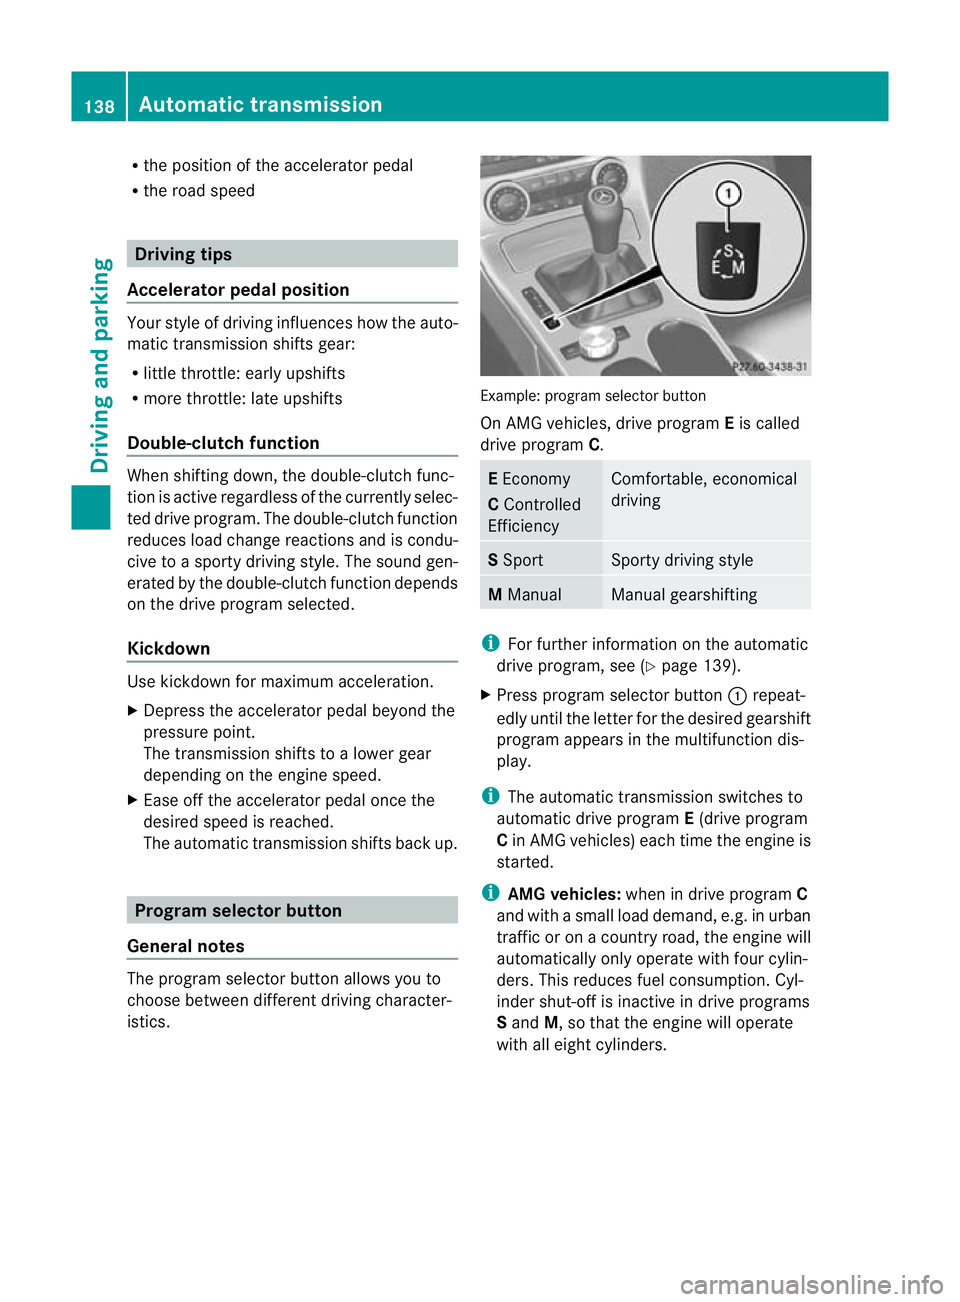
istics. Example
:program selector button
On AMG vehicles, drive program Eis called
drive program C. E
Economy
C Controlled
Efficiency Comfortable, economical
driving
S
Sport Sporty driving style
M
Manual Manual gearshifting
i
For further information on the automatic
drive program, see (Y page 139).
X Press progra mselecto rbutton :repeat-
edly until the lette rfor the desired gearshift
program appears in the multifunction dis-
play.
i The automatic transmission switches to
automatic drive program E(drive program
C in AMG vehicles) each time the engine is
started.
i AMG vehicles: when in drive program C
and with a small load demand, e.g. in urban
traffic or on a country road, the engine will
automatically only operate with four cylin-
ders. This reduces fuel consumption. Cyl-
inder shut-off is inactive in drive programs
S and M, so that the engine will operate
with all eight cylinders. 138
Automatic transmissionDriving and parking
Page 142 of 321
Steering wheel gearshift paddles
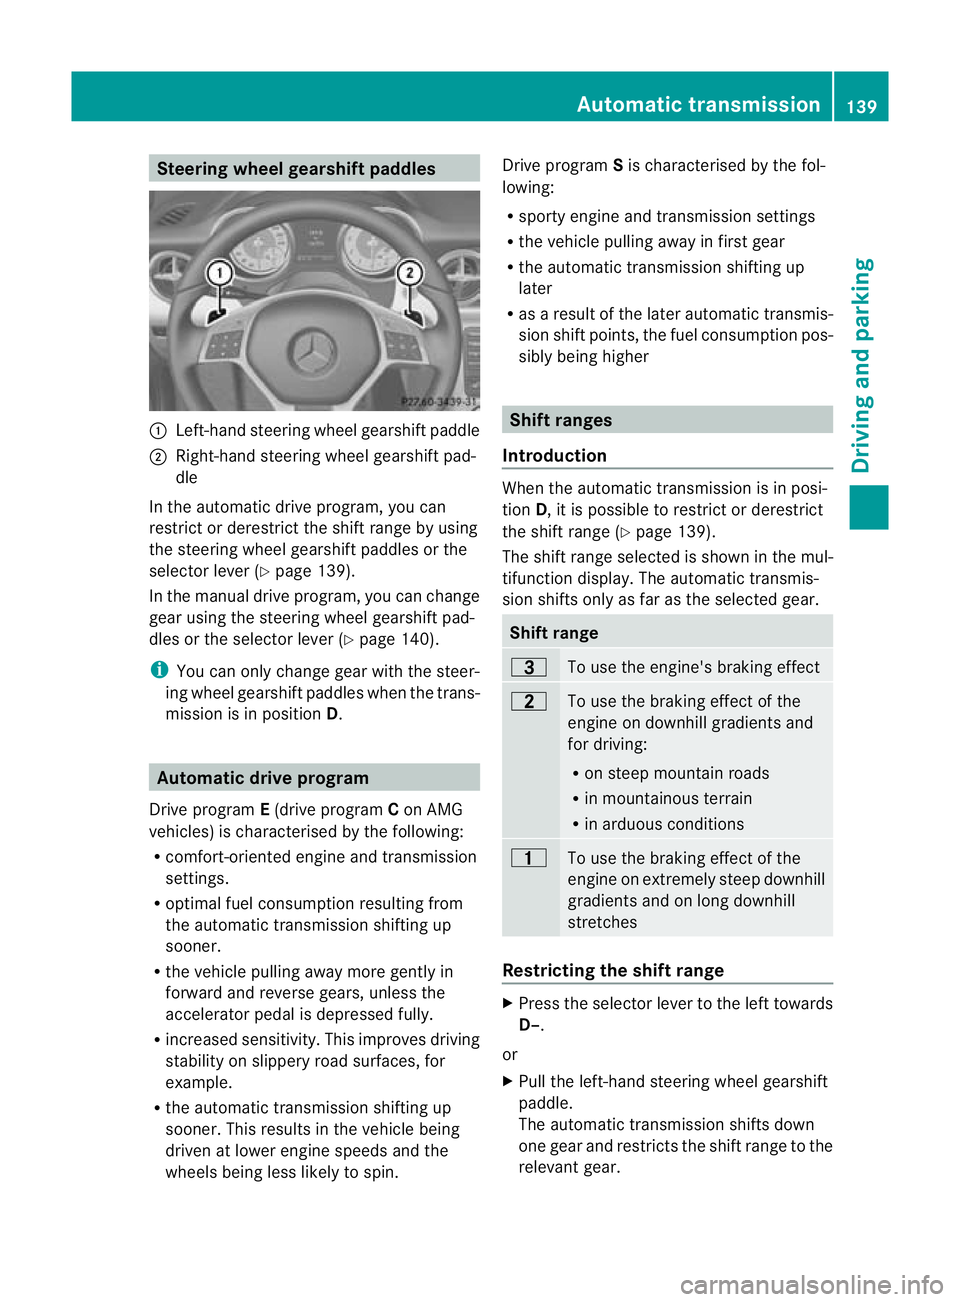
:
Left-hand steering wheel gearshift paddle
; Right-hand steering wheel gearshift pad-
dle
In the automatic drive program, you can
restrict or derestrict the shift range by using
the steering wheel gearshift paddles or the
selector lever (Y page 139).
In the manual drive program, you can change
gear using the steering wheel gearshift pad-
dles or the selector lever (Y page 140).
i You can only change gear with the steer-
ing wheel gearshift paddles when the trans-
mission is in position D.Automatic drive program
Drive program E(drive program Con AMG
vehicles) is characterised by the following:
R comfort-oriented engine and transmission
settings.
R optimal fuel consumption resulting from
the automatic transmission shifting up
sooner.
R the vehicle pulling away more gently in
forward and reverse gears, unless the
accelerator pedal is depressed fully.
R increased sensitivity. This improves driving
stability on slippery road surfaces, for
example.
R the automatic transmission shifting up
sooner. This results in the vehicle being
driven at lower engine speeds and the
wheels being less likely to spin. Drive program
Sis characterised by the fol-
lowing:
R sporty engine and transmission settings
R the vehicle pulling away in first gear
R the automatic transmission shifting up
later
R as a result of the later automatic transmis-
sion shift points, the fuel consumption pos-
sibly being higher Shift ranges
Introduction When the automatic transmission is in posi-
tion
D, it is possible to restrictord erestrict
the shift range (Y page 139).
The shift range selected is shown in the mul-
tifunction display. The automatic transmis-
sion shifts only as far as the selected gear. Shift range
=
To use the engine's brakin
geffect 5
To use the braking effect of the
engine on downhill gradients and
for driving:
R
on steep mountai nroads
R in mountainous terrain
R in arduous conditions 4
To use the braking effect of the
engine on extremely steep downhill
gradients and on long downhill
stretches
Restricting the shift range
X
Press the selector lever to the left towards
D–.
or
X Pull the left-hand steerin gwheel gearshift
paddle.
The automatic transmission shifts down
one gear and restricts the shift range to the
relevant gear. Automatic transmission
139Driving and parking Z
Page 186 of 321
Depending on the audio syste
mfitted, the display messages in the Audio ,
Navi and
Tel menus
differ slightly. The examples given in this Owner's Manual apply to vehicles equipped with
COMAND Online. Trip menu
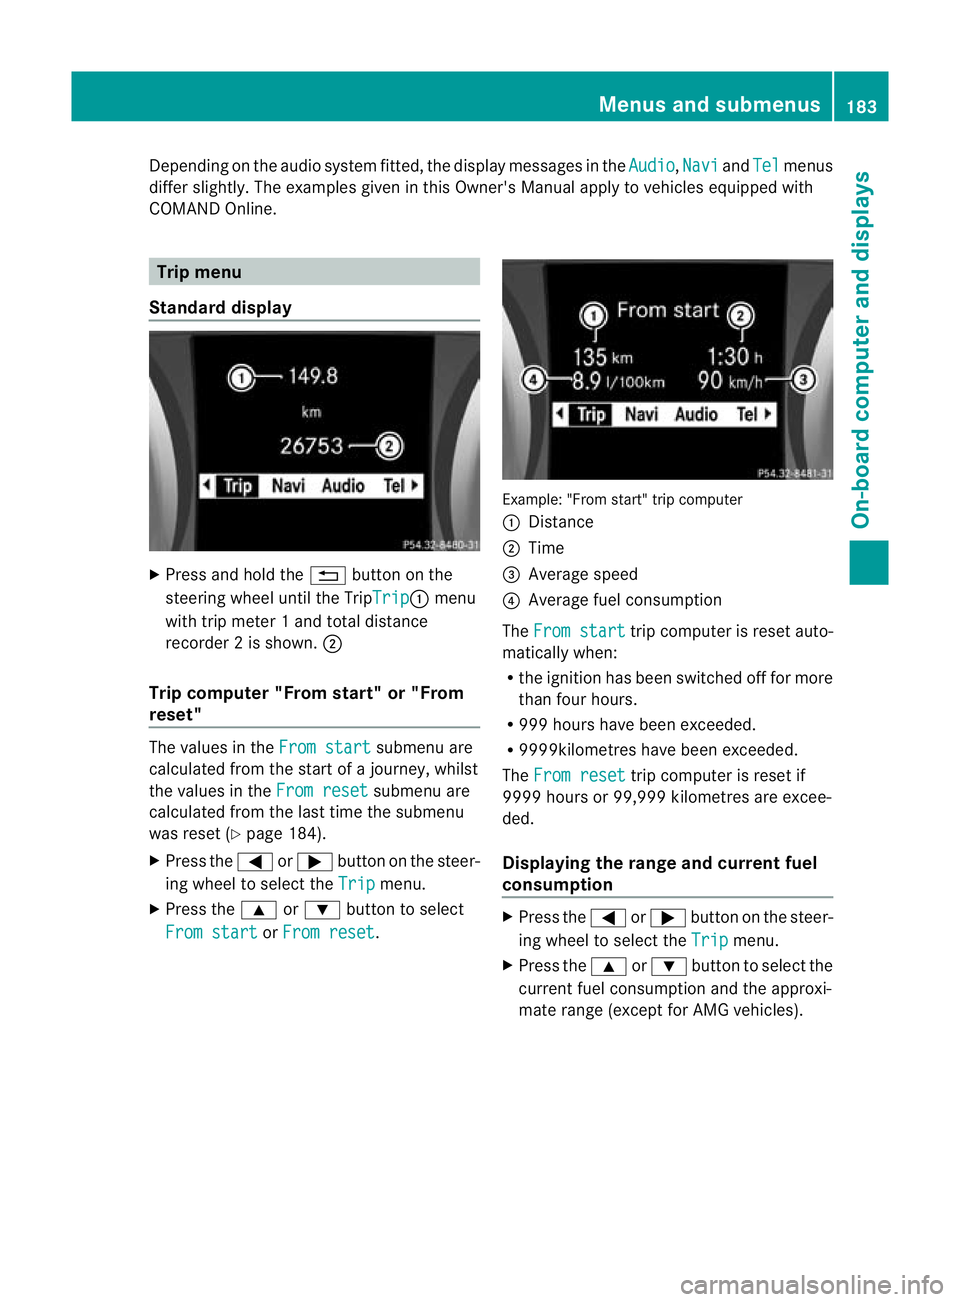
Standard display X
Press and hold the %button on the
steering wheel until the Trip Trip :
menu
with trip meter 1 and total distance
recorder 2is shown. ;
Trip computer "From start" or "From
reset" The values in the
From start submenu are
calculated from the start of a journey, whilst
the values in the From reset submenu are
calculated from the last time the submenu
was reset (Y page 184).
X Press the =or; button on the steer-
ing wheel to select the Trip menu.
X Press the 9or: button to select
From start or
From reset . Example: "From start" trip computer
:
Distance
; Time
= Average speed
? Average fuel consumption
The From start trip computer is reset auto-
matically when:
R the ignition has been switched off for more
than four hours.
R 999 hours have been exceeded.
R 9999kilometres have been exceeded.
The From reset trip computer is reset if
9999 hours or 99,999 kilometres are excee-
ded.
Displaying the range and current fuel
consumption X
Press the =or; button on the steer-
ing wheel to select the Trip menu.
X Press the 9or: button to select the
current fuel consumption and the approxi-
mate range (except for AMG vehicles). Menus and submenus
183On-board computer and displays Z
Page 187 of 321
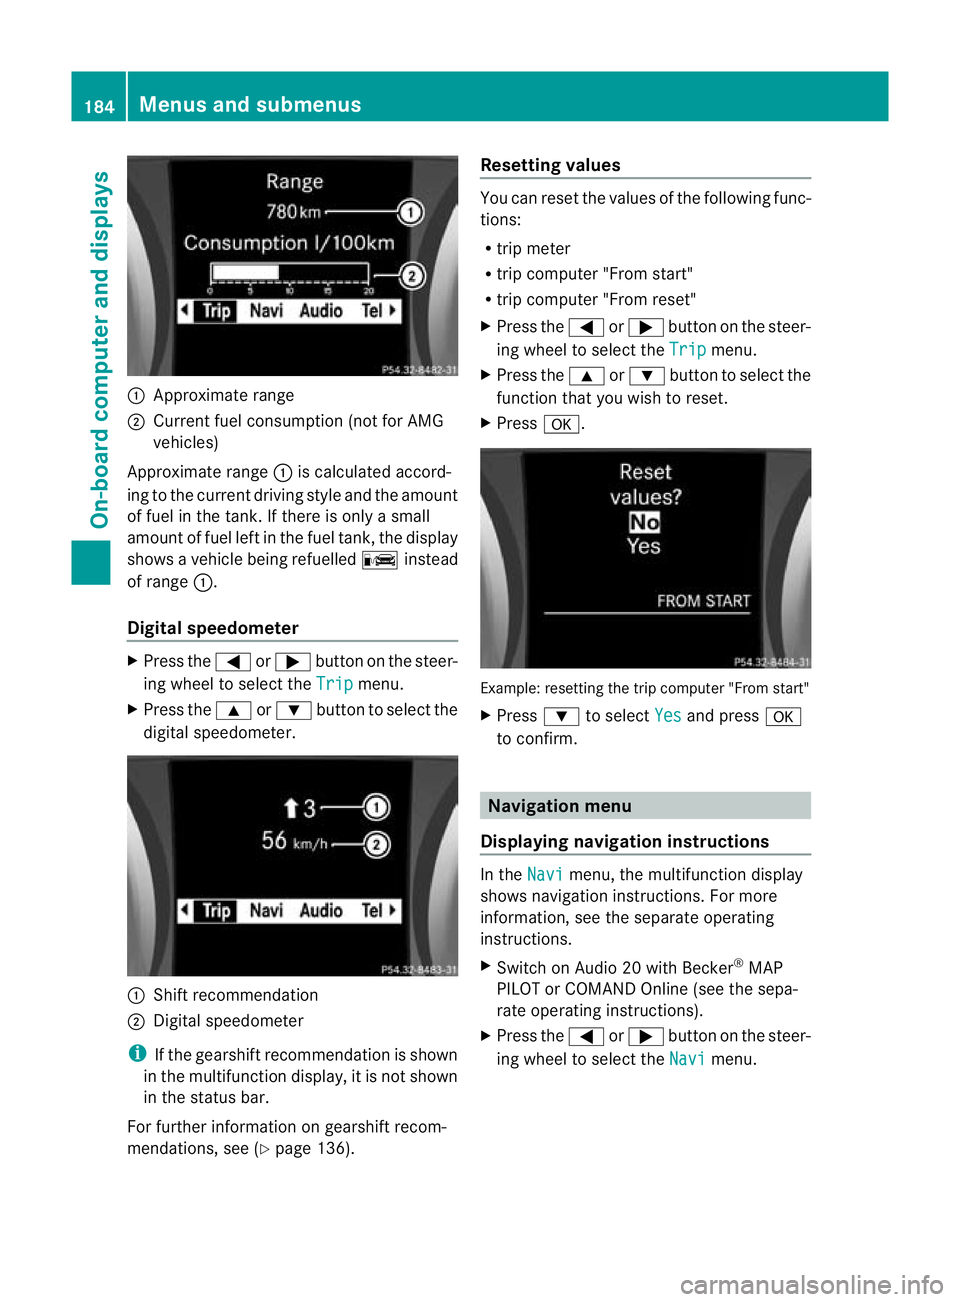
:
Approximate range
; Current fuel consumption (not for AMG
vehicles)
Approximate range :is calculated accord-
ing to the current driving style and the amount
of fuel in the tank. If there is only a small
amount of fuel left in the fuel tank, the display
shows a vehicle being refuelled Cinstead
of range :.
Digital speedometer X
Press the =or; button on the steer-
ing wheel to select the Trip menu.
X Press the 9or: button to select the
digital speedometer. :
Shift recommendation
; Digital speedometer
i If the gearshift recommendatio nis shown
in the multifunction display, it is not shown
in the status bar.
For further information on gearshift recom-
mendations, see (Y page 136). Resetting values You can reset the values of the following func-
tions:
R trip meter
R trip computer "From start"
R trip computer "From reset"
X Press the =or; button on the steer-
ing wheel to select the Trip menu.
X Press the 9or: button to select the
function that you wish to reset.
X Press a. Example: resetting the trip computer "From start"
X
Press :to select Yes and press
a
to confirm. Navigation menu
Displaying navigation instructions In the
Navi menu, the multifunction display
shows navigation instructions. For more
information, see the separate operating
instructions.
X Switch on Audio 20 with Becker ®
MAP
PILOT or COMAND Online (see the sepa-
rate operating instructions).
X Press the =or; button on the steer-
ing wheel to select the Navi menu.184
Menus and submenusOn-board computer and displays
Page 294 of 321
warm tyres and only correct it if it is too low
for the current operating conditions.
Driving with tyre pressure that is too high or
too low can:
R shorten the service life of the tyres
R cause increased tyre damage
R have a negative effect on handling charac-
teristics and thus the driving safety (e.g .by
causing aquaplaning)
i The tyre pressure values given for low
loads are minimum values which offe ryou
good ride comfor tcharacteristics.
However, you can also use the values given
for higher loads. These are permissible and
will not adversely affect the running of the
vehicle. H
Environmental note
Check the tyre pressure regularly, at least
every 14 days.
For speeds up to 210 km/h the values given
on the tyre pressure information label (fuel
filler flap) may be reduced by 30 kPa (0.3 bar,
4p si) without a reduction in safety.
This improves the ride comfort of your vehi-
cle; however, the fuel consumption may
increase slightly. Tyre pressure loss warning system
Important safety notes While the vehicle is in motion, the tyre pres-
sure loss warning system monitors the set
tyre pressure using the rotational speed of
the wheels. This enables the system to detect
significant pressure loss in a tyre. If the speed
of rotation of a wheel changes as a result of
a loss of pressure, a corresponding warning
message will appearint he multifunction dis-
play.
The tyre pressure warning system does not
warn you of an incorrectly set tyre pressure.
Observe the notes on the recommended tyre
pressure (Y page 289). The tyre pressure loss warning system does
not replace the need to regularly check your
vehicle's tyre pressures, since an even loss of
pressure on several tyres at the same time
cannot be detected by the tyre pressure loss
warning system.
The tyre pressure monitor is not able to warn
you of a sudden loss of pressure, e.g. if the
tyre is penetrated by a foreign object. In the
event of a sudden loss of pressure, bring the
vehicle to a halt by braking carefully. Avoid
abrupt steering manoeuvres.
The function of the tyre pressure loss warning
system is limited or delayed if:
R
snow chains are fitted to your vehicle's
tyres.
R road conditions are wintry.
R you are driving on sand or gravel.
R you adopt a very sporty driving style (cor-
nering at high speeds or driving with high
rates of acceleration).
R you are driving with a heavy load (in the
vehicle or on the roof).
Restarting the tyre pressure loss warn-
ing system Restart the tyre pressure loss warning system
if you have:
R
changed the tyre pressure
R changed the wheels or tyres
R fitted new wheels or tyres
X Before restarting, consult the table of tyre
pressures on the inside of the fuel filler flap
to ensure that the tyre pressure in all four
tyres is set correctly for the respective
operating conditions.
The tyre pressure loss warning system can
only give reliable warnings if you have set
the correct tyre pressure. If an incorrect
tyre pressure is set, these incorrectv alues
will be monitored.
X Observe the notes in the section on tyre
pressures ( Ypage 289). Tyre pressure
291Wheels and tyres Z
Page 298 of 321
Direction of rotation
Tyres with a specified direction of rotation
have additional benefits, e.g. if there is a risk
of aquaplaning .You will only gain these ben-
efits if the correct direction of rotation is
observed.
An arrow on the sidewall of the tyre indicates
its correct direction of rotation.
You may fit a spare wheel/emergency spare
wheel against the direction of rotation.
Observe the time restriction on use as well as
the speed limitation specified on the emer-
gency spare wheel/spare wheel. Storing wheels
Store wheels that are not being used in a cool,
dry and preferably dark place. Protec tthe
tyres against oil, grease, petrol and diesel. Cleaning the wheels
G
WARNING
Do not use high-pressure cleaners with circu-
lar-jet nozzles (dirt grinders) to clean your
vehicle, in particular the tyres. You could oth-
erwise damage the tyres and cause an acci-
dent. Wheel and tyre combinations
Points to remember
! For safety reasons, Mercedes-Ben zrec-
ommends that you only use tyres and
wheels which have been approved by
Mercedes-Benzs pecifically for your vehi-
cle. These are specially adapted to the control
systems, such as ABS or ESP
®
and are
marked as follows:
R MO =Mercedes-BenzO riginal
R MOE =Mercedes-BenzO riginal Extended
(tyres featuring run-flat characteristics)
R MO1 =Mercedes-BenzO riginal (only cer-
tain AMG tyres)
Mercedes-Benz Original Extended tyres
may only be used on wheels that have been
specifically approved by Mercedes-Benz.
Only use tyres, wheels or accessories tes-
ted and approved by Mercedes-Benz. Cer-
tain characteristics, e.g. handling, vehicle
noise emissions or fuel consumption, may
otherwise be adversely affected. In addi-
tion, when driving with aload, tyre dimen-
sion variations could cause the tyres to
come into contact with the bodywork and
axle components.T his could result in dam-
age to the tyres or the vehicle.
Mercedes-Ben zaccepts no liability for
damage resulting from the use of tyres,
wheels or accessories othe rthan those tes-
ted and approved.
Further information about wheels, tyres
and approved combinations can be
obtained from any qualified specialist
workshop.
! Large wheels: the lower the section width
for a certain wheel size, the lower the ride
comfort is on poor road surfaces. Roll com-
fort and suspension comfort are reduced
and the risk of damage to the wheels and
tyres as a result of driving over obstacles
increases.
i You will find a table of tyre pressures on
the inside of your vehicle's fuel filler flap.
For further information on tyre pressure,
see (Y page 289). Check tyre pressures
regularly, and only when the tyres are cold. Wheel and tyre combinations
295Wheels and tyres Z