2012 MERCEDES-BENZ SLK ROADSTER reset
[x] Cancel search: resetPage 13 of 321
ETS
.................................................. 56
Function/notes ................................ 56
Important safety guidelines .............56
Warning lamp ................................. 228
ETS (Electronic Traction System) ....... 56
Exhaus ttail pipe (cleaning instruc-
tions) .................................................. 257
Exterior lighting see Lights
Exterior mirrors
Adjusting ......................................... 94
Anti-dazzle mode (automatic) ..........95
Folding in/ou t(automatically) .........95
Folding in/ou t(electrically) .............94
Folding in whe nlocking (on-board
computer) ...................................... 195
Out of position (troubleshooting) .....95
Parking position ............................... 95
Resetting ......................................... 95
Storing settings (memory func-
tion) ................................................. 96F
Fatigue Assist see ATTENTION ASSIST
Faul tmessage
see Display messages
Filler cap
see Fuel filler flap
Fire extinguisher ............................... 260
First-aid kit ......................................... 260
Flat tyre Changing a wheel/fitting the
spare wheel ................................... 266
MOExtended run-fla tsystem ......... 272
Preparing the vehicle .....................263
Raising the vehicle .........................268
TIREFIT kit ...................................... 263
see Emergency spare wheel
Floormat ............................................ .246
Foglamps Extended range .............................. 105
Switching on/off ........................... 101
Frequencies
Garage door opene r....................... 246
Mobile phone ................................. 301
Two-way radio ................................ 301 Front foglamps
Display message ............................ 210
Fron twindscreen
see Windscreen
Fuel
Additives ........................................ 305
Consumption statistic s.................. 183
Displaying the current consump-
tion ................................................ 183
Displaying the range ......................183
Fuel gauge ....................................... 28
Grade (petrol) ................................ 304
Important safety notes ..................303
Notes about consumption .............306
Notes for AMG vehicles .................304
Problem (malfunction) ...................145
Quality (diesel )............................... 305
Refuelling ...................................... .142
Tank content/reserve fuel .............304
Fuel filler flap Opening/closing .......143
Fuel level Calling up the range (on-board
computer) ...................................... 183
Gauge .............................................. 28
Fuel reserve
see Fuel
Fuel tank
Capacity ........................................ 304
Problem (malfunction) ...................145
Fuse allocation chart (vehicle tool
kit) ...................................................... 261
Fuses Allocation chart ............................. 282
Before changing ............................. 282
Fuse box in the boot ......................282
Fuse box in the engine compart-
ment .............................................. 282
Important safety notes ..................281 G
Garage door opener Clearing the memory .....................245
Frequencies ................................... 246
Notes ............................................. 24310
Index
Page 16 of 321
Main-beam headlamps
Changing bulbs .............................. 108
Display message ............................ 209
Switching on/off ........................... 103
Maintenance
see ASSYST PLUS service interval
display
Manual transmission
Engaging revers egear ................... 136
Gea rlever ...................................... 135
Pulling away ................................... 129
Shifting to neutra l.......................... 136
Shift recommendatio n................... 136
Starting the engine ........................129
Matt finish (cleaning instructions) ..255
Memory card (audio) .........................186
Memory function ................................. 96
Mercedes-Benz Service Centre see Qualified specialist workshop
Message memory (on-board com-
puter) ................................................. .199
Messages see Display messages
Mirrors
see Exterior mirrors
see Rear-view mirror
see Vanity mirror
Mobile phone
Frequencies ................................... 301
Installatio n..................................... 301
Menu (on-board computer) ............187
Notes/placing in the bracket ......... 242
Transmission output (maximum) .... 301
see Telephone
Modifying the programming (key) .....67
MOExtended run-flat system ...........272
Motorway mode ................................ 104
MP3 Operating ...................................... .186
see Separate operating instructions
Multifunction display
Function/notes ............................. 180
Permanent displa y......................... 191
Multifunction steering wheel
Operating the on-board computer .179
Overview .......................................... 31 N
Navigation Menu (on-board computer) ............184
On-board computer .......................184
see separate operating instructions
Neck level heating
see AIRSCARF
NECK-PRO head restraints
Operation ........................................ .43
Resetting after being triggered ........44
Notes on running in anew vehicle ..126 O
Occupant safety Childre ninthe vehicle ..................... 47
Important safety notes ....................38
Odometer ........................................... 183
see Total distance recorder
see Trip meter
Oil
see Engine oil
On-board computer
AMG menu ..................................... 195
Assistance menu ........................... 189
Audi omenu ................................... 186
Convenience submenu ..................194
Displaying a service message ........253
Display messages ..........................199
DISTRONI CPLUS ........................... 162
Factory setting submenu ...............195
Important safety notes ..................178
Instrument cluster submenu ..........190
Ligh tsubmenu ............................... 191
Menu overview .............................. 182
Message memory .......................... 199
Navigation menu ............................ 184
Operating vide oDVD ..................... 187
Operation ....................................... 179
RACETIMER ................................... 196
Service menu ................................. 190
Settings menu ............................... 190
Standard displa y............................ 183
Telephone menu ............................ 187
Trip menu ...................................... 183
Vehicle submenu ........................... 193 Index
13
Page 19 of 321
Settings
Factory (on-board computer) .........195
On-board computer .......................190
Setting the air distribution ...............119
Setting the airflow ............................119
SETUP (on-board computer) .............196
Short journeys (diesel particle fil-
ter) ...................................................... 148
Sidebag ................................................ 42
Side windows Convenience closing ........................77
Important safety notes ....................75
Opening/closing (front) ...................76
Opening/closing all. ........................76
Problem (malfunction) .....................78
resetting .......................................... 77
Snow chains ...................................... 289
Socket Centre console .............................. 241
Points to observe before use .........241
Under the armrest .........................241
Spare wheel
Storage location ............................ 262
Storing ........................................... 262
see Emergency spare wheel
Specialist workshop ............................ 22
Spectacles compartment .................237
Speed, controlling see Cruise control
Spee dLimit Assist
Activating/deactivating the warn-
ing function .................................... 189
Displayin g...................................... 189
Display message ............................ 213
Display message in the multifunc-
tion displa y.................................... 175
Important safety notes ..................174
Speedometer
Activating/deactivating the addi-
tional speedometer ........................191
Digita l............................................ 184
In the Instrument cluster .................28
Segments ...................................... 179
Selecting the unit of measure-
ment .............................................. 190
see Instrument cluster SPEEDTRONIC
Deactivating variabl e..................... 155
Display message ............................ 216
Function/notes ............................. 153
Important safety notes ..................153
LIM indicator lamp .........................154
Permanent ..................................... 156
Selecting ........................................ 154
Storing the current spee d.............. 155
Variabl e......................................... 154
SPORT handling mode
Activating/deactivating (AMG
vehicles) .......................................... 57
Warning lamp ................................. 229
SRS (Supplemental Restraint Sys-
tem)
Display message ............................ 207
Introduction ..................................... 39
Warning lamp ................................. 230
Warning lamp (function) ................... 39
Starting (engine) ................................ 128
Station see Radio
Steering (display message) ..............221
Steering wheel Adjusting (electrically). ....................93
Adjusting (manually). .......................92
Button overview ............................... 31
Cleaning ......................................... 258
Gearshift paddles ........................... 139
Important safety notes ....................92
Storing settings (memory func-
tion) ................................................. 96
Steering wheel gearshift paddles ....139
Stopwatch (RACETIMER) ................... 196
Stowage areas ................................... 236
Stowage compartment Spectacles compartment ...............237
Stowage compartments
Armrest (front) ............................... 237
Armrest (under) ............................. 237
Centre console .............................. 237
Cuph older..................................... 239
Door ............................................... 238
Glove compartment .......................236
Important safety information .........236
Luggage net ................................... 238
Rea rwall........................................ 23816
Index
Page 20 of 321
Summer opening
see Convenience opening feature
Summer tyres .................................... 288
Sun visor ............................................ 240
Supplement Restraint System see SRS (Supplemental Restraint
System)
Surround lighting (on-board com-
puter) ................................................. .192
Switching off the alarm (ATA) ............61 T
Tail lamps Display message ............................ 209
see Lights
Tank
see Fuel tank
Technical data
Notes ............................................. 300
Tyres/wheels ................................. 295
Vehicle data ................................... 310
Telephone
Accepting acall............................. 188
Display message ............................ 221
Menu (on-board computer) ............187
Number from the phone book ....... .188
Redialling ....................................... 188
Rejecting/ending acall................. 188
Telephone compartment ................237
Temperature
Coolant .......................................... 178
Coolant (on-board computer) ......... 195
Engine oil (on-board computer) ...... 195
Outside temperature ..................... .179
Setting (climate control) ................118
TEMPOMAT
Function/notes ............................. 151
Theft-deterrent system
ATA (Anti-Theft Alarm system) .........61
Immobiliser ...................................... 61
Time
see Separate Owner' smanual
Timing (RACETIMER) .........................196
TIREFIT kit .......................................... 263
Total distance recorder ....................183
Tow-away protection ..........................62Towing
Important safety notes ..................278
With the rear axle raised ................280
Towing away
Fitting the towing eye. ...................279
Removing the towing eye. ..............280
With both axles on the ground .......280
Tow-starting
Emergency engine starting ............281
Fitting the towing eye. ...................279
Important safety notes ..................278
Removing the towing eye. ..............280
Transmission
see Automatic transmission
see Manual transmission
Transporting the vehicle ..................281
Trim pieces (cleaning instructions) .258
Trip computer (on-board com-
puter) ................................................. .183
Trip meter Calling up ....................................... 183
Resetting (on-board computer) ......184
Trip odometer
see Trip meter
Turn signals
Changing bulbs (front) ...................108
Switching on/off ........................... 103
Two-way radio
Frequencies ................................... 301
Installatio n..................................... 301
Transmission output (maximum) .... 301
Type identification plate
see Vehicle identification plate
Tyre pressure
Calling up (on-board computer) .....292
Display message ............................ 217
Not reached (TIREFIT) ....................265
Pressure loss warning ....................291
Reached (TIREFIT) ..........................265
Recommended ............................... 289
Tyre pressure monitor
Function/notes ............................. 292
Restarting ...................................... 293
Warning lamp ................................. 233
Tyres
Checking ........................................ 287
Direction of rotatio n...................... 295 Index
17
Page 25 of 321
ponents and interference to your compo-
nents caused by other electrical/electronic
components can be largely prevented. Diagnostics connection
G
WARNING
If you connect equipment to the diagnostics
connection, it can affect the operation of the
vehicle systems. This can impair the operating
safety of your vehicle while driving. There is a
risk of accident.
Do not connect any equipment to the diag-
nostics connection. G
WARNING
Loose equipment or equipment cables that
are connected to the diagnostics connection
can obstruct the area around the pedals. The
equipment or the cables could get between
the pedals in the event of sudden braking or
acceleration. As a result, the movement of the
pedals may be impaired. There is a risk of
accident.
Do not attach any equipment or cables in the
driver footwell.
! If the engine is switched off and equip-
ment on the diagnostics connection is
used, the starter battery may discharge.
The diagnostics connection is only intended
for the connection of diagnostic equipment at
a qualified specialist workshop.
Connecting equipment to the diagnostics
connection can, for example, lead to emis-
sions monitoring information being reset.
This may lead to the vehicle failing to meet
the requirements of the nex temissions test
during the main inspection. Qualified specialist workshop
Aq ualified specialist workshop has the nec-
essary specialist knowledge, tools and quali-
fications to correctl ycarry out the work required on your vehicle
.This is especially the
case for work relevant to safety.
Observe the information in the Service Book-
let.
Always have the following work carried out at
a qualified specialist workshop:
R work relevant to safety
R service and maintenance work
R repair work
R alterations, installation work and modifica-
tions
R work on electronic components
Mercedes-Ben zrecommends that you use a
Mercedes-Benz Service Centre. Vehicle registration
Mercedes-Benz may ask its Service Centres
to carry out technical inspections on certain
vehicles to improve their quality or safety.
If you did not purchase your vehicle from an
authorised specialist dealer and your vehicle
has never been inspected at a Mercedes-
BenzS ervice Centre, it is possible that your
vehicle is not registered in your name with
Mercedes-Benz. Mercedes-Benz can only
infor myou about vehicle checks if it has your
registration data.
It is advisable to register your vehicle with a
Mercedes-Benz Service Centre.
InformM ercedes-Benza s soon as possible
abouta ny change in address or vehicle own-
ership. Correc
tuse G
WARNING
Various warning stickers are affixed to your
vehicle. Their purpose is to draw your atten-
tion, and the attention of others, to various
dangers. Therefore, do not remove any warn-
ing stickers unless the sticker clearly states
that you may do so. 22
Introduction
Page 47 of 321
a certain severity. This provides bette
rhead
support. G
WARNING
Only use head restraint covers which have
been tested and approved by Mercedes-Benz
for your vehicle model.
The use of non-approved head restraint cov-
ers may prevent NECK-PRO head restraints
from triggering properly. Consequently, the
NECK-PRO head restraints cannot provide the
intended level of protection.
Consult a Mercedes-Benz Service Centre
regarding availability.
If the NECK-PRO head restraints have been
triggered in an accident, reset the NECK-PRO
head restraints on the driver’s and front-
passenger seat (Y page 44). Otherwise, the
additional protection will not be available in
the event of another rear-end collision. You
can recognise when NECK-PRO head
restraints have been triggered by the fact that
they have moved forwards and can no longer
be adjusted. Resetting triggered NECK-PRO head
restraints
Following a rear-end collision, Mercedes-
Benz recommends that you have NECK-PRO
head restraints checked at a qualified spe-
cialist workshop, e.g. a Mercedes-Benz
Service Centre.
i Resetting the NECK-PRO head restraints
requires a lot of strength. If you have diffi-
culty resetting the NECK-PRO head
restraints, have this work carried out at a
qualified specialist workshop, e.g. a
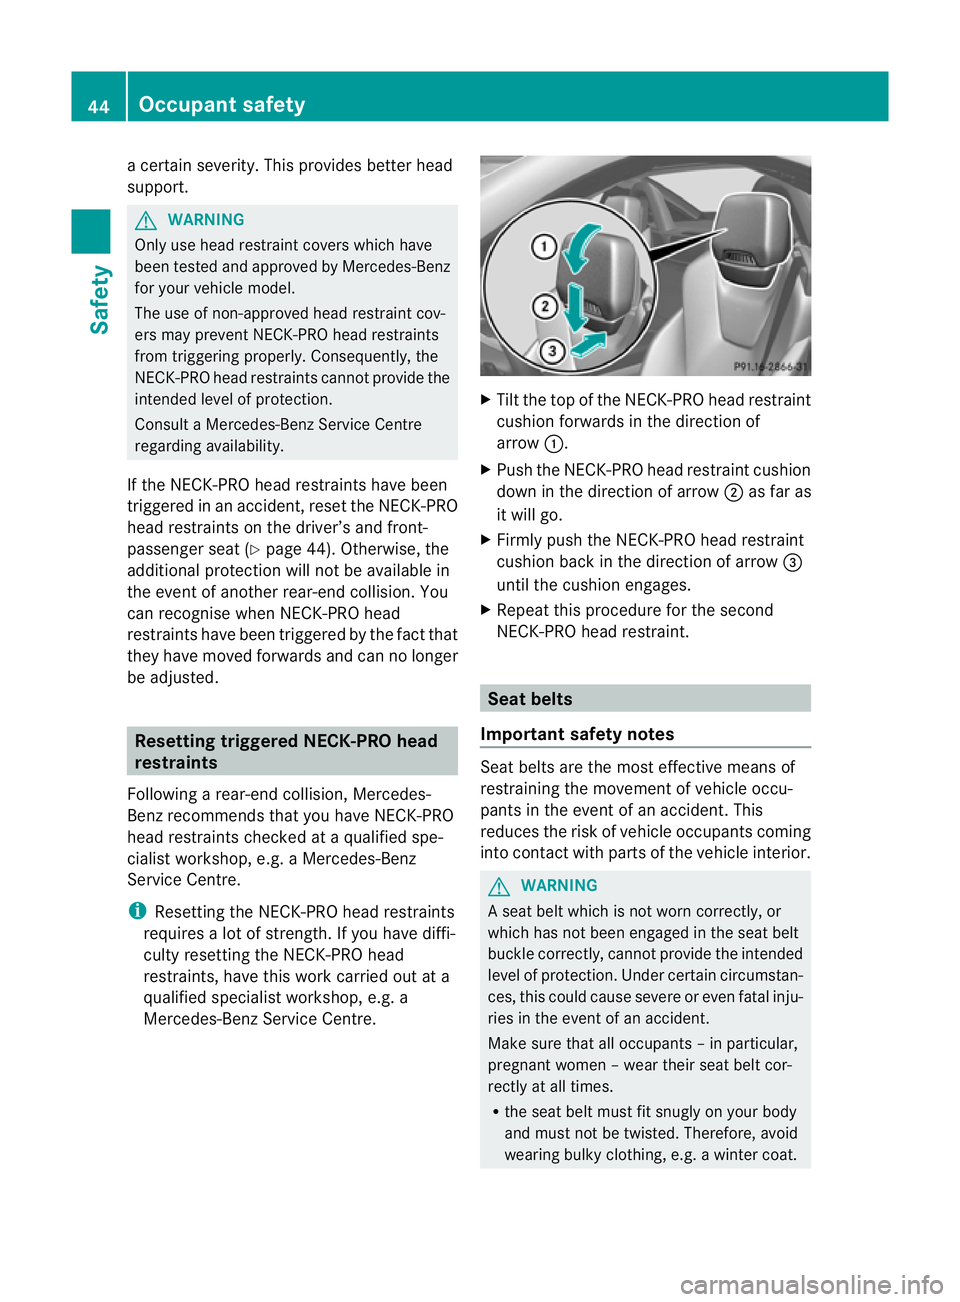
Mercedes-Benz Service Centre. X
Tilt the top of the NECK-PRO head restraint
cushion forwards in the direction of
arrow :.
X Push the NECK-PRO head restraint cushion
down in the direction of arrow ;as far as
it will go.
X Firmly push the NECK-PRO head restraint
cushion back in the direction of arrow =
until the cushion engages.
X Repeat this procedure for the second
NECK-PRO head restraint. Seat belts
Important safety notes Seat belts are the most effective means of
restraining the movement of vehicle occu-
pants in the event of an accident. This
reduces the risk of vehicle occupants coming
into contact with parts of the vehicle interior.
G
WARNING
A seat belt which is not worn correctly, or
which has not been engaged in the seat belt
buckle correctly, cannot provide the intended
level of protection. Under certain circumstan-
ces, this could cause severe or even fatal inju-
ries in the event of an accident.
Make sure that all occupants –inparticular,
pregnant women – wear their seat belt cor-
rectly at all times.
R the seat belt must fit snugly on your body
and must no tbe twisted. Therefore, avoid
wearing bulky clothing, e.g. a winter coat. 44
Occupant safetySafety
Page 80 of 321
will remain open
.To close the other side
windows, you must pull the switch on the
centre console and hold it. The front side
window will close first, then the rear side
windows.
X To close all side windows: pull
switch :.
The rear side windows close after the front
side windows.
X Make sure that all the side windows are
fully closed.
i If the roof is open, the switch on the
centre console can only be used to operate
the front side windows.
Using the key G
WARNING
Make sure that nobody can become trapped
as you close the side windows.
Proceed as follows if there is a risk of entrap-
ment:
R Release the &button.
R Press and hold the %button until the
side windows open again.
If the roof is closed and the boot separator is
open, you can use the key to open or close all
of the side windows at the same time:
X Make sure that the roof is closed
(Y page 79) and that the boot separator
is open (Y page 81).
X Point the tip of the key at the driver's door
handle.
X To open all side windows: press
the % button on the key until the side
windows are fully opened.
X To interrupt the opening procedure:
release the %button.
X To close all side windows: press the
& button on the key until the side win-
dows are fully closed.
X To interrupt the closing procedure:
release the &button. Convenience closing with KEYLESS-GO G
WARNING
When using the convenience closing feature,
make sure that nobody can become trapped.
Proceed as follows if there is a risk of entrap-
ment:
R release the sensor surface on the door han-
dle.
R pull the door handle immediately and hold
it.
The side windows open.
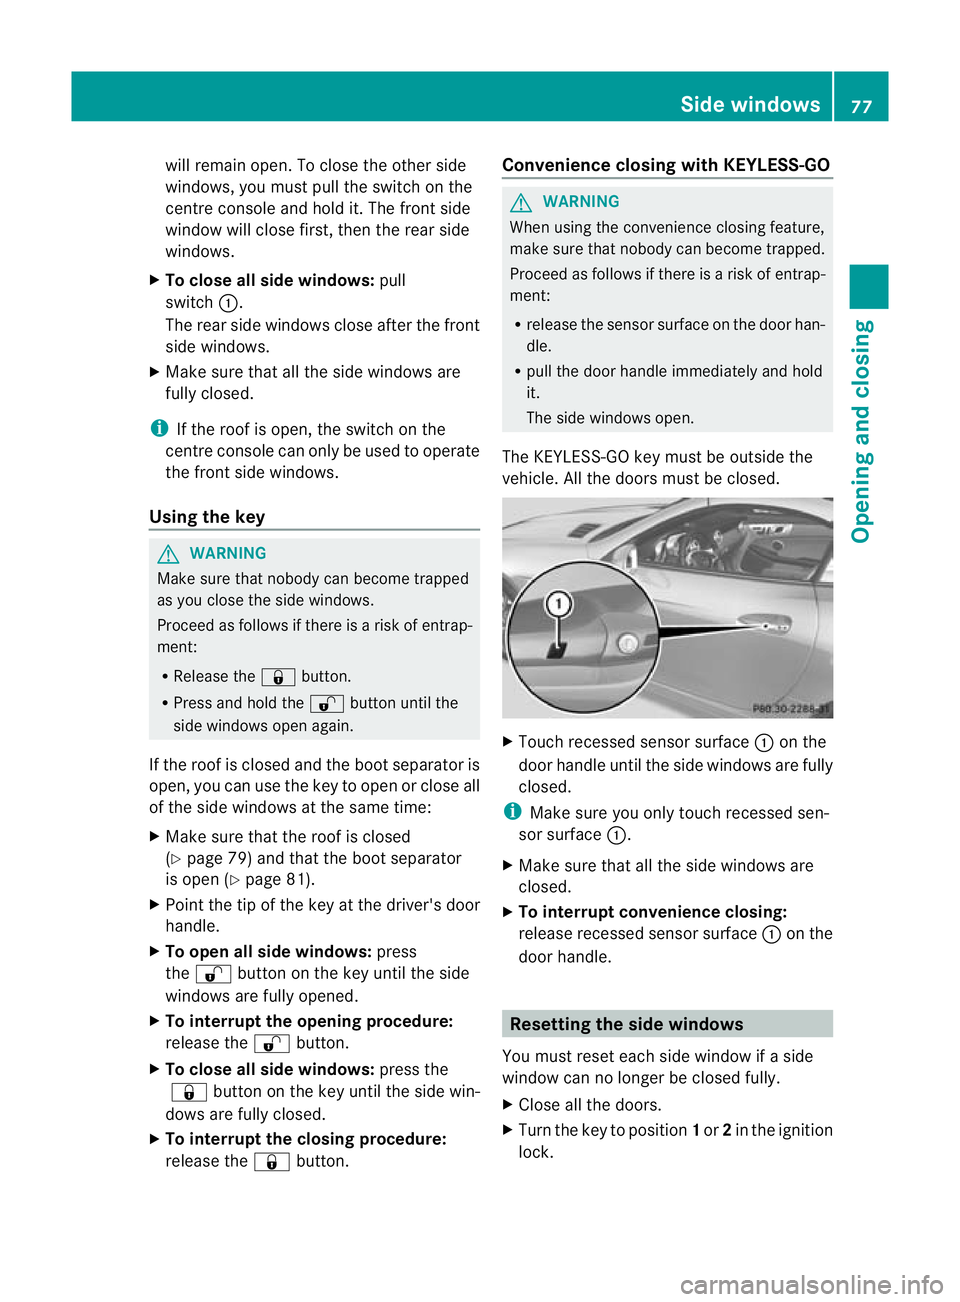
The KEYLESS-GO key must be outside the
vehicle. All the doors must be closed. X
Touch recessed sensor surface :on the
door handle until the side windows are fully
closed.
i Make sure you only touch recessed sen-
sor surface :.
X Make sure that all the side windows are
closed.
X To interrupt convenience closing:
release recessed sensor surface :on the
door handle. Resetting the side windows
You must reset each side window if a side
window can no longer be closed fully.
X Close all the doors.
X Turn the key to position 1or 2in the ignition
lock. Side windows
77Opening and closing Z
Page 81 of 321
X
Pull the corresponding switch on the door
control panel until the side window is com-
pletely closed. (Y page 76).
X Hold the switch for an additional second.
If the side window opens again slightly:
X Immediately pull the corresponding switch
on the door control panel until the side win-
dow is completely closed (Y page 76).
X Hold the switch for an additional second.
X If the corresponding side window remains
closed after the button has been released,
the side window has been reset correctly.
If this is not the case, repeat the steps
above again. Problems with the side windows
Problem: aside window cannot be closed
because it is blocked by objects, e.g.
leaves in the window guide.
X Remove the objects.
X Close the side window.
Problem :aside window cannot be closed
and you cannot see the cause. G
WARNING
Closing the side windows with increased force
or without the anti-entrapment feature could
lead to serious or even fatal injury. Make sure
that nobody can become trapped when clos-
ing the side windows.
If a side window is obstructed during closing
and reopens again slightly:
X Immediately afte rthe window blocks, pull
the corresponding switch again until the
side window has closed.
The side window is closed with increased
force. If a side window is obstructed again during
closing and reopens again slightly:
X
Immediately after the window blocks, pull
the corresponding switch again until the
side window has closed.
The side window is closed without the anti-
entrapment feature. Roof
Important safety notes
For safety reasons, the roof can only be
opened or closed when the vehicle is station-
ary. G
WARNING
Always open or close the roof fully before
driving.
If the roof does not open or close fully, the
roof hydraulic system is depressurised and
the roof is lowered:
R after about seven minutes if the ignition is
switched on
R after about
15 seconds if the ignition is switched off
Aw arning tone sounds shortly beforehand.
The K symbol and Vario-roof lower‐ ing message appear in the multifunction dis-
play.
Lock the roof again before driving on. Other-
wise, the unlocked roo fcould open during the
journey and cause you to lose control of your
vehicle. You and/or other persons could be
injured as a result. G
WARNING
Closing the roof manually is a complex, tech-
nically challenging procedure. Attempting to
manually close the roof may cause damage to
the roof and/or injury.
For this reason, the manual closing process
should only be carried out at a qualified spe-
cialist workshop. 78
RoofOpening and closing