2012 MERCEDES-BENZ SL ROADSTER instrument cluster
[x] Cancel search: instrument clusterPage 253 of 637
Display messages
Possible causes/consequences and
M
MSolutions ÷
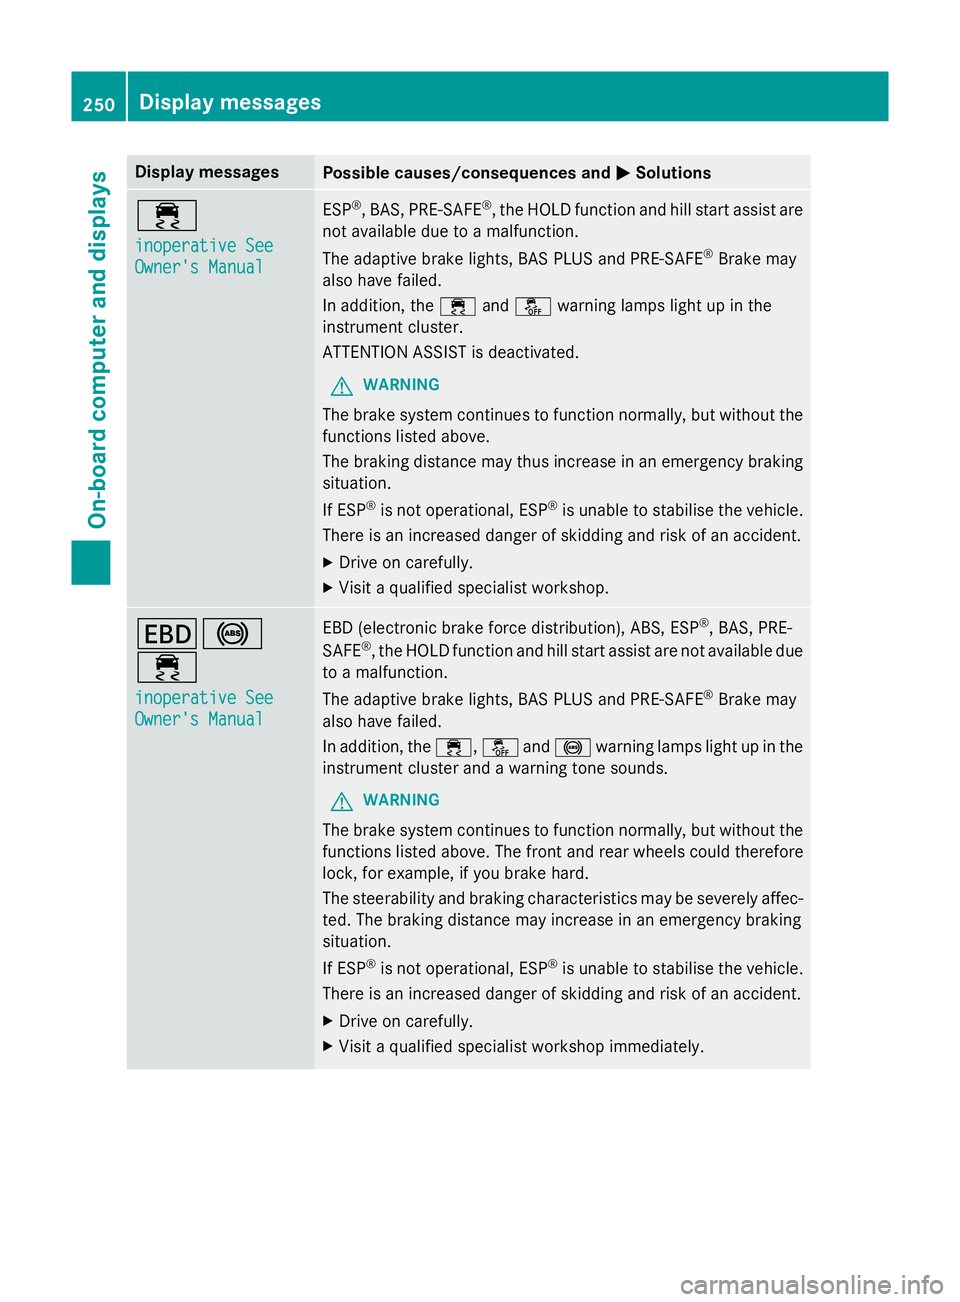
inoperative See inoperative See
Owner's Manual Owner's Manual ESP
®
, BAS, PRE‑SAFE ®
, the HOLD function and hill start assist are
not available due to a malfunction.
The adaptive brake lights, BAS PLUS and PRE ‑SAFE®
Brake may
also have failed.
In addition, the ÷andå warning lamps light up in the
instrument cluster.
ATTENTION ASSIST is deactivated.
G WARNING
The brake system continues to function normally, but without the functions listed above.
The braking distance may thus increase in an emergency braking
situation.
If ESP ®
is not operational, ESP ®
is unable to stabilise the vehicle.
There is an increased danger of skidding and risk of an accident.
X Drive on carefully.
X Visit a qualified specialist workshop. T!
÷
inoperative See inoperative See
Owner's Manual Owner's Manual EBD (electronic brake force distribution), ABS, ESP
®
, BAS, PRE-
SAFE ®
, the HOLD function and hill start assist are not available due
to a malfunction.
The adaptive brake lights, BAS PLUS and PRE ‑SAFE®
Brake may
also have failed.
In addition, the ÷,åand! warning lamps light up in the
instrument cluster and a warning tone sounds.
G WARNING
The brake system continues to function normally, but without the functions listed above. The front and rear wheels could therefore
lock, for example, if you brake hard.
The steerability and braking characteristics may be severely affec-ted. The braking distance may increase in an emergency braking
situation.
If ESP ®
is not operational, ESP ®
is unable to stabilise the vehicle.
There is an increased danger of skidding and risk of an accident.
X Drive on carefully.
X Visit a qualified specialist workshop immediately. 250
Display
messagesOn-board computer and displays
Page 256 of 637
Display messages
Possible causes/consequences and
M
MSolutions !
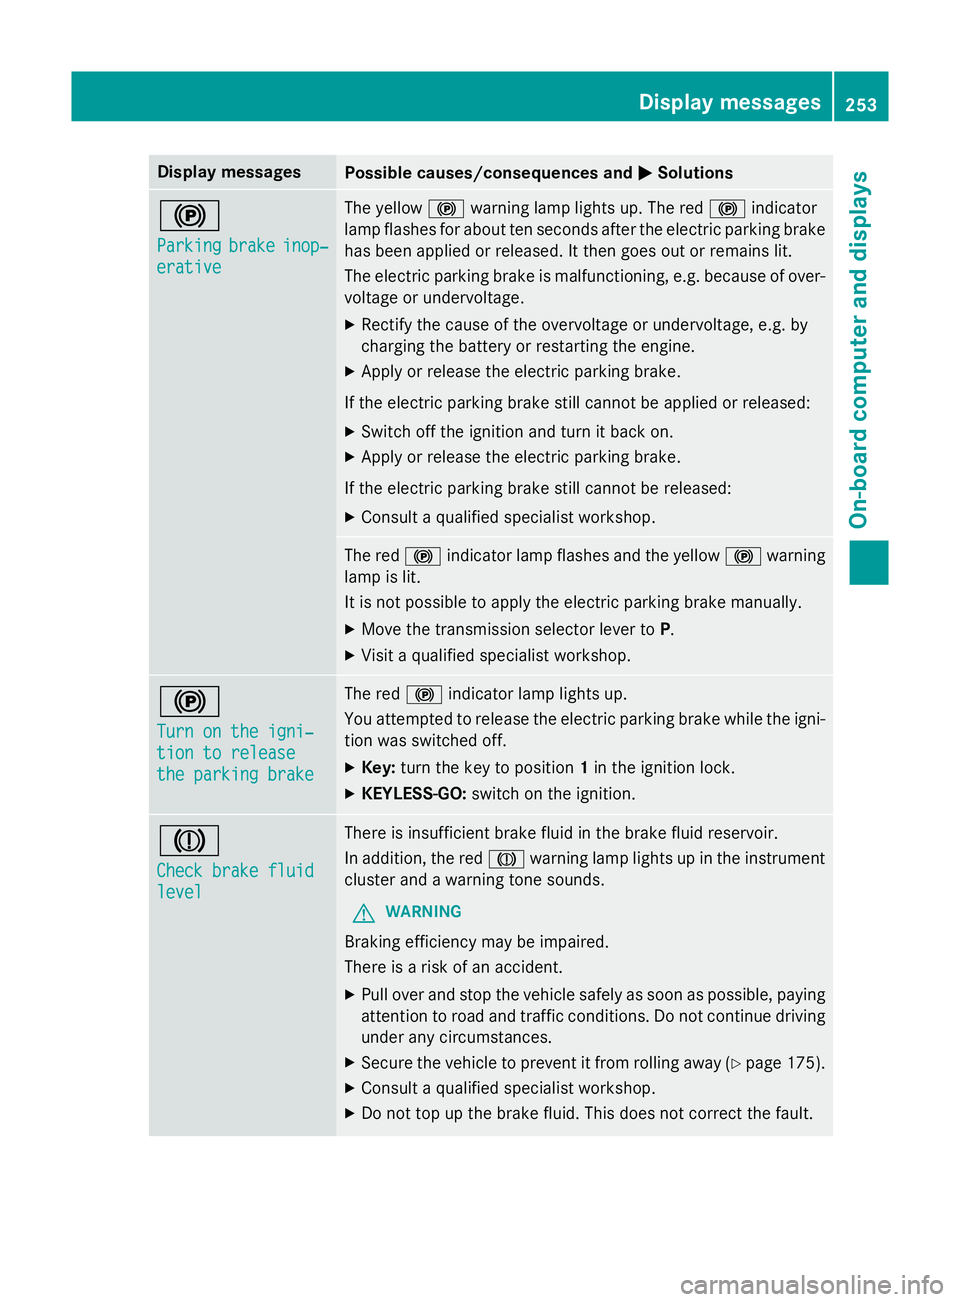
Parking Parking
brake
brakeinop‐
inop‐
erative
erative The yellow
!warning lamp lights up. The red !indicator
lamp flashes for about ten seconds after the electric parking brake
has been applied or released. It then goes out or remains lit.
The electric parking brake is malfunctioning, e.g. because of over- voltage or undervoltage.
X Rectify the cause of the overvoltage or undervoltage, e.g. by
charging the battery or restarting the engine.
X Apply or release the electric parking brake.
If the electric parking brake still cannot be applied or released: X Switch off the ignition and turn it back on.
X Apply or release the electric parking brake.
If the electric parking brake still cannot be released: X Consult a qualified specialist workshop. The red
!indicator lamp flashes and the yellow !warning
lamp is lit.
It is not possible to apply the electric parking brake manually.
X Move the transmission selector lever to P.
X Visit a qualified specialist workshop. !
Turn on the igni‐ Turn on the igni‐
tion to release tion to release
the parking brake the parking brake The red
!indicator lamp lights up.
You attempted to release the electric parking brake while the igni-
tion was switched off.
X Key: turn the key to position 1in the ignition lock.
X KEYLESS-GO: switch on the ignition. J
Check brake fluid Check brake fluid
level level There is insufficient brake fluid in the brake fluid reservoir.
In addition, the red Jwarning lamp lights up in the instrument
cluster and a warning tone sounds.
G WARNING
Braking efficiency may be impaired.
There is a risk of an accident. X Pull over and stop the vehicle safely as soon as possible, paying
attention to road and traffic conditions. Do not continue driving
under any circumstances.
X Secure the vehicle to prevent it from rolling away (Y page 175).
X Consult a qualified specialist workshop.
X Do not top up the brake fluid. This does not correct the fault. Display
messages
253On-board computer and displays Z
Page 258 of 637
Display messages
Possible causes/consequences and
M
MSolutions 6
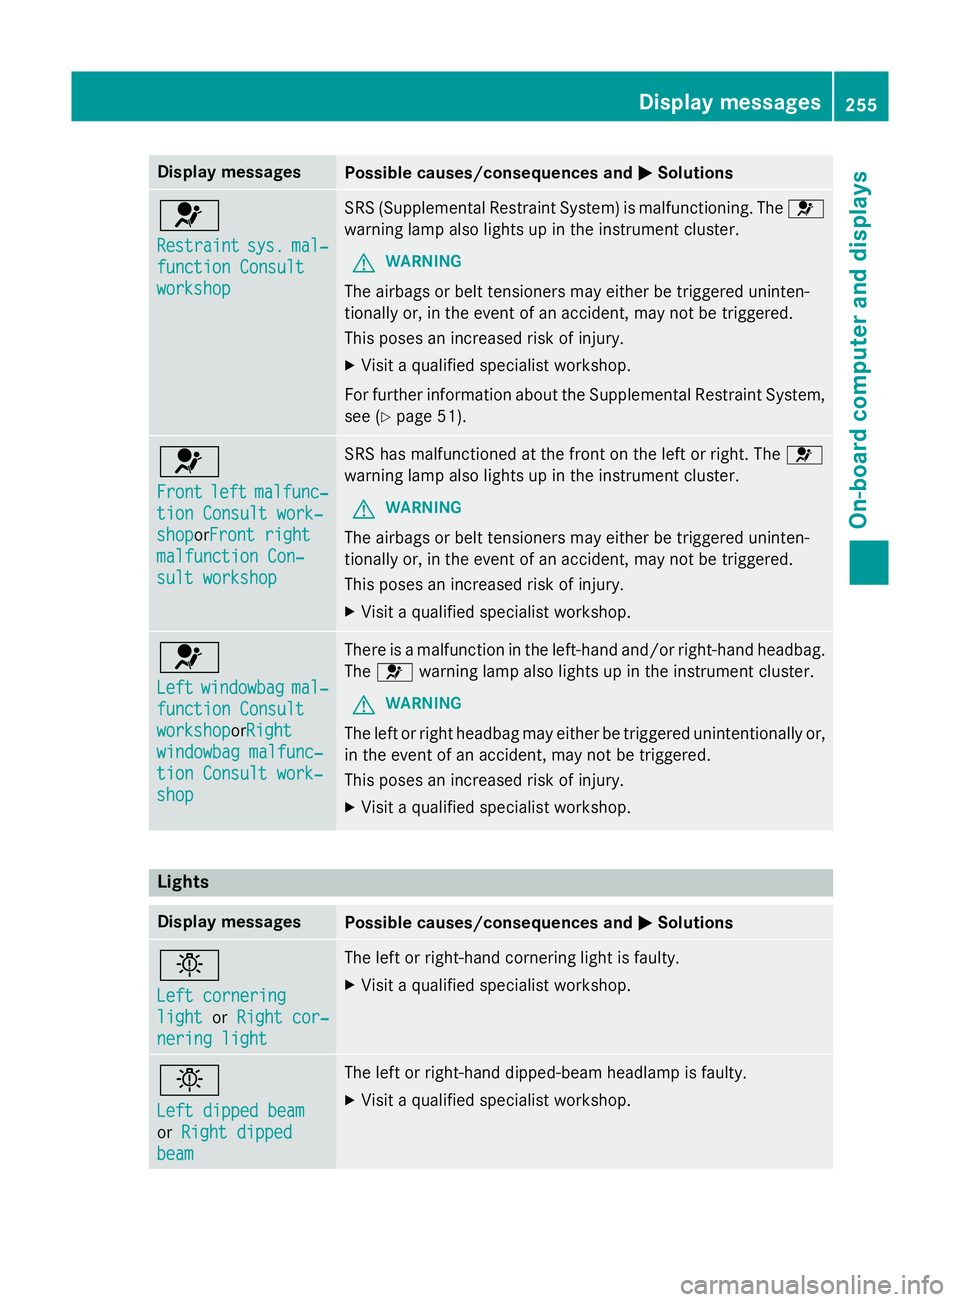
Restraint Restraint
sys.
sys.mal‐
mal‐
function Consult
function Consult
workshop workshop SRS (Supplemental Restraint System) is malfunctioning. The
6
warning lamp also lights up in the instrument cluster.
G WARNING
The airbags or belt tensioners may either be triggered uninten-
tionally or, in the event of an accident, may not be triggered.
This poses an increased risk of injury. X Visit a qualified specialist workshop.
For further information about the Supplemental Restraint System, see (Y page 51). 6
Front Front
left
leftmalfunc‐
malfunc‐
tion Consult work‐
tion Consult work‐
shop shopor Front right
Front right
malfunction Con‐
malfunction Con‐
sult workshop sult workshop SRS has malfunctioned at the front on the left or right. The
6
warning lamp also lights up in the instrument cluster.
G WARNING
The airbags or belt tensioners may either be triggered uninten-
tionally or, in the event of an accident, may not be triggered.
This poses an increased risk of injury. X Visit a qualified specialist workshop. 6
Left Left
windowbag
windowbag mal‐
mal‐
function Consult
function Consult
workshop workshoporRight Right
windowbag malfunc‐
windowbag malfunc‐
tion Consult work‐ tion Consult work‐
shop shop There is a malfunction in the left-hand and/or right-hand headbag.
The 6 warning lamp also lights up in the instrument cluster.
G WARNING
The left or right headbag may either be triggered unintentionally or,
in the event of an accident, may not be triggered.
This poses an increased risk of injury.
X Visit a qualified specialist workshop. Lights
Display messages
Possible causes/consequences and
M
MSolutions b
Left cornering Left cornering
light light
orRight cor‐
Right cor‐
nering light
nering light The left or right-hand cornering light is faulty.
X Visit a qualified specialist workshop. b
Left dipped beam Left dipped beam
or
Right dipped Right dipped
beam
beam The left or right-hand dipped-beam headlamp is faulty.
X Visit a qualified specialist workshop. Display
messages
255On-board computer and displays Z
Page 376 of 637
instrument cluster; see the separate vehicle
Owner's Manual.
X To hide the menu: slideZVthe COMAND
controller and, when the Full screen
Full screen
menu item is shown, press W.
X To call up the scale bar: as soon as you
turn cVd the COMAND controller, scale
bar ?appears.
X Turn cVd until the desired scale is set.
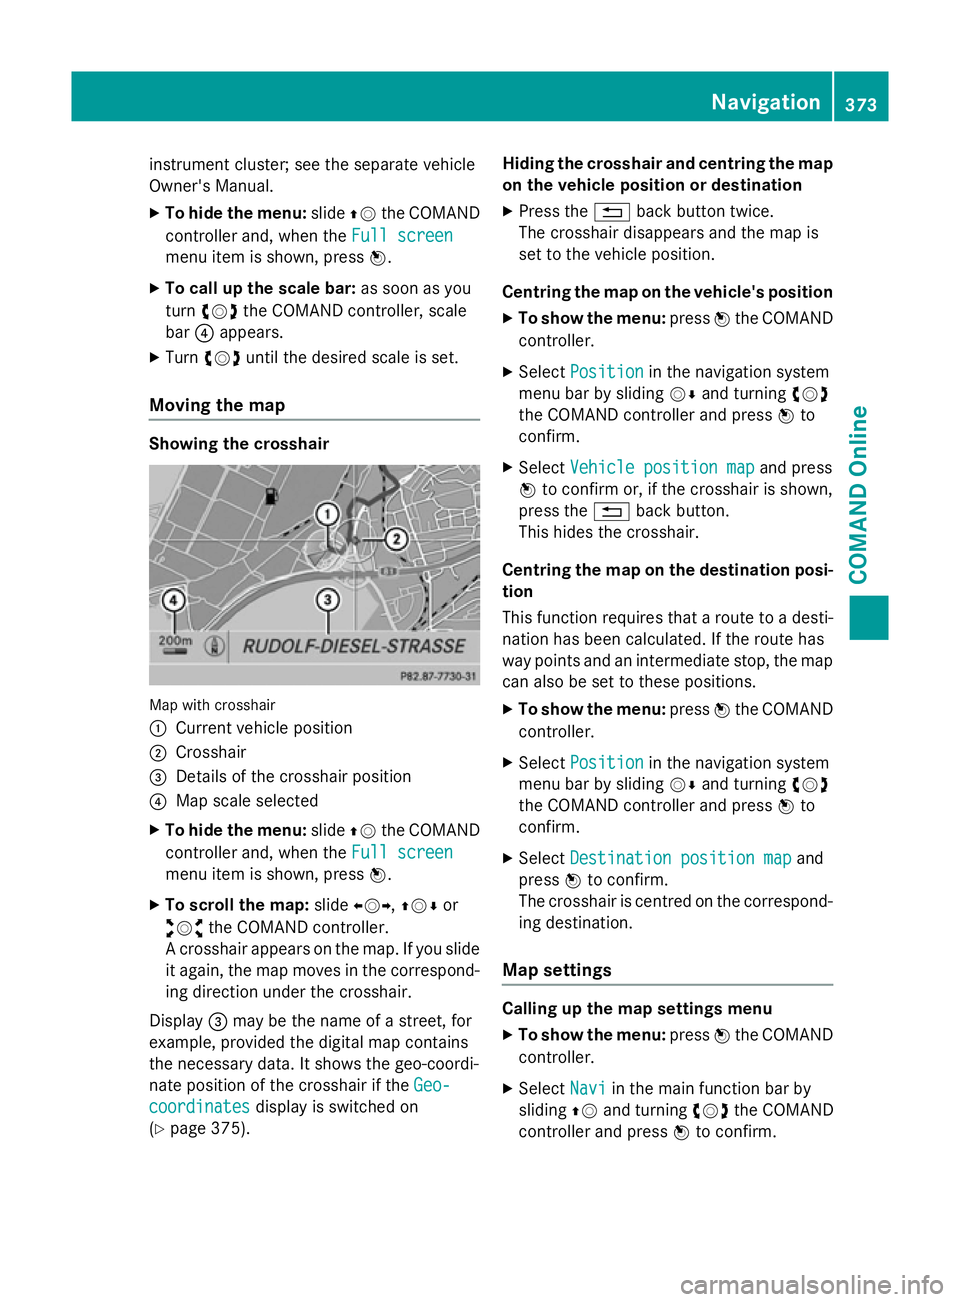
Moving the map Showing the crosshair
Map with crosshair
:
Current vehicle position
; Crosshair
= Details of the crosshair position
? Map scale selected
X To hide the menu: slideZVthe COMAND
controller and, when the Full screen Full screen
menu item is shown, press W.
X To scroll the map: slideXVY, ZVÆor
aVb the COMAND controller.
A crosshair appears on the map. If you slide
it again, the map moves in the correspond- ing direction under the crosshair.
Display =may be the name of a street, for
example, provided the digital map contains
the necessary data. It shows the geo-coordi-
nate position of the crosshair if the Geo-
Geo-
coordinates
coordinates display is switched on
(Y page 375). Hiding the crosshair and centring the map
on the vehicle position or destination
X Press the %back button twice.
The crosshair disappears and the map is
set to the vehicle position.
Centring the map on the vehicle's position
X To show the menu: pressWthe COMAND
controller.
X Select Position Position in the navigation system
menu bar by sliding VÆand turning cVd
the COMAND controller and press Wto
confirm.
X Select Vehicle position map
Vehicle position map and press
W to confirm or, if the crosshair is shown,
press the %back button.
This hides the crosshair.
Centring the map on the destination posi- tion
This function requires that a route to a desti- nation has been calculated. If the route has
way points and an intermediate stop, the map
can also be set to these positions.
X To show the menu: pressWthe COMAND
controller.
X Select Position Position in the navigation system
menu bar by sliding VÆand turning cVd
the COMAND controller and press Wto
confirm.
X Select Destination position map
Destination position map and
press Wto confirm.
The crosshair is centred on the correspond-
ing destination.
Map settings Calling up the map settings menu
X To show the menu: pressWthe COMAND
controller.
X Select Navi
Naviin the main function bar by
sliding ZVand turning cVdthe COMAND
controller and press Wto confirm. Navigation
373COMAND Online Z
Page 431 of 637
vehicle. There is a risk of an accident. Only
operate this equipment when the traffic sit-
uation permits. If you cannot be sure of this,
stop the vehicle paying attention to road and traffic conditions and operate the equipment
with the vehicle stationary.
You must observe the legal requirements for
the country in which you are currently driving when operating COMAND Online.
X Call up the COMAND phone book
(Y page 401).
X Select MB Contact
MB Contact by turningcVdthe
COMAND controller.
There are two ways to contact the Mercedes-
Benz Customer Centre:
X Press Wthe COMAND controller to con-
firm.
or X Press the 6button on COMAND Online.
This initiates a call. When the call is con-
nected, a voice message prompts you to
confirm the data transmission by pressing
the stated number on the COMAND Online keypad. After confirmation, COMAND
Online sends the required vehicle data.
i Alternatively, you can initiate a call using
the multifunction steering wheel (see the
vehicle Owner's Manual).
During data transmission, you will see a cor-
responding symbol in the display. This may
take a moment. Then, you can select the
desired service and be connected to a spe-
cialist from the Mercedes-Benz Service
Centre.
i Contact your Mercedes-Benz Service
Centre for further information on
Mercedes-Benz Contact, the range of serv- ices offered and on using the function.
Demand-actuated service message To attain the optimal level of support in main-
taining your vehicle, you can arrange a service
appointment directly with the Mercedes-Benz
Customer Centre. As well as a warning in the instrument cluster, a window appears in the COMAND display. Here, a message actively
indicates that a service is required and this
message enables you to contact the
Mercedes-Benz Customer Centre directly.
You will see the message:
is is due
due soon.
soon. Would
Wouldyou
youlike
like to
tomake
make
a workshop appointment?
a workshop appointment?
X To arrange a service appointment:
select Call Now Call Now by turning cVdthe
COMAND controller and press Wto con-
firm.
After your confirmation, the vehicle data is sent via Mercedes-Benz Contact, and a
Customer Centre employee personally
deals with your appointment. The informa-
tion is then sent to your desired service
outlet.
They will then contact with you within 24
hours to confirm the following details:
R scope of service
R length of stay
R price
X To arrange a service appointment later:
select Call Later
Call Later and confirm with W.
The window is hidden, then reappears after a certain amount of time.
X To not arrange a service appointment:
select No Noand confirm with W.
The window is hidden and does not show
this maintenance requirement again.
Mercedes-Benz Contact Accident Assis- tance Mercedes-Benz emergency call system
active
Mercedes-Benz Contact Accident Assistance
is a supplement to the Mercedes-Benz emer-
gency call system (Y page 429). If an emer-
gency call to the Mercedes-Benz emergency
call centre has been triggered following an
accident, a voice connection with an operator
is established. Depending on the accident sit-
uation, the operator may then suggest that
you forward the call to Mercedes-Benz Con-
tact Accident Assistance. This will enable you 428
TelephoneCOMAND Online
Page 530 of 637
X
Select Settings
Settings using the:button
and press the 9button to confirm.
X Select Language
Language using the9: but-
tons and press the 9button to confirm.
The list of languages appears. A #dot indi-
cates the current setting.
X Select a language using the 9:but-
tons and press the 9button to confirm.
The Rear Seat Entertainment System acti-
vates the selected language.
Changing the display design X
Select Settings Settings in the system menu using
the : button on the remote control and
press the 9button to confirm.
X Select Day design
Day design ,Night design
Night design or
Automatic
Automatic using the9: buttons
and press the 9button to confirm.
The dot indicates the current setting. Design Explanation
Day design
Day design The display is set per-
manently to day
design.
Night design Night design The display is set per-
manently to night
design.
Automatic Automatic The display design
changes depending on
the vehicle instrument
cluster illumination.
Setting the brightness
X
Select Settings Settings in the system menu using
the : button on the remote control and
press the 9button to confirm.
X Select Brightness
Brightness using the9:
buttons and press the 9button to confirm.
A scale appears. X
Adjust the brightness using the 9:
buttons and press the 9button to confirm.
The brightness bar moves up or down. The picture becomes lighter or darker in
accordance with the scale.
Hiding/showing the picture X
To hide the picture: selectDisplay off Display off
in the system menu using the :;
buttons on the remote control and press
the 9button to confirm.
The picture is hidden.
X To display the picture: press the9but-
ton. Audio CD/DVD and MP3 mode
Important safety notes G
WARNING
The CD/DVD drive is a class 1 laser product. If you open the housing of the CD/DVD drive,
invisible laser beams may be released. These laser beams may damage your retina. There is
a risk of injury.
You must not open the casing. Always have
maintenance work and repairs carried out at a
qualified specialist workshop.
General notes You will find information on the following top-
ics in the Audio section:
R Notes on CDs/DVDs (Y page 480)
R Notes on MP3 mode (Y page 479)
R Notes on copyright (Y page 480) Rear Seat Entertainment System
527COMAND Online Z
Page 585 of 637
H
Environmental note
Have the used tyre sealant bottle disposed of professionally, e.g. at a qualified specialist
workshop.
If a tyre pressure of 180 kPa (1.8 bar/26 psi) has been achieved after ten minutes:
X Switch off the tyre inflation compressor.
X Unscrew the filler hose from the valve of
the faulty tyre.
X Stow the tyre sealant bottle, the tyre infla-
tion compressor and the warning triangle.
X Pull away immediately .
The maximum speed for a tyre sealed with
tyre sealant is 80 km/h. The upper part of
the TIREFIT sticker must be affixed to the
instrument cluster where it will be easily
seen by the driver.
X Stop after driving for approximately ten
minutes and check the tyre pressure with
the tyre inflation compressor.
The tyre pressure must now be at least
130 kPa (1.3 bar/19 psi). G
WARNING
If the required tyre pressure is not reached
after driving for a short period, the tyre is too badly damaged. The tyre sealant cannot
repair the tyre in this instance. Damaged tyres and a tyre pressure that is too low can signif-
icantly impair the vehicle's braking and driv-
ing characteristics. There is a risk of accident.
Do not continue driving. Contact a qualified
specialist workshop.
i In your vehicle, you will find a sticker with
the Mercedes-Benz Service24h telephone
number, e.g. on the B-pillar on the driver's
side.
X Correct the tyre pressure if it is still at least
130 kPa (1.3 bar/19 psi) (see the fuel filler
flap for values).
X To increase the tyre pressure: switch on
the tyre inflation compressor. X
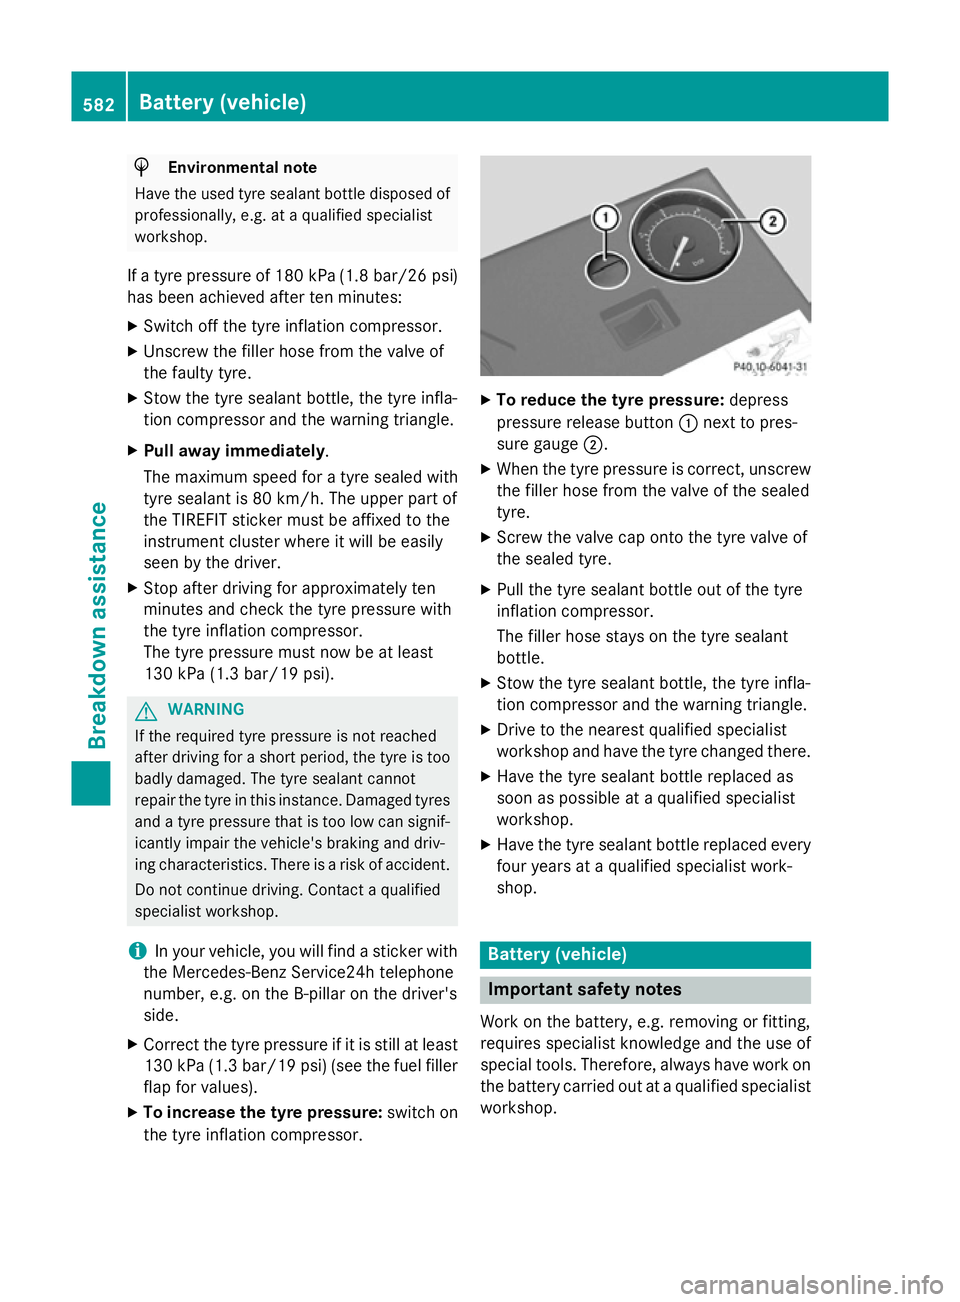
To reduce the tyre pressure: depress
pressure release button :next to pres-
sure gauge ;.
X When the tyre pressure is correct, unscrew
the filler hose from the valve of the sealed
tyre.
X Screw the valve cap onto the tyre valve of
the sealed tyre.
X Pull the tyre sealant bottle out of the tyre
inflation compressor.
The filler hose stays on the tyre sealant
bottle.
X Stow the tyre sealant bottle, the tyre infla-
tion compressor and the warning triangle.
X Drive to the nearest qualified specialist
workshop and have the tyre changed there.
X Have the tyre sealant bottle replaced as
soon as possible at a qualified specialist
workshop.
X Have the tyre sealant bottle replaced every
four years at a qualified specialist work-
shop. Battery (vehicle)
Important safety notes
Work on the battery, e.g. removing or fitting,
requires specialist knowledge and the use of
special tools. Therefore, always have work on the battery carried out at a qualified specialist
workshop. 582
Battery (vehicle)Breakdown assistance
Page 587 of 637
!
Have the battery checked regularly at a
qualified specialist workshop.
Observe the service intervals in the Service
Booklet or contact a qualified specialist
workshop for more information.
! You should have all work involving the
battery carried out at a qualified specialist
workshop. In the exceptional case that it is
necessary for you to disconnect the battery yourself, make sure that:
R you switch off the engine and remove the
key. On vehicles with KEYLESS-GO,
ensure that the ignition is switched off.
Check that all the indicator lamps in the
instrument cluster are off. Otherwise,
electronic components, such as the
alternator, may be damaged.
R you first remove the negative terminal
clamp and then the positive terminal
clamp. Never swap the terminal clamps.
Otherwise, the vehicle's electronic sys-
tem may be damaged.
R the transmission is locked in position P
after disconnecting the battery. The vehi-
cle is secured against rolling away. You
can then no longer move the vehicle.
The battery and the cover of the positive
terminal clamp must be fitted securely dur- ing operation.
In order for the battery to achieve the maxi-
mum possible service life, it must always be
sufficiently charged.
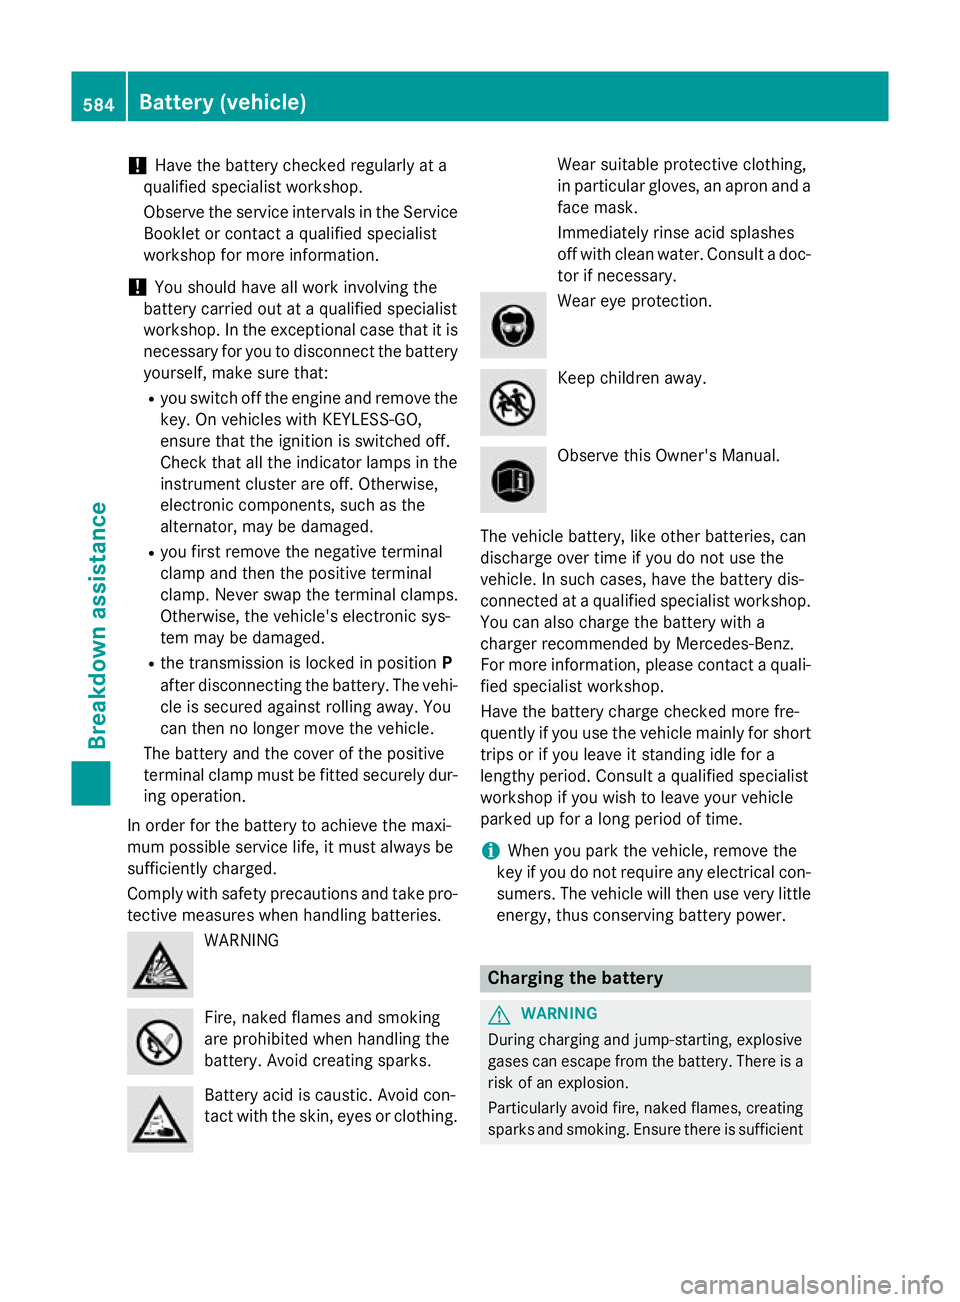
Comply with safety precautions and take pro-
tective measures when handling batteries. WARNING
Fire, naked flames and smoking
are prohibited when handling the
battery. Avoid creating sparks.
Battery acid is caustic. Avoid con-
tact with the skin, eyes or clothing. Wear suitable protective clothing,
in particular gloves, an apron and a
face mask.
Immediately rinse acid splashes
off with clean water. Consult a doc- tor if necessary. Wear eye protection.
Keep children away.
Observe this Owner's Manual.
The vehicle battery, like other batteries, can
discharge over time if you do not use the
vehicle. In such cases, have the battery dis-
connected at a qualified specialist workshop.
You can also charge the battery with a
charger recommended by Mercedes-Benz.
For more information, please contact a quali- fied specialist workshop.
Have the battery charge checked more fre-
quently if you use the vehicle mainly for short
trips or if you leave it standing idle for a
lengthy period. Consult a qualified specialist
workshop if you wish to leave your vehicle
parked up for a long period of time.
i When you park the vehicle, remove the
key if you do not require any electrical con- sumers. The vehicle will then use very littleenergy, thus conserving battery power. Charging the battery
G
WARNING
During charging and jump-starting, explosive
gases can escape from the battery. There is a risk of an explosion.
Particularly avoid fire, naked flames, creating
sparks and smoking. Ensure there is sufficient 584
Battery (vehicle)Breakdown assistance