2012 MERCEDES-BENZ SL ROADSTER turn signal
[x] Cancel search: turn signalPage 397 of 637
X
Select the list symbol to the right of the
entry by sliding VYthe COMAND control-
ler and press Wto confirm.
X Select De-authorise
De-authorise and pressWto con-
firm.
A prompt appears, asking whether you
really wish to de-authorise this device.
X Select Yes YesorNo
No.
If you select Yes
Yes, the device will be deleted
from the Bluetooth ®
telephones list.
If you select No
No, the process will be cancel-
led.
i Before re-authorising the mobile phone,
you should also delete the device name MB
MB
Bluetooth
Bluetooth from your mobile phone's Blue-
tooth ®
list.
Displaying connection details X
Press the %function button on
COMAND Online.
X Select Connect device
Connect device from the tele-
phone basic menu by sliding VÆand turn-
ing cVdthe COMAND controller and
press Wto confirm.
The Bluetooth ®
phone list appears.
X Select the desired mobile phone in the
Bluetooth ®
phone list.
X Select the list symbol to the right of the
entry by sliding VYthe COMAND control-
ler and press Wto confirm.
X Select Details
Details and press Wto confirm.
The following information concerning the
selected mobile phone is shown:
R Bluetooth ®
name
R Bluetooth ®
address
R availability status (shown after a new
search)
R authorisation status
X To close the detailed view: turncVd or
slide XVY the COMAND controller. Telephone basic menu (Bluetooth
®
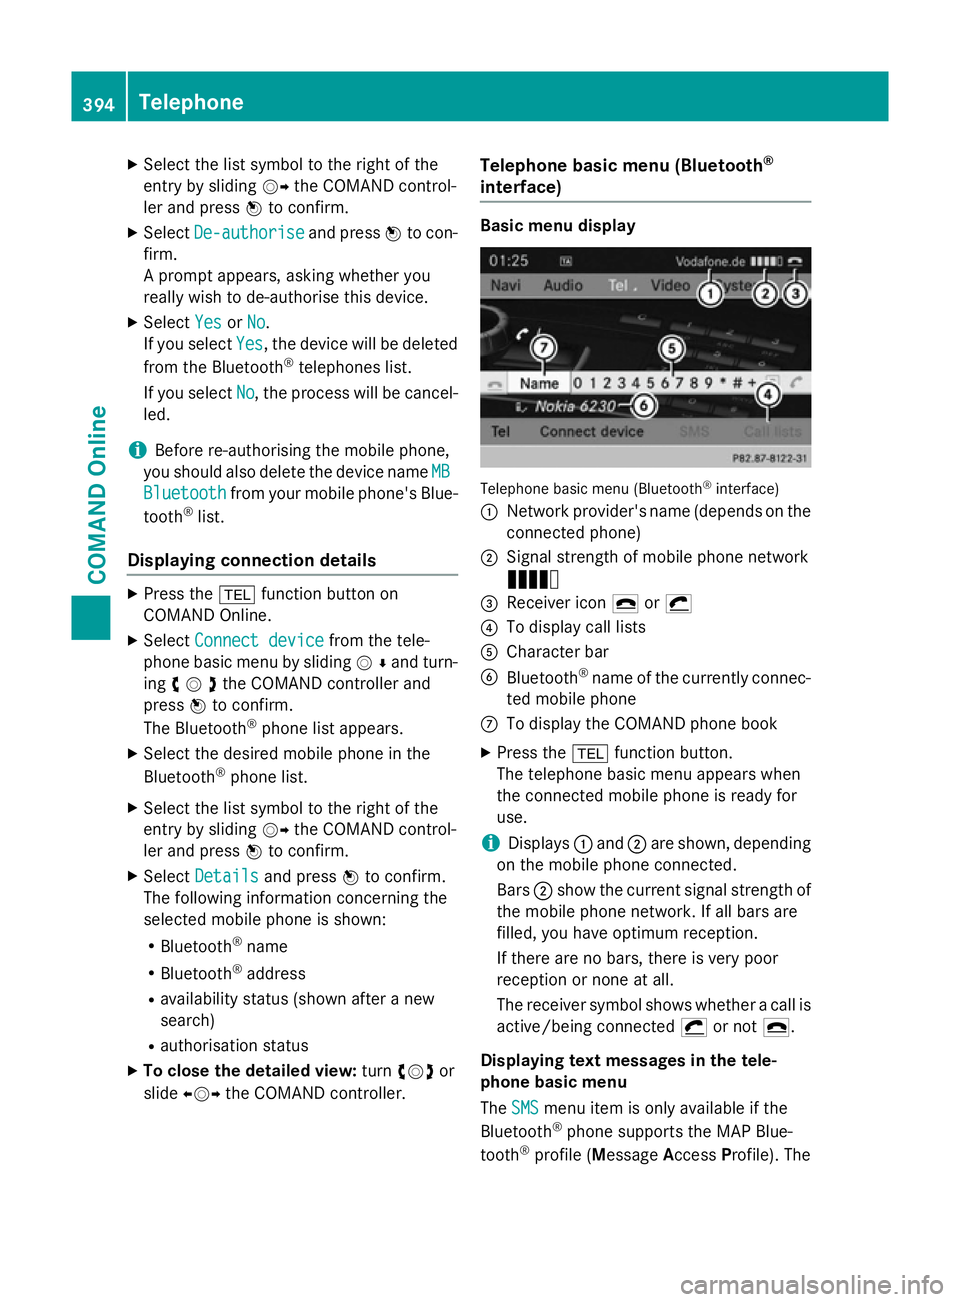
interface) Basic menu display
Telephone basic menu (Bluetooth
®
interface)
: Network provider's name (depends on the
connected phone)
; Signal strength of mobile phone network
Ä
= Receiver icon ¢or¡
? To display call lists
A Character bar
B Bluetooth ®
name of the currently connec-
ted mobile phone
C To display the COMAND phone book
X Press the %function button.
The telephone basic menu appears when
the connected mobile phone is ready for
use.
i Displays
:and ;are shown, depending
on the mobile phone connected.
Bars ;show the current signal strength of
the mobile phone network. If all bars are
filled, you have optimum reception.
If there are no bars, there is very poor
reception or none at all.
The receiver symbol shows whether a call is active/being connected ¡or not ¢.
Displaying text messages in the tele-
phone basic menu
The SMS SMS menu item is only available if the
Bluetooth ®
phone supports the MAP Blue-
tooth ®
profile (Message AccessProfile). The 394
TelephoneCOMAND Online
Page 426 of 637
X
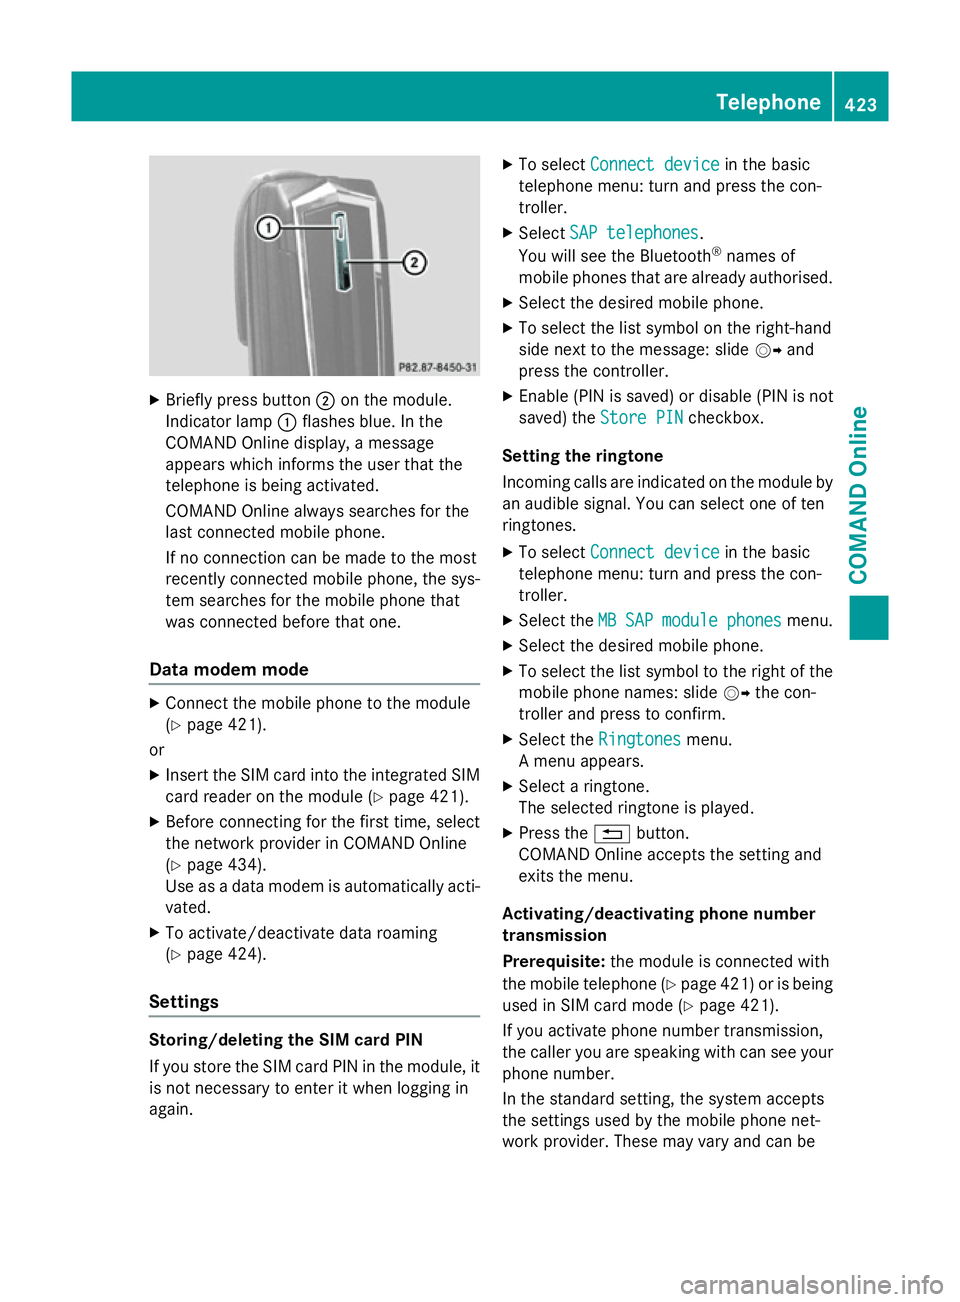
Briefly press button ;on the module.
Indicator lamp :flashes blue. In the
COMAND Online display, a message
appears which informs the user that the
telephone is being activated.
COMAND Online always searches for the
last connected mobile phone.
If no connection can be made to the most
recently connected mobile phone, the sys- tem searches for the mobile phone that
was connected before that one.
Data modem mode X
Connect the mobile phone to the module
(Y page 421).
or
X Insert the SIM card into the integrated SIM
card reader on the module (Y page 421).
X Before connecting for the first time, select
the network provider in COMAND Online
(Y page 434).
Use as a data modem is automatically acti- vated.
X To activate/deactivate data roaming
(Y page 424).
Settings Storing/deleting the SIM card PIN
If you store the SIM card PIN in the module, it
is not necessary to enter it when logging in
again. X
To select Connect device Connect device in the basic
telephone menu: turn and press the con-
troller.
X Select SAP telephones SAP telephones.
You will see the Bluetooth ®
names of
mobile phones that are already authorised.
X Select the desired mobile phone.
X To select the list symbol on the right-hand
side next to the message: slide VYand
press the controller.
X Enable (PIN is saved) or disable (PIN is not
saved) the Store PIN
Store PIN checkbox.
Setting the ringtone
Incoming calls are indicated on the module by
an audible signal. You can select one of ten
ringtones.
X To select Connect device
Connect device in the basic
telephone menu: turn and press the con-
troller.
X Select the MB MBSAP
SAP module
module phones
phonesmenu.
X Select the desired mobile phone.
X To select the list symbol to the right of the
mobile phone names: slide VYthe con-
troller and press to confirm.
X Select the Ringtones
Ringtones menu.
A menu appears.
X Select a ringtone.
The selected ringtone is played.
X Press the %button.
COMAND Online accepts the setting and
exits the menu.
Activating/deactivating phone number
transmission
Prerequisite: the module is connected with
the mobile telephone (Y page 421)or is being
used in SIM card mode (Y page 421).
If you activate phone number transmission,
the caller you are speaking with can see your phone number.
In the standard setting, the system accepts
the settings used by the mobile phone net-
work provider. These may vary and can be Telephone
423COMAND Online Z
Page 470 of 637
X
Option 1: pressWthe COMAND controller
when the display/selection window is
active.
X Select Autostore
Autostore in the presets by turning
cVd the COMAND controller and press W
to confirm.
X Option 2: selectPresets
Presets by sliding VÆ
and turning cVdthe COMAND controller
and press Wto confirm.
X Select Autostore
Autostore and pressWto confirm.
In both cases, COMAND Online searches
for stations that can be received. You will
see a message to this effect. The available
stations are automatically stored in the pre- set positions.
X To cancel storing: selectCancel
Cancel and
press Wto confirm.
Radio Data System (RDS) General notes
The Radio Data System (RDS) provides inaud-
ible additional information in the FM wave-
band. The system consists of a listening
receiver and a monitoring receiver.
The monitoring receiver permanently scans
the FM waveband and collects certain data
from all receivable stations. This includes, for
instance, reception quality and RDS data
such as programme names and alternative
frequencies. COMAND Online stores the data and constantly updates the memory. The
audio receiver is therefore able to switch
automatically to an alternative frequency with
a better signal.
i RDS only functions for stations which
transmit RDS data.
Switching RDS on/off
You can use the Frequency fix (radio mode) or Station fix (DAB mode) functions to prevent
COMAND Online from switching between the
alternative frequencies of a station. This is
useful, for example, when the same content is broadcast with a time delay, or when there is
interference on one of the frequencies.
X Select Radio
Radio in the radio display by sliding
VÆ and turning cVdthe COMAND con-
troller and press Wto confirm.
X Select Frequency Frequency fix
fixorStation
Station fix
fix by
turning cVdthe COMAND controller and
press Wto confirm.
Depending on the previous status, switch
Frequency fix Frequency fix onO or off ª.
Traffic Programme Note
Many FM stations transmit traffic announce-
ments (TA). You can also hear these in DAB
radio mode.
Switching traffic announcements on/off
X Option 1: selectRadio Radio by sliding VÆand
turning cVdthe COMAND controller and
press Wto confirm.
The tick next to TA
TAindicates that traffic
announcement reception is switched on.
You see the TA TAsymbol in the status bar.
X Select TA
TAand press Wto confirm.
TA
TA is switched on or off, depending on the
previous status.
X Option 2: on COMAND Online or on the
multifunction steering wheel, press and
hold the 8button until the TA TAicon lights
up or goes out in the status bar.
A warning tone sounds.
Once traffic announcements have been
switched on, COMAND Online selects an RDS station.
Traffic Programme is retrieved from:
R the currently selected FM station
R an RDS station from the network of the
currently selected FM station
R the RDS station with the best reception
quality
When traffic announcements are switched
on, a traffic announcement will interrupt the Audio
467COMAND Online Z
Page 471 of 637
audio signal from the currently activated
audio or video source.
i Telephone conversations and navigation
announcements are not interrupted.
A display message appears in the display in all
audio operating modes.
Interrupting a traffic announcement
During a traffic announcement:
X On COMAND Onlin eor on the multifunction
steering wheel, briefly press the 8but-
ton.
or
X Press the 9,:or9 button on the
multifunction steering wheel.
COMAND Online switches back to the
audio source that was selected before the
announcement. Any subsequent new
announcements will continue to interrupt
the audio source.
Radio text/radio text plus Messages in the display
The function is available in FM mode and in
DAB radio mode.
Radio text/radio text plus consists of addi-
tionally transmitted data, e.g. information on
the current programme, which is displayed in the COMAND display.
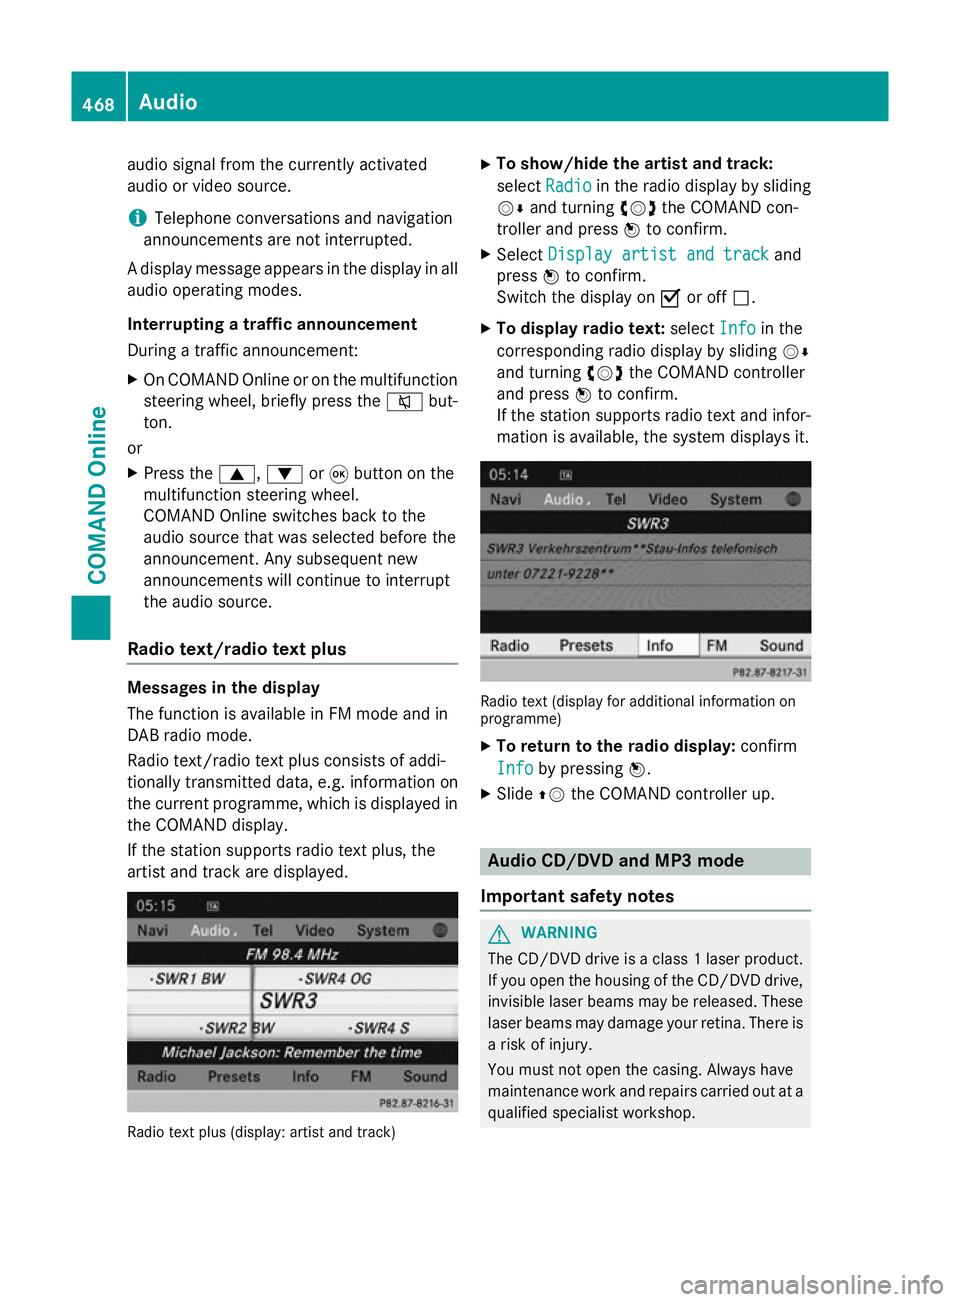
If the station supports radio text plus, the
artist and track are displayed. Radio text plus (display: artist and track) X
To show/hide the artist and track:
select Radio Radio in the radio display by sliding
VÆ and turning cVdthe COMAND con-
troller and press Wto confirm.
X Select Display artist and track
Display artist and track and
press Wto confirm.
Switch the display on Oor off ª.
X To display radio text: selectInfo
Info in the
corresponding radio display by sliding VÆ
and turning cVdthe COMAND controller
and press Wto confirm.
If the station supports radio text and infor- mation is available, the system displays it. Radio text (display for additional information on
programme)
X To return to the radio display: confirm
Info
Info by pressing W.
X Slide ZVthe COMAND controller up. Audio CD/DVD and MP3 mode
Important safety notes G
WARNING
The CD/DVD drive is a class 1 laser product. If you open the housing of the CD/DVD drive,
invisible laser beams may be released. These laser beams may damage your retina. There is
a risk of injury.
You must not open the casing. Always have
maintenance work and repairs carried out at a
qualified specialist workshop. 468
AudioCOMAND Online
Page 505 of 637
Basic settings
Adjusting the brightness, contrast or
colour The following describes the TV, video DVD
and video AUX modes.
X In TV or video DVD mode, press Wthe
COMAND controller.
The menu is shown.
X Select TV TV,DVD-V DVD-V orAux
Aux by turning cVdthe
COMAND controller and press Wto con-
firm.
A menu appears.
X Select Brightness Brightness, Contrast ContrastorColour
Colour
by turning cVdthe COMAND controller
and press Wto confirm.
X Set the value between - 5 and + 5 and press
W to confirm.
Changing the picture format The following describes the TV, video DVD
and video AUX modes.
X In TV or video DVD mode, press Wthe
COMAND controller.
The menu is shown.
X Select TV TV,DVD-V
DVD-V orAux
Aux by turning cVdthe
COMAND controller and press Wto con-
firm.
A menu appears.
X Select Automatic Automatic ,16:9 optimised
16:9 optimised ,4:3
4:3
or Widescreen
Widescreen and pressWto confirm.
The dot in front of the entry indicates the
currently selected format.
X Select a setting by turning cVdthe
COMAND controller and press Wto con-
firm. TV mode
Reception quality Portable electronic devices in the vehicle may
seriously impair TV reception. The TV tuner is designed to receive digital TV
channels compliant with the DVB-T standard. If the reception deteriorates, the TV receiver
automatically switches to an alternative digi-
tal frequency transmitting the same pro-
gramme content with better reception.
i In some countries, DVB-T may not be
available, or may not be available in all
areas.
The constantly changing reception conditions
while the vehicle is in motion can interrupt the signal. If the reception is too poor,
COMAND Online can mute the sound and
freeze or hide the picture. To indicate this, an
icon of a radio tower with a line through it
appears in the display.
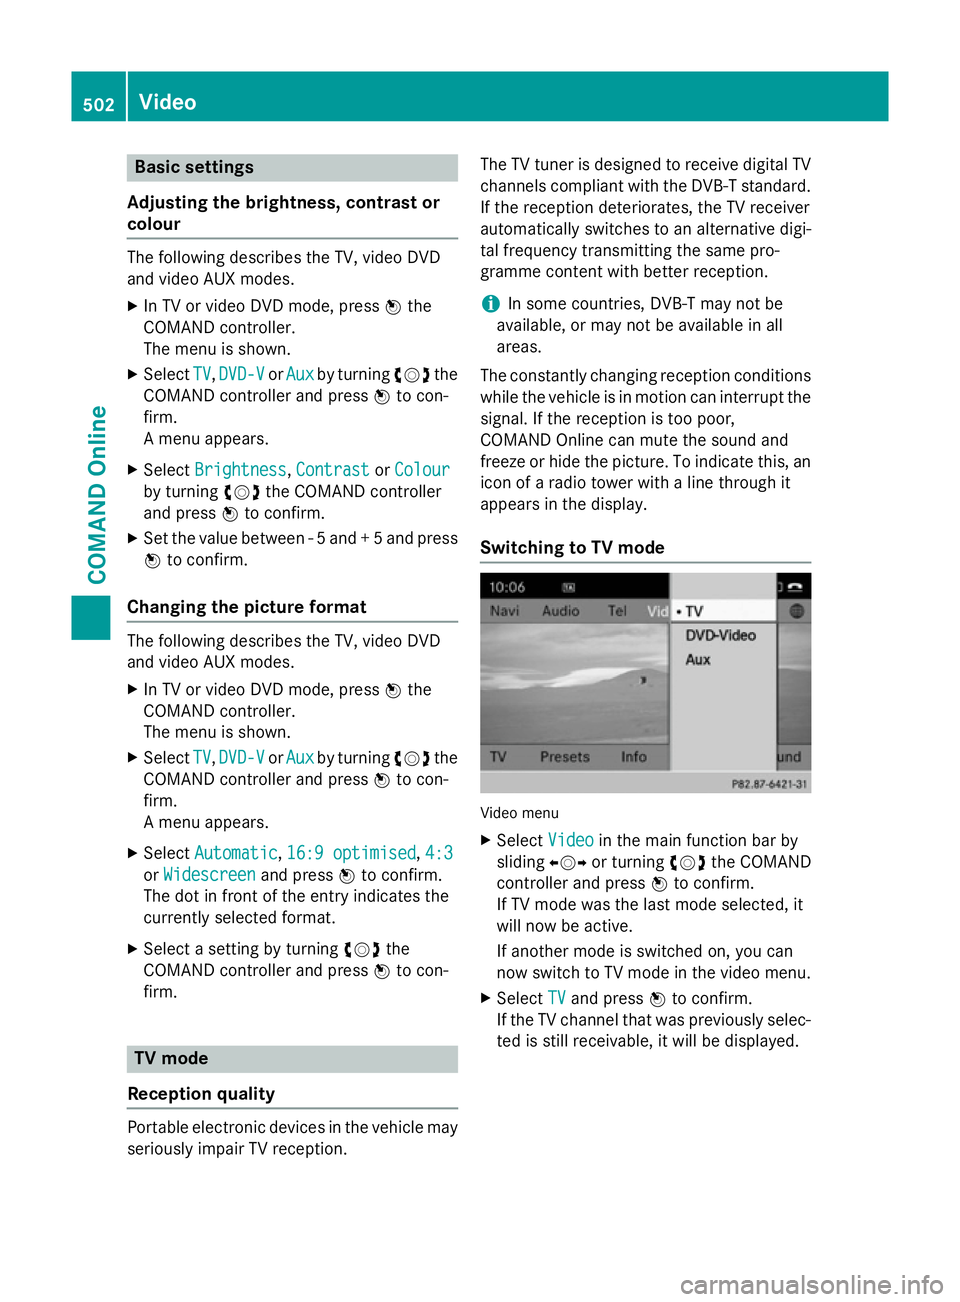
Switching to TV mode Video menu
X Select Video Videoin the main function bar by
sliding XVYor turning cVdthe COMAND
controller and press Wto confirm.
If TV mode was the last mode selected, it
will now be active.
If another mode is switched on, you can
now switch to TV mode in the video menu.
X Select TV
TV and press Wto confirm.
If the TV channel that was previously selec-
ted is still receivable, it will be displayed. 502
VideoCOMAND Online
Page 557 of 637
lamp
:lights up yellow after ten seconds
have elapsed.
X Release button ;,=or?. Indicator
lamp :flashes yellow.
X To program the remote control: point
garage door remote control Atowards
buttons ;to? on the rear-view mirror at
a distance of 5 to 20 cm.
X Press and hold button Bon remote control
A until indicator lamp :lights up green.
When indicator lamp :lights up green:
programming is finished.
When indicator lamp :flashes green: pro-
gramming was successful. The next step is to synchronise the rolling code.
X Release button Bof remote control Aof
the garage door drive.
If indicator lamp :lights up red: repeat the
programming process for the correspond-
ing button on the rear-view mirror. When
doing so, vary the distance between remote
control Aand the rear-view mirror.
The required distance between remote
control Aand the integrated garage door
opener depends on the garage door drive
system. Several attempts may be required.
You should test every position for at least
25 seconds before trying another position.
Synchronising the rolling code
Pay attention to the "Important safety notes"
(Y page 553).
If the garage door system uses a rolling code, you will also have to synchronise the garage
door system with the integrated garage door
opener in the rear-view mirror. To do this you
will need to use the programming button on
the door drive control panel. Depending on
the manufacturer, the location of the pro-
gramming button may vary. It is usually loca-
ted on the door drive unit on the garage ceil-
ing.
Familiarise yourself with the garage door
drive operating instructions, e.g. under "Pro-
gramming of additional remote controls",
before carrying out the following steps. Your vehicle must be within range of the
garage door or exterior gate drive. Make sure
that neither your vehicle nor any persons/
objects are present within the sweep of the
door or gate.
X Turn the key to position 2in the ignition
lock (Y page 155).
X Get out of the vehicle.
X Press the programming button on the door
drive unit.
Usually, you now have 30 seconds to ini-
tiate the next step.
X Get into the vehicle.
X Press previously programmed button ;,
= or? of the integrated garage door
opener until the door closes.
The rolling code synchronisation is then
complete.
Problems when programming
If you have problems when programming the
integrated garage door opener, please note
the following:
R Check the transmitter frequency used by
garage door drive remote control Aand
whether it is supported. The transmitter
frequency can usually be found on the back
of the garage door drive remote control.
R Replace the batteries in garage door
remote control A. This increases the like-
lihood that garage door remote control A
will transmit a strong and precise signal to the integrated garage door opener in the
rear-view mirror.
R When programming, hold remote control
A at varying distances and angles from the
button which you are programming. Try var- ious angles at a distance between 5and
30 cm or at the same angle but at varying
distances.
R If there is another remote control for the
same garage door drive, perform the pro-
gramming steps again using this remote
control. Before performing these steps,
make sure that new batteries have been 554
FeaturesStowing and features
Page 558 of 637
fitted in garage door drive remote control
A.
R Note that some remote controls transmit
only for a limited period (the indicator lamp
on the remote control goes out). Press but- ton Bon remote control Aagain before
transmission ends.
R Align the aerial cable of the garage door
opener unit. This can improve signal recep-
tion/transmission.
Opening or closing the garage door Once programmed, the integrated garage
door opener will assume the function of the
garage door system's remote control. Please
also read the operating instructions for the
garage door system.
X Turn the key to position 2in the ignition
lock (Y page 155).
X Press button ;,=or? which you have
programmed to operate the garage door.
Garage door system with a fixed code: indi-
cator lamp :lights up green.
Garage door system with a rolling code:
indicator lamp :flashes green.
The transmitter will transmit a signal for as
long as the button is pressed. The transmis-
sion is halted after a maximum of ten seconds
and indicator lamp :lights up yellow. Press
button ;,=or? again if necessary.
Clearing the memory Make sure that you clear the memory of the
integrated garage door opener before selling
the vehicle.
X Turn the key to position 2in the ignition
lock (Y page 155).
X Press and hold buttons ;and ?.
The indicator lamp first lights up yellow and then green.
X Release buttons ;and ?.
The memory of the integrated garage door
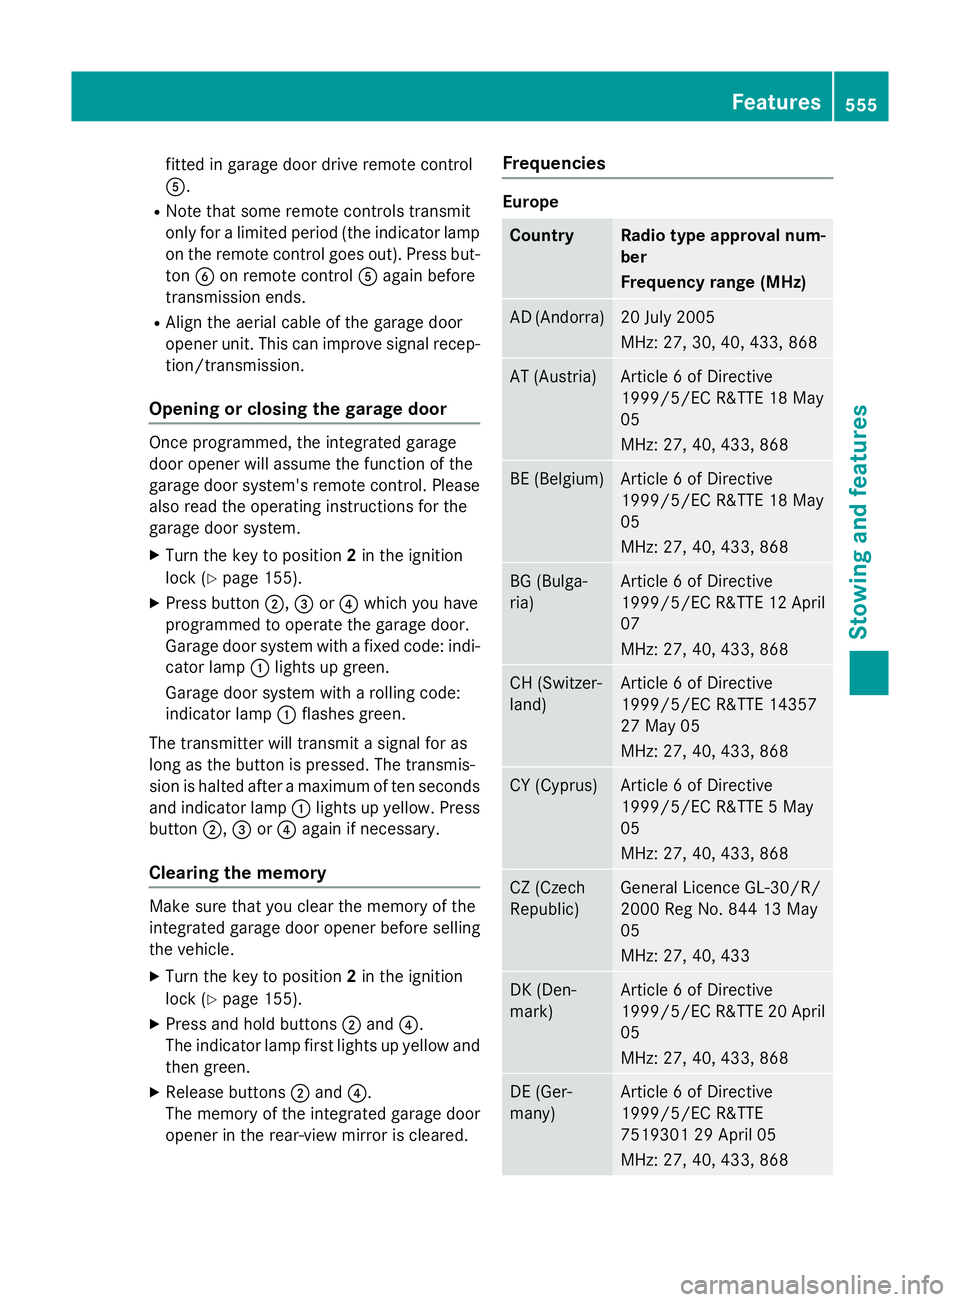
opener in the rear-view mirror is cleared. Frequencies Europe
Country Radio type approval num-
ber
Frequency range (MHz)
AD (Andorra) 20 July 2005
MHz: 27, 30, 40, 433, 868
AT (Austria) Article 6 of Directive
1999/5/EC R&TTE 18 May
05
MHz: 27, 40, 433, 868
BE (Belgium) Article 6 of Directive
1999/5/EC R&TTE 18 May
05
MHz: 27, 40, 433, 868
BG (Bulga-
ria) Article 6 of Directive
1999/5/EC R&TTE 12 April
07
MHz: 27, 40, 433, 868 CH (Switzer-
land) Article 6 of Directive
1999/5/EC R&TTE 14357
27 May 05
MHz: 27, 40, 433, 868
CY (Cyprus) Article 6 of Directive
1999/5/EC R&TTE 5 May
05
MHz: 27, 40, 433, 868
CZ (Czech
Republic) General Licence GL-30/R/
2000 Reg No. 844 13 May
05
MHz: 27, 40, 433
DK (Den-
mark) Article 6 of Directive
1999/5/EC R&TTE 20 April
05
MHz: 27, 40, 433, 868 DE (Ger-
many) Article 6 of Directive
1999/5/EC R&TTE
7519301 29 April 05
MHz: 27, 40, 433, 868 Features
555Stowing and features Z
Page 574 of 637
!
Only fold the windscreen wipers away
from the windscreen when vertical. Other-
wise, you will damage the bonnet.
! Do not use dry cloths, abrasive products,
solvents or cleaning agents containing sol-
vents to clean the inside of the windows. Do not touch the insides of the windows with
hard objects, e.g. an ice scraper or ring.
There is otherwise a risk of damaging the
windows.
! Clean the water drainage channels of the
windscreen and the rear window at regular intervals. Deposits such as leaves, petals
and pollen may under certain circumstan-
ces prevent water from draining away. This
can lead to corrosion damage and damage
to electronic components.
X Clean the inside and outside of the win-
dows with a damp cloth and a cleaning
agent that is recommended and approved
by Mercedes-Benz.
Cleaning the wiper blades G
WARNING
If the windscreen wipers are set in motion
when cleaning the windscreen or wiper
blades, you could become trapped. There is a danger of injury.
Always switch off the windscreen wipers and
the ignition before cleaning the windscreen or wiper blades.
! Do not pull on the wiper blade. Otherwise,
the wiper blade could be damaged.
! Do not clean wiper blades too often and
do not rub them too hard. Otherwise, the
graphite coating could be damaged. This
could cause wiper noise.
! Hold the wiper arm securely when folding
back. The windscreen could be damaged if
the wiper arm hits against it suddenly. X
Fold the wiper arms away from the wind-
screen.
X Clean the wiper blades carefully using a
damp cloth.
X Fold the windscreen wipers back again
before switching on the ignition.
Cleaning the exterior lighting !
Only use cleaning agents or cleaning
cloths that are suitable for plastic lenses.
Unsuitable cleaning agents or cleaning
cloths could scratch or damage the plastic lenses of the exterior lighting.
X Clean the plastic lenses of the exterior
lighting using a wet sponge and a mild
cleaning agent, e.g. Mercedes-Benz car
shampoo or cleaning cloths.
Mirror turn signals !
Only use cleaning agents or cleaning
cloths that are suitable for plastic lenses.
Unsuitable cleaning agents or cleaning
cloths could scratch or damage the plastic lenses of the mirror turn signals.
X Clean the plastic lenses of the mirror turn
signals in the exterior mirror housing using
a wet sponge and mild cleaning agent, e.g.
Mercedes-Benz car shampoo or cleaning
cloths.
Cleaning the sensors !
If you clean the sensors with a high-pres-
sure cleaner, make sure that you keep a
distance of at least 30 cm between the
vehicle and the high-pressure cleaner noz-
zle. Information about the correct distance is available from the equipment manufac-
turer. Care
571Maintenance and care Z