2012 MERCEDES-BENZ SL ROADSTER towing
[x] Cancel search: towingPage 561 of 637
America
Country Radio type approval num-
ber
Frequency range (MHz)
BB (Barba-
dos) Registration not required
MHz: 27, 40, 433, 868
CL (Chile) 38447/F-23 No.3.3634
MHz: 40, 433
3943/DFRS05165/F-50
MHz: 280 to 433
GF (French
Guyana) Article 6 of Directive
1999/5/EC R&TTE 10668
13 May 05
MHz: 27, 30, 40, 433, 868
GP (Guade-
loupe) Article 6 of Directive
1999/5/EC R&TTE 10668
13 May 05
MHz: 27, 30, 40, 433, 868
MQ (Martini-
que) Article 6 of Directive
1999/5/EC R&TTE 11 July
05
MHz: 27, 30, 40, 433, 868
MX (Mexico) MHz: 280 to 390
Asia
Country Radio type approval num-
ber
Frequency range (MHz)
AE (United
Arab Emi-
rates) 1623/5/10-2/26/76
MHz: 433
JO (Jordan) TRC/LPD/2005/23
MHz: 27, 30, 40, 433, 868 KW (Kuwait) 5 October 2005
MHz: 27, 30, 40, 418, 433,
868
SA (Saudi
Arabia) 11_02_05/5024-5-6
MHz: 418, 433 Country Radio type approval num-
ber
Frequency range (MHz)
SY (Syria) 279/4/14 / 05 March 06
TR (Turkey) National Certification 23
July 07
MHz: 433
Australia
Country Radio type approval num-
ber
Frequency range (MHz)
AU (Aus-
tralia) 28 June 2005
MHz: 27, 30, 40, 433, 868
NZ (New
Zealand) 20 March 06
MHz: 27, 30, 40, 433
Floormats
G
WARNING
Objects in the driver's footwell may restrict
the clearance around the pedals or block a
depressed pedal. This jeopardises the oper-
ating and road safety of the vehicle. There is a risk of an accident.
Stow all objects securely in the vehicle so that
they do not get into the driver's footwell.
Always fit the floormats securely and as pre-
scribed in order to ensure that there is always sufficient room for the pedals. Do not use
loose floormats and do not place several floor-mats on top of one another. 558
FeaturesStowing and featu
res
Page 562 of 637
X
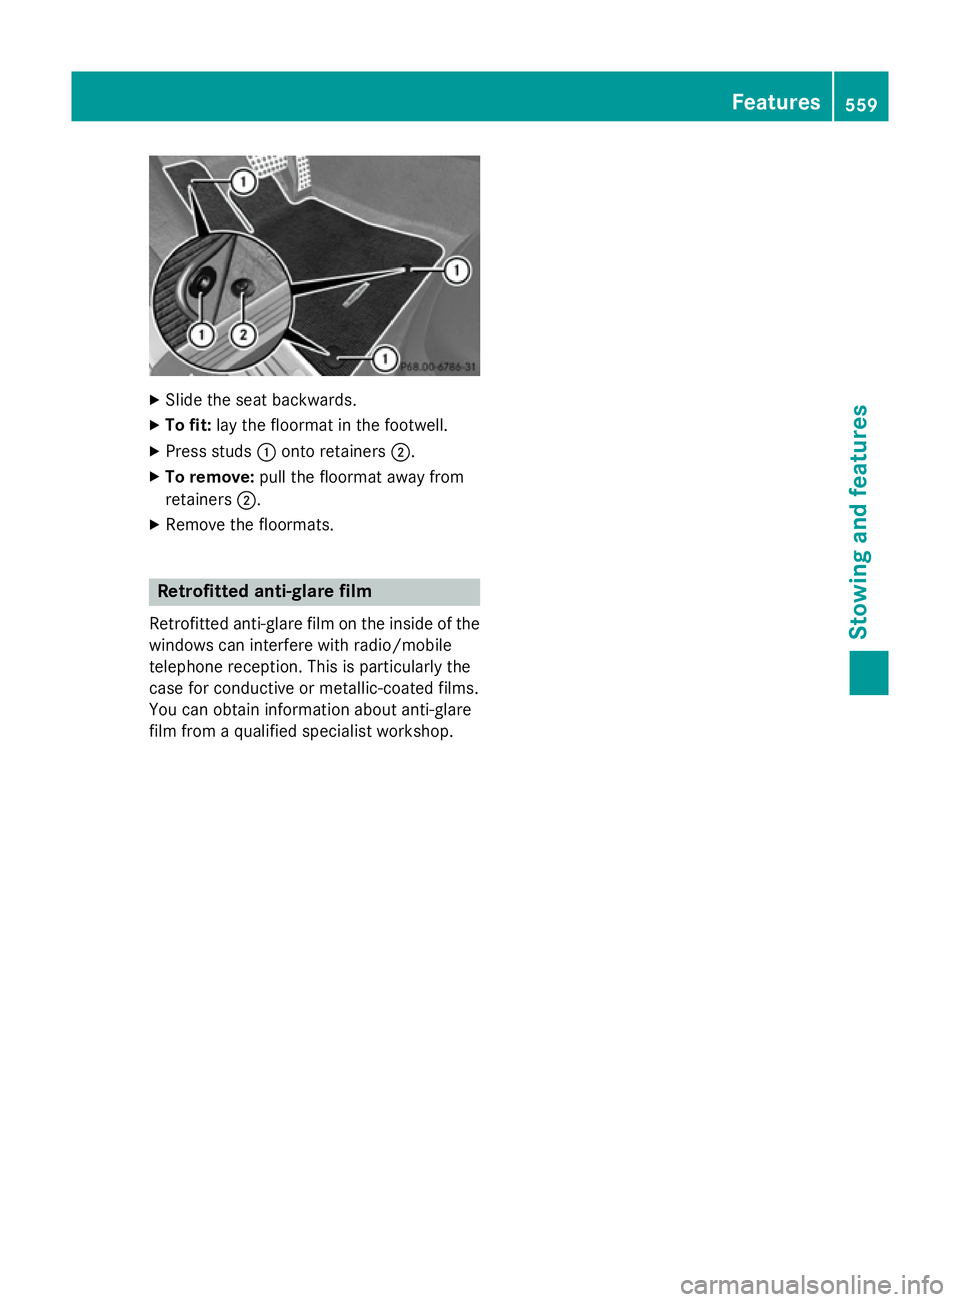
Slide the seat backwards.
X To fit: lay the floormat in the footwell.
X Press studs :onto retainers ;.
X To remove: pull the floormat away from
retainers ;.
X Remove the floormats. Retrofitted anti-glare film
Retrofitted anti-glare film on the inside of the
windows can interfere with radio/mobile
telephone reception. This is particularly the
case for conductive or metallic-coated films.
You can obtain information about anti-glare
film from a qualified specialist workshop. Features
559Stowing and features Z
Page 571 of 637
In these or similar operating conditions, have
the air filter, engine oil and oil filter, for exam- ple, changed more frequently. The tyres mustbe checked more frequently if the vehicle is
operated under increased loads. Further
information can be obtained at a qualified
specialist workshop, e.g. a Mercedes-Benz
Service Centre.
Driving abroad An extensive Mercedes-Benz Service network
is also available in other countries. You can
obtain further information from any
Mercedes-Benz Service Centre. Care
Notes on care
H
Environmental note
Dispose of empty packaging and cleaning
cloths in an environmentally responsible man- ner.
! For cleaning your vehicle, do not use any
of the following:
R dry, rough or hard cloths
R abrasive cleaning agents
R solvents
R cleaning agents containing solvents
Do not scrub.
Do not touch the surfaces or protective
films with hard objects, e.g. a ring or ice
scraper. You could otherwise scratch or
damage the surfaces and protective film.
! Do not park up the vehicle for an extended
period straight after cleaning it, particularly after having cleaned the wheels with wheel
cleaner. Wheel cleaners could cause
increased corrosion of the brake discs and
brake pads/linings. For this reason, you
should drive for a few minutes after clean-
ing. Braking heats the brake discs and the
brake pads/linings, thus drying them. The
vehicle can then be parked up. Regular care of your vehicle is a condition for
retaining the quality in the long term.
Use care products and cleaning agents rec-
ommended and approved by Mercedes-Benz. Washing the vehicle and cleaning the
paintwork
Automatic car wash G
WARNING
Braking efficiency is reduced after the vehicle has been washed. There is a risk of an acci-
dent.
After washing the vehicle, brake carefully
while paying attention to the traffic conditions in order to restore full braking efficiency.
! If DISTRONIC PLUS or the HOLD function
is activated, the vehicle brakes automati-
cally in certain situations. To prevent dam-
age to the vehicle, deactivate DISTRONIC
PLUS and the HOLD function in the follow-
ing or other similar situations:
R when towing the vehicle
R in the car wash
! It is preferable to use car washes with
adjustable high-pressure pre-cleaning that
corresponds to the specification for the
Cabriolet programme. In car washes that
use high water pressures, there is a risk
that a small amount of water may leak into
the vehicle.
! Vehicles with HANDS-FREE ACCESS: if a
key with KEYLESS-GO is within the detec-
tion range of the KEYLESS-GO antenna, the
following situations could lead to the unin-
tentional opening of the boot lid:
R using a car wash
R using a high-pressure cleaner
Make sure that the key is at least 2 maway
from the vehicle.
! Make sure that the automatic transmis-
sion is in position Nwhen washing your 568
CareMaintenance and care
Page 578 of 637
Useful information
............................576
Where will I find...? ...........................576
Flat tyre ............................................. 578
Battery (vehicle) ................................ 582
Jump-starting .................................... 586
Towing and tow-starting ..................588
Electrical fuses ................................. 592 575Breakdown assistance
Page 580 of 637
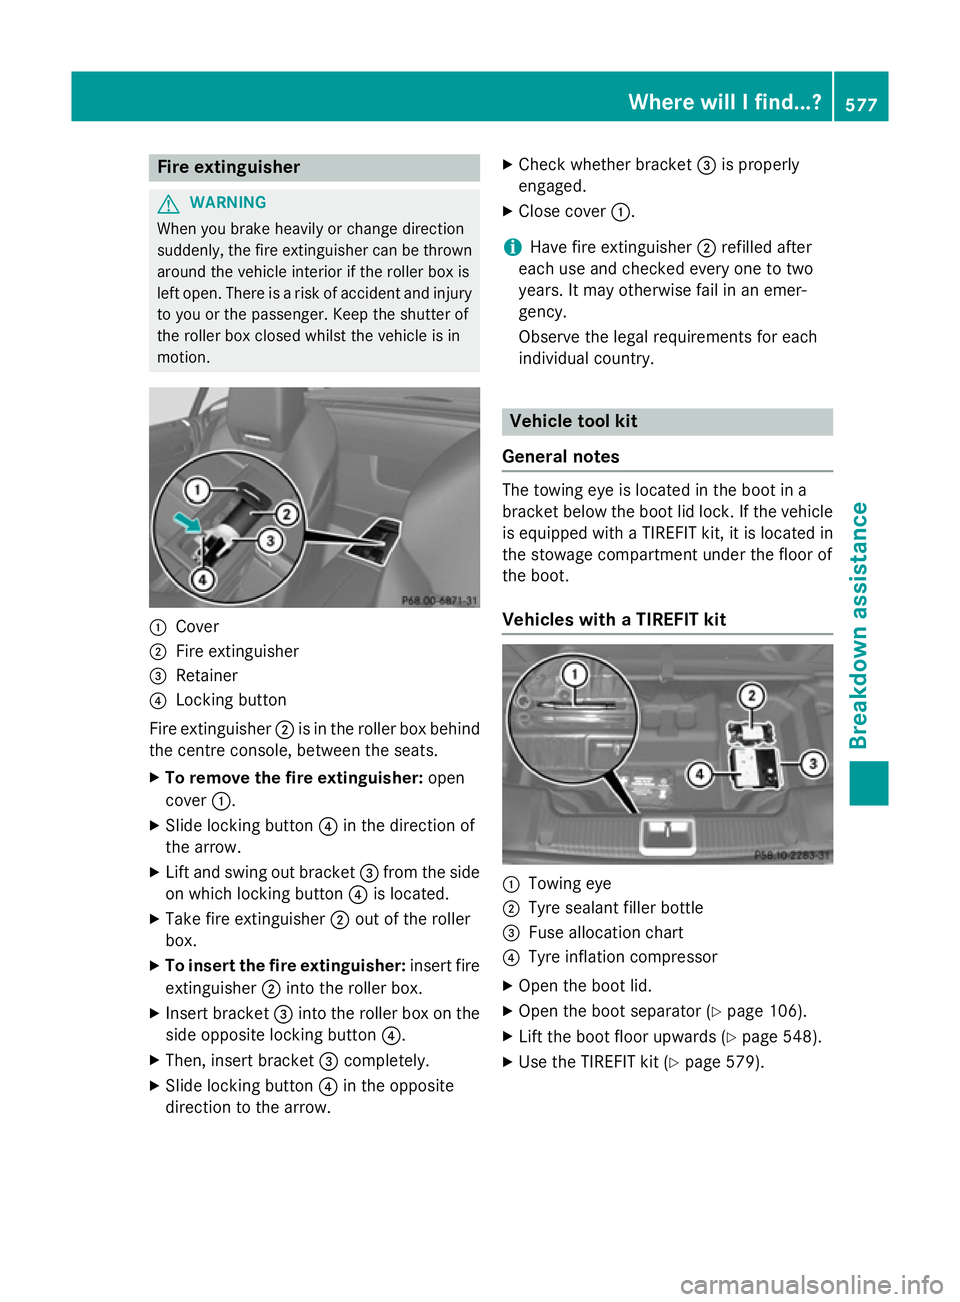
Fire extinguisher
G
WARNING
When you brake heavily or change direction
suddenly, the fire extinguisher can be thrown around the vehicle interior if the roller box is
left open. There is a risk of accident and injury
to you or the passenger. Keep the shutter of
the roller box closed whilst the vehicle is in
motion. :
Cover
; Fire extinguisher
= Retainer
? Locking button
Fire extinguisher ;is in the roller box behind
the centre console, between the seats.
X To remove the fire extinguisher: open
cover :.
X Slide locking button ?in the direction of
the arrow.
X Lift and swing out bracket =from the side
on which locking button ?is located.
X Take fire extinguisher ;out of the roller
box.
X To insert the fire extinguisher: insert fire
extinguisher ;into the roller box.
X Insert bracket =into the roller box on the
side opposite locking button ?.
X Then, insert bracket =completely.
X Slide locking button ?in the opposite
direction to the arrow. X
Check whether bracket =is properly
engaged.
X Close cover :.
i Have fire extinguisher
;refilled after
each use and checked every one to two
years. It may otherwise fail in an emer-
gency.
Observe the legal requirements for each
individual country. Vehicle tool kit
General notes The towing eye is located in the boot in a
bracket below the boot lid lock. If the vehicle
is equipped with a TIREFIT kit, it is located in
the stowage compartment under the floor of
the boot.
Vehicles with a TIREFIT kit :
Towing eye
; Tyre sealant filler bottle
= Fuse allocation chart
? Tyre inflation compressor
X Open the boot lid.
X Open the boot separator (Y page 106).
X Lift the boot floor upwards (Y page 548).
X Use the TIREFIT kit (Y page 579). Where will I find...?
577Breakdown assistance Z
Page 591 of 637
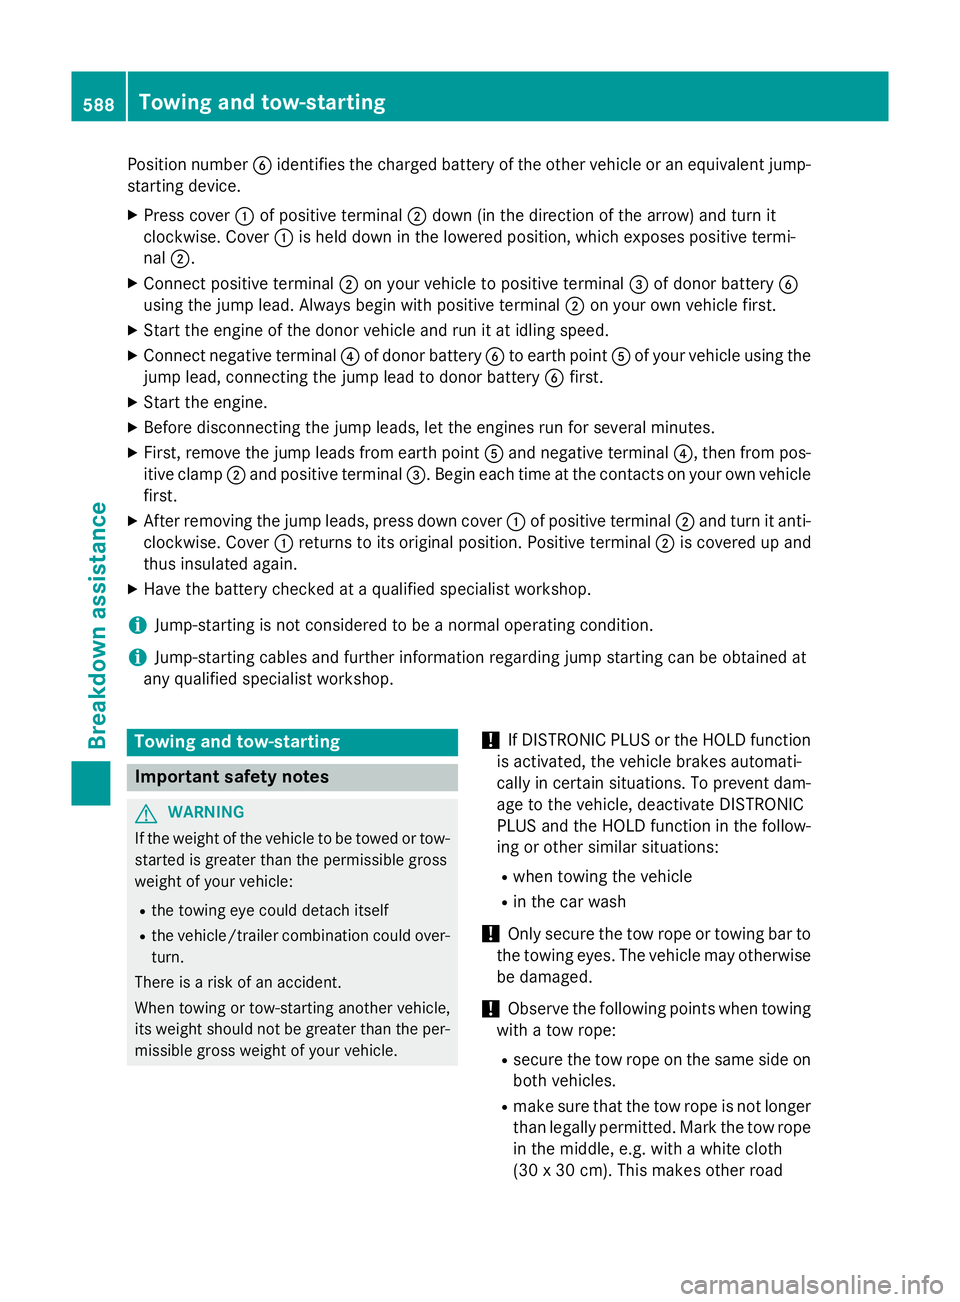
Position number
Bidentifies the charged battery of the other vehicle or an equivalent jump-
starting device.
X Press cover :of positive terminal ;down (in the direction of the arrow) and turn it
clockwise. Cover :is held down in the lowered position, which exposes positive termi-
nal ;.
X Connect positive terminal ;on your vehicle to positive terminal =of donor battery B
using the jump lead. Always begin with positive terminal ;on your own vehicle first.
X Start the engine of the donor vehicle and run it at idling speed.
X Connect negative terminal ?of donor battery Bto earth point Aof your vehicle using the
jump lead, connecting the jump lead to donor battery Bfirst.
X Start the engine.
X Before disconnecting the jump leads, let the engines run for several minutes.
X First, remove the jump leads from earth point Aand negative terminal ?, then from pos-
itive clamp ;and positive terminal =. Begin each time at the contacts on your own vehicle
first.
X After removing the jump leads, press down cover :of positive terminal ;and turn it anti-
clockwise. Cover :returns to its original position. Positive terminal ;is covered up and
thus insulated again.
X Have the battery checked at a qualified specialist workshop.
i Jump-starting is not considered to be a normal operating condition.
i Jump-starting cables and further information regarding jump starting can be obtained at
any qualified specialist workshop. Towing and tow-starting
Important safety notes
G
WARNING
If the weight of the vehicle to be towed or tow- started is greater than the permissible gross
weight of your vehicle:
R the towing eye could detach itself
R the vehicle/trailer combination could over-
turn.
There is a risk of an accident.
When towing or tow-starting another vehicle,
its weight should not be greater than the per-
missible gross weight of your vehicle. !
If DISTRONIC PLUS or the HOLD function
is activated, the vehicle brakes automati-
cally in certain situations. To prevent dam-
age to the vehicle, deactivate DISTRONIC
PLUS and the HOLD function in the follow- ing or other similar situations:
R when towing the vehicle
R in the car wash
! Only secure the tow rope or towing bar to
the towing eyes. The vehicle may otherwise be damaged.
! Observe the following points when towing
with a tow rope:
R secure the tow rope on the same side on
both vehicles.
R make sure that the tow rope is not longer
than legally permitted. Mark the tow rope in the middle, e.g. with a white cloth
(30 x 30 cm). This makes other road 588
Towing and tow-startingBreakdown assistance
Page 592 of 637
users aware that a vehicle is being
towed.
R only secure the tow rope to the towing
eye.
R observe the brake lamps of the towing
vehicle while driving. Always maintain a
distance so that the tow rope does not
sag.
R do not use steel cables or chains to tow
your vehicle. You could otherwise dam-
age the vehicle.
! Do not use the towing eye for recovery,
this could damage the vehicle. If in doubt,
recover the vehicle with a crane.
! When towing, pull away slowly and
smoothly. If the tractive power is too high,
the vehicles could be damaged.
! To tow vehicles with KEYLESS-GO, use
the key instead of the Start/Stop button.
The automatic transmission may otherwise switch to position Pwhen you open the
driver's or front-passenger door which
could damage the transmission.
! Make sure that the electric parking brake
is released. If the electric parking brake is
faulty, visit a qualified specialist workshop.
! You may tow the vehicle for a maximum of
50km. A towing speed of 50 km/h must not
be exceeded.
For towing distances over 50 km, the entire vehicle must be lifted up and transported.
! If you tow or tow-start another vehicle, its
weight must not exceed the maximum per- missible gross vehicle weight of your vehi-
cle.
i Information on your vehicle's gross vehi-
cle weight rating can be found on the vehi-
cle identification plate (Y page 622).
Observe the legal requirements for the rele-
vant countries when towing.
It is better to have the vehicle transported
than to have it towed. The automatic transmission must be in posi-
tion
Nwhen the vehicle is being towed.
The battery must be connected and charged. Otherwise, you:
R cannot turn the key in the ignition lock to
position 2
R cannot shift the automatic transmission to
position N
i Deactivate the automatic locking feature
before the vehicle is towed (Y page 242).
You could otherwise be locked out when
pushing or towing the vehicle.
Deactivate tow-away protection before the
vehicle is towed (Y page 80). Fitting/removing the towing eye
Fitting the towing eye G
WARNING
The exhaust tail pipe may be extremely hot.
There is a risk of burning when removing the
rear cover.
Do not touch the exhaust tail pipe. Use
extreme caution when removing the rear
cover. Towing and tow-starting
589Breakdown assistance Z
Page 593 of 637
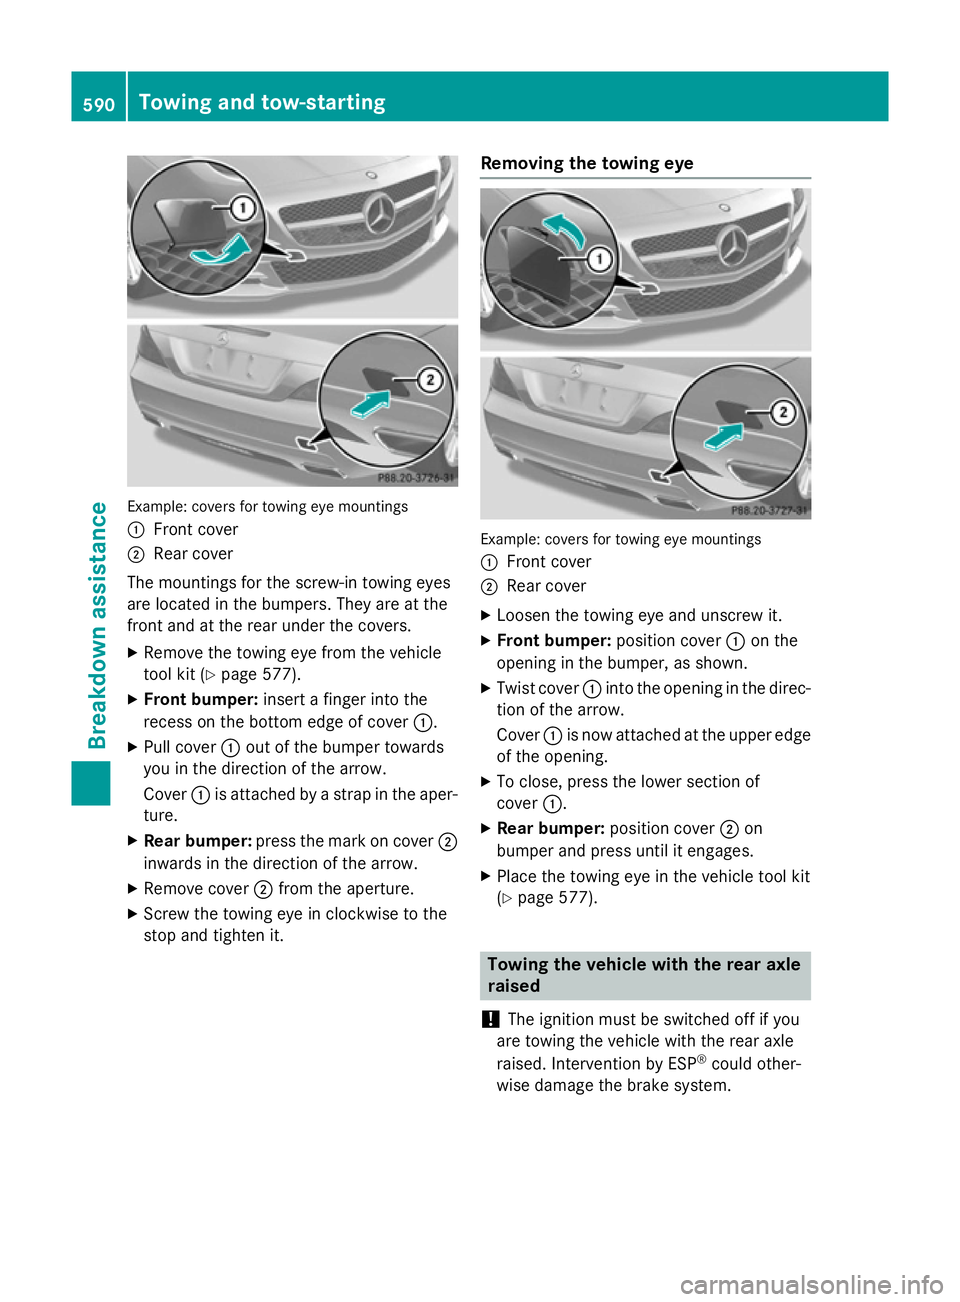
Example: covers for towing eye mountings
: Front cover
; Rear cover
The mountings for the screw-in towing eyes
are located in the bumpers. They are at the
front and at the rear under the covers. X Remove the towing eye from the vehicle
tool kit (Y page 577).
X Front bumper: insert a finger into the
recess on the bottom edge of cover :.
X Pull cover :out of the bumper towards
you in the direction of the arrow.
Cover :is attached by a strap in the aper-
ture.
X Rear bumper: press the mark on cover ;
inwards in the direction of the arrow.
X Remove cover ;from the aperture.
X Screw the towing eye in clockwise to the
stop and tighten it. Removing the towing eye
Example: covers for towing eye mountings
: Front cover
; Rear cover
X Loosen the towing eye and unscrew it.
X Front bumper: position cover:on the
opening in the bumper, as shown.
X Twist cover :into the opening in the direc-
tion of the arrow.
Cover :is now attached at the upper edge
of the opening.
X To close, press the lower section of
cover :.
X Rear bumper: position cover;on
bumper and press until it engages.
X Place the towing eye in the vehicle tool kit
(Y page 577). Towing the vehicle with the rear axle
raised
! The ignition must be switched off if you
are towing the vehicle with the rear axle
raised. Intervention by ESP ®
could other-
wise damage the brake system. 590
Towing and tow-startingBreakdo
wn assis tance