2012 MERCEDES-BENZ SL ROADSTER towing
[x] Cancel search: towingPage 200 of 637
Important safety notes
G
WARNING
When leaving the vehicle, it can still roll away despite being braked by the HOLD function if:
R there is a malfunction in the system or in
the voltage supply
R the HOLD function is deactivated by the
accelerator pedal being depressed, e.g. by
a vehicle occupant
R the electrical system in the engine com-
partment, the battery or the fuses are tam-
pered with
R the battery is disconnected
There is a risk of an accident.
Before leaving the vehicle, always deactivate
the HOLD function and secure the vehicle
from rolling away.
! If DISTRONIC PLUS or the HOLD function
is activated, the vehicle brakes automati-
cally in certain situations. To prevent dam-
age to the vehicle, deactivate DISTRONIC
PLUS and the HOLD function in the follow-
ing or other similar situations:
R when towing the vehicle
R in the car wash
Deactivate the HOLD function (Y page 197).
Activation conditions You can activate the HOLD function if:
R
the vehicle is stationary
R the engine is running or if it has been auto-
matically switched off by the ECO start/
stop function
R the driver's door is closed or if your seat
belt is fastened
R the electric parking brake is released
R the transmission is in position D,Ror N
R DISTRONIC PLUS is deactivated Activating the HOLD function X
Make sure that the activation conditions
are met.
X Depress the brake pedal.
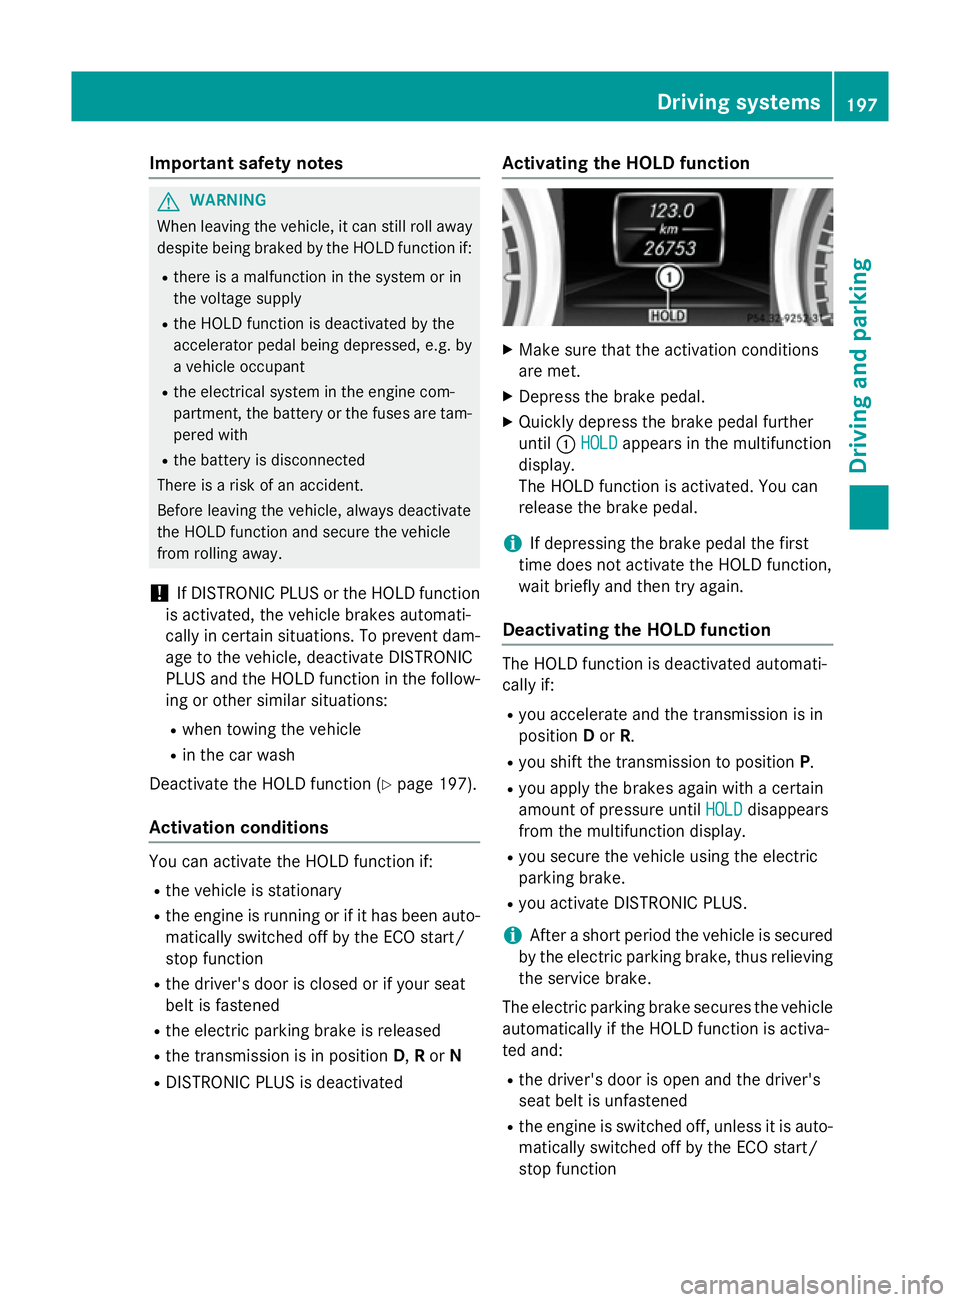
X Quickly depress the brake pedal further
until :HOLD HOLD appears in the multifunction
display.
The HOLD function is activated. You can
release the brake pedal.
i If depressing the brake pedal the first
time does not activate the HOLD function,
wait briefly and then try again.
Deactivating the HOLD function The HOLD function is deactivated automati-
cally if:
R you accelerate and the transmission is in
position Dor R.
R you shift the transmission to position P.
R you apply the brakes again with a certain
amount of pressure until HOLD HOLDdisappears
from the multifunction display.
R you secure the vehicle using the electric
parking brake.
R you activate DISTRONIC PLUS.
i After a short period the vehicle is secured
by the electric parking brake, thus relieving
the service brake.
The electric parking brake secures the vehicle
automatically if the HOLD function is activa-
ted and:
R the driver's door is open and the driver's
seat belt is unfastened
R the engine is switched off, unless it is auto-
matically switched off by the ECO start/
stop function Driving systems
197Driving and parking Z
Page 432 of 637
to make arrangements to have the vehicle
towed to a Mercedes-Benz Service Centre.
X To forward the call: press thegkey on
the number keypad.
The voice connection to the Mercedes-
Benz emergency call centre is ended and
the call is automatically forwarded to
Mercedes-Benz Contact Accident Assis-
tance.
After your confirmation, the vehicle data is sent via Mercedes-Benz Contact. An
employee of Mercedes-Benz Contact Acci-
dent Assistance will then make the neces-
sary arrangements with MB Service 24h to have your vehicle towed to a Mercedes-
Benz Service Centre. Mercedes-Benz emergency call sys-
tem
Overview The Mercedes-Benz emergency call system
can help to decisively reduce the time
between an accident and the arrival of emer-
gency services at the site of the accident. It
can also help locate an accident site in places
that are difficult to see.
The emergency call can be made automati-
cally or manually and is transmitted to the
Europe-wide private Mercedes-Benz emer-
gency call number. The vehicle position data
is simultaneously transmitted by text mes-
sage and DTMF to the Mercedes-Benz emer-
gency call centre. The Mercedes-Benz emer-
gency call centre transmits the vehicle posi-
tion data to one of the Europe-wide public
emergency call centres. In almost all coun-
tries, the voice connection can be made in the respective country's language. This allows
measures for rescue, recovery or towing to a
Mercedes-Benz Service Centre to be initiated quickly.
If the Mercedes-Benz emergency call system function is operational, you see the SOS
SOS READY READY
display message in the basic tele-
phone menu (Y page 432).
Information on service availability in Europe
(Y page 429).
i Note that manual emergency calls should
only be used if you or others are in need of rescue, not e.g. in the event of a break-
down.
Operation costs (e.g. for rescue teams)
incurred by a falsely triggered manual
emergency call, must be paid for by the
vehicle owner.
Service availability in Europe The Mercedes-Benz emergency call system is
available for your vehicle for 15 years after
the initial date of production, if:
R it is equipped with COMAND Online
R it was originally produced for the European
market
You can find more information on the regional
availability of the Mercedes-Benz emergency
call system at http://www.mercedes-
benz.com/connect_ecall .
Conditions Equipment requirements
You need:
R a Bluetooth ®
-capable mobile phone which,
if possible, supports the MAP profile (Mes-
sage Access Profile) for sending text mes-
sages, or
R if the vehicle is equipped with permanently
installed/SAP telephony, a SIM card or a
suitable mobile phone
Functional requirements
The vehicle has GPS reception.
Check the following:
R COMAND Online is switched on
R when using the Bluetooth ®
interface, the
mobile phone must be authorised for and
connected with COMAND Online, and log-
ged into a mobile phone network Telephone
429COMAND Online Z
Page 546 of 637
Useful information
............................544
Stowage areas .................................. 544
Features ............................................. 548 543Stowing and features
Page 547 of 637
Useful information
i This Owner's Manual describes all mod-
els, series and optional equipment for your
vehicle that were available at the time of
going to press. National variations are pos- sible. Note that your vehicle may not be
equipped with all of the functions descri-
bed. This is also the case for systems and
functions relevant to safety.
i Read the information on qualified special-
ist workshops: (Y page 34). Stowage areas
Stowage spaces
Important safety notes G
WARNING
If you do not correctly store objects in the
vehicle interior, they can slip or be flung
around, thus striking vehicle occupants.
There is a risk of injury, especially when brak- ing or abruptly changing directions.
R Always store objects so that they cannot be
flung around in these or in similar situa-
tions.
R Always make sure that objects do not pro-
trude from stowage compartments, lug-
gage nets or stowage nets.
R Close lockable stowage compartments
while driving.
R Stow and secure objects that are heavy,
hard, pointy, sharp-edged, fragile or too
large in the boot. Glove compartment X
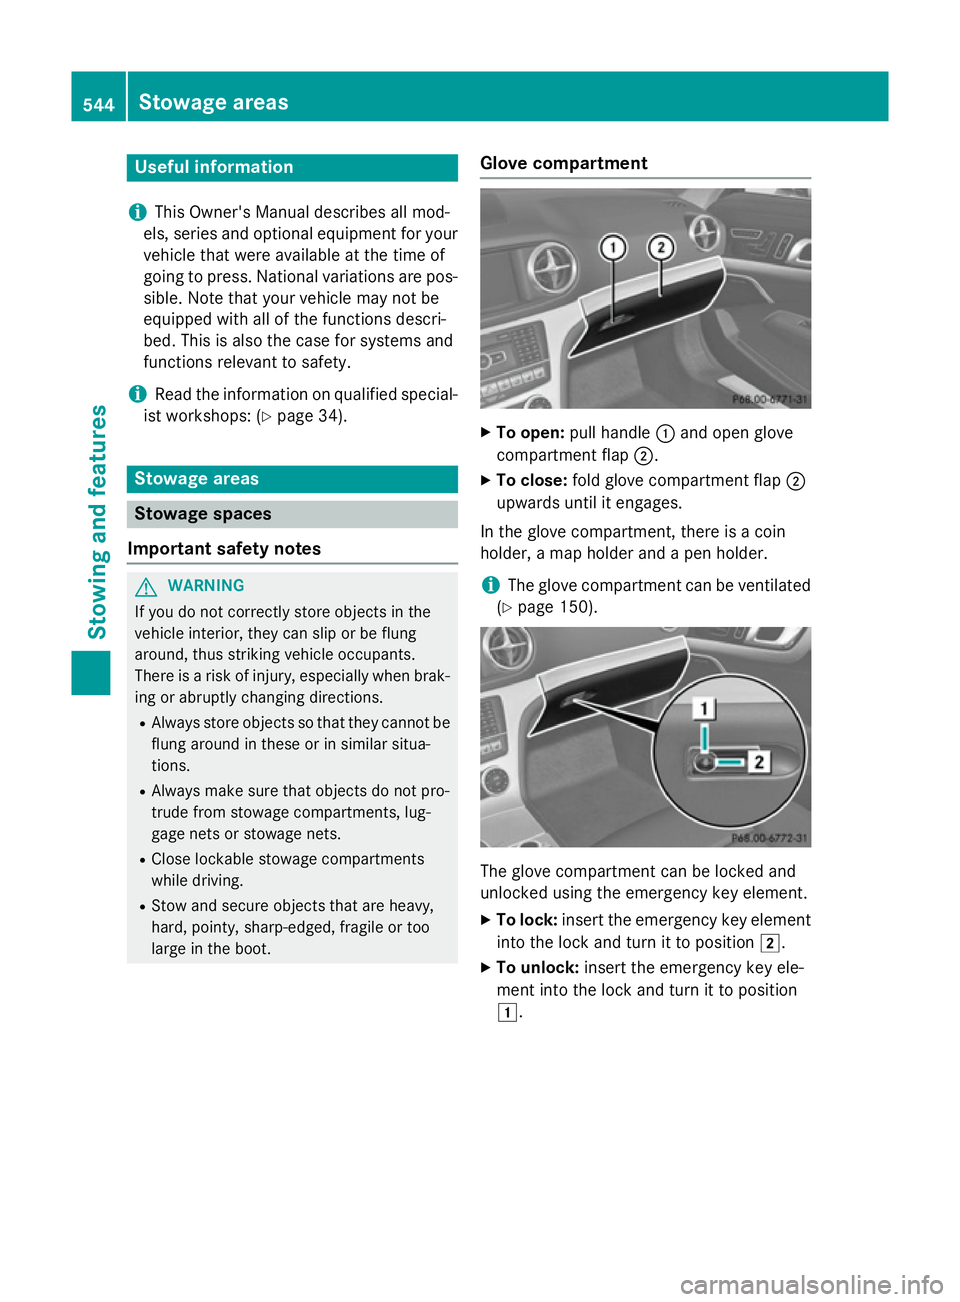
To open: pull handle :and open glove
compartment flap ;.
X To close: fold glove compartment flap ;
upwards until it engages.
In the glove compartment, there is a coin
holder, a map holder and a pen holder.
i The glove compartment can be ventilated
(Y page 150). The glove compartment can be locked and
unlocked using the emergency key element.
X To lock: insert the emergency key element
into the lock and turn it to position 2.
X To unlock: insert the emergency key ele-
ment into the lock and turn it to position
1. 544
Stowage areasStowing and features
Page 548 of 637
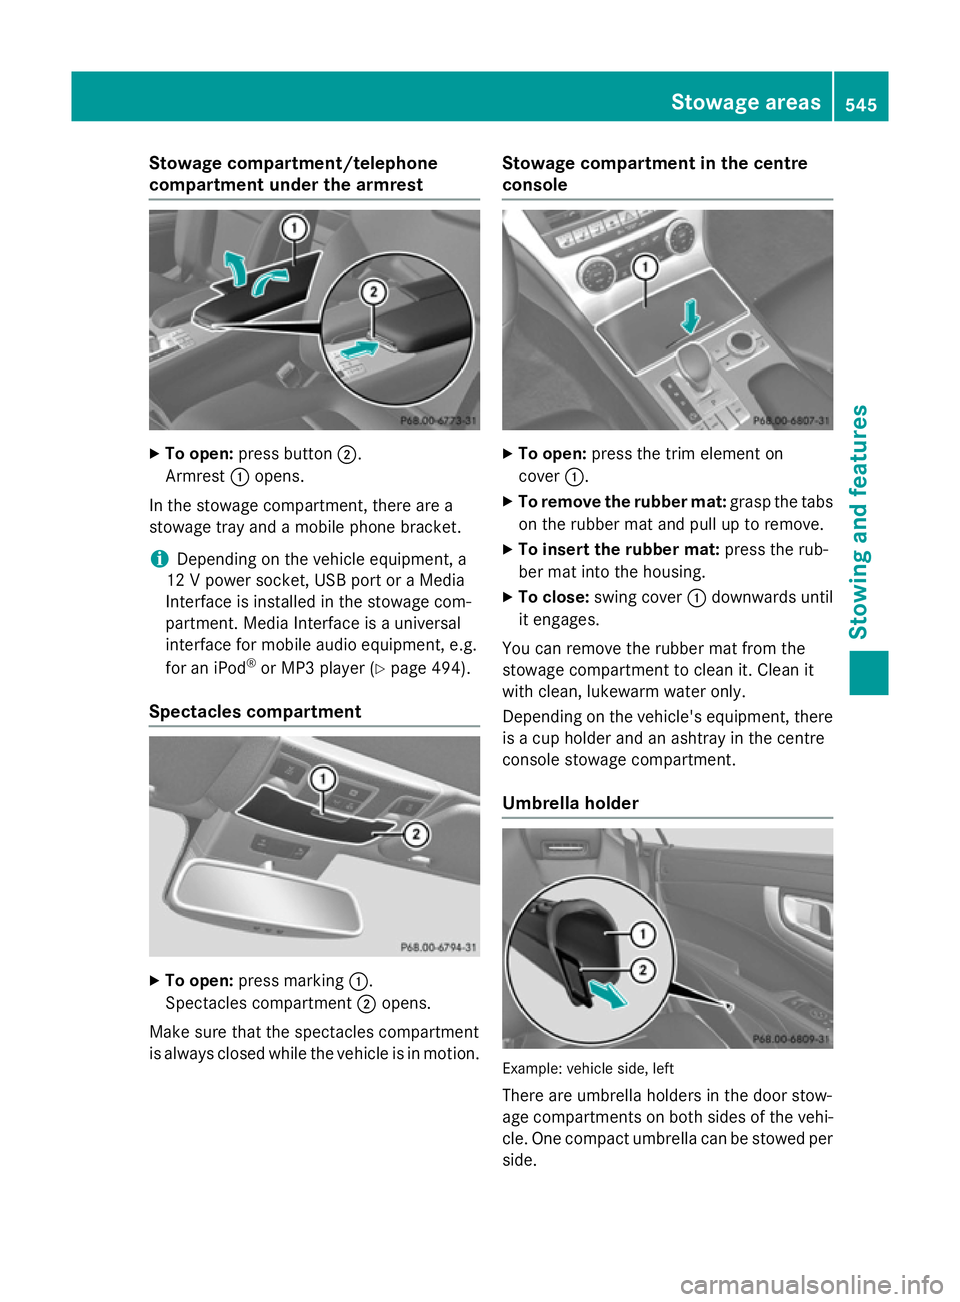
Stowage compartment/telephone
compartment under the armrest
X
To open: press button ;.
Armrest :opens.
In the stowage compartment, there are a
stowage tray and a mobile phone bracket.
i Depending on the vehicle equipment, a
12 V power socket, USB port or a Media
Interface is installed in the stowage com-
partment. Media Interface is a universal
interface for mobile audio equipment, e.g.
for an iPod ®
or MP3 player (Y page 494).
Spectacles compartment X
To open: press marking :.
Spectacles compartment ;opens.
Make sure that the spectacles compartment
is always closed while the vehicle is in motion. Stowage compartment in the centre
console
X
To open: press the trim element on
cover :.
X To remove the rubber mat: grasp the tabs
on the rubber mat and pull up to remove.
X To insert the rubber mat: press the rub-
ber mat into the housing.
X To close: swing cover :downwards until
it engages.
You can remove the rubber mat from the
stowage compartment to clean it. Clean it
with clean, lukewarm water only.
Depending on the vehicle's equipment, there is a cup holder and an ashtray in the centre
console stowage compartment.
Umbrella holder Example: vehicle side, left
There are umbrella holders in the door stow-
age compartments on both sides of the vehi-
cle. One compact umbrella can be stowed per
side. Stowage areas
545Stowing and features Z
Page 550 of 637
!
Only close the boot once the roof is low-
ered completely. Otherwise, you could
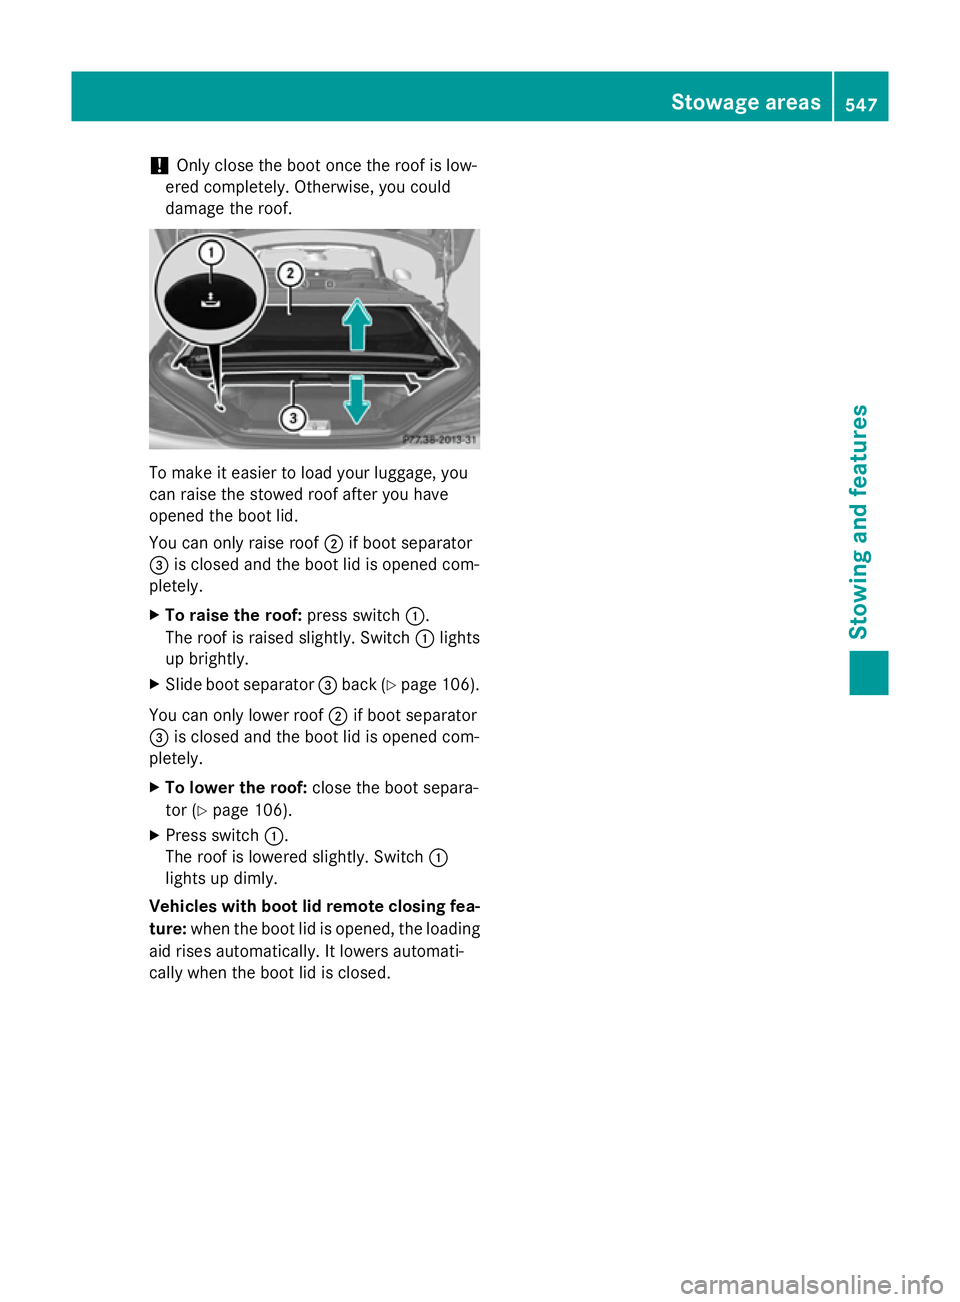
damage the roof. To make it easier to load your luggage, you
can raise the stowed roof after you have
opened the boot lid.
You can only raise roof ;if boot separator
= is closed and the boot lid is opened com-
pletely.
X To raise the roof: press switch:.
The roof is raised slightly. Switch :lights
up brightly.
X Slide boot separator =back (Y page 106).
You can only lower roof ;if boot separator
= is closed and the boot lid is opened com-
pletely.
X To lower the roof: close the boot separa-
tor (Y page 106).
X Press switch :.
The roof is lowered slightly. Switch :
lights up dimly.
Vehicles with boot lid remote closing fea- ture: when the boot lid is opened, the loading
aid rises automatically. It lowers automati-
cally when the boot lid is closed. Stowage areas
547Stowing and features Z
Page 551 of 637
Problems with the loading aid
Problem
Possible causes/consequences and
M
MSolutions It is no longer possible
to lower the stowed
roof in the boot using
the loading aid. You cannot close the boot any more.
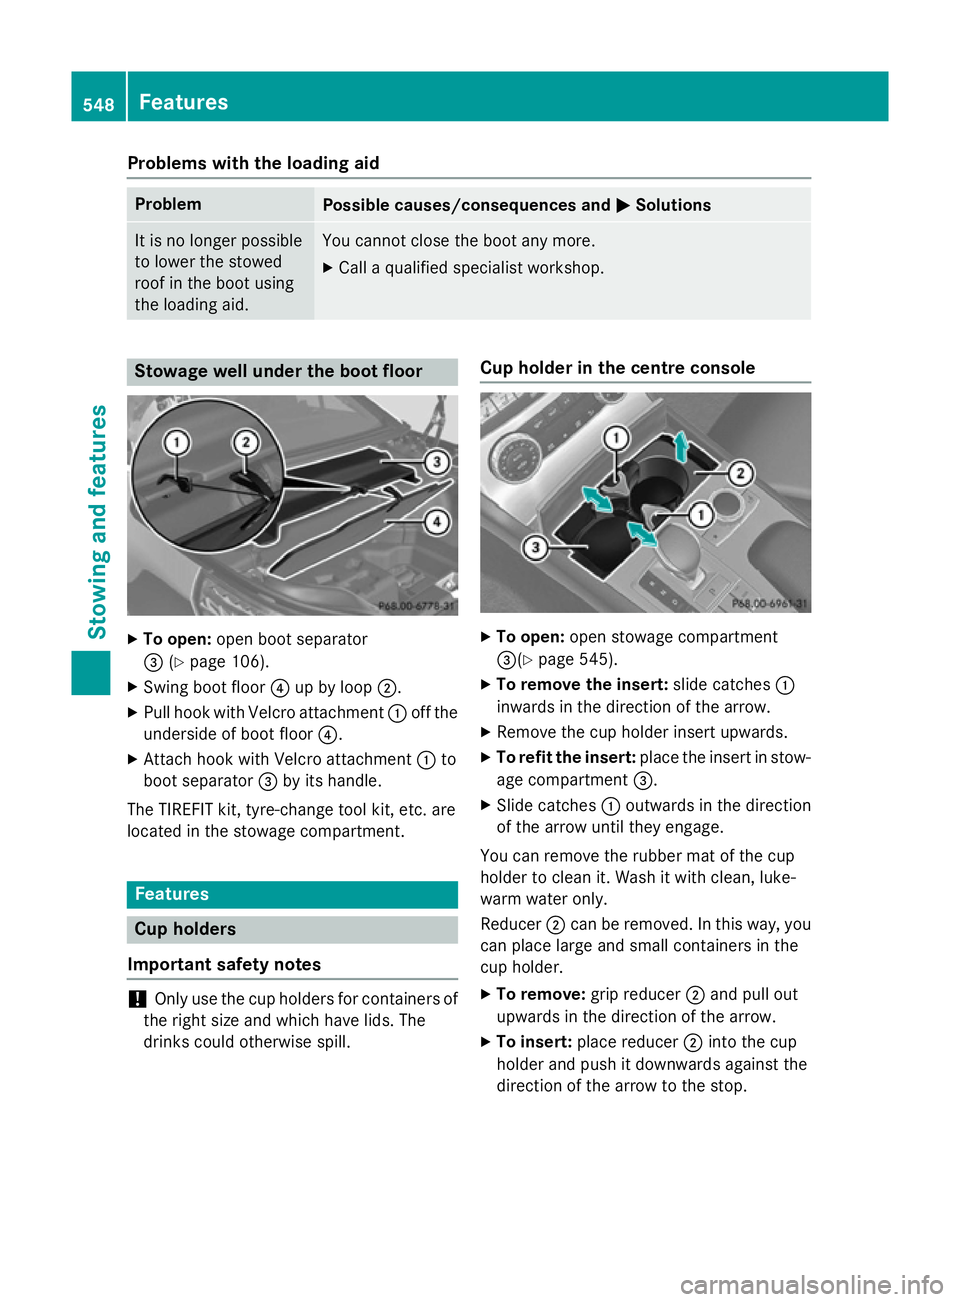
X Call a qualified specialist workshop. Stowage well under the boot floor
X
To open: open boot separator
= (Ypage 106).
X Swing boot floor ?up by loop ;.
X Pull hook with Velcro attachment :off the
underside of boot floor ?.
X Attach hook with Velcro attachment :to
boot separator =by its handle.
The TIREFIT kit, tyre-change tool kit, etc. are
located in the stowage compartment. Features
Cup holders
Important safety notes !
Only use the cup holders for containers of
the right size and which have lids. The
drinks could otherwise spill. Cup holder in the centre console
X
To open: open stowage compartment
=(Y page 545).
X To remove the insert: slide catches:
inwards in the direction of the arrow.
X Remove the cup holder insert upwards.
X To refit the insert: place the insert in stow-
age compartment =.
X Slide catches :outwards in the direction
of the arrow until they engage.
You can remove the rubber mat of the cup
holder to clean it. Wash it with clean, luke-
warm water only.
Reducer ;can be removed. In this way, you
can place large and small containers in the
cup holder.
X To remove: grip reducer ;and pull out
upwards in the direction of the arrow.
X To insert: place reducer ;into the cup
holder and push it downwards against the
direction of the arrow to the stop. 548
FeaturesStowing and features
Page 552 of 637
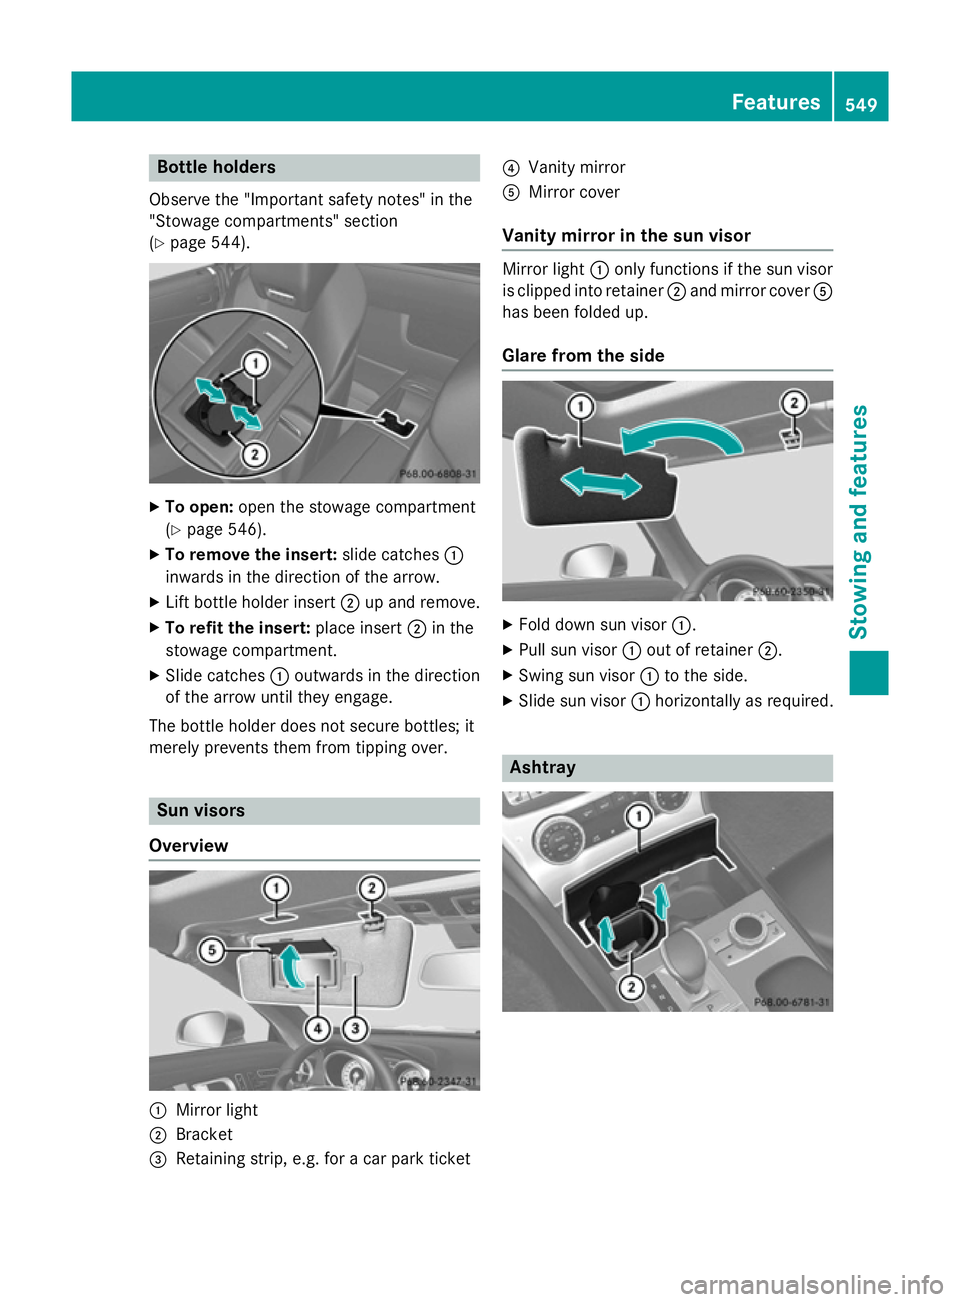
Bottle holders
Observe the "Important safety notes" in the
"Stowage compartments" section
(Y page 544). X
To open: open the stowage compartment
(Y page 546).
X To remove the insert: slide catches:
inwards in the direction of the arrow.
X Lift bottle holder insert ;up and remove.
X To refit the insert: place insert;in the
stowage compartment.
X Slide catches :outwards in the direction
of the arrow until they engage.
The bottle holder does not secure bottles; it
merely prevents them from tipping over. Sun visors
Overview :
Mirror light
; Bracket
= Retaining strip, e.g. for a car park ticket ?
Vanity mirror
A Mirror cover
Vanity mirror in the sun visor Mirror light
:only functions if the sun visor
is clipped into retainer ;and mirror cover A
has been folded up.
Glare from the side X
Fold down sun visor :.
X Pull sun visor :out of retainer ;.
X Swing sun visor :to the side.
X Slide sun visor :horizontally as required. Ashtray Features
549Stowing an d features Z