2012 MERCEDES-BENZ SL ROADSTER key
[x] Cancel search: keyPage 62 of 637
reduces the risk of vehicle occupants coming
into contact with parts of the vehicle interior.
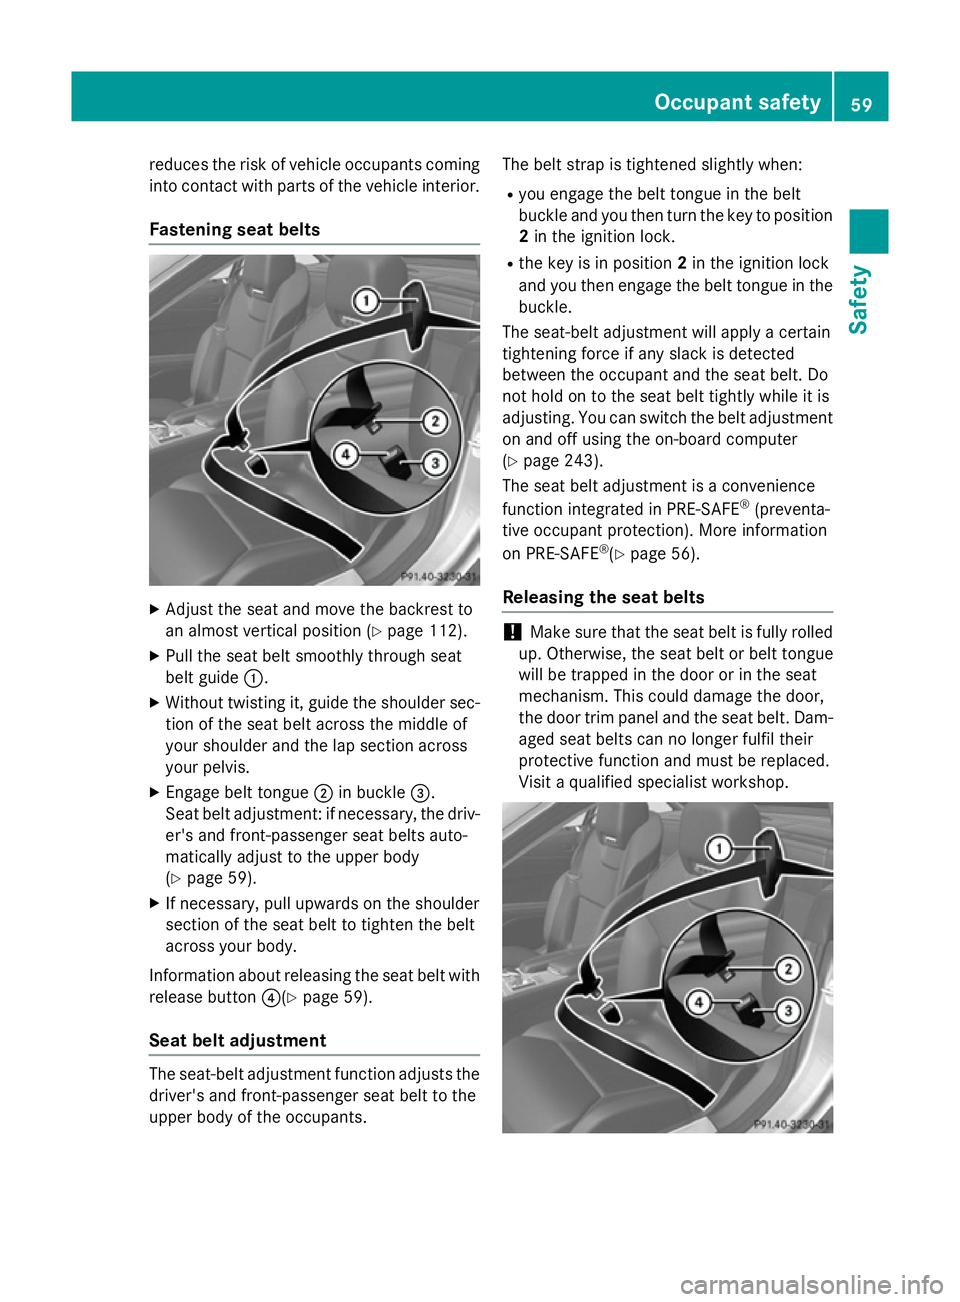
Fastening seat belts X
Adjust the seat and move the backrest to
an almost vertical position (Y page 112).
X Pull the seat belt smoothly through seat
belt guide :.
X Without twisting it, guide the shoulder sec-
tion of the seat belt across the middle of
your shoulder and the lap section across
your pelvis.
X Engage belt tongue ;in buckle =.
Seat belt adjustment: if necessary, the driv- er's and front-passenger seat belts auto-
matically adjust to the upper body
(Y page 59).
X If necessary, pull upwards on the shoulder
section of the seat belt to tighten the belt
across your body.
Information about releasing the seat belt with
release button ?(Ypage 59).
Seat belt adjustment The seat-belt adjustment function adjusts the
driver's and front-passenger seat belt to the
upper body of the occupants. The belt strap is tightened slightly when:
R you engage the belt tongue in the belt
buckle and you then turn the key to position
2 in the ignition lock.
R the key is in position 2in the ignition lock
and you then engage the belt tongue in the buckle.
The seat-belt adjustment will apply a certain
tightening force if any slack is detected
between the occupant and the seat belt. Do
not hold on to the seat belt tightly while it is
adjusting. You can switch the belt adjustment
on and off using the on-board computer
(Y page 243).
The seat belt adjustment is a convenience
function integrated in PRE-SAFE ®
(preventa-
tive occupant protection). More information
on PRE-SAFE ®
(Y page 56).
Releasing the seat belts !
Make sure that the seat belt is fully rolled
up. Otherwise, the seat belt or belt tongue
will be trapped in the door or in the seat
mechanism. This could damage the door,
the door trim panel and the seat belt. Dam-
aged seat belts can no longer fulfil their
protective function and must be replaced.
Visit a qualified specialist workshop. Occupant safety
59Safety Z
Page 65 of 637
G
WARNING
If children are left unsupervised in the vehicle, they can:
R open doors and endanger other persons or
road users
R climb out and be injured by the traffic
R operate vehicle equipment and, for exam-
ple, trap themselves.
Children could also set the vehicle in motion, for example by:
R releasing the parking brake
R shifting the automatic transmission out of
park position P
R starting the engine.
There is a risk of an accident and injury.
When leaving the vehicle, always take the key
with you and lock the vehicle. Never leave
children unattended in the vehicle. Always
keep the key out of reach of children. G
WARNING
If persons (particularly children) are exposed
to heat or cold for a prolonged period, there is a risk of serious or even fatal injuries. Never
leave persons (particularly children) unatten-
ded in the vehicle. G
WARNING
If the child restraint system is placed in direct sunlight, the parts could become very hot.
Children could be suffer burns by touching
these parts, in particular on the metallic parts
of the child restraint system. There is a risk of injury.
If you and your child leave the vehicle, always
make sure that the child restraint system is
not in direct sunlight. Cover it with a blanket, for example. If the child restraint system has
been exposed to direct sunlight, leave it to
cool down before securing the child in it.
Never leave children unattended in the vehi-
cle.
If a child is travelling in your vehicle, secure
the child using a child restraint system which is appropriate to the age, weight and size of
the child. In order to correctly secure the child
in the child restraint system, always comply
with the child restraint system manufactur-
er's installation instructions. Make sure that
the child is secured for the trip.
Mercedes-Benz recommends that you use
the listed child restraint systems
(Y page 67). You can obtain further infor-
mation about the correct child restraint sys-
tem from any Mercedes-Benz Service Centre.
i It is advisable to use Mercedes-Benz care
products to clean child restraint systems.
You can obtain information about this from
any Mercedes-Benz Service Centre. Child restraint system on the front-
passenger seat
G
WARNING
If the front-passenger front airbag is not dis-
abled:
R a child secured in a child restraint system
on the front-passenger seat could be seri-
ously or even fatally injured by the front-
passenger airbag deploying. This is espe-
cially a risk if the child is in the immediate
vicinity of the front-passenger front airbag
when it deploys.
R never secure a child on the front-passenger
seat in a rearward-facing child restraint sys- tem.
R move the front-passenger seat as far back
as possible. When doing so, ensure that the
shoulder belt strap from the belt outlet on
the vehicle is routed towards the front to
the shoulder belt guide on the child
restraint system.
The front-passenger front airbag is not disa-
bled:
R on vehicles without automatic child seat
recognition on the front-passenger seat.
R on vehicles with automatic child seat rec-
ognition on the front-passenger seat, 62
Child restraint systemsSafety
Page 68 of 637
An incorrectly fitted child restraint system
could come loose and seriously or even fatally injure the child or other vehicle occupants.
When fitting the child restraint system, always
make sure that it is engaged correctly in the
ISOFIX securing loops on both sides. X
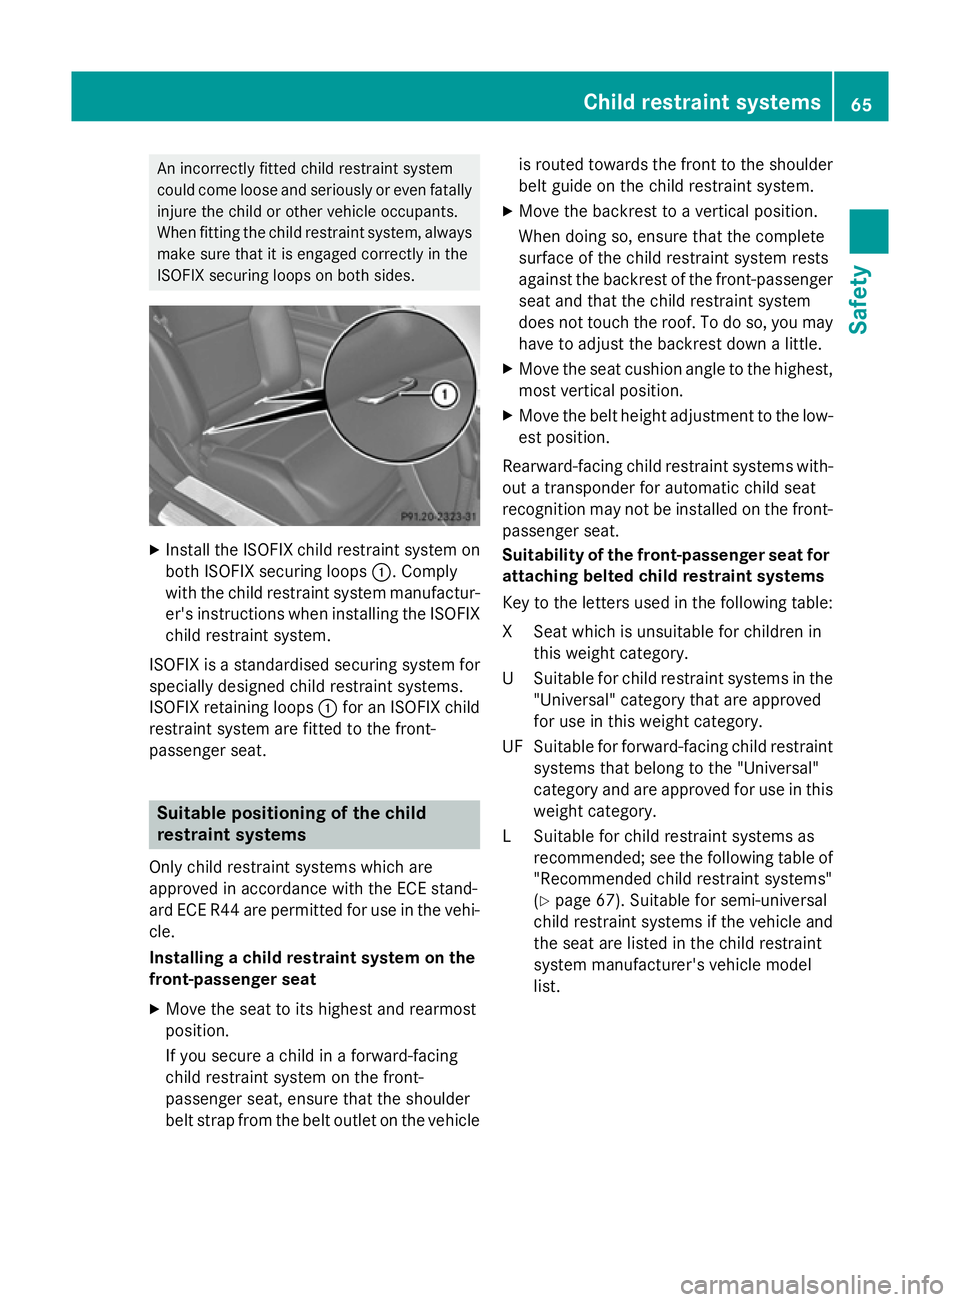
Install the ISOFIX child restraint system on
both ISOFIX securing loops :. Comply
with the child restraint system manufactur- er's instructions when installing the ISOFIXchild restraint system.
ISOFIX is a standardised securing system for
specially designed child restraint systems.
ISOFIX retaining loops :for an ISOFIX child
restraint system are fitted to the front-
passenger seat. Suitable positioning of the child
restraint systems
Only child restraint systems which are
approved in accordance with the ECE stand-
ard ECE R44 are permitted for use in the vehi- cle.
Installing a child restraint system on the
front-passenger seat
X Move the seat to its highest and rearmost
position.
If you secure a child in a forward-facing
child restraint system on the front-
passenger seat, ensure that the shoulder
belt strap from the belt outlet on the vehicle is routed towards the front to the shoulder
belt guide on the child restraint system.
X Move the backrest to a vertical position.
When doing so, ensure that the complete
surface of the child restraint system rests
against the backrest of the front-passenger
seat and that the child restraint system
does not touch the roof. To do so, you may have to adjust the backrest down a little.
X Move the seat cushion angle to the highest,
most vertical position.
X Move the belt height adjustment to the low-
est position.
Rearward-facing child restraint systems with- out a transponder for automatic child seat
recognition may not be installed on the front-
passenger seat.
Suitability of the front-passenger seat for attaching belted child restraint systems
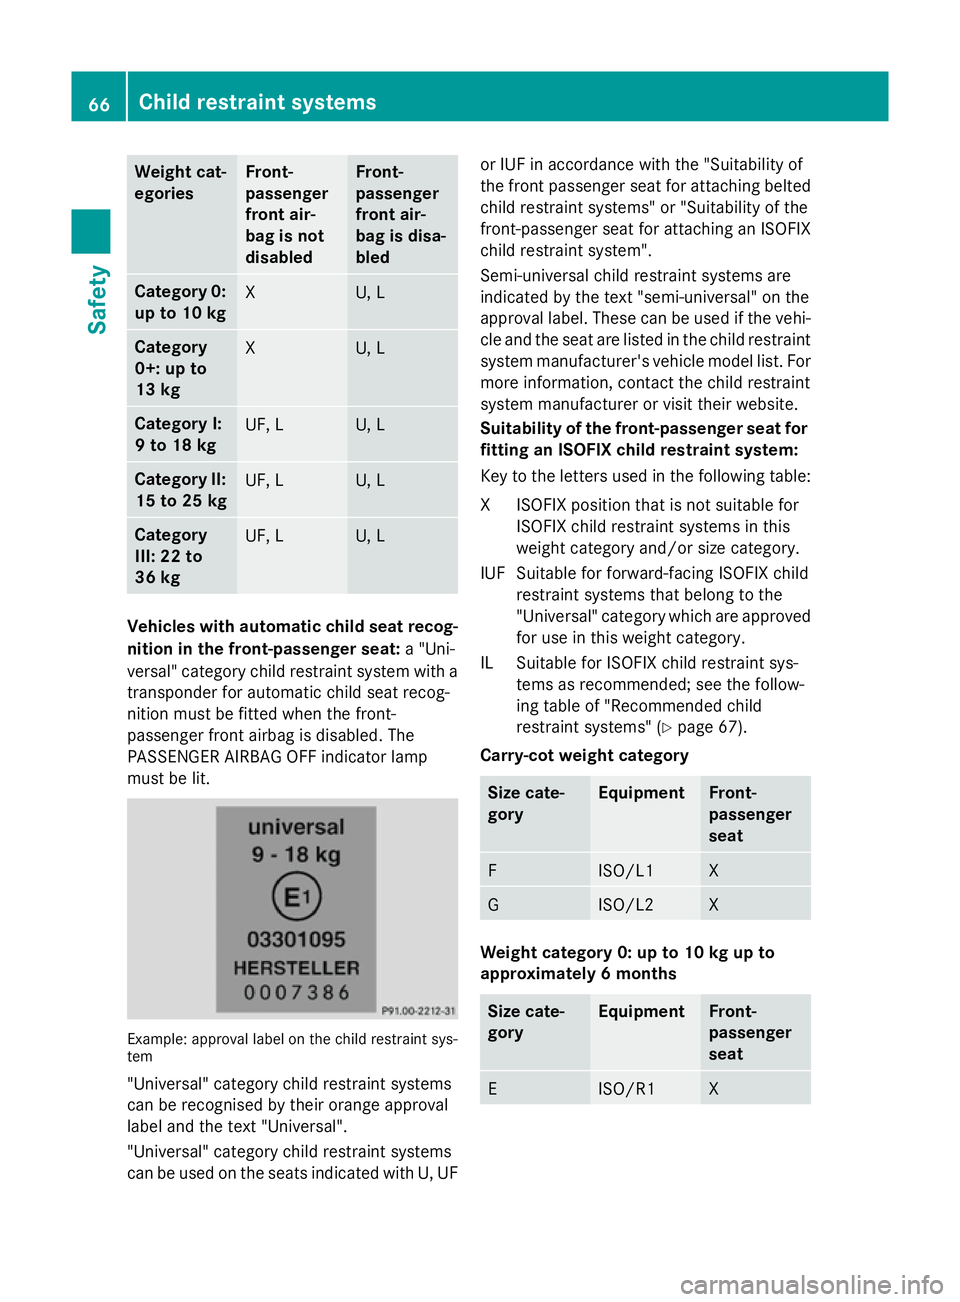
Key to the letters used in the following table:
XS eat which is unsuitable for children in
this weight category.
US uitable for child restraint systems in the
"Universal" category that are approved
for use in this weight category.
UF Suitable for forward-facing child restraint systems that belong to the "Universal"
category and are approved for use in this
weight category.
LS uitable for child restraint systems as
recommended; see the following table of
"Recommended child restraint systems"
(Y page 67). Suitable for semi-universal
child restraint systems if the vehicle and
the seat are listed in the child restraint
system manufacturer's vehicle model
list. Child restraint systems
65Safety Z
Page 69 of 637
Weight cat-
egories Front-
passenger
front air-
bag is not
disabled Front-
passenger
front air-
bag is disa-
bled
Category 0:
up to 10 kg X U, L
Category
0+: up to
13 kg
X U, L
Category I:
9 to 18 kg
UF, L U, L
Category II:
15 to 25 kg UF, L U, L
Category
III: 22 to
36 kg
UF, L U, L
Vehicles with automatic child seat recog-
nition in the front-passenger seat: a "Uni-
versal" category child restraint system with a
transponder for automatic child seat recog-
nition must be fitted when the front-
passenger front airbag is disabled. The
PASSENGER AIRBAG OFF indicator lamp
must be lit. Example: approval label on the child restraint sys-
tem
"Universal" category child restraint systems
can be recognised by their orange approval
label and the text "Universal".
"Universal" category child restraint systems
can be used on the seats indicated with U, UF or IUF in accordance with the "Suitability of
the front passenger seat for attaching belted
child restraint systems" or "Suitability of the
front-passenger seat for attaching an ISOFIX
child restraint system".
Semi-universal child restraint systems are
indicated by the text "semi-universal" on the
approval label. These can be used if the vehi-
cle and the seat are listed in the child restraint system manufacturer's vehicle model list. For
more information, contact the child restraint
system manufacturer or visit their website.
Suitability of the front-passenger seat for fitting an ISOFIX child restraint system:
Key to the letters used in the following table:
XI SOFIX position that is not suitable for
ISOFIX child restraint systems in this
weight category and/or size category.
IUF Suitable for forward-facing ISOFIX child restraint systems that belong to the
"Universal" category which are approvedfor use in this weight category.
IL Suitable for ISOFIX child restraint sys- tems as recommended; see the follow-
ing table of "Recommended child
restraint systems" (Y page 67).
Carry-cot weight category Size cate-
gory Equipment Front-
passenger
seat
F ISO/L1 X
G ISO/L2 X
Weight category 0: up to 10 kg up to
approximately 6 months
Size cate-
gory Equipment Front-
passenger
seat
E ISO/R1 X66
Child restraint systemsSafety
Page 82 of 637
This steering support is provided in particular
if:
R both right wheels or both left wheels are on
a wet or slippery road surface when you
brake.
R the vehicle starts to skid.
Important safety notes i
Observe the "Important safety notes" sec-
tion (Y page 70).
No steering support is provided from STEER
CONTROL, if:
R ESP ®
is malfunctioning.
R the steering is faulty.
Power steering will, however, continue to
function. Anti-theft systems
Immobiliser
X To activate with the key: remove the key
from the ignition lock.
X To activate with KEYLESS-GO: switch the
ignition off and open the driver's door.
X To deactivate: switch on the ignition.
The immobiliser prevents your vehicle from
being started without the correct key.
When leaving the vehicle, always take the
SmartKey with you and lock the vehicle. The
engine can be started by anyone with a valid
key that is left inside the vehicle.
i The immobiliser is always deactivated
when you start the engine. ATA (Anti-Theft Alarm system)
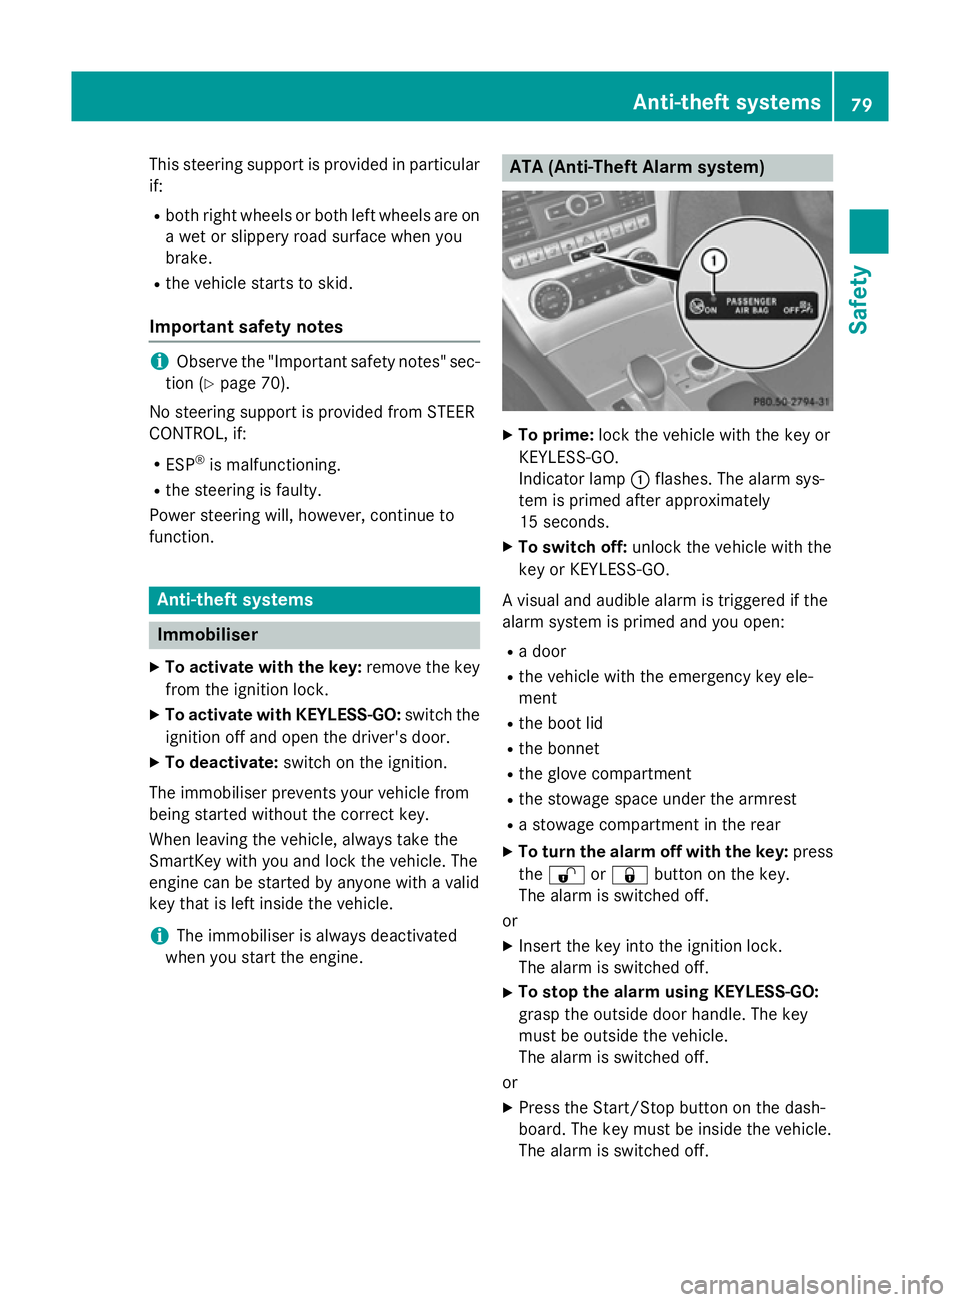
X
To prime: lock the vehicle with the key or
KEYLESS-GO.
Indicator lamp :flashes. The alarm sys-
tem is primed after approximately
15 seconds.
X To switch off: unlock the vehicle with the
key or KEYLESS-GO.
A visual and audible alarm is triggered if the
alarm system is primed and you open:
R a door
R the vehicle with the emergency key ele-
ment
R the boot lid
R the bonnet
R the glove compartment
R the stowage space under the armrest
R a stowage compartment in the rear
X To turn the alarm off with the key: press
the % or& button on the key.
The alarm is switched off.
or
X Insert the key into the ignition lock.
The alarm is switched off.
X To stop the alarm using KEYLESS-GO:
grasp the outside door handle. The key
must be outside the vehicle.
The alarm is switched off.
or
X Press the Start/Stop button on the dash-
board. The key must be inside the vehicle.
The alarm is switched off. Anti-theft systems
79Safety Z
Page 83 of 637
The alarm is not switched off, even if you
close the open door that has triggered it, for
example. Tow-away protection
Function An audible and visual alarm is triggered if your
vehicle's angle of inclination is altered while
tow-away protection is primed. This can occur
if the vehicle is jacked up on one side, for
example.
Activating X
Make sure that:
R the doors are closed
R the boot lid is closed
Only then is the tow-away protection
primed.
X Lock the vehicle with the key or KEYLESS-
GO.
Tow-away protection is primed after
approximately 30 seconds.
Deactivating X
To switch off: unlock the vehicle with the
key or KEYLESS-GO.
Tow-away protection is switched off auto-
matically.
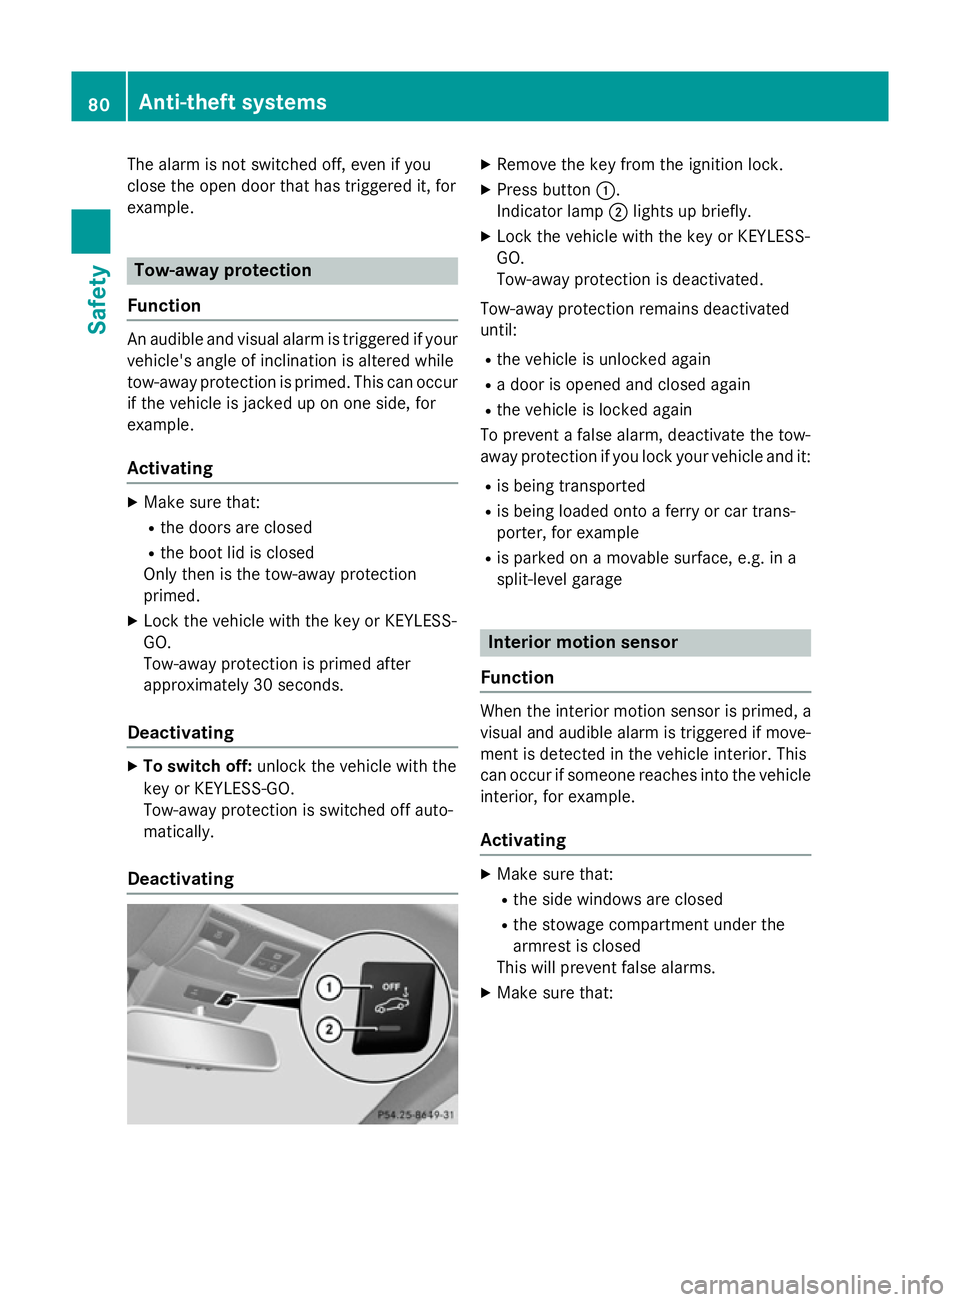
Deactivating X
Remove the key from the ignition lock.
X Press button :.
Indicator lamp ;lights up briefly.
X Lock the vehicle with the key or KEYLESS-
GO.
Tow-away protection is deactivated.
Tow-away protection remains deactivated
until: R the vehicle is unlocked again
R a door is opened and closed again
R the vehicle is locked again
To prevent a false alarm, deactivate the tow-
away protection if you lock your vehicle and it:
R is being transported
R is being loaded onto a ferry or car trans-
porter, for example
R is parked on a movable surface, e.g. in a
split-level garage Interior motion sensor
Function When the interior motion sensor is primed, a
visual and audible alarm is triggered if move-
ment is detected in the vehicle interior. This
can occur if someone reaches into the vehicle interior, for example.
Activating X
Make sure that:
R the side windows are closed
R the stowage compartment under the
armrest is closed
This will prevent false alarms.
X Make sure that: 80
Anti-theft systemsSafety
Page 84 of 637
R
the roof is closed
R the doors are closed
R the boot lid is closed
Only then is the interior motion sensor
primed.
X Lock the vehicle with the key or KEYLESS-
GO.
The interior motion sensor is primed after
approximately 30 second s.
i Only
for the Netherlands and Belgium:
the interior motion sensor is primed even
when the roof is open. However, the roof
should be closed so as to prevent a false
alarm.
Deactivating X
Unlock the vehicle with the key or KEY-
LESS-GO.
The interior motion sensor is automatically
deactivated.
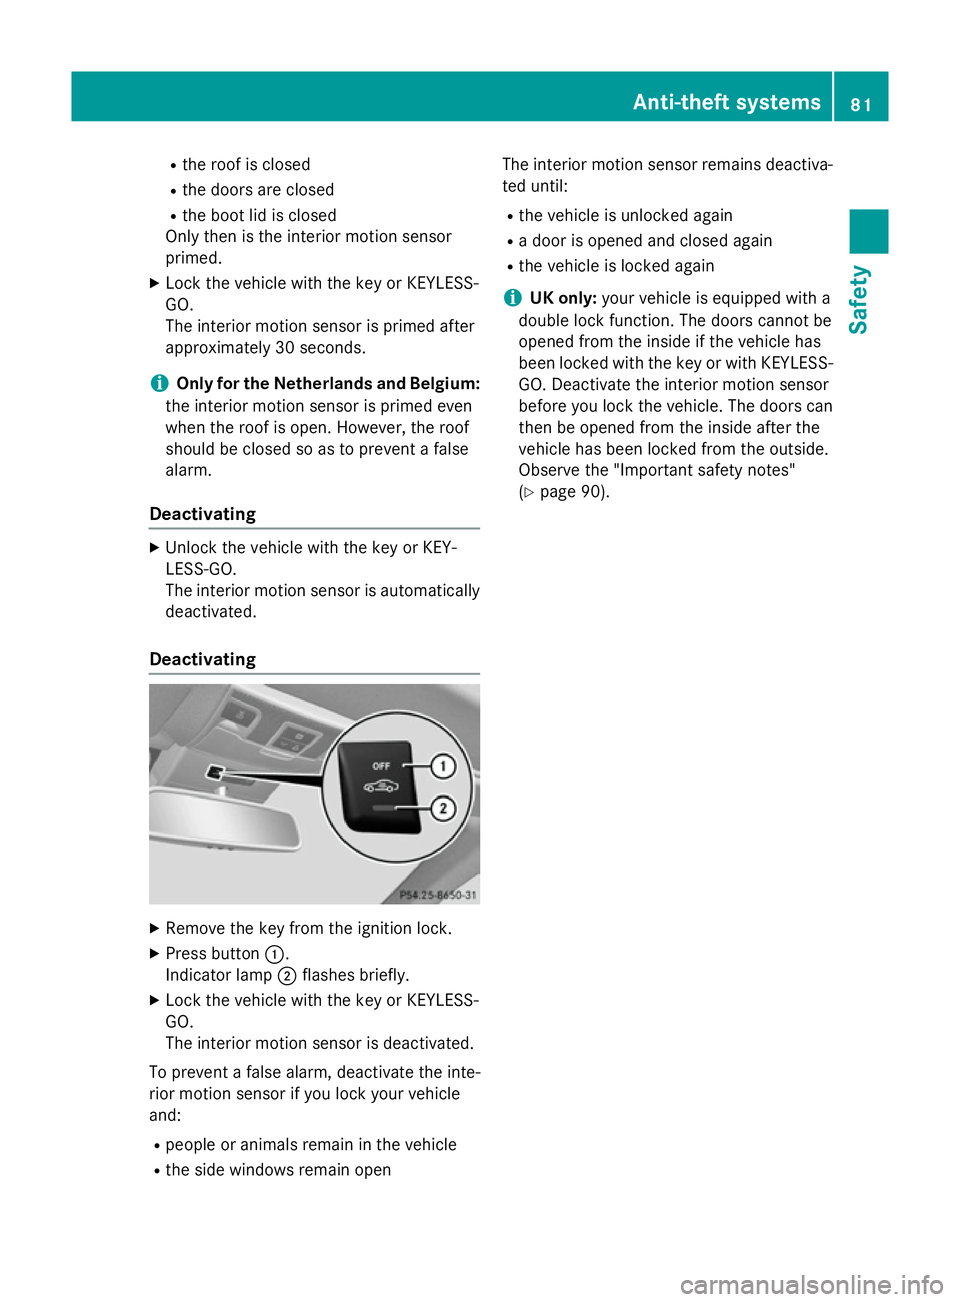
Deactivating X
Remove the key from the ignition lock.
X Press button :.
Indicator lamp ;flashes briefly.
X Lock the vehicle with the key or KEYLESS-
GO.
The interior motion sensor is deactivated.
To prevent a false alarm, deactivate the inte-
rior motion sensor if you lock your vehicle
and:
R people or animals remain in the vehicle
R the side windows remain open The interior motion sensor remains deactiva-
ted until:
R the vehicle is unlocked again
R a door is opened and closed again
R the vehicle is locked again
i UK only:
your vehicle is equipped with a
double lock function. The doors cannot be
opened from the inside if the vehicle has
been locked with the key or with KEYLESS- GO. Deactivate the interior motion sensor
before you lock the vehicle. The doors can
then be opened from the inside after the
vehicle has been locked from the outside.
Observe the "Important safety notes"
(Y page 90). Anti-theft systems
81Safety Z
Page 86 of 637
Useful information
..............................84
Key ....................................................... 84
Doors .................................................... 90
Boot ...................................................... 94
Side windows ...................................... 99
Roof .................................................... 103 83Opening and closing