2012 MERCEDES-BENZ SL ROADSTER check engine
[x] Cancel search: check enginePage 184 of 637
brake system warning lamp in the instrument
cluster and note any brake status messages
in the multifunction display. If you regularly
drive at high speeds, it is particularly impor-
tant to have the brake system checked and
maintained regularly. Driving on wet roads
Aquaplaning If water has accumulated to a certain depth
on the road surface, there is a danger of aqua-
planing occurring, even if:
R you are driving at low speeds
R the tyres have adequate tread depth
For this reason, do not drive in tyre ruts, and
brake carefully.
Driving on flooded roads !
Bear in mind that vehicles travelling in
front or in the opposite direction create
waves. This may cause the maximum per-
missible water depth to be exceeded.
These notes must be observed under all
circumstances. You could otherwise dam-
age the engine, the electronics or the trans- mission.
If you have to drive on stretches of road on
which water has collected, please bear in
mind that:
R the maximum permissible fording depth in
still water is 12 cm
R you should drive no faster than walking
pace Winter driving
G
WARNING
If you shift down on a slippery road surface in an attempt to increase the engine's braking
effect, the drive wheels could lose their grip.
This increases the risk of skidding and having
an accident. Do not shift down for additional engine brak-
ing on a slippery road surface.
G
DANGER
If the exhaust pipe is blocked or adequate
ventilation is not possible, poisonous gases
such as carbon monoxide (CO) may enter the vehicle. This is the case, e.g. if the vehicle
becomes trapped in snow. There is a risk of
fatal injury.
If you leave the engine or the auxiliary heating
running, make sure the exhaust pipe and area
around the vehicle are clear of snow. To
ensure an adequate supply of fresh air, open a window on the side of the vehicle that is not
facing into the wind.
! Take care not to damage the sealing strip
and the moulding on the side of the rear
window when scraping ice off the rear win-
dow.
Have your vehicle winterproofed at a qualified specialist workshop at the onset of winter.
You should drive particularly carefully on slip-
pery road surfaces. Avoid sudden accelera-
tion, steering and braking manoeuvres. Do
not use cruise control.
If the vehicle threatens to skid or cannot be
stopped when moving at low speed:
X Move the transmission to position N.
X Try to bring the vehicle under control by
using corrective steering.
The outside temperature indicator is not
designed to serve as an ice-warning device
and is therefore unsuitable for that purpose.
Changes in the outside temperature are dis-
played after a short delay.
Indicated temperatures just above the freez-
ing point do not guarantee that the road sur-
face is free of ice. The road may still be icy,
especially in wooded areas or on bridges. The vehicle could skid if you fail to adapt your
driving style. Always adapt your driving style
and drive at a speed to suit the prevailing
weather conditions. Driving tips
181Driving and parking Z
Page 190 of 637
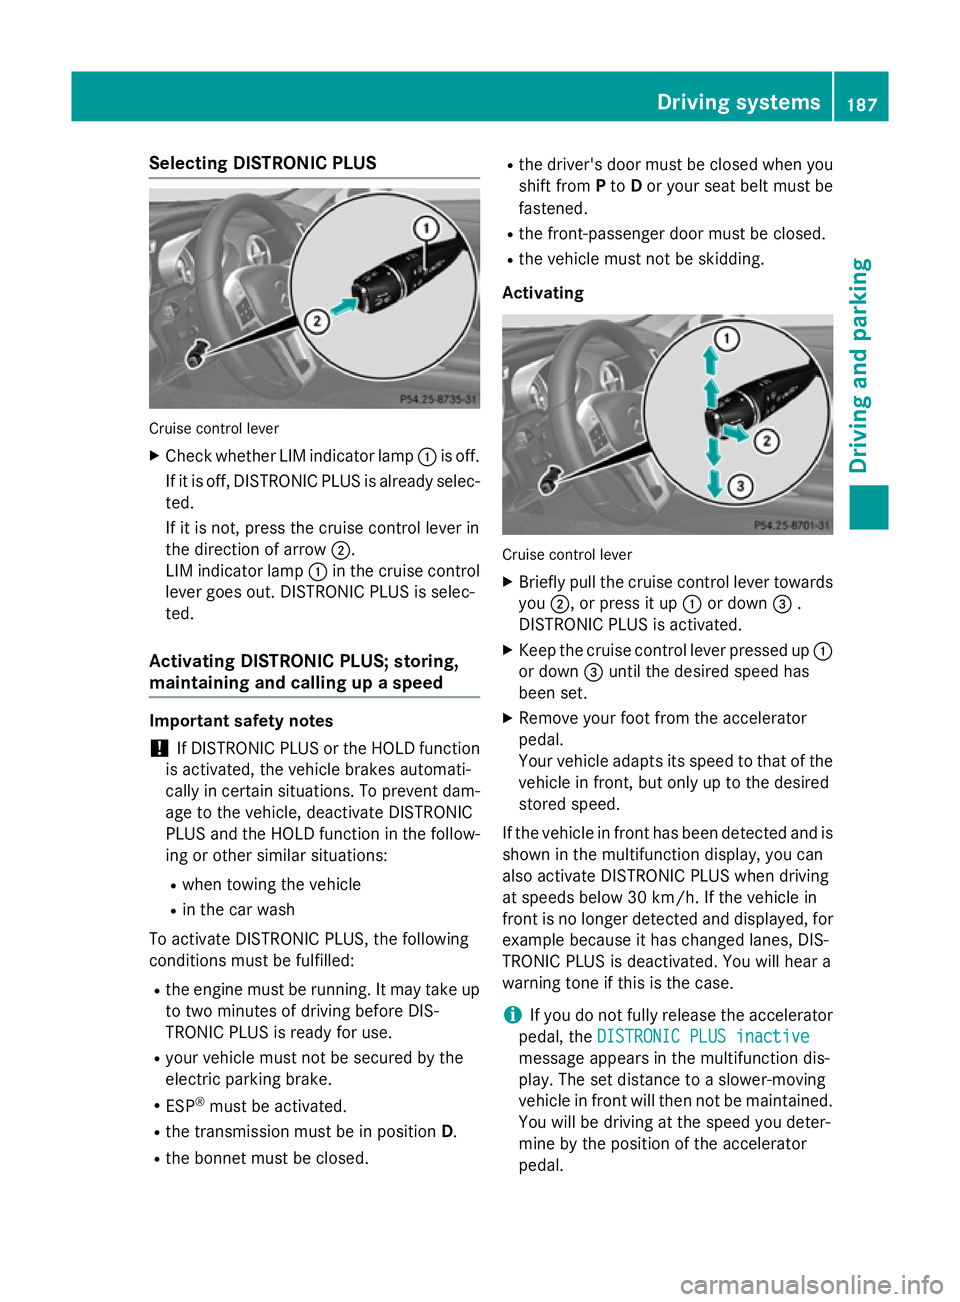
Selecting DISTRONIC PLUS
Cruise control lever
X Check whether LIM indicator lamp :is off.
If it is off, DISTRONIC PLUS is already selec- ted.
If it is not, press the cruise control lever in
the direction of arrow ;.
LIM indicator lamp :in the cruise control
lever goes out. DISTRONIC PLUS is selec-
ted.
Activating DISTRONIC PLUS; storing,
maintaining and calling up a speed Important safety notes
! If DISTRONIC PLUS or the HOLD function
is activated, the vehicle brakes automati-
cally in certain situations. To prevent dam-
age to the vehicle, deactivate DISTRONIC
PLUS and the HOLD function in the follow-
ing or other similar situations:
R when towing the vehicle
R in the car wash
To activate DISTRONIC PLUS, the following
conditions must be fulfilled:
R the engine must be running. It may take up
to two minutes of driving before DIS-
TRONIC PLUS is ready for use.
R your vehicle must not be secured by the
electric parking brake.
R ESP ®
must be activated.
R the transmission must be in position D.
R the bonnet must be closed. R
the driver's door must be closed when you
shift from Pto Dor your seat belt must be
fastened.
R the front-passenger door must be closed.
R the vehicle must not be skidding.
Activating Cruise control lever
X Briefly pull the cruise control lever towards
you ;, or press it up :or down =.
DISTRONIC PLUS is activated.
X Keep the cruise control lever pressed up :
or down =until the desired speed has
been set.
X Remove your foot from the accelerator
pedal.
Your vehicle adapts its speed to that of the
vehicle in front, but only up to the desired
stored speed.
If the vehicle in front has been detected and is
shown in the multifunction display, you can
also activate DISTRONIC PLUS when driving
at speeds below 30 km/h. If the vehicle in
front is no longer detected and displayed, for
example because it has changed lanes, DIS-
TRONIC PLUS is deactivated. You will hear a
warning tone if this is the case.
i If you do not fully release the accelerator
pedal, the DISTRONIC PLUS inactive
DISTRONIC PLUS inactive
message appears in the multifunction dis-
play. The set distance to a slower-moving
vehicle in front will then not be maintained. You will be driving at the speed you deter-
mine by the position of the accelerator
pedal. Driving systems
187Driving and parking Z
Page 198 of 637
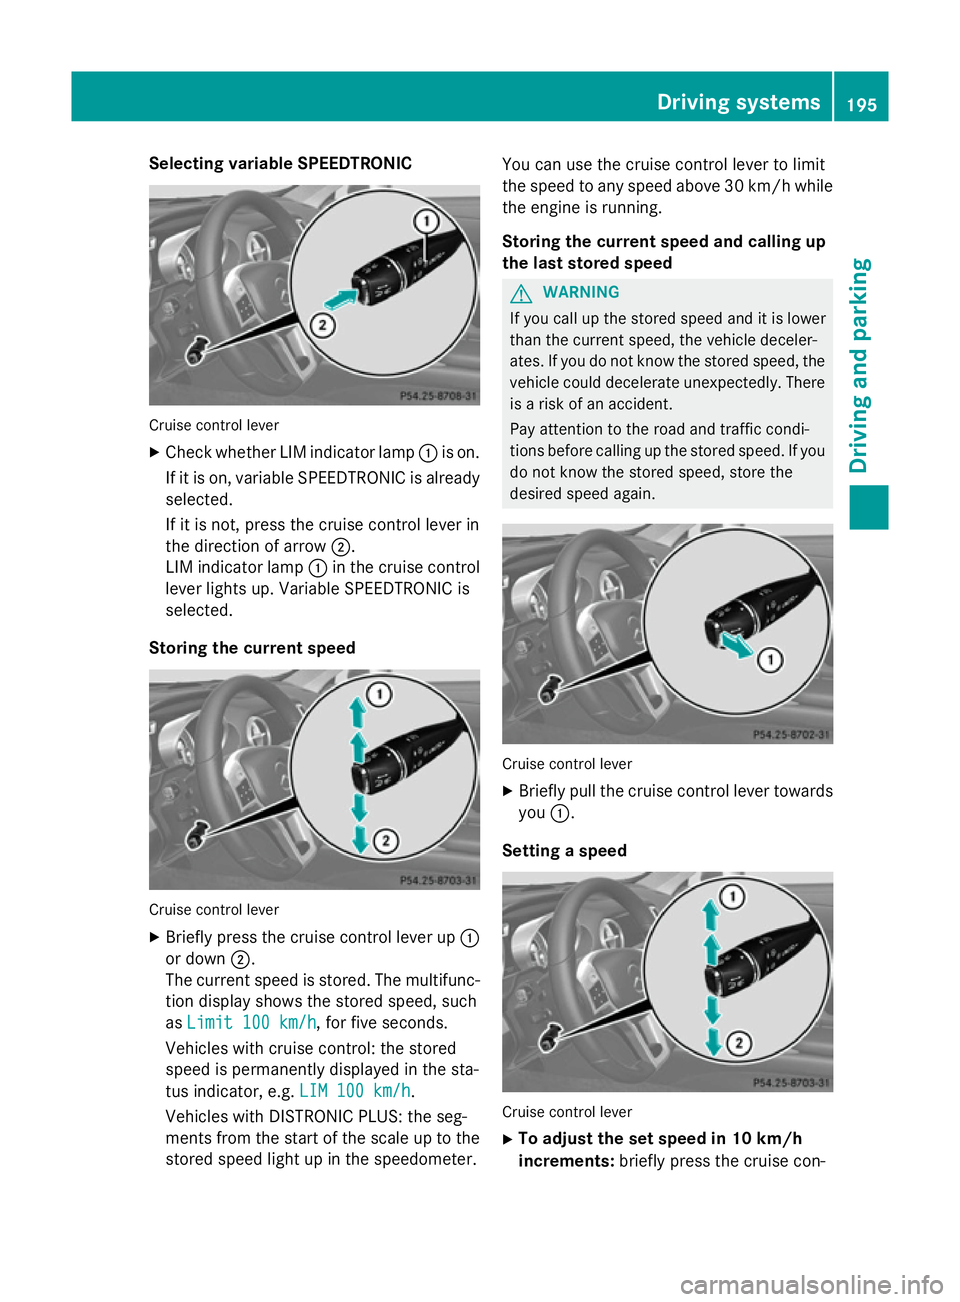
Selecting variable SPEEDTRONIC
Cruise control lever
X Check whether LIM indicator lamp :is on.
If it is on, variable SPEEDTRONIC is already selected.
If it is not, press the cruise control lever in
the direction of arrow ;.
LIM indicator lamp :in the cruise control
lever lights up. Variable SPEEDTRONIC is
selected.
Storing the current speed Cruise control lever
X Briefly press the cruise control lever up :
or down ;.
The current speed is stored. The multifunc- tion display shows the stored speed, such
as Limit 100 km/h
Limit 100 km/h, for five seconds.
Vehicles with cruise control: the stored
speed is permanently displayed in the sta-
tus indicator, e.g. LIM 100 km/h LIM 100 km/h.
Vehicles with DISTRONIC PLUS: the seg-
ments from the start of the scale up to the
stored speed light up in the speedometer. You can use the cruise control lever to limit
the speed to any speed above 30 km/hw hile
the engine is running.
Storing the current speed and calling up
the last stored speed G
WARNING
If you call up the stored speed and it is lower
than the current speed, the vehicle deceler-
ates. If you do not know the stored speed, the vehicle could decelerate unexpectedly. There
is a risk of an accident.
Pay attention to the road and traffic condi-
tions before calling up the stored speed. If you do not know the stored speed, store the
desired speed again. Cruise control lever
X Briefly pull the cruise control lever towards
you :.
Setting a speed Cruise control lever
X To adjust the set speed in 10 km/h
increments: briefly press the cruise con- Driving systems
195Driving and parking Z
Page 221 of 637
Pedestrian and animal recognition is deacti-
vated at temperatures above 32 †. The spot-
light function and automatic activation are
then no longer active.
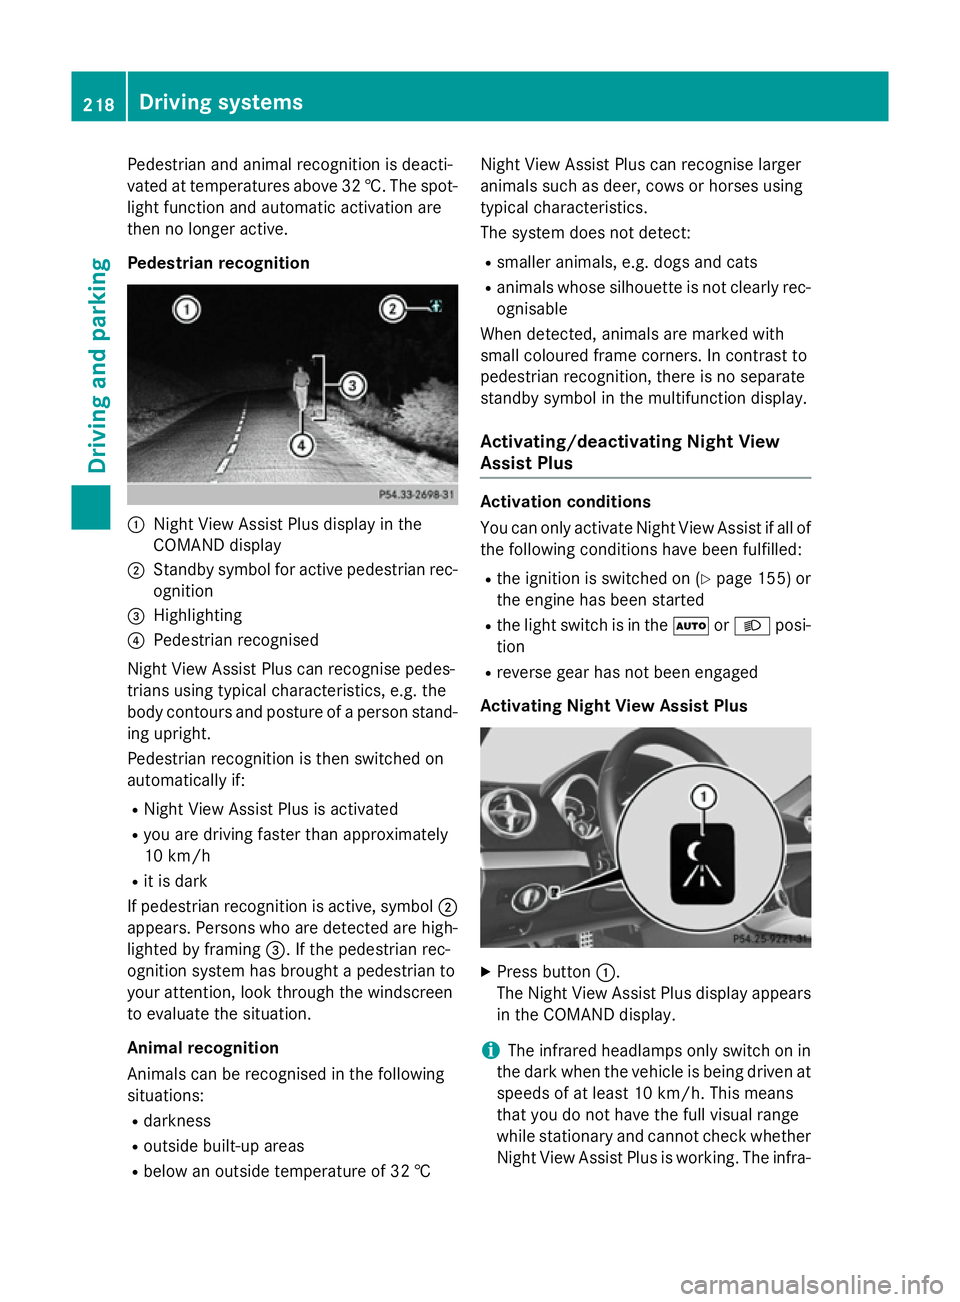
Pedestrian recognition :
Night View Assist Plus display in the
COMAND display
; Standby symbol for active pedestrian rec-
ognition
= Highlighting
? Pedestrian recognised
Night View Assist Plus can recognise pedes-
trians using typical characteristics, e.g. the
body contours and posture of a person stand- ing upright.
Pedestrian recognition is then switched on
automatically if:
R Night View Assist Plus is activated
R you are driving faster than approximately
10 km/h
R it is dark
If pedestrian recognition is active, symbol ;
appears. Persons who are detected are high-
lighted by framing =. If the pedestrian rec-
ognition system has brought a pedestrian to
your attention, look through the windscreen
to evaluate the situation.
Animal recognition
Animals can be recognised in the following
situations:
R darkness
R outside built-up areas
R below an outside temperature of 32 † Night View Assist Plus can recognise larger
animals such as deer, cows or horses using
typical characteristics.
The system does not detect:
R smaller animals, e.g. dogs and cats
R animals whose silhouette is not clearly rec-
ognisable
When detected, animals are marked with
small coloured frame corners. In contrast to
pedestrian recognition, there is no separate
standby symbol in the multifunction display.
Activating/deactivating Night View
Assist Plus Activation conditions
You can only activate Night View Assist if all of
the following conditions have been fulfilled:
R the ignition is switched on (Y page 155) or
the engine has been started
R the light switch is in the ÃorL posi-
tion
R reverse gear has not been engaged
Activating Night View Assist Plus X
Press button :.
The Night View Assist Plus display appears in the COMAND display.
i The infrared headlamps only switch on in
the dark when the vehicle is being driven at speeds of at least 10 km/h. This means
that you do not have the full visual range
while stationary and cannot check whether
Night View Assist Plus is working. The infra- 218
Driving systemsDriving and parking
Page 231 of 637
Useful information
i This Owner's Manual describes all mod-
els, series and optional equipment for your
vehicle that were available at the time of
going to press. National variations are pos- sible. Note that your vehicle may not be
equipped with all of the functions descri-
bed. This is also the case for systems and
functions relevant to safety.
i Read the information on qualified special-
ist workshops: (Y page 34). Important safety notes
G
WARNING
Operating the integrated information systems and communications equipment in the vehicle
while driving will distract you from traffic con-
ditions. You could then lose control of the
vehicle. There is a risk of an accident.
Only operate these devices if road traffic con-
ditions permit. If you are unsure about the
surrounding conditions, pull over to a safe
location and make entries only while the vehi-
cle is stationary. G
WARNING
If the instrument cluster has failed or mal-
functioned, you may not recognise function
restrictions relevant to safety. The operating
safety of your vehicle may be impaired. There is a risk of an accident.
Drive on carefully. Have the vehicle checked
at a qualified specialist workshop immedi-
ately.
You must observe the legal requirements for
the country in which you are currently driving when operating the on-board computer.
The on-board computer only shows messages
or warnings from certain systems in the mul- tifunction display. You should therefore make
sure your vehicle is operating safely at all times. Otherwise, a vehicle that is not oper-
ating safely may cause an accident.
For an overview, see the instrument panel
illustration (Y
page 40). Displays and operation
Instrument cluster lighting
The lighting in the instrument cluster, in the
displays and the controls in the vehicle inte-
rior can be adjusted using the brightness con- trol knob.
The brightness control knob is on the bottom
left of the instrument cluster (Y page 40).
X Turn the brightness control knob anti-
clockwise or clockwise.
If the light switch is set to Ã,Tor
L, the brightness is dependant upon
the brightness of the ambient light.
i The light sensor in the instrument cluster
automatically controls the brightness of
the multifunction display.
In daylight, the displays in the instrument
cluster are not lit. Coolant temperature gauge
G
WARNING
If you open the bonnet while the engine is
overheating or while there is a fire in the
engine compartment, you could come into
contact with hot gases or other leaking ser-
vice products. There is a danger of injury.
Allow an overheating engine to cool down
before opening the bonnet. If there is a fire in the engine compartment, leave the bonnet
closed and notify the fire brigade.
The coolant temperature gauge is in the
instrument cluster on the right-hand side
(Y page 40).
Under normal operating conditions and with
the specified coolant level, the coolant tem-
perature may rise to 120 †. 228
Displays and operationOn-board computer and displays
Page 242 of 637
R
Checking the tyre pressure electronically
(Y page 602)
R Calling up the service due date
(Y page 567) Settings menu
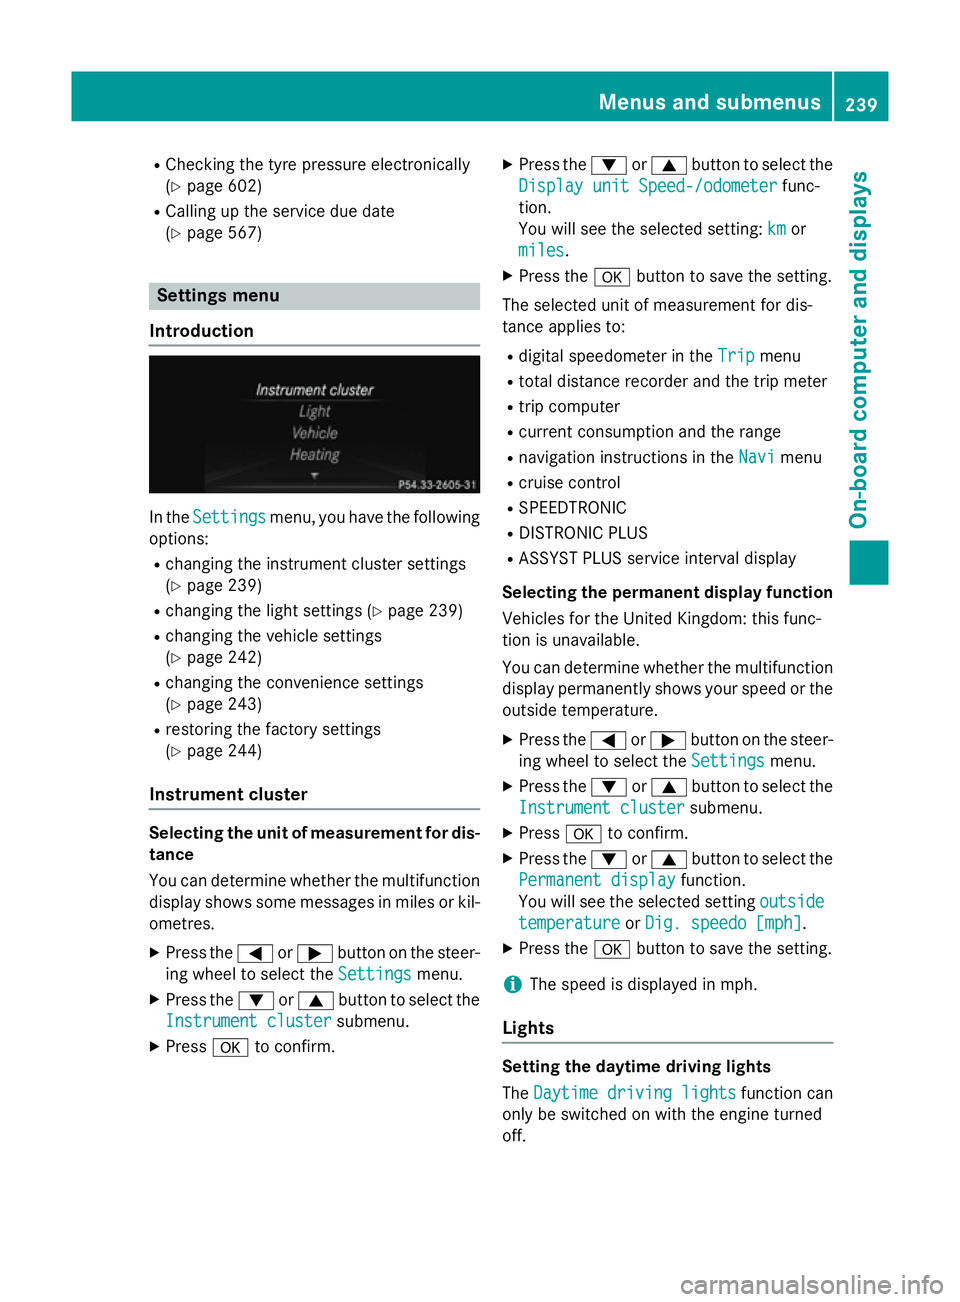
Introduction In the
Settings Settings menu, you have the following
options:
R changing the instrument cluster settings
(Y page 239)
R changing the light settings (Y page 239)
R changing the vehicle settings
(Y page 242)
R changing the convenience settings
(Y page 243)
R restoring the factory settings
(Y page 244)
Instrument cluster Selecting the unit of measurement for dis-
tance
You can determine whether the multifunction
display shows some messages in miles or kil- ometres.
X Press the =or; button on the steer-
ing wheel to select the Settings
Settings menu.
X Press the :or9 button to select the
Instrument cluster
Instrument cluster submenu.
X Press ato confirm. X
Press the :or9 button to select the
Display unit Speed-/odometer Display unit Speed-/odometer func-
tion.
You will see the selected setting: km kmor
miles
miles.
X Press the abutton to save the setting.
The selected unit of measurement for dis-
tance applies to: R digital speedometer in the Trip Tripmenu
R total distance recorder and the trip meter
R trip computer
R current consumption and the range
R navigation instructions in the Navi Navimenu
R cruise control
R SPEEDTRONIC
R DISTRONIC PLUS
R ASSYST PLUS service interval display
Selecting the permanent display function
Vehicles for the United Kingdom: this func-
tion is unavailable.
You can determine whether the multifunction display permanently shows your speed or the
outside temperature.
X Press the =or; button on the steer-
ing wheel to select the Settings Settingsmenu.
X Press the :or9 button to select the
Instrument cluster
Instrument cluster submenu.
X Press ato confirm.
X Press the :or9 button to select the
Permanent display
Permanent display function.
You will see the selected setting outside
outside
temperature
temperature orDig. speedo [mph]
Dig. speedo [mph].
X Press the abutton to save the setting.
i The speed is displayed in mph.
Lights Setting the daytime driving lights
The
Daytime driving lights Daytime driving lights function can
only be switched on with the engine turned
off. Menus and submenus
239On-board computer and displays Z
Page 256 of 637
Display messages
Possible causes/consequences and
M
MSolutions !
Parking Parking
brake
brakeinop‐
inop‐
erative
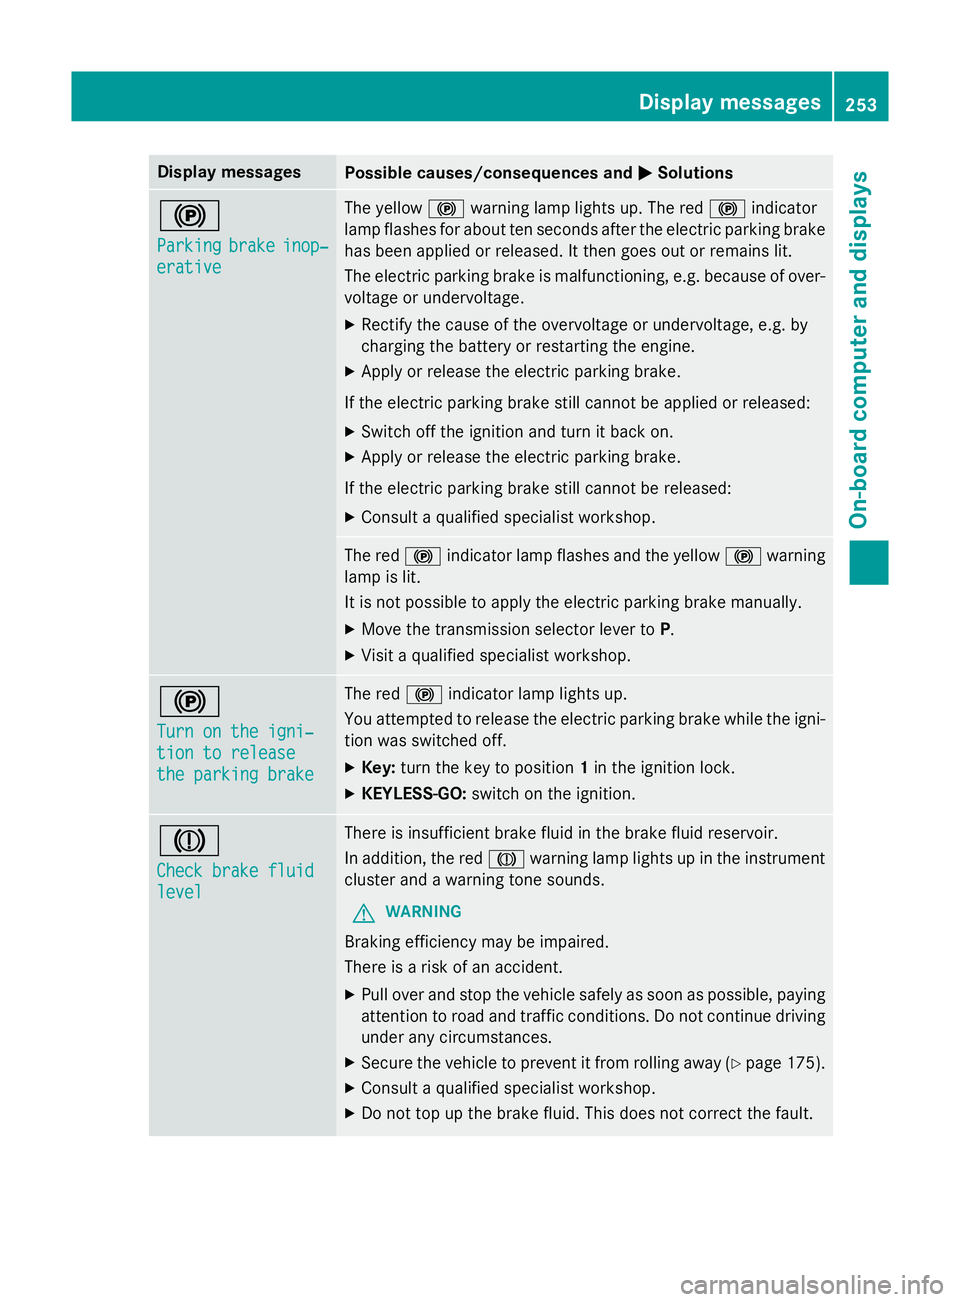
erative The yellow
!warning lamp lights up. The red !indicator
lamp flashes for about ten seconds after the electric parking brake
has been applied or released. It then goes out or remains lit.
The electric parking brake is malfunctioning, e.g. because of over- voltage or undervoltage.
X Rectify the cause of the overvoltage or undervoltage, e.g. by
charging the battery or restarting the engine.
X Apply or release the electric parking brake.
If the electric parking brake still cannot be applied or released: X Switch off the ignition and turn it back on.
X Apply or release the electric parking brake.
If the electric parking brake still cannot be released: X Consult a qualified specialist workshop. The red
!indicator lamp flashes and the yellow !warning
lamp is lit.
It is not possible to apply the electric parking brake manually.
X Move the transmission selector lever to P.
X Visit a qualified specialist workshop. !
Turn on the igni‐ Turn on the igni‐
tion to release tion to release
the parking brake the parking brake The red
!indicator lamp lights up.
You attempted to release the electric parking brake while the igni-
tion was switched off.
X Key: turn the key to position 1in the ignition lock.
X KEYLESS-GO: switch on the ignition. J
Check brake fluid Check brake fluid
level level There is insufficient brake fluid in the brake fluid reservoir.
In addition, the red Jwarning lamp lights up in the instrument
cluster and a warning tone sounds.
G WARNING
Braking efficiency may be impaired.
There is a risk of an accident. X Pull over and stop the vehicle safely as soon as possible, paying
attention to road and traffic conditions. Do not continue driving
under any circumstances.
X Secure the vehicle to prevent it from rolling away (Y page 175).
X Consult a qualified specialist workshop.
X Do not top up the brake fluid. This does not correct the fault. Display
messages
253On-board computer and displays Z
Page 257 of 637
Display messages
Possible causes/consequences and
M
MSolutions #
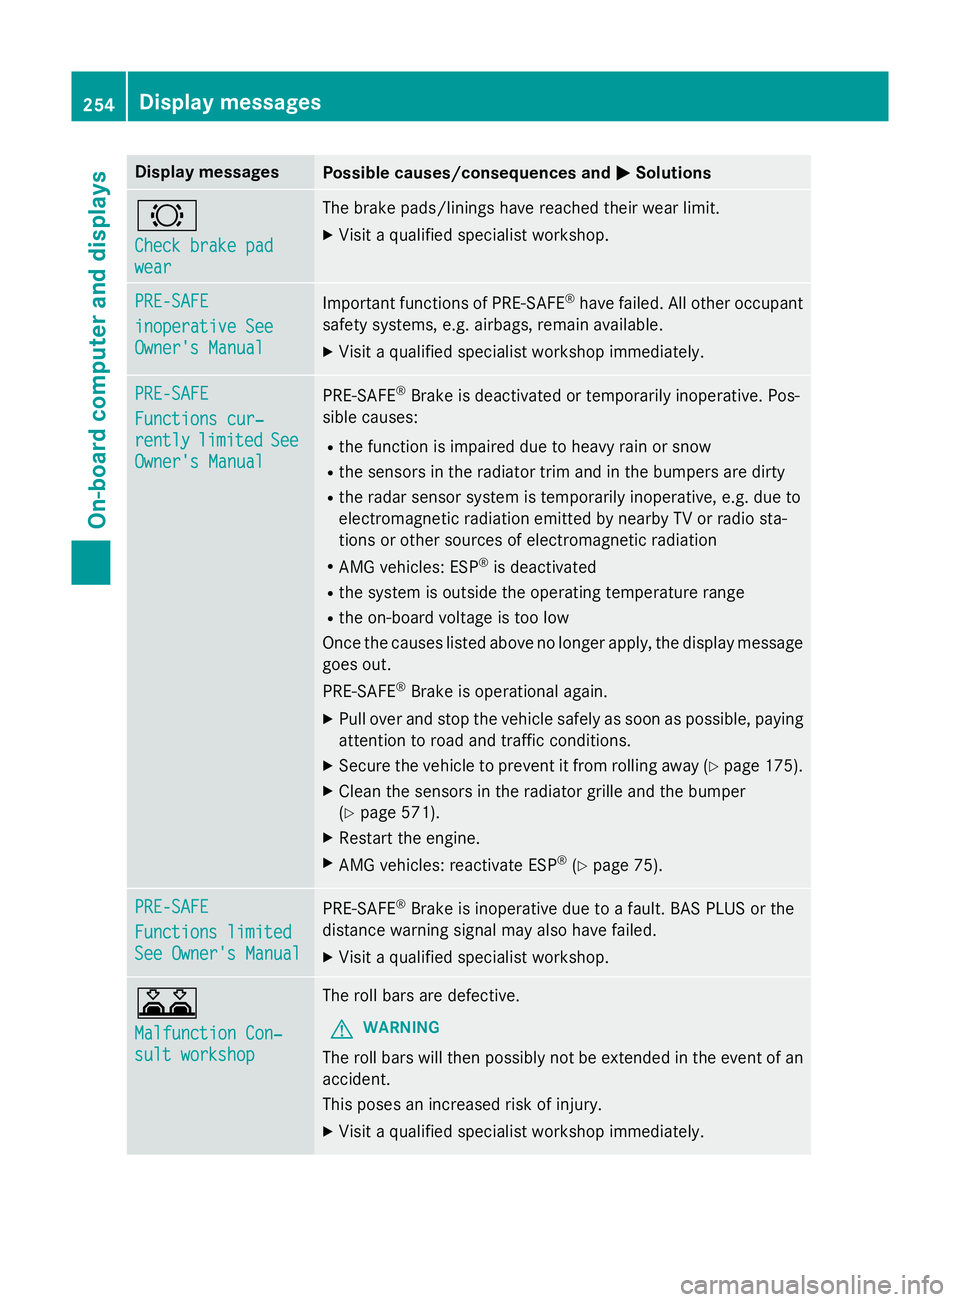
Check brake pad Check brake pad
wear wear The brake pads/linings have reached their wear limit.
X Visit a qualified specialist workshop. PRE-SAFE
PRE-SAFE
inoperative See inoperative See
Owner's Manual Owner's Manual
Important functions of PRE-SAFE
®
have failed. All other occupant
safety systems, e.g. airbags, remain available.
X Visit a qualified specialist workshop immediately. PRE-SAFE
PRE-SAFE
Functions cur‐ Functions cur‐
rently rently
limited
limited See
See
Owner's Manual
Owner's Manual PRE
‑SAFE ®
Brake is deactivated or temporarily inoperative. Pos-
sible causes:
R the function is impaired due to heavy rain or snow
R the sensors in the radiator trim and in the bumpers are dirty
R the radar sensor system is temporarily inoperative, e.g. due to
electromagnetic radiation emitted by nearby TV or radio sta-
tions or other sources of electromagnetic radiation
R AMG vehicles: ESP ®
is deactivated
R the system is outside the operating temperature range
R the on-board voltage is too low
Once the causes listed above no longer apply, the display message goes out.
PRE ‑SAFE ®
Brake is operational again.
X Pull over and stop the vehicle safely as soon as possible, paying
attention to road and traffic conditions.
X Secure the vehicle to prevent it from rolling away (Y page 175).
X Clean the sensors in the radiator grille and the bumper
(Y page 571).
X Restart the engine.
X AMG vehicles: reactivate ESP ®
(Y page 75). PRE-SAFE PRE-SAFE
Functions limited Functions limited
See Owner's Manual See Owner's Manual
PRE-SAFE
®
Brake is inoperative due to a fault. BAS PLUS or the
distance warning signal may also have failed.
X Visit a qualified specialist workshop. A
Malfunction Con‐ Malfunction Con‐
sult workshop sult workshop The roll bars are defective.
G WARNING
The roll bars will then possibly not be extended in the event of an
accident.
This poses an increased risk of injury.
X Visit a qualified specialist workshop immediately. 254
Display
messagesOn-board computer and displays