2012 MERCEDES-BENZ CLS SHOOTING BRAKE belt
[x] Cancel search: beltPage 302 of 405

X
To loosen and detach: pull belt
clamp ?up to reduce the tension in the
lashing strap.
X Remove spring hook =from the lashing
eyelet or bracket (vehicles with EASY-PACK
load-securing kit (Y page 300)).
X Detach guide rod :from bracket ;.
X To stow: press the red button on the upper
and lowe rguide rod.
X Fold the safety ne tand roll it up.
X Close the two Velcro fasteners on the
safety net holder. EASY-PACK boot box (CLS Coupé)
Important safety notes G
WARNING
Only load the EASY-PACK convenience bo xto
the maximum permissible load of 10 kg. To
prevent overloading, the floor of the box
moves down onto the boot floor ma twhen
loaded with more than approx. 5kg.
Do not transpor tsharp-edged and fragile
objects in the box.
Otherwise, e.g. in the event of a rapid change
of direction or heavy braking, the objects
could be thrown out of the EASY-PACK con-
venience box and injure you and others.
! When the EASY-PACK convenience box is
pulled out, no objects may be placed on the
frame of the box or pushed onto the frame
from above. Otherwise, the box could be
damaged.
Adjusting the height to any position G
WARNING
Make sure that your hands are not inside the
EASY-PACK convenience box when the load
surface moves up. Otherwise, you could be
injured. X
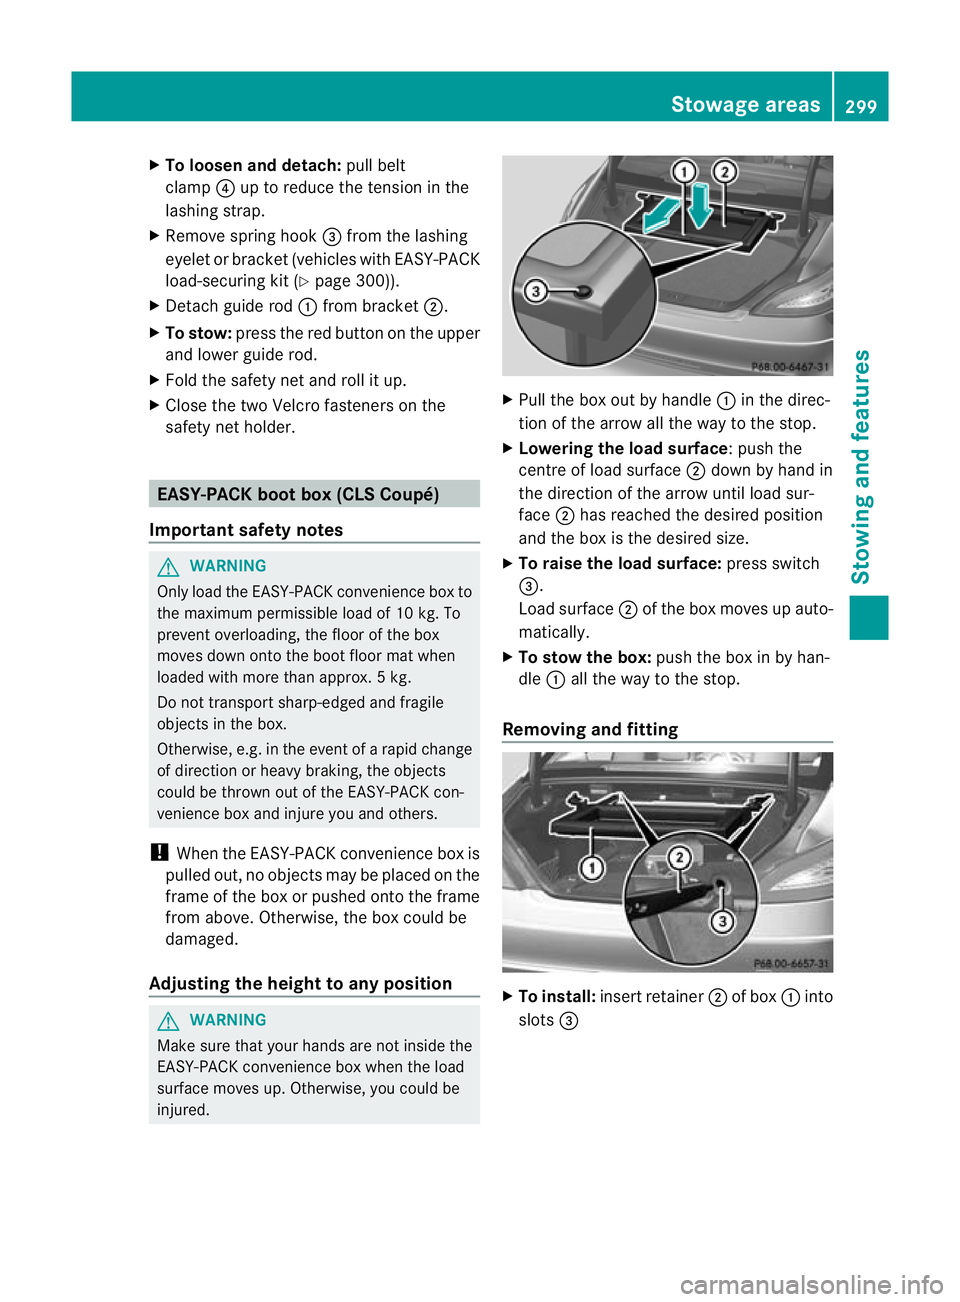
Pull the box out by handle :in the direc-
tion of the arrow all the way to the stop.
X Lowering the load surface:p ush the
centre of load surface ;down by hand in
the direction of the arrow until load sur-
face ;has reached the desired position
and the box is the desired size.
X To raise the load surface: press switch
=.
Load surface ;of the box moves up auto-
matically.
X To stow the box: push the box in by han-
dle :all the way to the stop.
Removing and fitting X
To install: insert retainer ;of box :into
slots = Stowage areas
299Stowing and featu res Z
Page 334 of 405

Cleaning the steering wheel and gear or
selector lever X
Thoroughly wipe with a damp cloth or use
leather care agents that have been recom-
mended and approved by Mercedes-Benz.
Cleaning wooden trim and trim ele-
ments !
Do no tuse solvent-based cleaning agents
such as tar remover, wheel cleaners, pol-
ishes or waxes. There is otherwise a risk of
damaging the surface.
X Wipe the wooden trim and trim elements
with a damp, lint-free cloth, e.g. a microfi-
bre cloth.
X Heavy soiling: use car care and cleaning
products recommended and approved by
Mercedes-Benz.
Cleaning the seat covers General notes
!
Do not use microfibre cloths to clean gen-
uine leather, artificial leather or
Alcantara® covers. If used often, these can
damage the cover.
i Note that regularc are is essential to
make sure that the appearance and com-
fort of the covers are retained over time.
Genuine leather seat covers
Leather is a natural product.
It displays the characteristics of a natural sur-
face, e.g.
R deviations in structure
R evidence of growth and injury
R sligh tdifferences in colour
These are features which are special to
leathe rand do not indicate faults in the mate-
rial. !
To retain the natural appearance of the
leather, observe the following cleaning
instructions:
R Clea ngenuine leather covers carefully
with a damp cloth and then wipe the cov-
ers down with a dry cloth.
R Make sure that the leather does not
become soaked. It may otherwise
become rough and cracked.
R Only use leather care agents that have
been tested and approved by Mercedes-
Benz. You can obtain these from a quali-
fied specialist workshop.
Seat covers made from other materials
! Observe the following when cleaning:
R Clean artificial leather covers with a cloth
moistened with a solution containing
1% detergen t(e.g. washing-up liquid).
R Clean cloth covers with a microfibre
cloth moistened with a solution contain-
ing 1% detergen t(e.g. washing-up liquid).
Rub carefully, and always wipe entire
seat sections to avoid leaving visible
lines. Leave the seat to dry afterwards.
Cleaning results depend on the type of
dirt and how long it has been there.
R Clean Alcantara® covers with a damp
cloth. Make sure that you wipe entire
seat sections to avoid leaving visible
lines.
Cleaning the seat belts !
Do not clean the seat belts using chemical
cleaning agents .Do not dry the seat belts
at temperatures above 80 † or in direct
sunlight.
X Use clean, lukewarm water and soap solu-
tion. Care
331Maintenance and care Z
Page 348 of 405

Do not use a rapid charging device to start the vehicle. If your vehicle's battery is discharged,
the engine can be jump-started from another vehicle or from a second battery using jump
leads. Observe the following points:
R the battery is not accessible in all vehicles .Ifthe other vehicle's battery is not accessible,
jump-start the vehicle using a second battery or ajump-starting device.
R vehicles with apetrol engine: only jump-star tthe vehicle when the engine and exhaust
system are cold.
R do not start the engine if the battery is frozen. Let the battery thaw first.
R jump-starting may only be performed from batteries with a nominal voltage of 12 V.
R only use jump leads that have a sufficient cross-section and insulated terminal clamps.
R if the battery is fully discharged, leave the battery that is being used to jump-start connected
for a few minutes before attempting to start. This charges the empty battery a little.
R make sure that the two vehicles do not touch.
Make sure that:
R The jump leads are not damaged.
R Non-insulated parts of the terminal clamps do not come into contact with other metal parts
while the jump leads are connected to the battery.
R The jump leads cannot come into contact with parts such as the V-belt pulley or the fan.
These parts move when the engine is started and while it is running.
X Firmly depress the parking brake.
X Shift the transmission to position P.
X Switch off all electrical consumers (e.g. radio, blower, etc.).
X Open the bonnet (Y page 320).
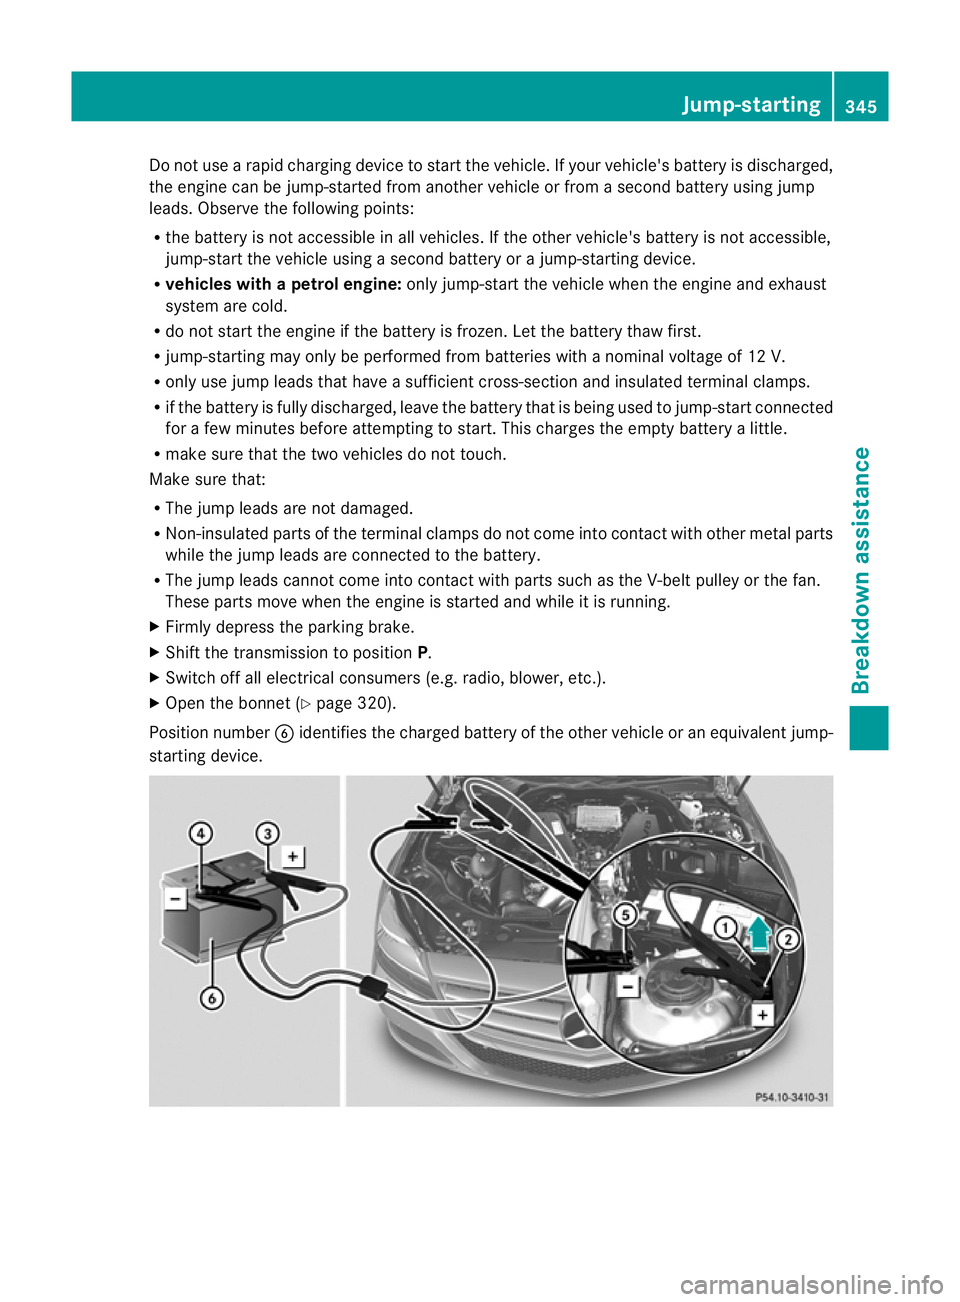
Position number Bidentifies the charged battery of the other vehicle or an equivalent jump-
starting device. Jump-starting
345Breakdown assistance Z
Page 385 of 405

Useful information
i This Owner's Manual describes all mod-
els, series and optional equipment for your
vehicle that were available at the time of
going to press. National variations are pos-
sible. Note that your vehicle may not be
equipped with all of the functions descri-
bed. This is also the case for systems and
functions relevant to safety.
i Read the information on qualified special-
ist workshops: (Y page 24). Information on technical data
You can find current technical data on the
Internet at:
http://www.mercedes-benz.com
i The technical data was determined in
accordance with EC Directives. All data
applies to the vehicle's standard equip-
ment. The data may therefore differ for
vehicles with optional equipment .You can
obtain further information from a
Mercedes-Benz Service Centre. Genuine Mercedes-Benz parts
G
WARNING
Driving safety may be impaired if non-
approved parts, tyres and wheels or safety-
relevant accessories are used.
This could lead to malfunctions in safety-rel-
evant systems, e.g. the brake system. This
could cause you to lose control of your vehicle
and cause an accident.
For this reason, Mercedes-Benz recommends
that you use genuine Mercedes-Benz parts or
parts of equal quality. Only use tyres, wheels
and accessories that have been specifically
approved for your vehicle. H
Environmental note
Daimler AG also supplies reconditioned
assemblies and parts which are of the same
quality as new parts. For these, the same war-
ranty applies as for new parts.
! Airbags and seat belt tensioners, as well
as control units and sensors for these
restraint systems, may be installed in the
following areas of your vehicle:
R doors
R door pillars
R door sills
R seats
R dashboard
R instrument cluster
R centre console
Do not install accessories such as audio
systems in these areas. Do not carry out
repairs or welding. You could impair the
operating efficiency of the restraint sys-
tems.
Have accessories retrofitted at a qualified
specialist workshop.
Mercedes-Benz tests genuine parts and con-
version parts and accessories that have been
specifically approved for your vehicle for their
reliability, safety and suitability. Despite
ongoing market research, Mercedes-Benz is
unable to assess other parts. Mercedes-Benz
accepts no responsibility for the use of parts
that have been independently or officially
approved.
In Germany, certain parts are only officially
approved for installation or modification if
they comply with legal requirements. This
also applies to some other countries. All gen-
uine Mercedes-Benz parts meet the approval
requirements. The use of non-approved parts
may invalidate the vehicle's general operating
permit. 382
Genuine Mercedes-Benz partsTechnical data