2012 MERCEDES-BENZ CLS SHOOTING BRAKE rear view mirror
[x] Cancel search: rear view mirrorPage 14 of 405
Folding in whe
nlocking (on-board
computer) ...................................... 245
Out of position (troubleshooting) ...109
Parking position ............................. 110
Resetting ....................................... 109
Storing settings (memory func-
tion) ............................................... 111F
Faul tmessage
see Display messages
Filler cap
see Fuel filler flap
Fire extinguisher ............................... 335
First-aid kit ......................................... 334
Fitting awheel
Removing awheel .......................... 365
Fitting wheels
Fitting awheel ............................... 366
Lowering the vehicle ......................366
Raising the vehicle .........................364
Securing the vehicle against roll-
ing away ........................................ 363
Flat tyre
MOExtended tyres .........................337
Preparing the vehicle .....................336
TIREFIT kit ...................................... 338
Floormat ............................................ .317
Foglamps (extende drange) .............. 120
Frequencies Garage door opener .......................314
Mobile phone ................................. 383
Two-way radio ................................ 383
Front foglamps
Display message ............................ 257
Fuel
Additives ........................................ 389
Consumption information ..............390
Consumption statistics ..................231
Displaying the current consump-
tion ................................................ 231
Displaying the range ......................231
Fuel gauge ............................... 30, 227
Grade (petrol) ................................ 387
Important safety notes ..................386
Notes for AMG vehicles .................388
Problem (malfunction) ...................164Quality (diesel
)............................... 389
Refuelling ...................................... .161
Tank content/reserve fuel .............387
Fuel filler flap
Emergency release ........................163
Opening/closing ............................ 162
Fuel filte r(white display message) .261
Fuel level Calling up the range (on-board
computer) ...................................... 231
Gauge ...................................... 30, 227
Fuel reserve
see Fuel
Fuel tank
Capacity ........................................ 387
Problem (malfunction) ...................164
Fuse allocation chart (vehicle tool
kit) ...................................................... 335
Fuses Allocation chart ............................. 350
Before changing ............................. 350
Fuse box in the boot ......................351
Fuse box in the engine compart-
ment .............................................. 350
Fuse box in the luggage compart-
ment .............................................. 351
Important safety notes ..................350 G
Garage door opener Clearing the memory .....................313
Frequencies ................................... 314
Important safety notes ..................311
Opening/closing the garage door ..313
Programming (button in the rear-
view mirror) ................................... 312
Gear indicator (on-board com-
puter) ................................................. .246
Gearshift program SETUP (on-board computer) ..........246
Genuine Mercedes-Benz parts .........382
Glove compartment ..........................291 Index
11
Page 17 of 405
Luggage compartment enlarge-
ment
................................................... 294
Luggage compartment floor opening/closing ............................ 302
stowage well, unde r....................... 302
Luggage cover
Removing and fitting ......................298
Luggage holde r(EASY-PACK load-
securing kit) ...................................... .300
Lumbar support Adjusting ....................................... 104
Adjusting the 4-way lumba rsup-
por t................................................ 104
Luxu ry head restraint .......................101 M
M+S tyres ........................................... 356
Main-beam headlamps Display message ............................ 257
Switching Adaptive Highbeam
Assist on/off ................................. 121
Switching on/off ........................... 117
Massage function (PULSE) ...............103
Matt finish (cleaning instructions) ..327
Memory card (audio) .........................234
Memory function ............................... 111
Mercedes-Benz Service Centre see Qualified specialist workshop
Message memory (on-board com-
puter) ................................................. .249
Messages see Display messages
Mirror
see Vanity mirror (in sun visor)
Mirrors
see Exterior mirrors
see Rear-view mirror
Mobile phone
Frequencies ................................... 383
Installatio n..................................... 383
Menu (on-board computer) ............235
Notes/placing in the bracket ......... 309
Sliding adapter ............................... 311
Transmission output (maximum) .... 383
Modifying the programming (key) .....78
MOExtended tyres .............................337
Motorway mode ................................ 119MP3
Operating ...................................... .234
see Separate operating instructions
Multifunction display
Function/notes ............................. 229
Permanent displa y......................... 239
Multifunction steering wheel
Operating the on-board computer .228
Overview .......................................... 33 N
Navigation Menu (on-board computer) ............232
NECK-PRO head restraints
Operation ........................................ .46
Resetting after being triggered ........47
NECK-PRO luxury head restraints
Operation ........................................ .46
Resetting after being triggered ........48
Night View Assist Plus
Activating/deactivating .................206
Cleaning ......................................... 330
Function/notes ............................. 205
Problem (fault) ............................... 208
Notes on running in anew vehicle ..146 O
Occupant safety Childre ninthe vehicle ..................... 53
Important safety notes ....................40
Odometer
see Total distance recorder
see Trip meter
Oil
see Engine oil
On-board computer
AMG menu ..................................... 246
Assistance menu ........................... 236
Audi omenu ................................... 233
Convenience submenu ..................244
Displaying a service message ........324
Display messages ..........................249
DISTRONI CPLUS ........................... 183
Factory setting submenu ...............245
Heating submenu ........................... 243
Important safety notes ..................22614
Index
Page 19 of 405
Rear compartment
Setting the ai rvents. ..................... 143
Rear-compartment seat belt sta-
tus indicator ........................................ 52
Rear foglamp Display message ............................ 257
Switching on/off ........................... 116
Rear seat
Display message ............................ 273
Rear seat (folding the backrest for-
wards/back) ...................................... 293
Rear Seat Entertainment System see Separate operating instructions
Rear-view mirror
Anti-dazzle mode (automatic) ........109
Dipping (manual )........................... 108
Rear window blind ............................305
Rear window heating Problem (fault) ............................... 137
Switching on/off ........................... 137
Rear window wiper
Replacing the wiper blade .............. 127
Switching on/off ........................... 126
Refuelling
Fuel gauge ............................... 30, 227
Important safety notes ..................161
Notes for AMG vehicles .................388
Refuelling proces s......................... 162
see Fuel
Remote control
Auxiliary heating/ventilation .......... 139
Changing the batteries (auxiliary
heating) ......................................... 141
Garage door opener .......................311
Programming (garage door
opener) .......................................... 312
Replacing the battery (auxiliary
heating remote control) .................... 141
Reserve (fuel tank) see Fuel
Reserve fuel
Display message ............................ 260
Warning lamp ................................. 285
Residual heat (climate control) ........138
Restraint system see SRS (Supplemental Restraint
System) Rev counter
........................................ 228
Reverse gear (selector lever) ...........154
Reversing camera Cleaning instructions .....................329
Function/notes ............................. 198
Switching on/off ........................... 199
Reversing lamp
Changing bulbs .............................. 124
Reversing lamp (display message) ..257
Roller sunblind Rea rwindow .................................. 305
Roof carrier ........................................ 302
Roof lining and carpets (cleaning
instructions) ...................................... 332
Roof load (maximum) ........................394 S
Safety Childre ninthe vehicle ..................... 53
Child restraint systems ....................53
Safety net
Attaching ....................................... 298
Important safety information .........298
Safety system
see Driving safety system
Seat
Folding the backres t(rear com-
partment) forwards/back ..............295
Seat backrest display message .....273
Seat belt
Adjusting the driver's and front-
passenger sea tbelt ......................... 50
Adjusting the height ......................... 50
Belt force limiter .............................. 52
Belt tensione r.................................. 52
Centre rear-compartment sea t........ 51
Cleaning ......................................... 331
Display message ............................ 253
Fastening ......................................... 50
Important safety guidelines .............49
Rea rseat belt status indicator .........52
Releasing ......................................... 51
Switching belt adjustment on/off
(on-board computer) ......................245
Warning lamp ................................. 277
Warning lamp (function) ................... 51 16
Index
Page 40 of 405

Overhea
dcontrol panel Function Page
:
u
Switches the rear
interio rlighting on/off 123
;
|
Switches the auto-
matic interior lighting con-
trol on/off 123
=
p
Switches the right-
hand reading lamp on/off 122
?
ë
Deactivates tow-
away protection 73
A
Rear-view mirror
109 Function Page
B
Buttons for the garage door
opener
312
C
3
Opens/closes the
sliding sunroof 93
D
ê
Deactivates the inte-
rior motion sensor 73
E
p
Switches the left-
hand reading lamp on/off 122
F
c
Switches the front
interior lighting on/off 123Overhead control panel
37At a glance
Page 76 of 405
Tow-away protection
Function An audible and visual alar
mis triggered if your
vehicle's angle of inclination is altered while
tow-away protection is primed. This can occur
if the vehicle is jacked up on one side, for
example.
Activating X
Make sure that:
R
the doors are closed.
R the boot lid/tailgate is closed.
Only then is the tow-away protection
primed.
X Lock the vehicle with the key or KEYLESS-
GO.
Tow-away protection is primed after
approximately 30 seconds.
To deactivate X
To switch off: unlock the vehicle with the
key or KEYLESS-GO.
Tow-away protection is switched off auto-
matically.
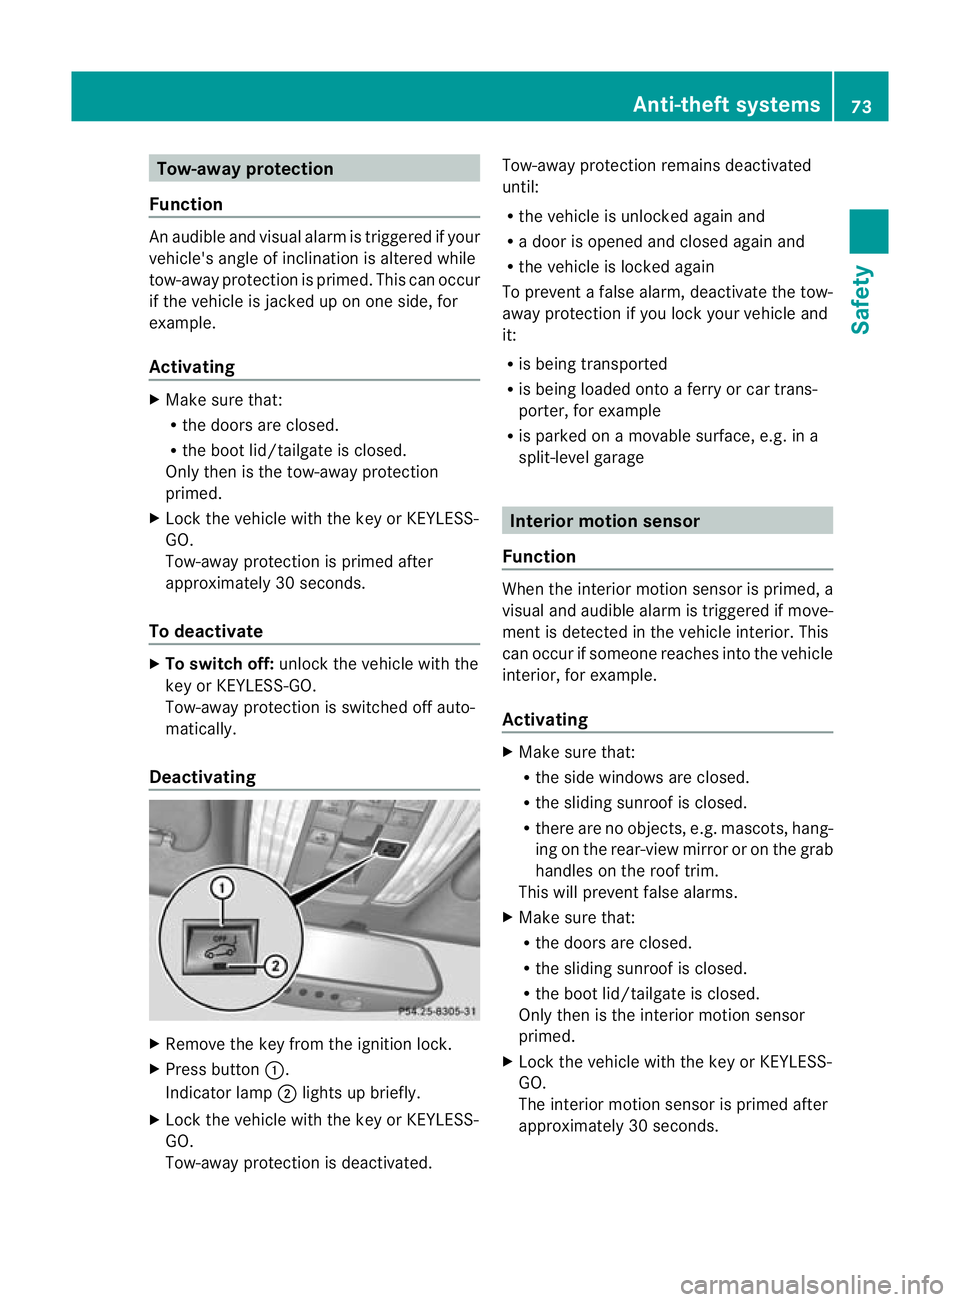
Deactivating X
Remove the key from the ignition lock.
X Press button :.
Indicator lamp ;lights up briefly.
X Lock the vehicle with the key or KEYLESS-
GO.
Tow-away protection is deactivated. Tow-away protection remains deactivated
until:
R
the vehicle is unlocked againa nd
R a door is opened and closed agai nand
R the vehicle is locked again
To prevent a false alarm, deactivate the tow-
away protection if you lock your vehicle and
it:
R is being transported
R is being loaded onto a ferry or car trans-
porter, for example
R is parked on a movable surface, e.g .ina
split-level garage Interior motion sensor
Function When the interior motion sensor is primed, a
visual and audible alarm is triggered if move-
ment is detected in the vehicle interior. This
can occur if someone reaches into the vehicle
interior, for example.
Activating
X
Make sure that:
R
the side windows are closed.
R the sliding sunroof is closed.
R there are no objects, e.g. mascots, hang-
ing on the rear-view mirror or on the grab
handles on the roof trim.
This will prevent false alarms.
X Make sure that:
R
the doors are closed.
R the sliding sunroof is closed.
R the boot lid/tailgate is closed.
Only then is the interior motion sensor
primed.
X Lock the vehicle with the key or KEYLESS-
GO.
The interior motion sensor is primed after
approximately 30 seconds. Anti-theft systems
73Safety Z
Page 101 of 405
Useful information
i This Owner's Manual describes all mod-
els, series and optional equipment for your
vehicle that were available at the time of
going to press. National variations are pos-
sible. Note that your vehicle may not be
equipped with all of the functions descri-
bed. This is also the case for systems and
functions relevant to safety.
i Read the information on qualified special-
ist workshops: (Y page 24). Correct driver's seat position
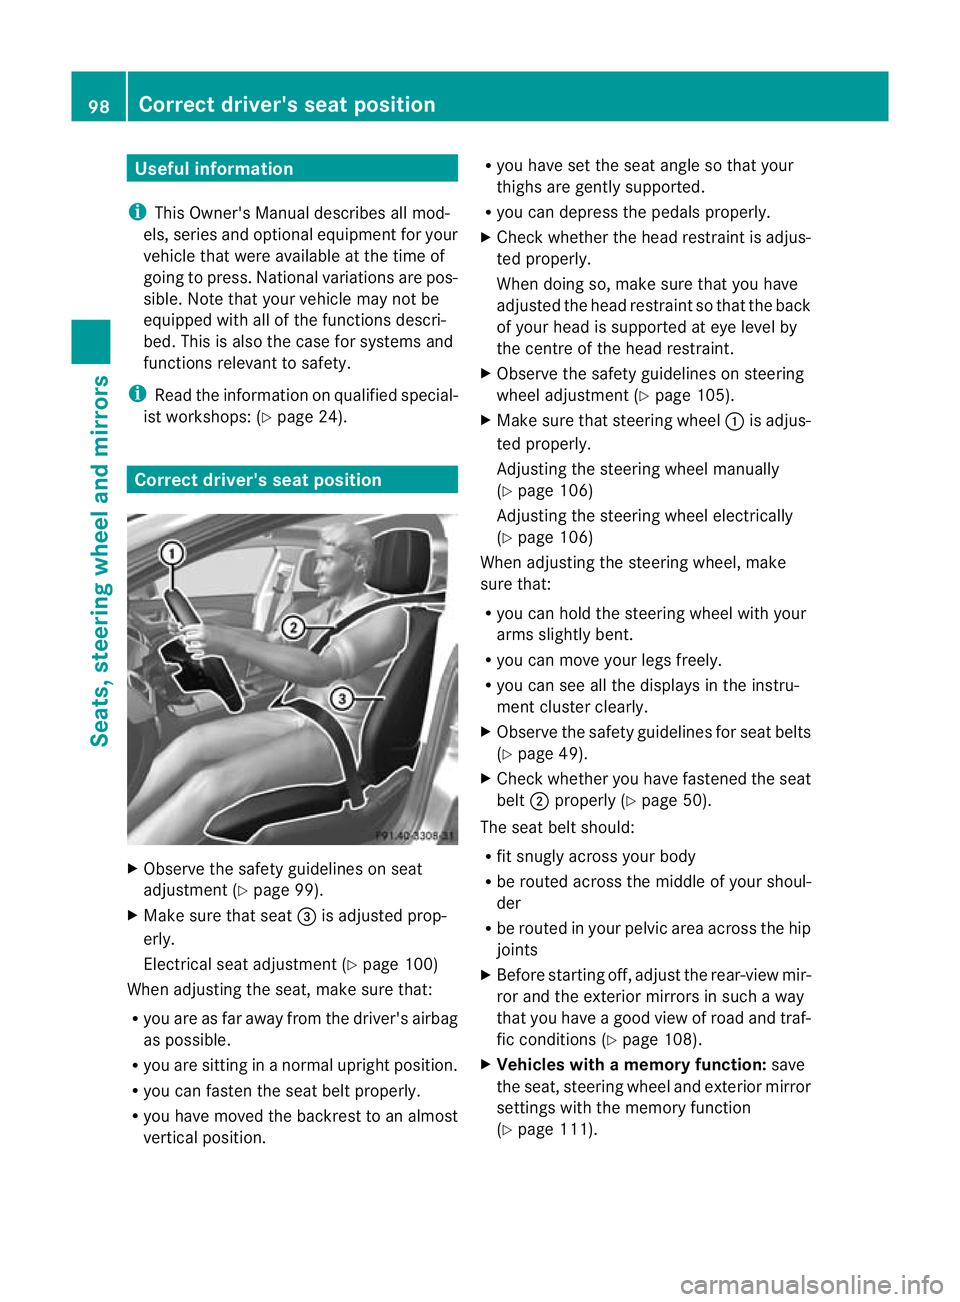
X
Observe the safety guidelines on seat
adjustment (Y page 99).
X Make sure that seat =is adjusted prop-
erly.
Electrical seat adjustment (Y page 100)
When adjusting the seat, make sure that:
R you are as far away from the driver's airbag
as possible.
R you are sitting in a normal upright position.
R you can faste nthe seat belt properly.
R you have moved the backrest to an almost
vertical position. R
you have set the seat angle so that your
thighs are gently supported.
R you can depress the pedals properly.
X Check whether the head restraint is adjus-
ted properly.
When doing so, make sure that you have
adjusted the head restraint so that the back
of your head is supported at eye level by
the centre of the head restraint.
X Observe the safety guidelines on steering
wheel adjustment (Y page 105).
X Make sure that steering wheel :is adjus-
ted properly.
Adjusting the steering wheel manually
(Y page 106)
Adjusting the steering wheel electrically
(Y page 106)
When adjusting the steering wheel, make
sure that:
R you can hold the steering wheel with your
arms slightly bent.
R you can move your legs freely.
R you can see all the displays in the instru-
ment cluster clearly.
X Observe the safety guidelines for seat belts
(Y page 49).
X Check whether you have fastened the seat
belt ;properly (Y page 50).
The seat belt should:
R fit snugly across your body
R be routed across the middle of your shoul-
der
R be routed in your pelvic area across the hip
joints
X Before starting off, adjust the rear-view mir-
ror and the exterior mirrors in such a way
that you have a good view of road and traf-
fic conditions (Y page 108).
X Vehicles with a memory function: save
the seat, steering wheel and exterior mirror
settings with the memory function
(Y page 111). 98
Correct driver's seat positionSeats, steering wheel and mirrors
Page 105 of 405
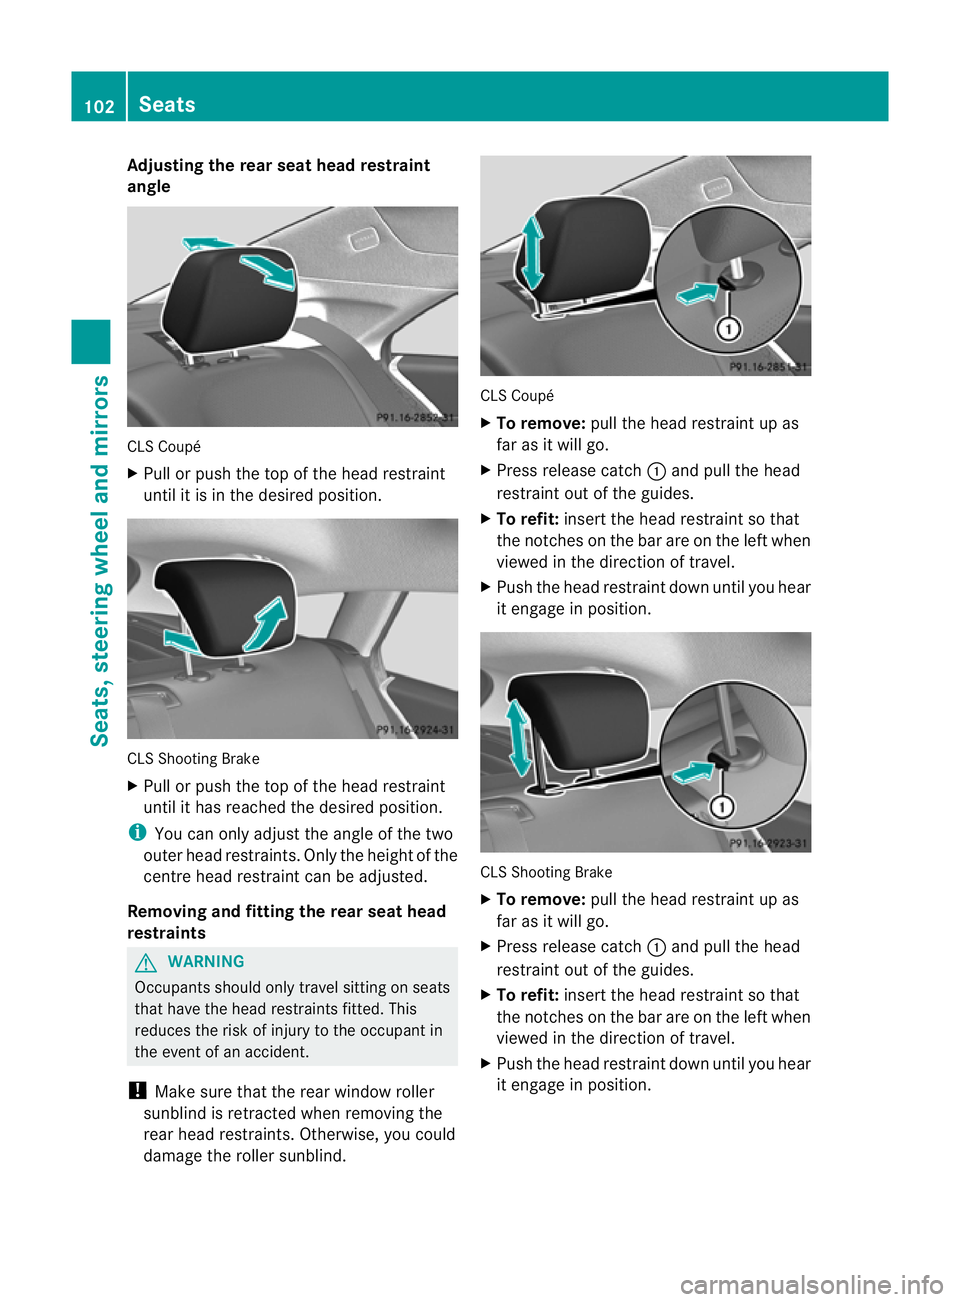
Adjusting the rear seat head restraint
angle
CLS Coupé
X
Pull or push the top of the head restraint
until it is in the desired position. CLS Shooting Brake
X
Pull or push the top of the head restraint
until it has reached the desired position.
i You can only adjust the angle of the two
outer head restraints. Only the height of the
centre head restraint can be adjusted.
Removing and fitting the rear seat head
restraints G
WARNING
Occupants should only travel sitting on seats
that have the head restraints fitted. This
reduces the risk of injury to the occupant in
the event of an accident.
! Make sure that the rear window roller
sunblind is retracted when removing the
rear head restraints. Otherwise, you could
damage the roller sunblind. CLS Coupé
X
To remove: pull the head restraint up as
far as it will go.
X Press release catch :and pull the head
restraint out of the guides.
X To refit: insert the head restraint so that
the notches on the bar are on the left when
viewed in the direction of travel.
X Push the head restraint down until you hear
it engage in position. CLS Shooting Brake
X To remove: pull the head restraint up as
far as it will go.
X Press release catch :and pull the head
restraint out of the guides.
X To refit: insert the head restraint so that
the notches on the bar are on the left when
viewed in the direction of travel.
X Push the head restraint down until you hear
it engage in position. 102
SeatsSeats, steering wheel and
mirrors
Page 111 of 405

The crash-responsive EASY-EXIT feature is
only operational if the EASY-EXIT/ENTRY fea-
ture is activated in the on-board computer.
(Y
page 244) Mirrors
Rear-view mirror
X
Anti-dazzle mode: flick anti-dazzle
switch :forwards or back. Exterior mirrors
Adjusting the exterior mirrors G
WARNING
The exterior mirrors reduce the size of the
image. Objects are actually closer than they
appear. You could misjudge the distance from
vehicles driving behind and cause an acci-
dent, e.g. when changin glane. For this rea-
son, make sure of the actual distance from the
vehicle driving behind by glancing ove ryour
shoulder. X
Make sure that the key is in position 1or
2 in the ignition lock.
X Press button :for the left-hand exterior
mirror or button ;for the right-hand exte-
rior mirror.
The indicator lamp in the corresponding
button lights up in red.
The indicator lamp goes out again after
some time. You can adjust the selected
mirror using adjustment button =as long
as the indicator lamp is lit.
X Press adjustmen tbutton =up, down, or
to the left or right until you have adjusted
the exterior mirror to the correct position.
You should have a good overview of traffic
conditions.
The convex exterio rmirrors provide a larger
field of vision.
The exterior mirrors are automatically heated
after starting the vehicle if the rear window
heating is switched on and the outside tem-
perature is low. Mirror heating lasts up to 10
minutes. 108
MirrorsSeats, steering wheel and mirrors