2012 MERCEDES-BENZ CLS SHOOTING BRAKE fuel type
[x] Cancel search: fuel typePage 25 of 405
Protection of the environment
General notes
H
Environmental note
Daimler's declared policy is one of compre-
hensive environmental protection.
The objectives are for the natural resources
which form the basis of our existence on this
planet to be used sparingly and in a manner
which takes the requirements of both nature
and humanity into account.
You too can help to protect the environment
by operating your vehicle in an environmen-
tally-responsible manner.
Fuel consumption and the rate of engine,
transmission, brake and tyre wear depend on
the following factors:
R operating conditions of your vehicle
R your personal driving style
You can influence both factors. You should
bear the following in mind:
Operating conditions:
R avoid short trips as these increase fuel con-
sumption.
R make sure that the tyre pressures are
always correct.
R do not carry any unnecessary weight.
R keep an eye on the vehicle's fuel consump-
tion.
R remove roof racks once you no longer need
them.
R a regularly serviced vehicle will contribute
to environmental protection. You should
therefore adhere to the service intervals.
R always have service work carried out at a
qualified specialist workshop.
Personal driving style:
R do not depress the accelerator pedal when
starting the engine.
R do not warm up the engine with the vehicle
stationary.
R drive carefully and maintain a safe distance
from the vehicle in front. R
avoid frequent, sudden acceleration.
R change gear in good time and use each gear
only up to Ôof its maximum engine speed.
R switch off the engine in stationary traffic. Returning an end-of-life vehicle
Mercedes-Benz will take back your
Mercedes-Benz to dispose of it in an environ-
mentally responsible manner, in accordance
with the European Union (EU) End of Life
Vehicles Directive.
The End of Life Vehicles Directive applies to
vehicles with a gross vehicle weight of up to
3.5 t, in accordance with national regulations.
For several years, Mercedes-Benz has been
meeting all the legal requirements for a
design which allows for recycling and re-use.
There is a network of return points and dis-
assembly plants which can recycle your vehi-
cle in an environmentally-responsible man-
ner. The methods employed in vehicle and
parts recycling are constantly being devel-
oped and improved. This means that your
Mercedes-Benz will also continue to meet
even the increased recycling quotas in the
future in good time. You can obtain further
information from your national Mercedes-
Benz homepage or your national hotline num-
ber. Product information
Mercedes-Benz recommends that you use
genuine Mercedes-Benz parts, conversion
parts and accessories that have been
approved for the type of vehicle.
Mercedes-Benz tests genuine parts and con-
version parts and accessories that have been
specifically approved for your vehicle for their
reliability, safety and suitability. Despite
ongoing market research, Mercedes-Benz is
unable to assess other parts. Therefore,
Mercedes-Benz accepts no responsibility for
the use of such parts in Mercedes-Benz vehi- 22
Introduction
Page 165 of 405
G
WARNING
Electrostatic charge can lead to the creation
of sparks and to fuel vapours igniting. There
is a risk of fire and explosion.
Touch the vehicle bodywork just before open-
ing the fuel filler cap. This will discharge a
possible electrostatic charge.
! Do not use petrol to refuel vehicles with a
diesel engine. Do not use diesel to refuel
vehicles with a petrol engine. Do not switch
on the ignitio nifyou accidentally refuel
with the wrong fuel. Otherwise, the fuel will
enter the fuel system. Even small amounts
of the wrong fuel could result in damage to
the fuel system and the engine. The repair
costs are high. Notify aqualified specialist
workshop and have the fuel tan kand fuel
lines drained completely.
! Overfilling the fuel tank could damage the
fuel system.
! Take care not to spill any fuel on painted
surfaces .You could otherwise damage the
paintwork.
! Use a filter when adding fuel from a fuel
can. The fuel lines and/or the diesel injec-
tion system could otherwise be blocked by
particles from the fuel can.
If you overfill the fuel tank, fuel may spray out
when the fuel pump nozzle is removed.
Further information on fuel and on fuel grades
can be found in the "Fuel" section
(Y page 386). Refuelling
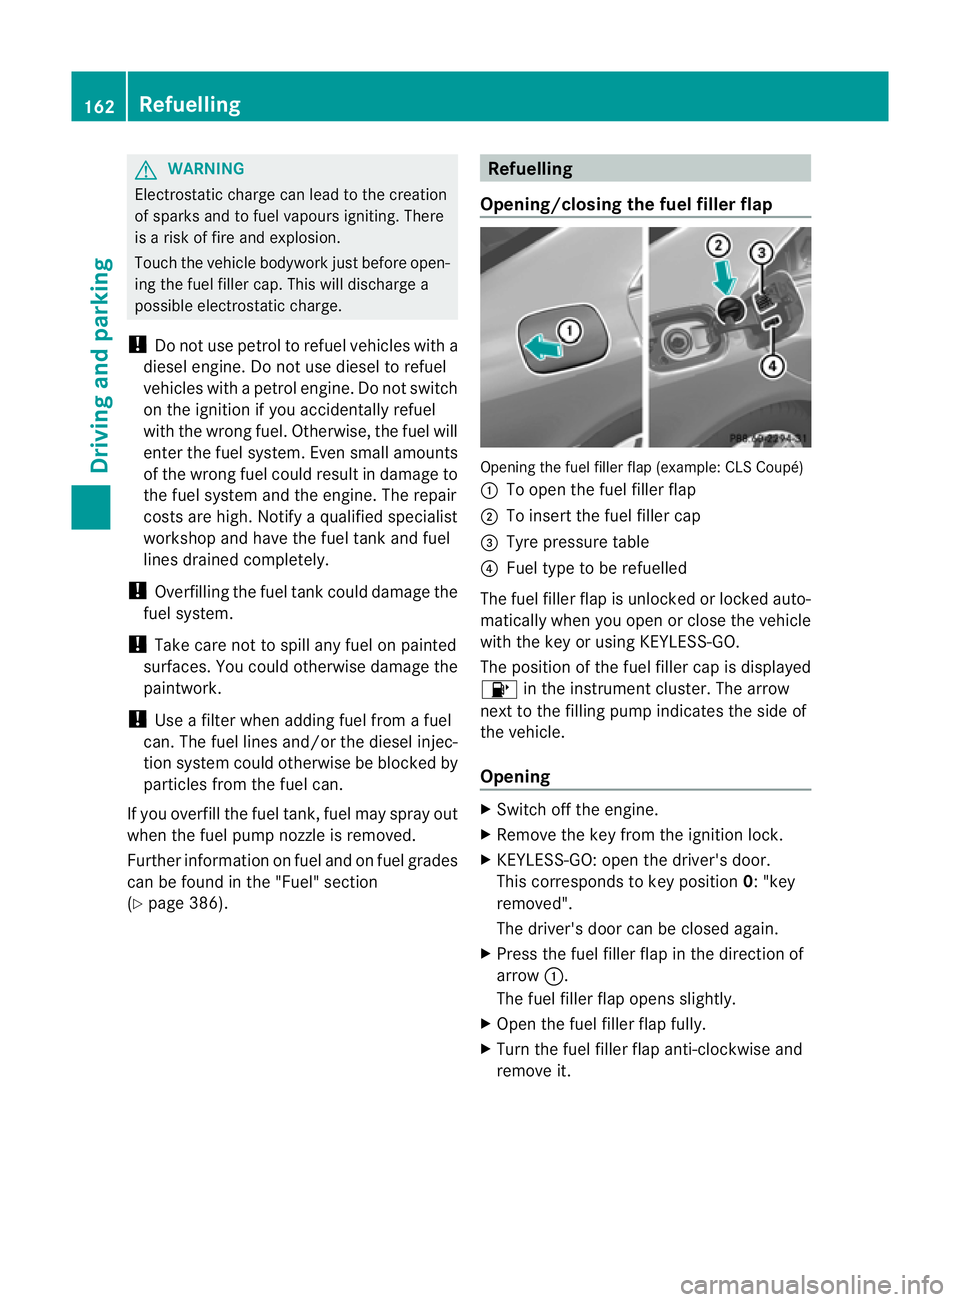
Opening/closing the fuel filler flap Opening the fuel filler flap (example: CLS Coupé)
:
To open the fuel filler flap
; To insert the fuel filler cap
= Tyre pressure table
? Fuel type to be refuelled
The fuel filler flap is unlocked or locked auto-
matically when you open or close the vehicle
with the key or using KEYLESS-GO.
The position of the fuel filler cap is displayed
8 in the instrument cluster. The arrow
next to the filling pump indicates the side of
the vehicle.
Opening X
Switch off the engine.
X Remove the key from the ignition lock.
X KEYLESS-GO: open the driver's door.
This corresponds to key position 0: "key
removed".
The driver's door can be closed again.
X Press the fuel filler flap in the direction of
arrow :.
The fuel filler flap opens slightly.
X Open the fuel filler flap fully.
X Turn the fuel filler flap anti-clockwise and
remove it. 162
RefuellingDriving and parking
Page 222 of 405
Notes on towing
atrailer
General notes !
Use a drawbar noseweigh tas close as
possible to the maximum permissible nose-
weight. Do not use a noseweight of less
than 50kg, otherwise the trailer may come
loose.
Note that the payload and the rear axle load
are reduced by the actual payload.
i When towing a trailer, set the tyre pres-
sure on the rear axle of the towing vehicle
for a maximum load; see the tyre pressure
table in the fuel filler flap (Y page 357).
You will find installation dimensions and loads
in the "Technical data" section
(Y page 396).
The maximum noseweight of the trailer draw-
bar on the ball coupling is 84 kg. The actual
noseweight may however not be higher than
the value which is given on the trailer tow
hitch or trailer identification plates. The low-
est weight applies.
Please note that when towing a trailer, PARK-
TRONIC (Y page 191), Active Parking Assist
(Y page 194) and Blind Spot Assist
(Y page 208) are only available with limita-
tions, or not at all.
i On vehicles without level control, the
height of the ball coupling will alter accord-
ing to the load placed on the vehicle. If nec-
essary, use a trailer with a height-adjusta-
ble drawbar.
Driving tips i
Observe the notes on ESP ®
trailer stabi-
lisation (Y page 69).
The maximum permissible speed for vehicle/
trailer combinations depends on the type of
trailer. Before beginning the journey, check
the trailer's documents to see what the max-
imum permitted speed is. Observe the legally
prescribed maximum speed in the relevant
country. For certain Mercedes-Benz vehicles, the max-
imum permissible rear axle load is increased
when towing a trailer. Refer to the "Technical
data" section to find out whether this applies
to your vehicle. If you utilise any of the added
maximum rear axle load when towing a trailer,
the vehicle/trailer combination may not
exceed a maximum speed of 100 km/h for
reasons concerning the operating permit.
This also applies in countries in which the
permissible maximum speed for vehicle/
trailer combinations is above 100 km/h.
When towing a trailer, your vehicle's handling
characteristics will be different in comparison
to when driving without a trailer and it will
consume more fuel.
Change into a lower gear in good time on long
and steep downhill gradients.
On long and steep downhill gradients, espe-
cially if the vehicle is laden or towing a trailer,
you must select shift range 1,2or 3.
i This also applies if you have activated
cruise control, SPEEDTRONIC or DIS-
TRONIC PLUS.
This will use the braking effect of the engine,
so less braking will be required to prevent the
vehicle from gaining speed. This relieves the
load on the brake system and prevents the
brakes from overheating and wearing too
quickly. If you need additional braking,
depress the brake pedal repeatedly rather
than continuously.
Driving tips If the trailer swings from side to side:
X
Do not accelerate.
X Do not countersteer.
X Brake if necessary. Towing
atrailer
219Driving an d parking Z
Page 357 of 405
Useful information
i This Owner's Manual describes all mod-
els, series and optional equipment for your
vehicle that were available at the time of
going to press. National variations are pos-
sible. Note that your vehicle may not be
equipped with all of the functions descri-
bed. This is also the case for systems and
functions relevant to safety.
i Read the information on qualified special-
ist workshops: (Y page 24). Important safety notes
G
WARNING
If wheels and tyres of the wrong size are used,
the wheel brakes or suspension components
may be damaged. There is arisk of accident.
Always replace wheels and tyres with those
that fulfil the specifications of the original part
(designation, manufacturer, model). G
WARNING
Af lat tyre severely impairs the driving, steer-
ing and braking characteristics of the vehicle.
There is a risk of accident.
Tyres without run-flat characteristics:
R do not drive with aflat tyre.
R immediately replace the flat tyre with your
emergency spare wheel or spare wheel, or
consult a qualified specialist workshop.
Tyres with run-flat characteristics:
R pay attention to the information and warn-
ing notices on MOExtended tyres (tyres
with run-flat characteristics).
Accessories that are not approved for your
vehicle by Mercedes-Ben zorare not being
used correctly can impair the operating
safety. Before purchasing and using non-approved
accessories, visit a qualified specialist work-
shop and enquire about:
R suitability
R legal stipulations
R factory recommendations
Information on the dimensions and types of
wheels and tyres for yourv ehicle can be
found under "Wheel/tyre combinations"
(Y page 367).
Information on air pressure for the tyres on
your vehicle can be found:
R on the tyre pressure label on the fuel filler
flap (Y page 162)
R under "Tyre pressure" (Y page 357)
R in the "Tyre pressure" section
Modification work on the brake system and
wheels is not permitted. The use of wheel
spacers or brake dust shields is not permit-
ted. This invalidates the general operating
permit for the vehicle.
i Further information on wheels and tyres
can be obtained at any qualified specialist
workshop. Operation
Information on driving
Check the tyre pressures when the vehicle is
heavily laden and, if necessary, adjust.
While driving, pay attention to vibrations,
noises and unusual handling characteristics,
e.g. pulling to one side. This may indicate that
the wheels or tyres are damaged. If you sus-
pect that a tyre is defective, reduce your
speed immediately. Stop the vehicle as soon
as possible to chec kthe wheels and tyres for
damage. Hidden tyre damage could also be
causing the unusual handling characteristics.
If you find no signs of damage, have the tyres
and wheels checked at a qualified specialist
workshop.
When parking your vehicle, make sure that
the tyres do not get deformed by the kerb or 354
OperationWheels and tyres
Page 364 of 405
Warning messages of the tyre pressure
monitor If the tyre pressure monitor detects a signifi-
cant pressure loss on one or more tyres, a
warning message is show ninthe multifunc-
tion display. Awarning tone also sounds and
the tyre pressure warning lamp lights up in
the instrument cluster.
Each tyre that is affected by a significant loss
of pressure is highlighted in the pressure dis-
play.
X If the Please correct tyre pressure message appears in the multifunction dis-
play, check the tyre pressure on all four
wheels and correct it if necessary.
i If the wheel positions on the vehicle are
interchanged, the tyre pressures may be
displayed for the wrong positions for a
short time. This is rectified after a few
minutes of driving and the tyre pressures
are displayed for the correct positions.
Restarting the tyre pressure monitor When you restar
tthe tyre pressure monitor,
all existing warning messages are deleted and
the warning lamps go out. The monitor uses
the currently set tyre pressures as the refer-
ence values for monitoring. In most cases, the
tyre pressure monitor will automatically
detect the new referencev alues after you
have changed the tyre pressure .However,
you can also define reference values man-
ually as described here. The tyre pressure
monitor then monitors the new tyre pressure
values.
X Use the table on the inside of the fuel filler
flap to ensure that the tyre pressure is set
correctly in all four tyres for the current
operating conditions.
Also observe the notes in the section on
tyre pressures (Y page 357).
X Make sure that the key is in position 2in
the ignition lock. X
Press the =or; buttons on the
steering wheel to select the Serv. menu.
X Press the 9or: button to select
Tyre pressure .
X Press the abutton.
The multifunction display shows the cur-
rent tyre pressure for each tyre or the
Tyre pressures will be displayed after a few minutes of driving mes-
sage.
X Press the :button.
The multifunction display shows the Use current pressure values as new ref‐
erence values message.
If you wish to confirm the restart:
X Press the abutton.
The Tyre press. monitor restarted message appears in the multifunction dis-
play.
After you have driven for a few minutes, the
system checks whether the current tyre
pressures are within the specified range.
The new tyre pressures are then accepted
as reference values and monitored.
If you wish to cancel the restart:
X Press the %button.
The tyre pressure values stored at the last
restart will continue to be monitored.
Radio type approval for the tyre pres-
sure monitor In certain countries, a radio type approval for
the tyre pressure monitor may be required.
The radio type approval number for the tyre
pressure monitor can be found online at:
http://www.mercedes-benz.de/
betriebsanleitung.
Missing values were not available at the time
of going to print. Tyre pressure
361Wheels and tyres Z
Page 371 of 405
Overview of abbreviations used in the follow-
ing tyre tables:
R BA: both axles
R FA: front axle
R RA: rear axle
You will find a table with recommended tyre
pressures for various operating conditions on
the inside of your vehicle's fuel filler flap. For
further information on tyre pressure, see
(Y page 357). Check tyre pressures regularly
and only when the tyres are cold.
Notes on the vehicle equipment –always fit
the vehicle:
R with tyres of the same size on a given axle
(left/right)
R with the same type of tyres at a given time
(summer tyres, winter tyres, MOExtended
tyres)
Vehicles with MOExtended tyres are not
equipped with a TIREFIT kit at the factory. It
is therefore recommended that you addition-
ally equip your vehicle with a TIREFIT kit if you
fit tyres that do not feature run-flat charac-
teristics, e.g. winter tyres. A TIREFIT kit can
be obtained fro maqualified specialist work-
shop.
i Not all wheel/tyre combinations can be
mounted at the factory in all countries. 368
Wheel and tyre combinationsWheels and tyres