2012 MERCEDES-BENZ CLS SHOOTING BRAKE belt
[x] Cancel search: beltPage 60 of 405
Top Tether
CLS Coupé
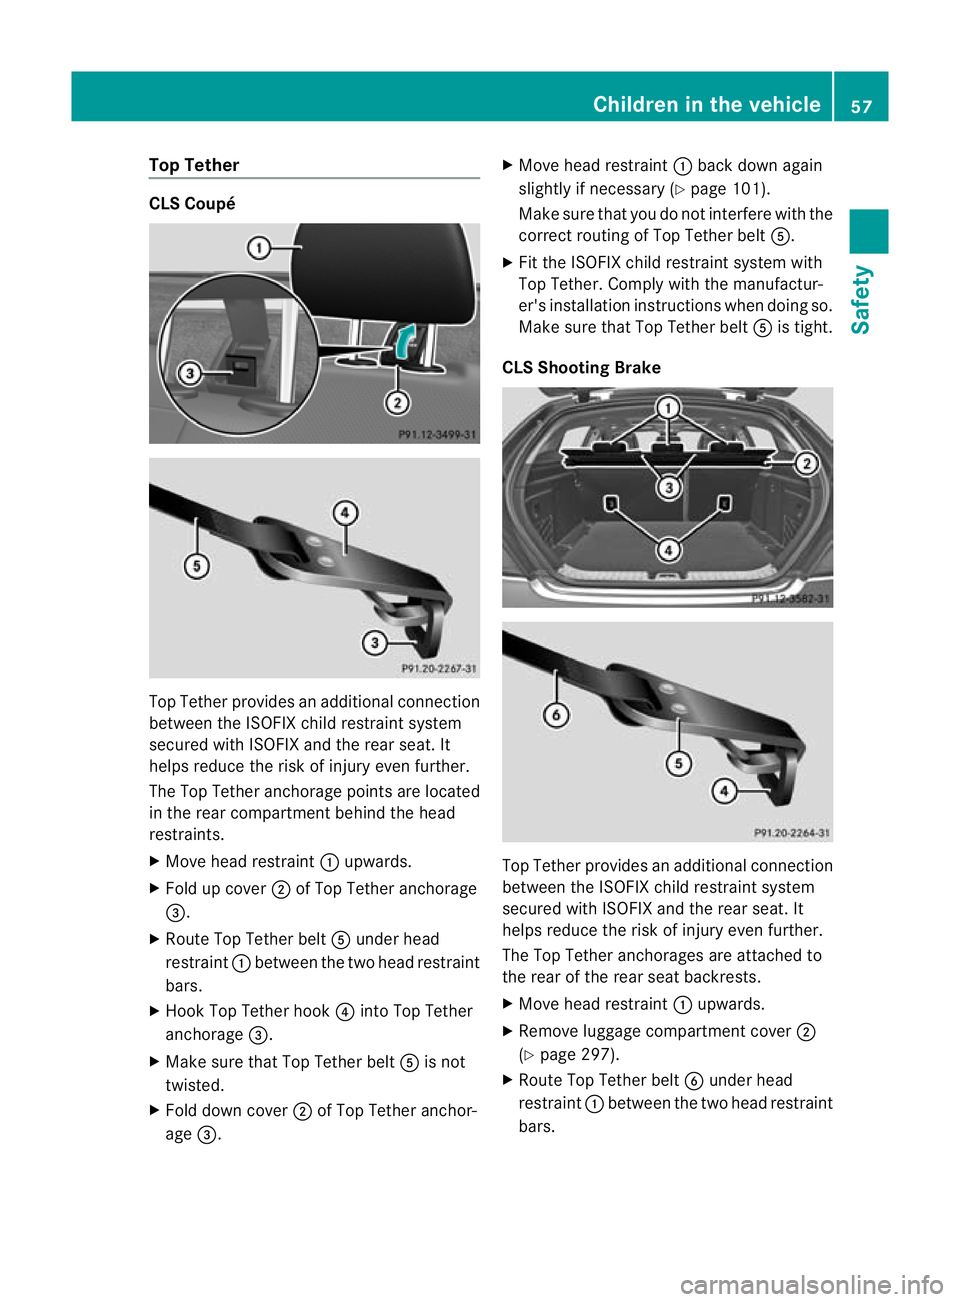
Top Tether provides an additional connection
between the ISOFIX child restraint system
secured with ISOFIX and the rear seat. It
helps reduce the ris kofinjury eve nfurther.
The Top Tether anchorage points are located
in the rear compartmen tbehind the head
restraints.
X Move head restraint :upwards.
X Fold up cover ;of Top Tether anchorage
=.
X Route Top Tether belt Aunder head
restraint :between the two head restraint
bars.
X Hook Top Tether hook ?into Top Tether
anchorage =.
X Make sure that Top Tether belt Ais not
twisted.
X Fold down cover ;of Top Tether anchor-
age =. X
Move head restraint :back down again
slightly if necessary (Y page 101).
Make sure that you do not interfere with the
correct routing of Top Tether belt A.
X Fit the ISOFIX child restraint system with
Top Tether .Comply with the manufactur-
er's installation instructions when doing so.
Make sure that Top Tether belt Ais tight.
CLS Shooting Brake Top Tether provides an additional connection
between the ISOFIX child restraint system
secured with ISOFIX and the rear seat. It
helps reduce the risk of injury even further.
The Top Tether anchorages are attached to
the rear of the rear seat backrests.
X Move head restraint :upwards.
X Remove luggage compartment cover ;
(Y page 297).
X Route Top Tether belt Bunder head
restraint :between the two head restraint
bars. Children in the vehicle
57Safety Z
Page 61 of 405
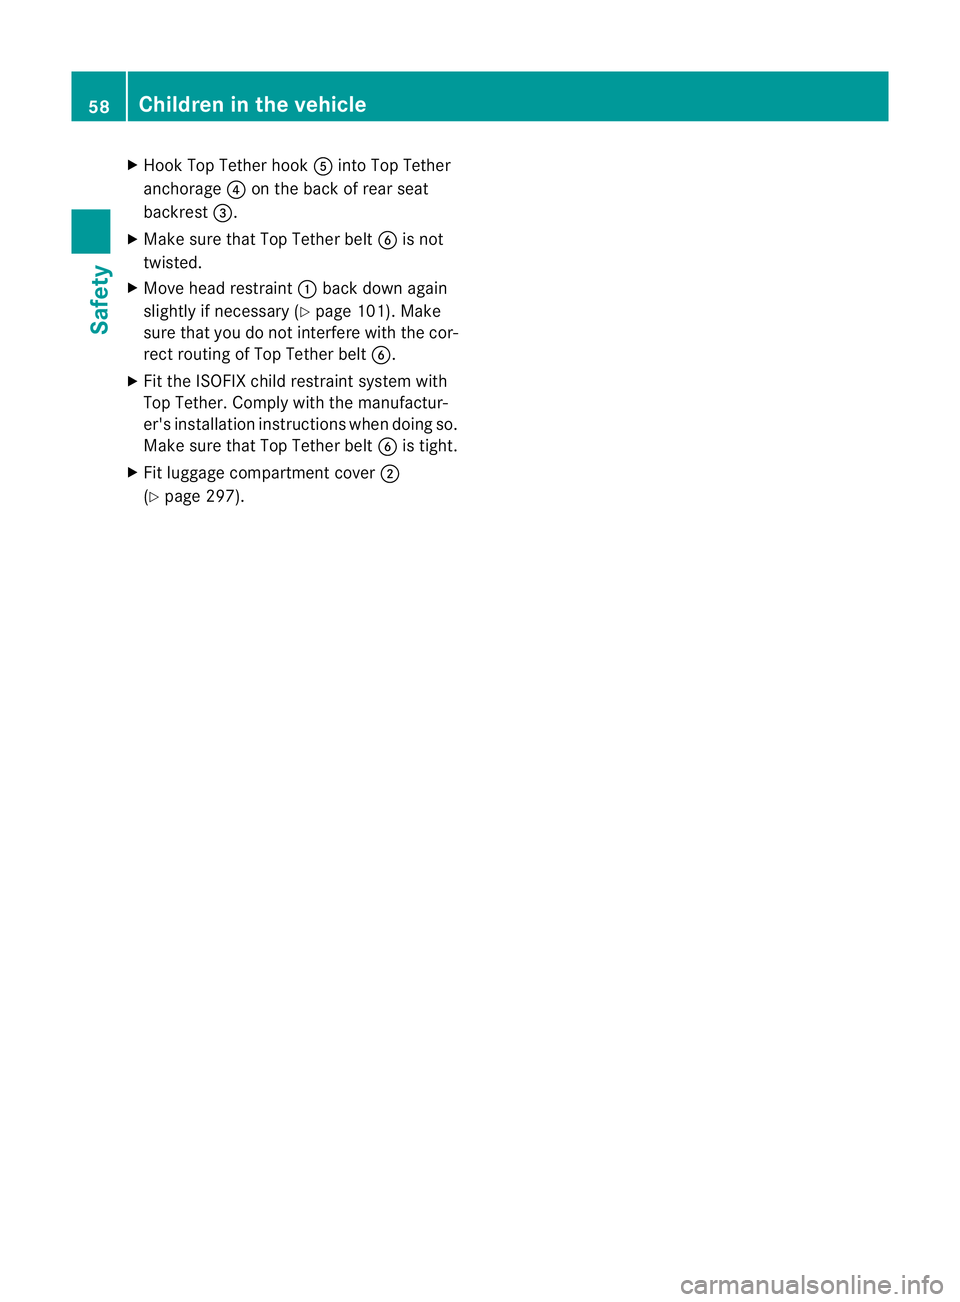
X
Hook Top Tethe rhook Ainto Top Tether
anchorage ?on the back of rear seat
backrest =.
X Make sure that Top Tether belt Bis not
twisted.
X Move head restraint :back down again
slightly if necessary (Y page 101). Make
sure that you do not interfere with the cor-
rect routing of Top Tether belt B.
X Fit the ISOFIX child restraint system with
Top Tether. Comply with the manufactur-
er's installation instructions when doing so.
Make sure that Top Tether belt Bis tight.
X Fit luggage compartment cover ;
(Y page 297). 58
Children in the vehicleSafety
Page 62 of 405
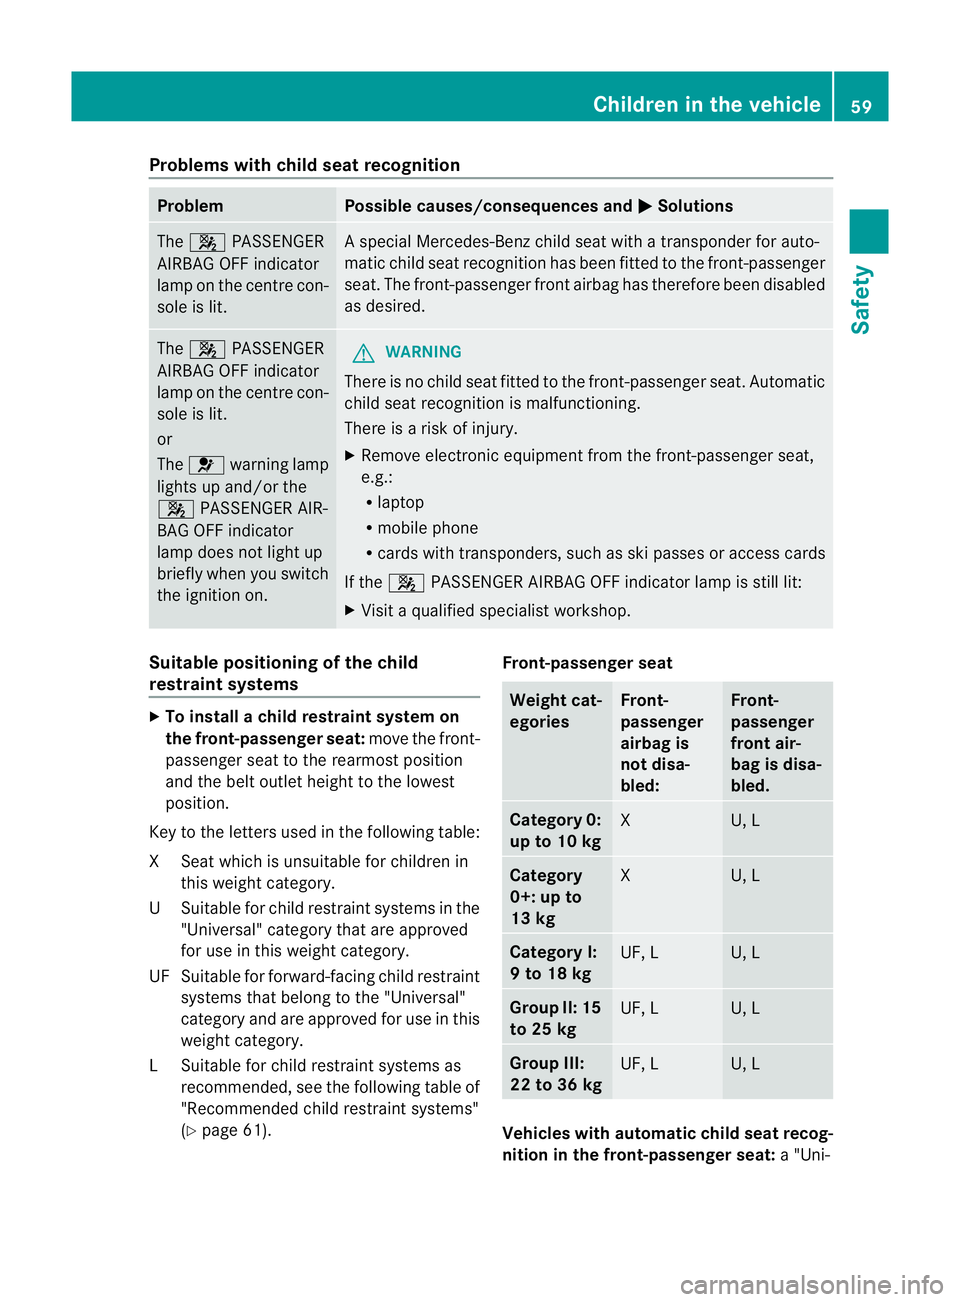
Problems with child seat recognition
Problem Possible causes/consequences and
M Solutions
The
4 PASSENGER
AIRBAG OFF indicator
lamp on the centre con-
sole is lit. As
pecial Mercedes-Benz child seat with a transponder for auto-
matic child seat recognition has been fitted to the front-passenger
seat. The front-passenger fron tairbag has therefore been disabled
as desired. The
4 PASSENGER
AIRBAG OFF indicator
lamp on the centre con-
sole is lit.
or
The 6 warning lamp
lights up and/or the
4 PASSENGER AIR-
BAG OFF indicator
lamp does not light up
briefly when you switch
the ignition on. G
WARNING
There is no child seat fitted to the front-passenger seat .Automatic
child seat recognition is malfunctioning.
There is a ris kofinjury.
X Remove electronic equipment from the front-passenger seat,
e.g.:
R
laptop
R mobile phone
R cards with transponders, such as ski passes or access cards
If the 4 PASSENGER AIRBAG OFF indicator lamp is still lit:
X Visi taqualified specialist workshop. Suitable positioning of the child
restraint systems
X
To install a child restraint system on
the front-passenger seat: move the front-
passenger seat to the rearmos tposition
and the belt outlet height to the lowest
position.
Key to the letters used in the following table:
XS eat which is unsuitable for children in
this weight category.
US uitable for child restraint systems in the
"Universal" category that are approved
for use in this weigh tcategory.
UF Suitable for forward-facing child restraint systems that belong to th e"Universal"
category and are approved for use in this
weight category.
LS uitable for child restraint systems as
recommended, see the following table of
"Recommended child restraint systems"
(Y page 61). Front-passenger seat Weight cat-
egories Front-
passenger
airbag is
not disa-
bled: Front-
passenger
front air-
bag is disa-
bled.
Categor
y0:
up to 10 kg X U, L
Category
0+: up to
13 kg
X U, L
Category I:
9 to 18 kg
UF, L U, L
Group II:1
5
to 25 kg UF, L U, L
Group III:
22 to 36 kg
UF, L U, L
Vehicles with automatic child seat recog-
nition in the front-passenger seat:
a "Uni- Children in the vehicle
59Safety Z
Page 73 of 405
G
WARNING
If EBD has malfunctioned, the rear wheels can
still lock, e.g. under full braking. This increa-
ses the risk of skidding and an accident.
You should therefore adapt yourd riving style
to the different handling characteristics. Have
the brake system checked at a qualified spe-
cialist workshop.
Observe informatio nregarding indicator and
warning lamps ( Ypage 279) as well as dis-
play messages (Y page 252).
EBD monitors and controls the brake pres-
sure on the rear wheels to improve driving
stability while braking. ADAPTIVE BRAKE
ADAPTIVE BRAKE enhances braking safety
and offers increased braking comfort. In addi-
tion to the brakin gfunction ,ADAPTIVE BRAKE
also has the HOLD functio n(Ypage 186 )and
hill start assist (Y page 150). PRE-SAFE
®
Brake
i Observe the "Important safety notes" sec-
tion (Y page 64).
PRE-SAFE ®
Brake is only available in vehicles
with DISTRONIC PLUS.
PRE-SAFE ®
Brake can help you to minimise
the ris kofacollisio nwith a vehicle ahead or
reduce the effects of such a collision. If PRE-
SAFE ®
Brake detects a risk of collision, you
will be warned visually and acoustically as
well as by automatic braking. PRE-SAFE ®
Brake cannot prevent a collision without your
intervention.
This function will issue a warning if:
R at speeds of around 30 km/h or more, over
several seconds, the distanc emaintained
to the vehicle travelling in front is insuffi-
cient. The
· distance warning lamp then lights
up in the instrument cluster.
R at a speed of approximately 7km/h or
higher, you very quickly approach a vehicle
in front.
An intermittent warning tone will then
sound and the ·distance warning lamp
will light up in the instrument cluster.
X Brake immediately in order to increase the
distance from the vehicle in front.
or
X Take evasive action provided it is safe to do
so.
From a speed of approximately 7km/h, if the
driver and passengers have fastened their
seat belts, PRE-SAFE ®
Brake can brake the
vehicle automatically at speeds up to approx-
imatel y200 km/h.
Due to the nature of the system, particularly
complicated driving conditions may cause
unnecessary warnings or the unnecessary
intervention of PRE-SAFE ®
Brake.
You can prevent the intervention of the PRE-
SAFE ®
Brake at any time by:
R depressing the accelerato rpedal further
R activating kickdown
R releasing the brake pedal.
The braking action of PRE-SAFE ®
Brake is
ended automatically if:
R you manoeuvre to avoid the obstacle.
R there is no longer any danger of a rear-end
collision.
R there is no longer an obstacle detected in
front of your vehicle.
With the help of the radar sensor system,
PRE-SAFE ®
Brake can detect obstacles that
are in front of your vehicle for an extended
period of time.
At speeds up to approximately 70 km/h, PRE-
SAFE ®
Brake can also detect stationary
obstacles such as stopped or parked vehi-
cles. 70
Driving safet
ysystemsSafety
Page 95 of 405
Problems with the side windows
G
WARNING
Closing the side windows with increased force or without the anti-entrapment feature could lead
to serious or even fatal injury. Make sure that nobody can become trapped when closing the side
windows. Problem Possible causes/consequences and
M Solutions
As
ide window cannot
be closed because it is
blocked by objects, e.g.
leaves in the window
guide. X
Remove the objects.
X Close the side window. As
ide window cannot
be closed and you can-
not see the cause. If a side window is obstructed during closing and reopens again
slightly:
X
Immediately after the window blocks, pull the corresponding
switch again until the side window has closed.
The side window is closed with increased force.
If a side window is obstructed again during closing and reopens
again slightly:
X Immediately after the window blocks, pull the corresponding
switch again until the side window has closed.
The side window is closed without the anti-entrapmen tfeature. Sliding sunroof
Important safety notes
G
WARNING
Make sure that nobody can become trapped
when opening and closing the sliding sunroof.
If there is a risk of entrapment, release the
switch immediately. During automatic opera-
tion, push the switch briefly in any direction
to stop the sliding sunroof. G
WARNING
The glass in the panorama sunroof could
break in an accident. If you are not wearing a
seat belt, there is a risk that you could be
thrown through the opening in the event of the
vehicle overturning .Therefore, always wear a
seat belt to reduce the risk of injuries. G
WARNING
Children could injure themselves if they oper-
ate the sliding sunroof.
Never leave children unsupervised in the vehi-
cle. Always take the key with you when leaving
the vehicle, even if you are only leaving it for
a short time.
! Only open the panorama sliding sunroof
if it is free of snow and ice. Otherwise, mal-
functions may occur.
Do not allow anything to protrude from the
sliding sunroof. Otherwise, the seals could
be damaged.
i Resonance noises can occur in addition
to the usual airflow noises when the sliding
sunroof is open. They are caused by minor
pressure fluctuations in the vehicle interior. 92
Sliding sunroofOpening and closing
Page 101 of 405
Useful information
i This Owner's Manual describes all mod-
els, series and optional equipment for your
vehicle that were available at the time of
going to press. National variations are pos-
sible. Note that your vehicle may not be
equipped with all of the functions descri-
bed. This is also the case for systems and
functions relevant to safety.
i Read the information on qualified special-
ist workshops: (Y page 24). Correct driver's seat position
X
Observe the safety guidelines on seat
adjustment (Y page 99).
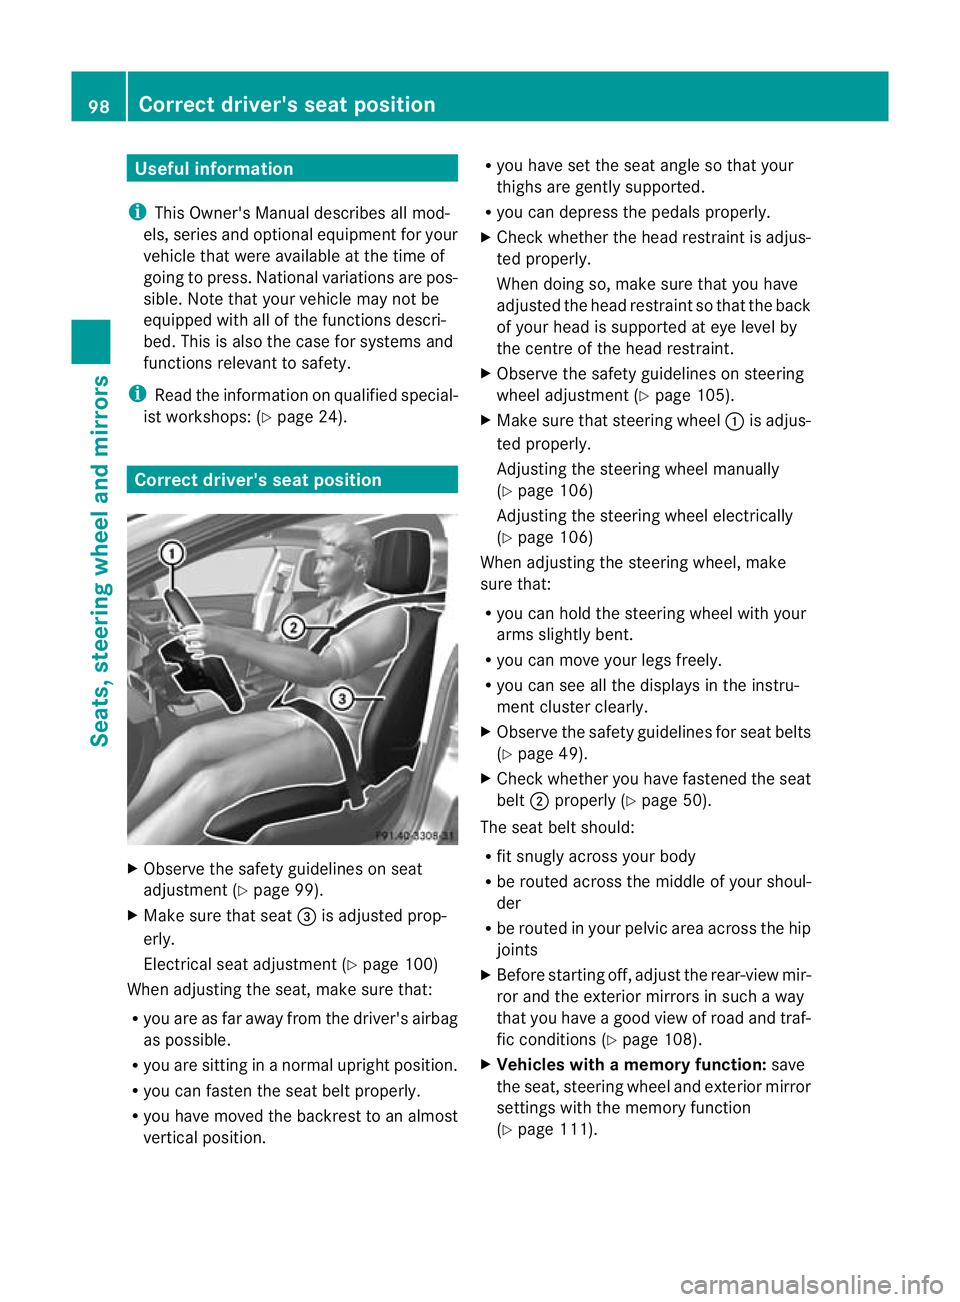
X Make sure that seat =is adjusted prop-
erly.
Electrical seat adjustment (Y page 100)
When adjusting the seat, make sure that:
R you are as far away from the driver's airbag
as possible.
R you are sitting in a normal upright position.
R you can faste nthe seat belt properly.
R you have moved the backrest to an almost
vertical position. R
you have set the seat angle so that your
thighs are gently supported.
R you can depress the pedals properly.
X Check whether the head restraint is adjus-
ted properly.
When doing so, make sure that you have
adjusted the head restraint so that the back
of your head is supported at eye level by
the centre of the head restraint.
X Observe the safety guidelines on steering
wheel adjustment (Y page 105).
X Make sure that steering wheel :is adjus-
ted properly.
Adjusting the steering wheel manually
(Y page 106)
Adjusting the steering wheel electrically
(Y page 106)
When adjusting the steering wheel, make
sure that:
R you can hold the steering wheel with your
arms slightly bent.
R you can move your legs freely.
R you can see all the displays in the instru-
ment cluster clearly.
X Observe the safety guidelines for seat belts
(Y page 49).
X Check whether you have fastened the seat
belt ;properly (Y page 50).
The seat belt should:
R fit snugly across your body
R be routed across the middle of your shoul-
der
R be routed in your pelvic area across the hip
joints
X Before starting off, adjust the rear-view mir-
ror and the exterior mirrors in such a way
that you have a good view of road and traf-
fic conditions (Y page 108).
X Vehicles with a memory function: save
the seat, steering wheel and exterior mirror
settings with the memory function
(Y page 111). 98
Correct driver's seat positionSeats, steering wheel and mirrors
Page 102 of 405
Seats
Important safety notes
G
WARNING
The seats can still be adjusted when there is
no key in the ignition lock. For this reason,
children should never be left unsupervised in
the vehicle. They could adjust the seats and
become trapped. G
WARNING
Only adjust the driver's seat when the vehicle
is stationary. You will otherwise be distracted
from the road and traffic conditions and you
could lose control of the vehicle as a result of
the seat moving. This could cause an acci-
dent. G
WARNING
If you adjust the seat height carelessly, you or
others could be trapped and thereby injured.
Children in particular could unintentionally
press the buttons to electrically adjust the
seats and become trapped.
Take care that:
R while moving the seats, your hands do not
get under the lever assembly of the seat
adjustment system.
R children in the vehicle do not slide their
hands under the levers. G
WARNING
Make sure that nobody can become trapped
when adjusting the seats.
Observe the notes on airbags.
Secure children as recommended; see the
"Children in the vehicle" section. G
WARNING
Make sure that the back of your head is sup-
ported at eye level by the central area of the
head restraint .Ifyour head is not supported
correctly by the head restraint, you could suf-
fer a severe neck injury in the event of an accident
.Never drive if the head restraints are
not engaged and set correctly. G
WARNING
As eat belt can only offer its intended degree
of protection when the backrest is almost ver-
tical and the occupant is sitting upright. Avoid
seat positions that do not allow the seat belt
to be routed correctly. Adjust the backrest so
that it is as upright as possible. Never travel
with the backrest reclined too far backwards.
You could otherwise be seriously or even
fatally injured in the event of an accident or
sudden braking.
! To avoid damage to the seats and the seat
heating, observe the following information:
R do not spill any liquids on the seats. If
liquid is spilled on the seats, dry them as
soon as possible.
R if the seat covers are damp or wet, do not
switch on the seat heating. The seat
heating should also not be used to dry
the seats.
R clean the seat covers as recommended;
see the "Interior care" section.
R do not transport heavy loads on the
seats. Do not place sharp objects on the
seat cushions, e.g. knives, nails or tools.
The seats should only be occupied by
passengers, if possible.
R when the seat heating is in operation, do
not cover the seats with insulating mate-
rials, e.g. blankets, coats, bags, seat cov-
ers, child seats or booster seats.
! To avoid damage to the seats and the seat
heating, observe the following information:
R do not spill any liquids on the seats. If
liquid is spilled on the seats, dry them as
soon as possible.
R if the seat covers are damp or wet, do not
switch on the seat heating. The seat
heating should also not be used to dry
the seats. Seats
99Seats, steering wheel and mirrors Z
Page 154 of 405
The ECO start/stop function is operational
and the
¤symbol is displayed in green in
the multifunction display if:
R the indicator lamp in the ECO button is lit
green.
R the vehicle is stationary.
R the outside temperature is within the com-
fort range.
R the engine is at normal operating temper-
ature.
R the set temperature for the vehicle interior
has been reached.
R the battery is sufficiently charged.
R the system detects that the windscreen is
not misted up when the air-conditioning
system is switched on.
R the bonnet is closed.
R the driver's door is closed and the driver's
seat belt is fastened.
If not all conditions for automatic engine
switch-off have been fulfilled, the ¤sym-
bol is shown in yellow.
AMG vehicles: the AMG menu in the multi-
function display additionally shows the Stop/Start inactive message.
i If you shift the transmission from Rto D,
the ECO start/stop function is available
again once the ¤symbol reappears in
green in the multifunction display.
i All vehicle systems remain active during
automatic engine switch-off.
i All vehicles (except AMG vehicles):
automatic engine switch-off can take place
a maximum of four times consecutively (ini-
tial stop, then three subsequent stops). The
¤ symbol is shown in yellow in the mul-
tifunction display after the engine has been
started automatically for the fourth time.
When the ¤symbol is shown in green
in the multifunction display, automatic
engine switch-off is again possible. i
AMG vehicles: The number of times
which the engine can be automatically
switched off consecutively is unlimited.
i You can also activate the HOLD function
when the vehicle is stationary if the engine
has been switched off automatically. It is
then not necessary to continue applying
the brakes during the automatic stop
phase. When you depress the accelerator
pedal, the engine starts automatically and
the braking effect of the HOLD function is
deactivated. Depress the accelerator pedal
gently, as the engine must be started first.
i During automatic engine switch-off, the
climate control system only operates at a
reduced capacity. If you require full climate
control capacity, the ECO start/stop func-
tion can be deactivated by pressing the
ECO button (Y page 152).
Automatic engine start The engine is started automatically if:
R
you switch off the ECO start/stop function
by pressing the ECO button
R you release the brakes when in transmis-
sion position Dor N, when the HOLD func-
tion is inactive
R you depress the accelerator pedal
R you engage reverse gear R
R you move the transmission out of position
P
R you switch to drive program S,S+ orM
(AMG vehicles)
R you unfasten your seat belt or open the
driver's door
R the vehicle starts to roll
R the brake system requires this
R the temperature in the vehicle interior devi-
ates from the set range
R the system detects moisture on the wind-
screen when the air-conditioning system is
switched on
R the battery's charge status is too low Driving
151Driving and parking Z