2012 MERCEDES-BENZ CLS SHOOTING BRAKE isofix
[x] Cancel search: isofixPage 10 of 405
Centre console
Lowe rsection .................................. 35
Lowe rsection (AMG vehicles) ..........36
Uppe rsection .................................. 34
Changing bulbs
Important safety notes ..................123
Overview of bul btypes .................. 124
Reversing lamps ............................ 124
Child-proof locks
Important safety notes ....................63
Rea rdoors ....................................... 63
Children
In the vehicle ................................... 53
Restraint systems ............................ 53
Child seat
Automatic recognition .....................55
ISOFIX .............................................. 56
On the front-passenger sea t............ 54
Problem (malfunction) .....................59
Recommendations ...........................61
Suitable positions ............................ 59
Top Tether ....................................... 57
Cigarette lighter ................................ 307
Cleaning Mirro rturn signal ........................... 328
Trailer tow hitch ............................. 329
Climate control
Auxiliary heating/ventilation .......... 138
Controlling automatically ...............134
Convenience opening/closing
(air-recirculatio nmode) ................. 137
Cooling with aird ehumidification..133
Demisting the windows .................. 136
Demisting the windscreen .............136
Important safety notes ..................130
Indicator lamp ................................ 134
Information on using
THERMOTRONIC automatic cli-
mate control .................................. 133
Notes on using THERMATIC auto-
matic climate control .....................131
Overview of systems ......................130
Problems with cooling with air
dehumidification ............................ 134
Problem with the rear window
heating .......................................... 137
Rea rcontrol panel ......................... 132
Setting the aird istribution.............135 Setting the airflow
.........................135
Setting the airv ents...................... 142
Setting the climate mode (AIR
FLOW) ............................................ 134
Setting the temperature ................134
Setting the temperature,
THERMATI C................................... 134
Setting the temperature,
THERMOTRONIC ............................ 135
Switching air-recirculation mode
on/off ............................................ 137
Switching on/off ........................... 133
Switching residual hea ton/off ......138
Switching the rear window heat-
ing on/off ...................................... 137
Switching the ZONE function on/
off .................................................. 136
THERMATIC automatic climate
control (2-zone) ............................. 131
THERMOTRONIC (3-zone) auto-
matic climate control .....................132
Coat hooks ......................................... 296
Cockpit Overview .......................................... 28
see Instrument cluster
Collapsible emergency spare
wheel
see Emergency spare wheel
COMAND display
Cleaning ......................................... 330
COMAND Online
see separate operating instructions
Combination switch ..........................117
Consumption statistics (on-board
computer) .......................................... 231
Convenience box ............................... 299
Convenience closing feature ..............90
Convenience opening/closing (air-
recirculation mode) ........................... 137
Convenience opening feature ............90
Coolan t(engine)
Checkin gthe level ......................... 323
Display message ............................ 259
Important safety notes ..................392
Temperature (on-board computer) .246
Temperature gauge ........................ 228
Warning lamp ................................. 285 Index
7
Page 15 of 405

H
Handbrake see Parking brake
Hazard warning lamps ......................118
Headbag Display message ............................ 255
Headlamp
Cleaning system (function) ............118
Cleaning system (notes) ................393
Headlamps
Misting up ...................................... 121
Topping up the cleaning system ....323
see Automatic headlamp mode
Head restraints
Adjusting ....................................... 100
Adjusting (electrically). ..................101
Adjusting (manually). .....................100
Adjusting (rear) .............................. 101
Fitting/removing (rear) ..................102
Luxury ............................................ 101
Heating
see Climate control
High-pressure cleaners ....................326
Hill start assist .................................. 150
HOLD function Display message ............................ 263
Function/notes ............................. 186I
Ignition lock see Key positions
Immobiliser .......................................... 72
In-car hotspot see Separate operating instructions
Indicator and warning lamps
Coolant .......................................... 285
DISTRONI CPLUS ........................... 287
Engine diagnostics .........................284
SPORT handling mode ...................282
Indicator lamps
Display message ............................ 256
see Warning and indicator lamps
Insectp rotection on the radiator ....321
Inspection see ASSYST PLUS Instrument cluster
Overview .................................. 30, 227
Settings ......................................... 239
Warning and indicator
lamps ...................................... .32, 276
Instrument cluster lighting ..............240
Intelligen tLight System
Activating/deactivatin g................. 240
Display message ............................ 258
Overview ........................................ 119
Setting the dipped-bea mhead-
lamps for driving on the right/left .241
Interior lighting ................................. 122
Automatic control system ..............122
Delayed switch-off (on-board
computer) ...................................... 242
Emergency lighting ........................123
Manual control ............................... 123
Overview ........................................ 122
Reading lamp ................................. 122
Setting brightness for display/
switches (on-board computer) .......240
Setting the ambient lighting
brightness (on-board computer) ....241
Setting the ambient lighting col-
our (on-board computer) ................ 241
Interior motion sensor ........................73
ISOFIX child seat securing system ....56 J
Jack Storage location ............................ 335
Using ............................................. 364
Jump start (engine)
see Jump starting (engine)
Jump starting (engine) ......................344 K
Key Changing the battery .......................79
Checking the battery .......................79
Convenience closing feature ............91
Convenience opening feature ..........90
Display message ............................ 275
Door central locking/unlocking .......77
Emergency key element ................... 78 12
Index
Page 59 of 405
tur
nthe key to position 2inthe ignition lock,
the 4 PASSENGER AIRBAG OFF indicator
lamp lights up briefly, but does not have any
function. It does not indicate that there is
automatic child seat recognition on the front-
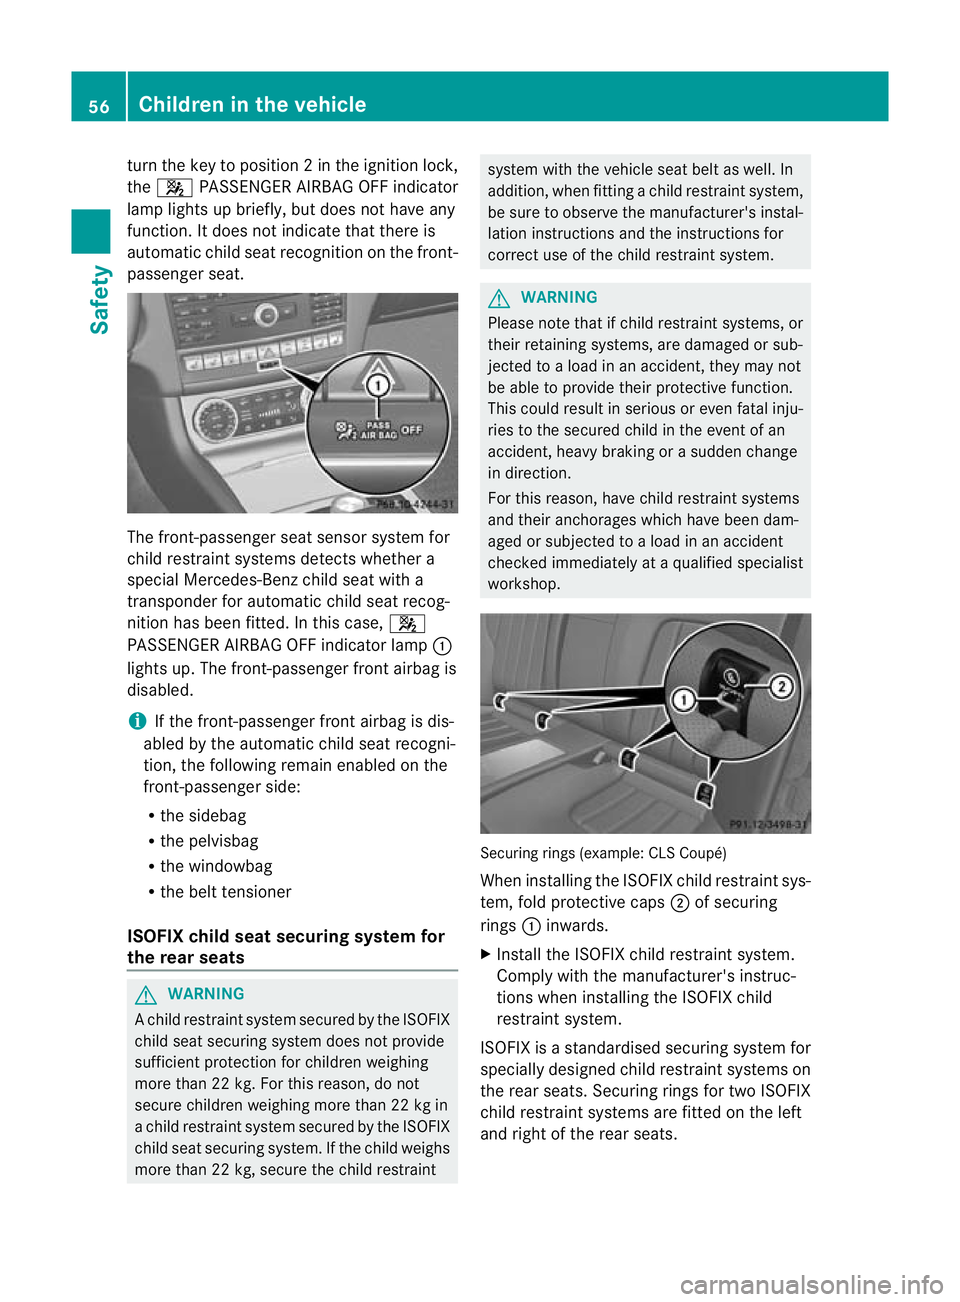
passenger seat. The front-passenger seat sensor system for
child restraint systems detects whether a
special Mercedes-Ben zchild seat with a
transponder for automatic child seat recog-
nition has been fitted. In this case, 4
PASSENGER AIRBAG OFF indicator lamp :
lights up. The front-passenger front airbag is
disabled.
i If the front-passenger front airbag is dis-
abled by the automatic child seat recogni-
tion, the following remain enabled on the
front-passenger side:
R the sidebag
R the pelvisbag
R the windowbag
R the belt tensioner
ISOFIX child seat securing system for
the rear seats G
WARNING
Ac hild restraint system secured by the ISOFIX
child seat securing system does not provide
sufficient protection for children weighing
more than 22 kg. For this reason, do not
secure children weighing more than 22 kg in
a child restraint system secured by the ISOFIX
child seat securing system. If the child weighs
more than 22 kg, secure the child restraint system with the vehicle seat belt as well. In
addition, when fitting a child restraint system,
be sure to observe the manufacturer's instal-
lation instructions and the instructions for
correct use of the child restraint system.
G
WARNING
Please note that if child restraint systems, or
their retaining systems, are damaged or sub-
jected to a load in an accident, they may not
be able to provide their protective function.
This could result in serious or even fatal inju-
ries to the secured child in the event of an
accident, heavy braking or a sudden change
in direction.
For this reason, have child restraint systems
and their anchorages which have been dam-
aged or subjected to a load in an accident
checked immediately at a qualified specialist
workshop. Securing rings (example: CLS Coupé)
When installing the ISOFIX child restraint sys-
tem, fold protective caps
;of securing
rings :inwards.
X Install the ISOFIX child restraint system.
Comply with the manufacturer's instruc-
tions when installing the ISOFIX child
restraint system.
ISOFIX is a standardised securing system for
specially designed child restraint systems on
the rear seats. Securing rings for two ISOFIX
child restraint systems are fitted on the left
and right of the rear seats. 56
Children in the vehicleSafety
Page 60 of 405
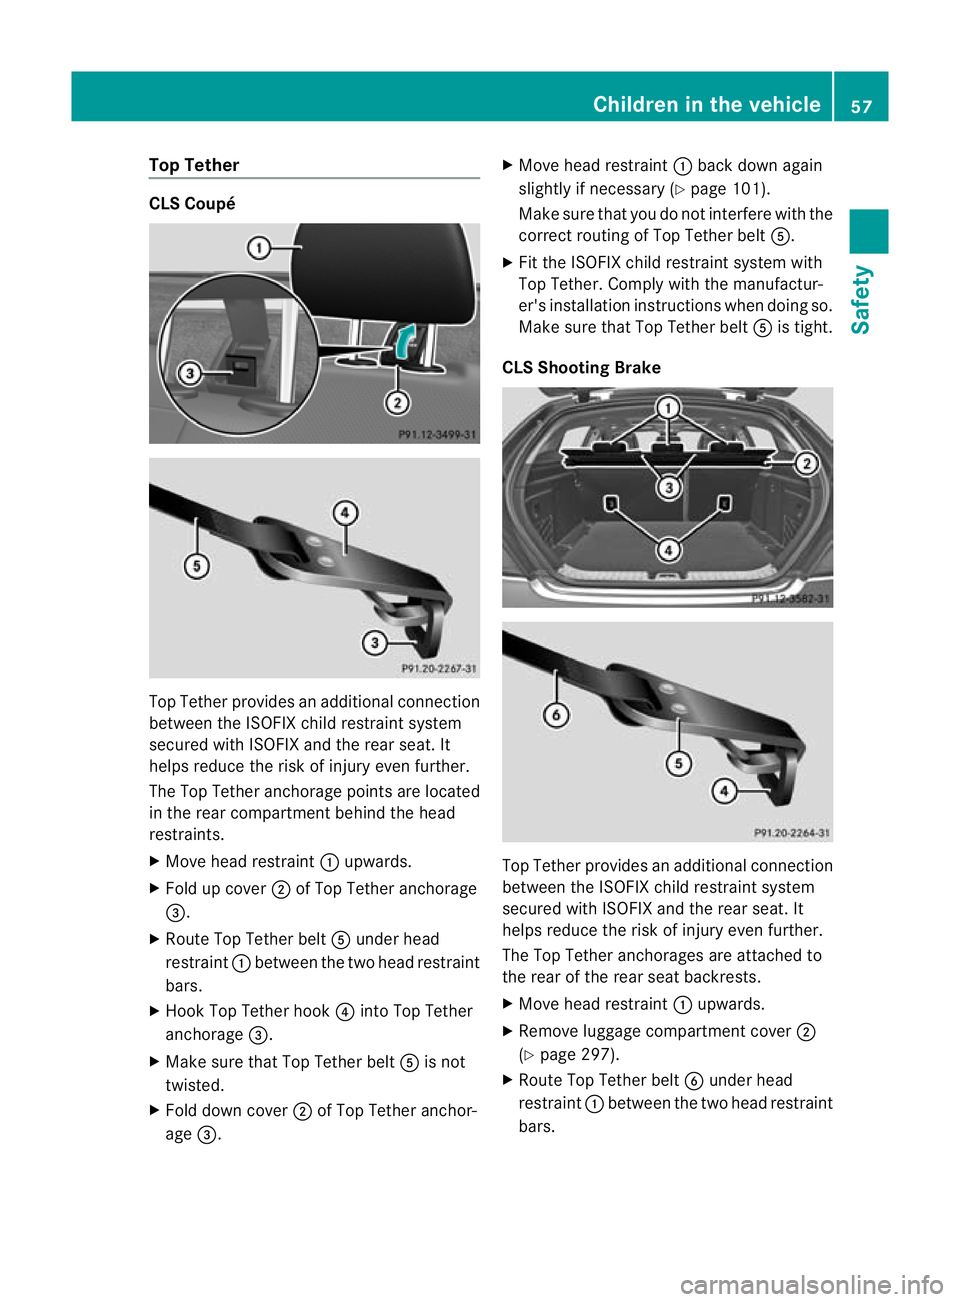
Top Tether
CLS Coupé
Top Tether provides an additional connection
between the ISOFIX child restraint system
secured with ISOFIX and the rear seat. It
helps reduce the ris kofinjury eve nfurther.
The Top Tether anchorage points are located
in the rear compartmen tbehind the head
restraints.
X Move head restraint :upwards.
X Fold up cover ;of Top Tether anchorage
=.
X Route Top Tether belt Aunder head
restraint :between the two head restraint
bars.
X Hook Top Tether hook ?into Top Tether
anchorage =.
X Make sure that Top Tether belt Ais not
twisted.
X Fold down cover ;of Top Tether anchor-
age =. X
Move head restraint :back down again
slightly if necessary (Y page 101).
Make sure that you do not interfere with the
correct routing of Top Tether belt A.
X Fit the ISOFIX child restraint system with
Top Tether .Comply with the manufactur-
er's installation instructions when doing so.
Make sure that Top Tether belt Ais tight.
CLS Shooting Brake Top Tether provides an additional connection
between the ISOFIX child restraint system
secured with ISOFIX and the rear seat. It
helps reduce the risk of injury even further.
The Top Tether anchorages are attached to
the rear of the rear seat backrests.
X Move head restraint :upwards.
X Remove luggage compartment cover ;
(Y page 297).
X Route Top Tether belt Bunder head
restraint :between the two head restraint
bars. Children in the vehicle
57Safety Z
Page 61 of 405
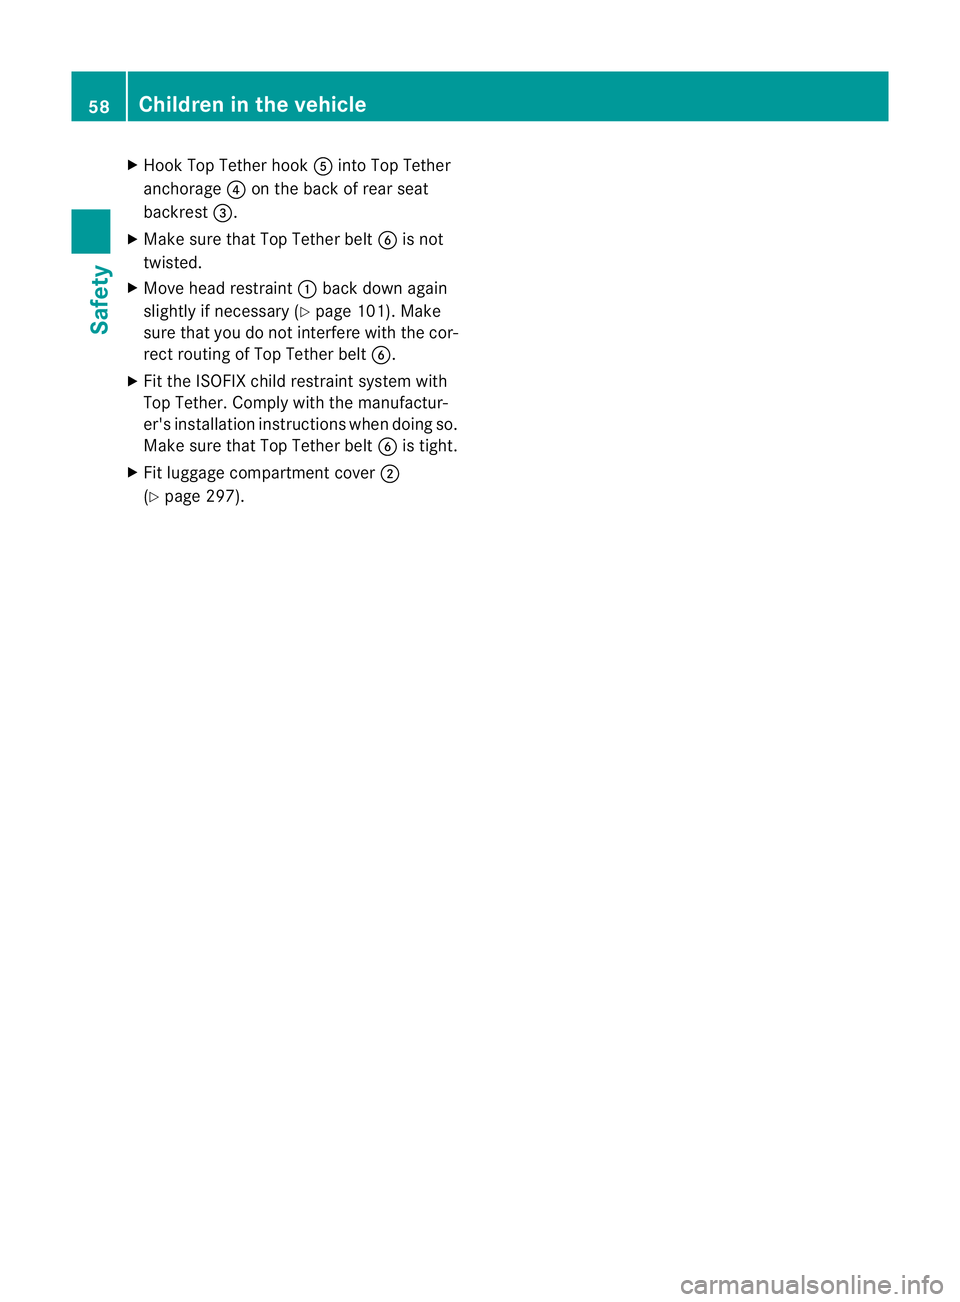
X
Hook Top Tethe rhook Ainto Top Tether
anchorage ?on the back of rear seat
backrest =.
X Make sure that Top Tether belt Bis not
twisted.
X Move head restraint :back down again
slightly if necessary (Y page 101). Make
sure that you do not interfere with the cor-
rect routing of Top Tether belt B.
X Fit the ISOFIX child restraint system with
Top Tether. Comply with the manufactur-
er's installation instructions when doing so.
Make sure that Top Tether belt Bis tight.
X Fit luggage compartment cover ;
(Y page 297). 58
Children in the vehicleSafety
Page 63 of 405
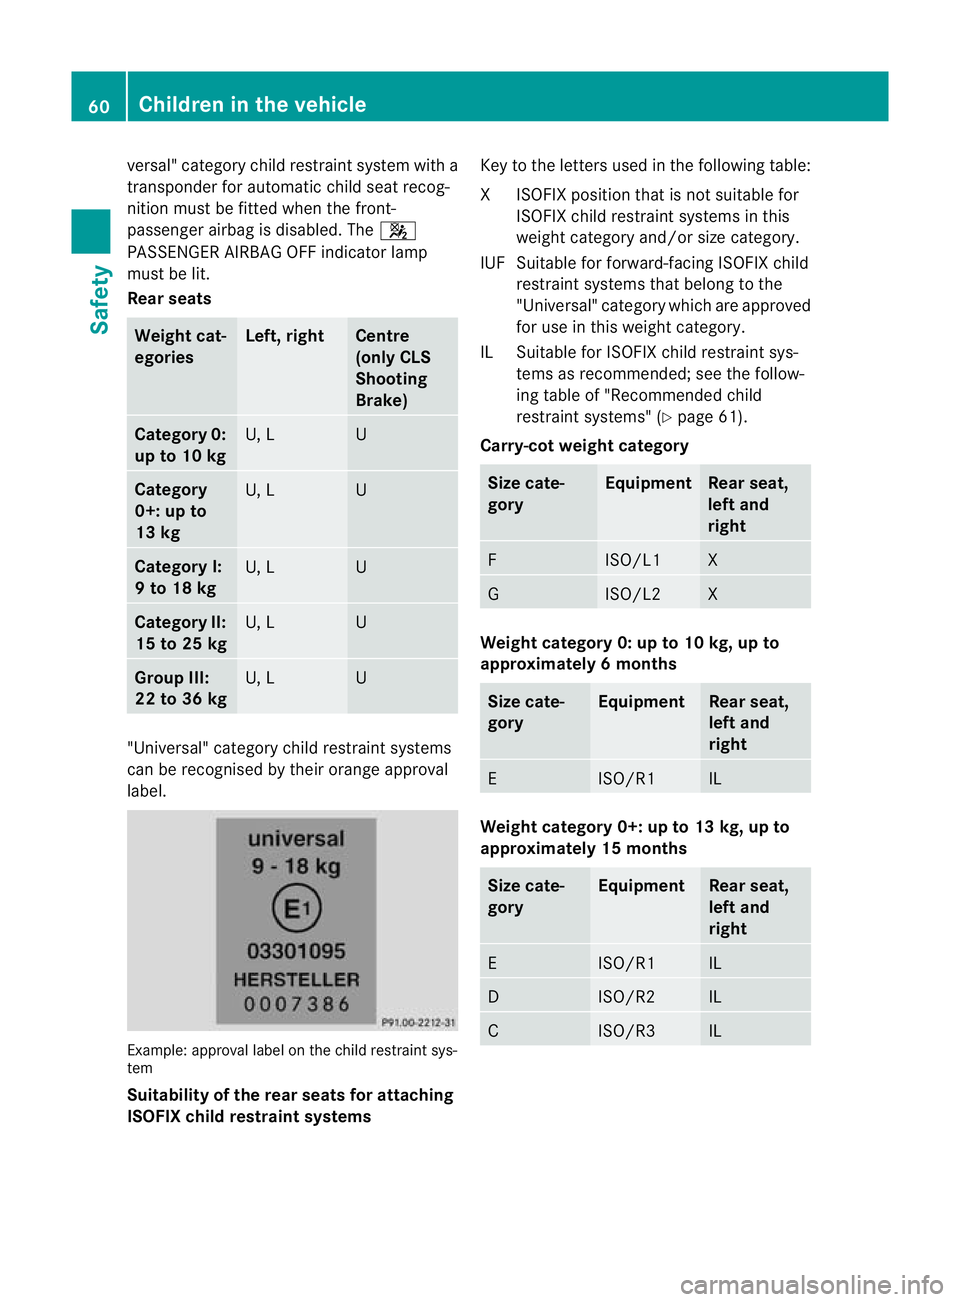
versal" category child restraint system with a
transponde rfor automatic child seat recog-
nition must be fitted when the front-
passenger airbag is disabled. The 4
PASSENGER AIRBAG OFF indicator lamp
must be lit.
Rear seats Weight cat-
egories Left, right Centre
(only CLS
Shooting
Brake)
Category 0:
up to 10 kg
U, L U
Category
0+: up to
13 kg
U, L U
Category I:
9 to 18 kg
U, L U
Category II:
15 to 25 kg
U, L U
Group III:
22 to 36 kg
U, L U
"Universal" category child restraint systems
can be recognised by their orange approval
label.
Example: approval label on the child restraint sys-
tem
Suitability of the rear seats for attaching
ISOFIX child restraint systems Key to the letters used in the following table:
XI
SOFIX position tha tis not suitable for
ISOFIX child restraint systems in this
weight category and/or size category.
IUF Suitable for forward-facing ISOFIX child restraint systems that belong to the
"Universal" category which are approved
for use in this weight category.
IL Suitable for ISOFIX child restraint sys- tems as recommended; see the follow-
ing table of "Recommended child
restraint systems" (Y page 61).
Carry-cot weight category Size cate-
gory Equipment Rear seat,
left and
right
F ISO/L1 X
G ISO/L2 X
Weight category 0: up to 10 kg, up to
approximately 6 months
Size cate-
gory Equipment Rear seat,
left and
right
E ISO/R1 IL
Weight category 0+: up to 13 kg, up to
approximately 15 months
Size cate-
gory Equipment Rear seat,
left and
right
E ISO/R1 IL
D ISO/R2 IL
C ISO/R3 IL60
Children in the vehicleSafety
Page 65 of 405
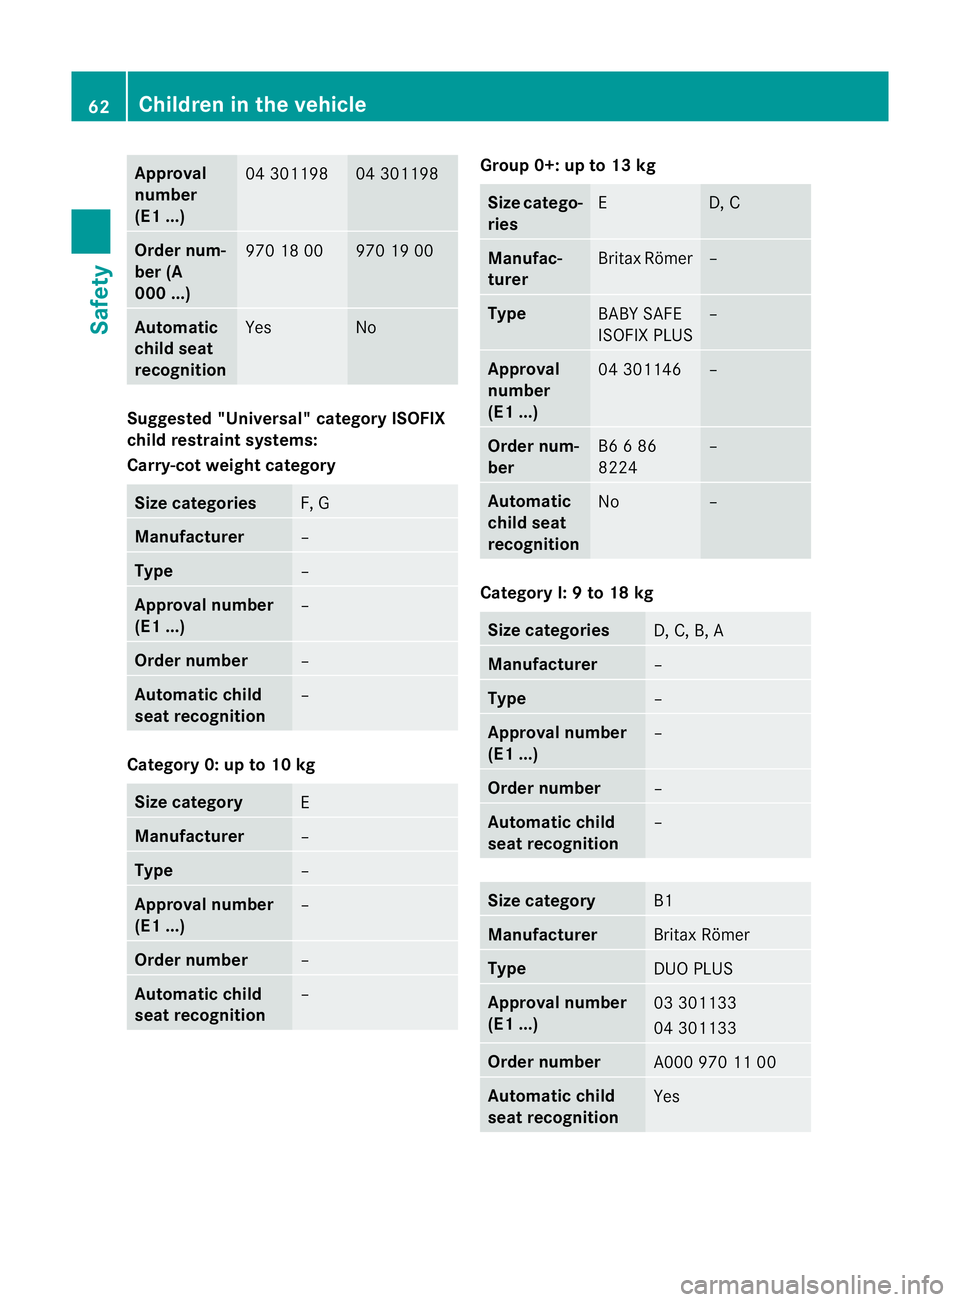
Approval
number
(E1 ...)
04 301198 04 301198
Order num-
ber (A
000 ...)
970 18 00 970 19 00
Automatic
child seat
recognition
Yes No
Suggested "Universal
"category ISOFIX
child restraint systems:
Carry-cot weight category Size categories
F, G
Manufacturer
–
Type
–
Approval number
(E1 ...) –
Order number
–
Automatic child
seat recognition
–
Category 0: up to 10 kg
Size category
E
Manufacturer
–
Type
–
Approval number
(E1 ...) –
Order number
–
Automatic child
seat recognition
– Group 0+: up to 13 kg
Size catego-
ries
E D, C
Manufac-
turer
Britax Römer –
Type
BABY SAFE
ISOFIX PLUS –
Approval
number
(E1 ...)
04 301146 –
Order num-
ber
B6 6 86
8224 –
Automatic
child seat
recognition
No –
Category I: 9 to 18 kg
Size categories
D, C, B, A
Manufacturer
–
Type
–
Approval number
(E1 ...)
–
Order number
–
Automatic child
seat recognition
–
Size category
B1
Manufacturer
Britax Römer
Type
DUO PLUS
Approval number
(E1 ...)
03 301133
04 301133
Order number
A000 970 11 00
Automatic child
seat recognition
Yes62
Children in the vehicleSafety