2012 MERCEDES-BENZ CLS COUPE door lock
[x] Cancel search: door lockPage 227 of 373
X
Press the :or9 button to select the
Surround lighting function.
When the Surround lighting function is
activated, the light cone and the area
around the vehicle are displaye dinred in
the multifunction display.
X Press the abutton to save the setting.
Deactivating delayed switch-off of the exte-
rior lighting temporarily:
X Before leaving the vehicle, turn the key to
position 0in the ignition lock.
X Turn the key to position 2in the ignition
lock.
The exterior lighting delayed switch-off is
deactivated.
Delayed switch-off of the exterior lighting is
reactivated the next time you start the
engine.
If you have activated the Surround light‐ing function and the light switch is set to
Ã,t he following functions are activated
when it is dark:
R surround lighting: the exterior lighting
remains lit for 40 seconds after unlocking
with the key. If you start the engine, the
surround lighting is switched off and auto-
matic headlamp mode is activated
(Y page 111).
R Exterior lighting delayed switch-off: the
exterior lighting remains lit for 60seconds
after the engine is switched off. If you close
all the doors and the boot lid, the exterior
lighting goes off after 5seconds.
i Depending on your vehicle's equipment,
when the surround lighting and delayed
switch-off exterior lighting are on, the fol-
lowing light up:
R side lamps
R dipped-beam headlamps
R daytime driving lights
R surround lighting in the exterior mirrors Activating/deactivating the interior light-
ing delayed switch-off
If you activat
ethe Lightin gdelayed sw.- off function
,the interior lighting remains on
for 20seconds after you remove the key from
the ignition lock.
X Press the =or; button on the steer-
ing wheel to select the Settings menu.
X Press the :or9 button to select the
Light submenu.
X Press ato confirm.
X Press the :or9 button to select the
Light. delay function.
When the Lightingdelayed sw.-off function is activated, the vehicle interior is
displayed in red in the multifunction dis-
play.
X Press the abutton to save the setting.
Vehicle Setting permanent SPEEDTRONIC
X
Press the =or; button on the steer-
ing wheel to select the Settings menu.
X Press the :or9 button to select the
Vehicle submenu.
X Press ato confirm.
X Press the :or9 button to select the
Limit speed (winter tyres): function.
You will see the curren tsetting.
X Press ato confirm.
X Press the :or9 button to adjust
permanen tSPEEDTRONIC in increment sof
ten ( 230 km/h to
160 km/h ). The
Off set-
ting switches permanent SPEEDTRONIC
off.
X Press the abutton to store the entry.
For furthe rinformation on permanent SPEED-
TRONI C(Ypage 170). 224
Menus and submenusOn-board computer and displays
Page 228 of 373
Switching the automatic locking feature
on/off
X
Press the =or; button on the steer-
ing wheel to select the Settings menu.
X Press the :or9 button to select the
Vehicle submenu.
X Press ato confirm.
X Press the :or9 button to select the
Auto. door locks function.
When the Automatic door locks func-
tion is activated, the vehicle doors are dis-
played in red in the multifunction display.
X Press the abutton to save the setting.
If you activate the Automatic door locks function, the vehicle is centrally locked above
as
peed of around 15 km/h.
For further information on the automatic lock-
ing feature, see (Y page 84).
Activating/deactivating the acoustic
locking confirmation
If you switch on the Acoustic Lock function,
an acoustic signal sounds when you lock the
vehicle.
X Press the =or; button on the steer-
ing wheel to select the Settings menu.
X Press the :or9 button to select the
Vehicle submenu.
X Press ato confirm.
X Press the :or9 button to select the
Acoustic Lock function.
If the Acoustic Lock function is activated,
the & symbol in the multifunction dis-
play lights up red.
X Press the abutton to save the setting.
Activating/deactivating the radar sensor
system
X Press the =or; button on the steer-
ing wheel to select the Settings menu.
X Press the :or9button to select the
Vehicle submenu.
X Press ato confirm. X
Press the 9or: button to select
Radar sensor (See Owner's Man.): .
You will see the selected setting: on or
off .
X Press the abutton to save the setting.
i You must deactivate the radar sensor sys-
tem in certain countries and near radio
telescope facilities. For further informa-
tion, see (Y page 368).
When you are close to radio telescope facili-
ties, the radar sensor system will be deacti-
vated automatically.
The following systems are switched off when
the radar sensor system is deactivated:
R DISTRONIC PLUS (Y page 170)
R BAS PLUS (Y page 64)
R PRE-SAFE ®
Brake (Y page 68)
R Blind Spot Assist (Y page 197)
R Active Blind Spot Assist (Y page 201)
Heating Auxiliary heating departuret
ime G
WARNING
Exhaust fumes are produced when the auxili-
ary heating is in operation. Inhaling these
exhaust fumes can be poisonous. You should
therefore switch off the auxiliary heating in
confined spaces without an extraction sys-
tem, e.g. agarage. G
WARNING
When operating the auxiliary heating parts of
the vehicle can get very hot. Make sure that
the exhaust system does not under any cir-
cumstances come into contact with easily
ignitable material such as dry grass or fuels.
The material could otherwise ignite and set
the vehicle alight. Choose your parking spot
accordingly.
Operating the auxiliary heating is thus pro-
hibited at filling stations or when your vehicle
is being refuelled. You must therefore switch
off the auxiliary heating at filling stations. Menus and submenus
225On-board computer and displays Z
Page 230 of 373
X
Press the :or9 button to select the
Easy Entry/Exit: function.
If the Easy Entry/Exit function is activa-
ted, the vehicle steerin gwheel is displayed
in red in the multifunction display.
X Press the abutton to save the setting.
Further information on the EASY-ENTRY/EXIT
feature (Y page 104).
Switching the belt adjustment on/off
X Press the =or; button on the steer-
ing wheel to select the Settings menu.
X Press the :or9 button to select the
Convenience submenu.
X Press ato confirm.
X Press the :or9 button to select the
Belt adjustment function.
When the Belt adjustment function is
activated, the vehicle seat belt is displayed
in red in the multifunction display.
X Press the abutton to save the setting.
For further information on belt adjustment,
see (Y page 50).
Switching the fold-in mirrors when lock-
ing function on/off
This function is only availabl eonvehicles with
Memory Function (Y page 107).
When you activat ethe Auto. fold in func-
tion, the exterior mirrors are folded in when
the vehicle is locked. When you unlock the
vehicle and then open adoor, the exterior
mirrors fold out again.
X Press the =or; button on the steer-
ing wheel to select the Settings menu.
X Press the :or9 button to select the
Convenience submenu.
X Press ato confirm.
X Press the :or9 button to select the
Auto. fold in function.
If the Auto. fold in function is activated,
the vehicle's exterior mirror is displaye din
red in the multifunction display.
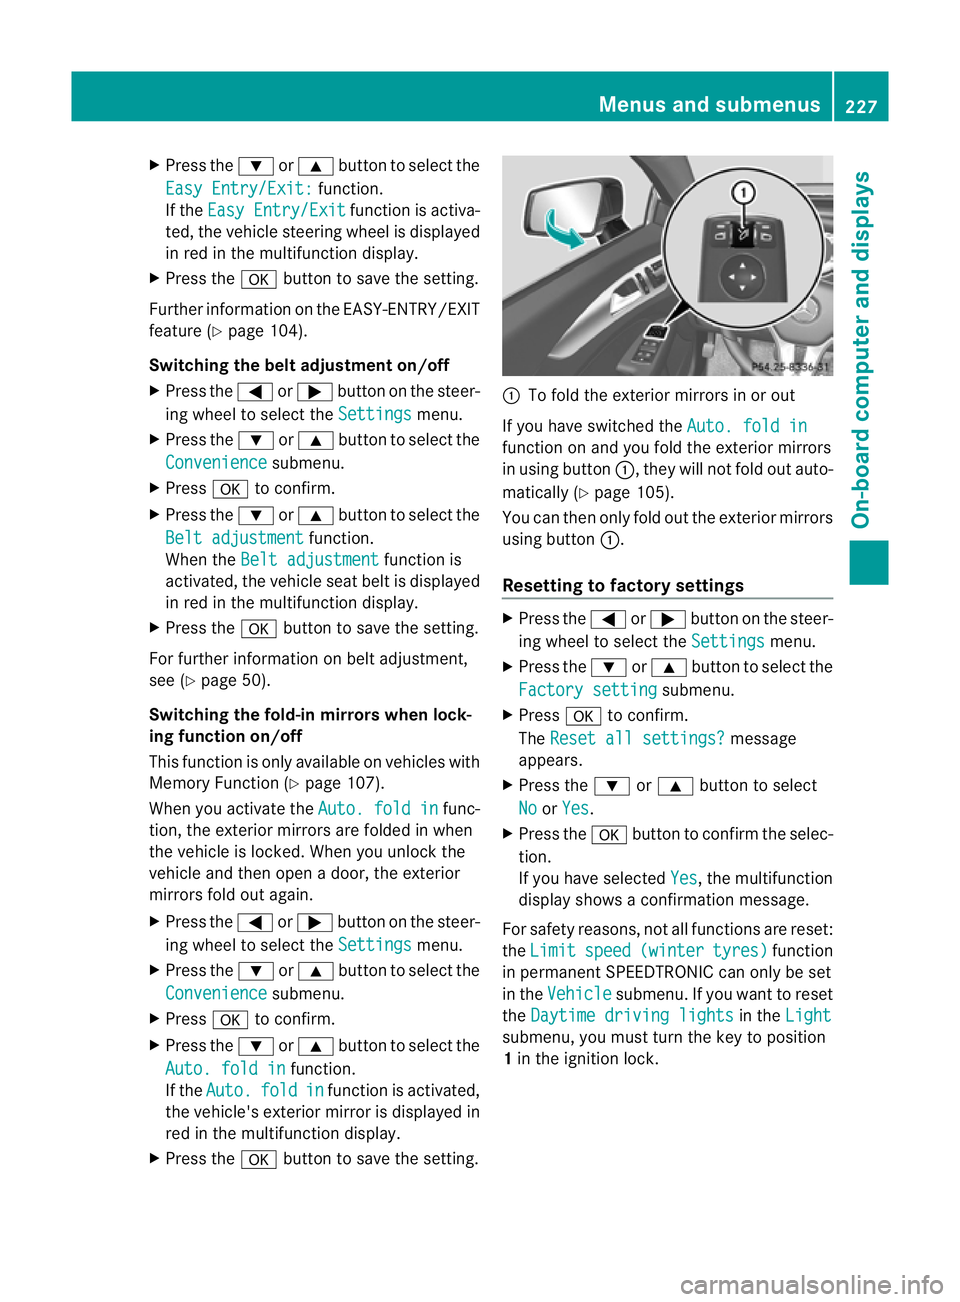
X Press the abutton to save the setting. :
To fold the exterior mirrors in or out
If you have switched the Auto. fold in function on and you fold the exterior mirrors
in using button
:,they will not fold out auto-
matically (Y page 105).
You can then only fold out the exterior mirrors
using button :.
Resetting to factor ysettings X
Pres sthe = or; button on th esteer-
ing wheel to selec tthe Settings menu.
X Press the :or9 button to select the
Factory setting submenu.
X Press ato confirm.
The Reset all settings? message
appears.
X Press the :or9 button to select
No or
Yes .
X Press the abutton to confirm the selec-
tion.
If you have selected Yes ,t
he multifunction
displays howsaconfirmation message.
For safety reasons, not all functions are reset:
the Limit speed (winter tyres) function
in permanent SPEEDTRONIC can only be set
in the Vehicle submenu. If you want to reset
the Daytime driving lights in the
Light submenu, you must turn the key to position
1
in the ignition lock. Menus and submenus
227On-board computer and displays Z
Page 258 of 373
Display messages Possible causes/consequences and
M Solutions
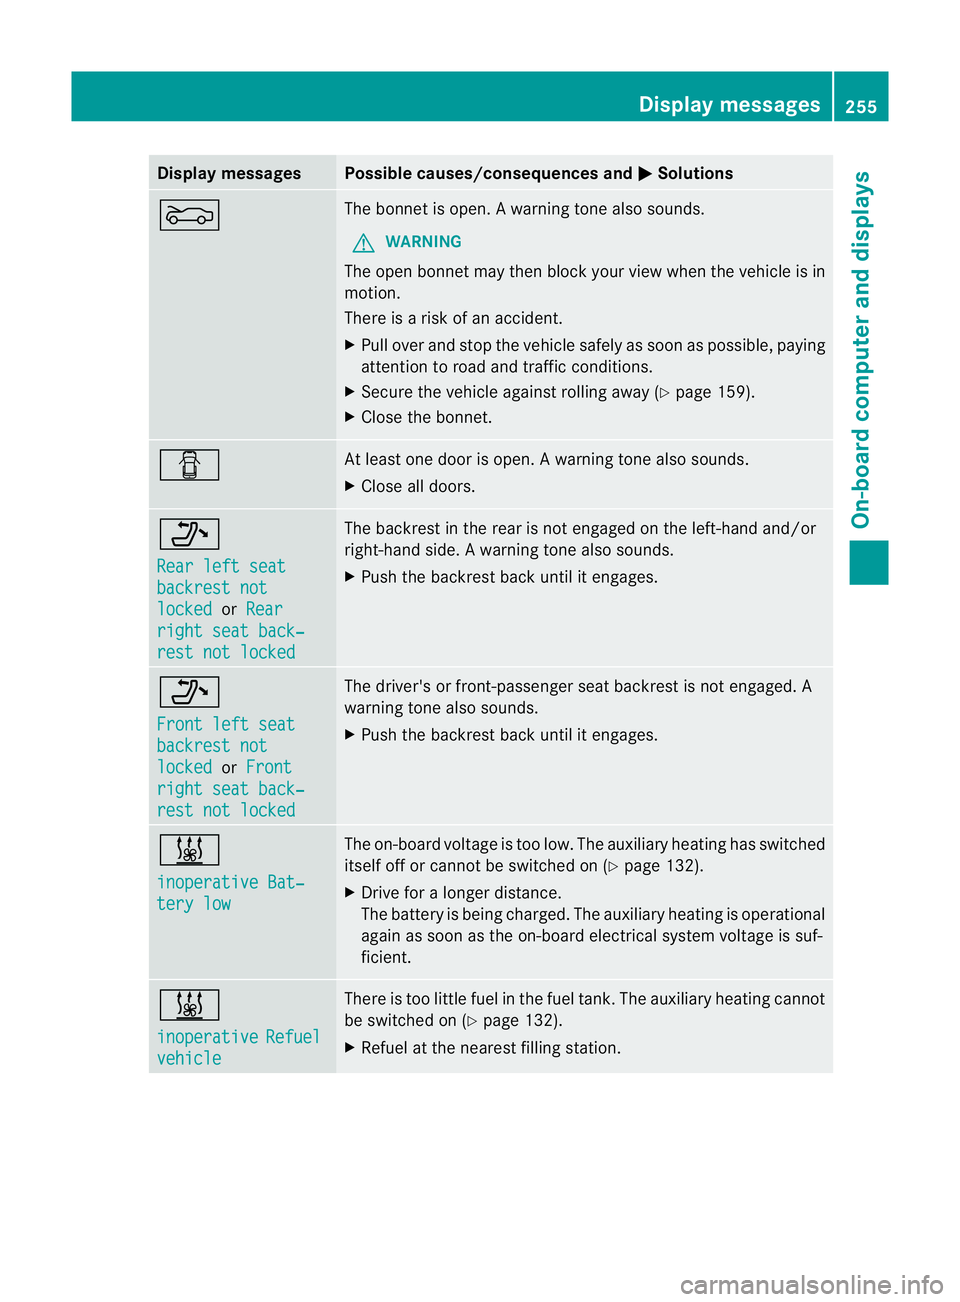
M The bonne
tisopen. Awarning tone also sounds.
G WARNING
The open bonne tmay then bloc kyour view when the vehicle is in
motion.
There is arisk of an accident.
X Pull over and stop the vehicle safely as soon as possible, paying
attention to road and traffic conditions.
X Secure the vehicle against rolling away (Y page 159).
X Close the bonnet. C At least one door is open.
Awarning tone also sounds.
X Close all doors. _
Rea
rl efts eat backrest not
locked or
Rear right sea
tback‐ res
tn ot locked The backres
tinthe rear is not engaged on the left-hand and/or
right-hand side. Awarning tone also sounds.
X Push th ebackres tback until it engages. _
Front lef
tseat backrest not
locked or
Front right sea
tback‐ res
tn ot locked The driver'
sorfront-pa ssenger seat backres tisnot engaged. A
warning tone also sounds.
X Push the backrest back until it engages. &
inoperative Bat‐
tery low The on-board voltage is too low. The auxiliary heating has switched
itself off or cannot be switched on (Y
page 132).
X Drive for alonger distance.
The battery is being charged. The auxiliary heating is operational
againass oon as the on-board electrical system voltage is suf-
ficient. &
inoperative
Refuel
vehicle There is too little fuel in the fuel tank. The auxiliary heating cannot
be switched on (Y
page 132).
X Refuel at the nearest filling station. Display messages
255On-board computer and displays Z
Page 261 of 373
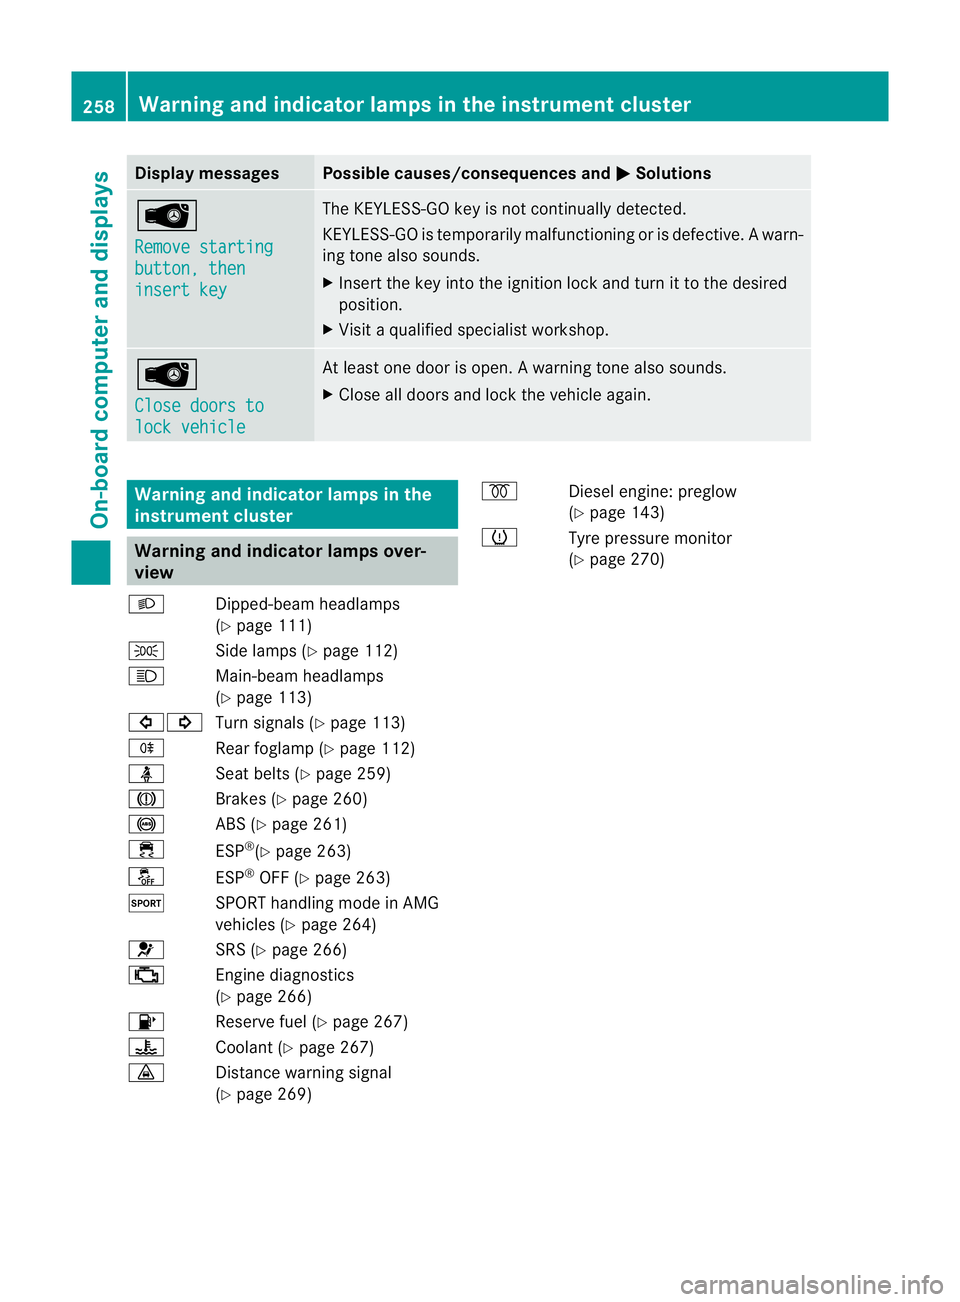
Display messages Possible causes/consequences and
M Solutions
Â
Remove starting
button
,then insert key The KEYLESS-GO ke
yisnot continually detected.
KEYLESS-GO is temporaril ymalfunctioning or is defective. Awarn-
ing tone also sounds.
X Inser tthe keyintot he ignition loc kand tur nittot hedesired
position.
X Visi taq ualified specialist workshop. Â
Close doors to
lock vehicle At least one door is open.
Awarning tone also sounds.
X Close all door sand loc kthe vehicle again. Warning and indicator lamps in the
instrument cluster
Warning and indicator lamps over-
view
L Dipped-beam headlamps
(Ypage 111)
T Side lamps (Y page 112)
K Main-beam headlamps
(Ypage 113)
#! Turn signals (Y page 113)
R Rear foglamp (Y page 112)
ü Seat belts (Y page 259)
J Brakes (Ypage 260)
! ABS (Ypage 261)
÷ ESP®
(Y page 263)
å ESP®
OFF (Y page 263)
M SPORT handling mode in AMG
vehicles (Ypage 264)
6 SRS (Ypage 266)
; Enginediagnostics
(Y page 266)
8 Reserve fuel (Y page 267)
? Coolant (Ypage 267)
· Distancewarning signal
(Y page 269) %
Diesel engine: preglow
(Ypage 143)
h Tyre pressure monitor
(Ypage 270) 258
Warning and indicator lampsint
he instrument clusterOn-board computer and displays
Page 290 of 373
X
Remove th emobile phone bracke tfrom
sliding adapter :;see the separate mobile
phone bracket fitting instructions.
X Detach sliding adapter :using suitable
tool =and remove. Garage door opener
Important safety notes The HomeLink
®
garage door opener integra-
ted in the rear-view mirror allows you to oper-
ate up to three different door and gate sys-
tems.
i The garage door opener is only available
for certain countries. Observe the legal
requirements for each individualc ountry.
The HomeLink ®
garage door opener is
compatible with most European garage and
gate opener drives. More information on
HomeLink ®
and/or compatible products is
available from:
R at aq ualified specialised workshop
R the HomeLink ®
hotline
(0) 08000 466 354 65 (free of charge )or
+49 (0) 6838 907 277 (charges apply)
R on the Internet at:
http://www.homelink.com
Programming Programming buttons
G
WARNING
Only press the button on the integrated
garage door opene rifthere are no persons or
objects present within the sweep of the
garage door. Persons could otherwise be
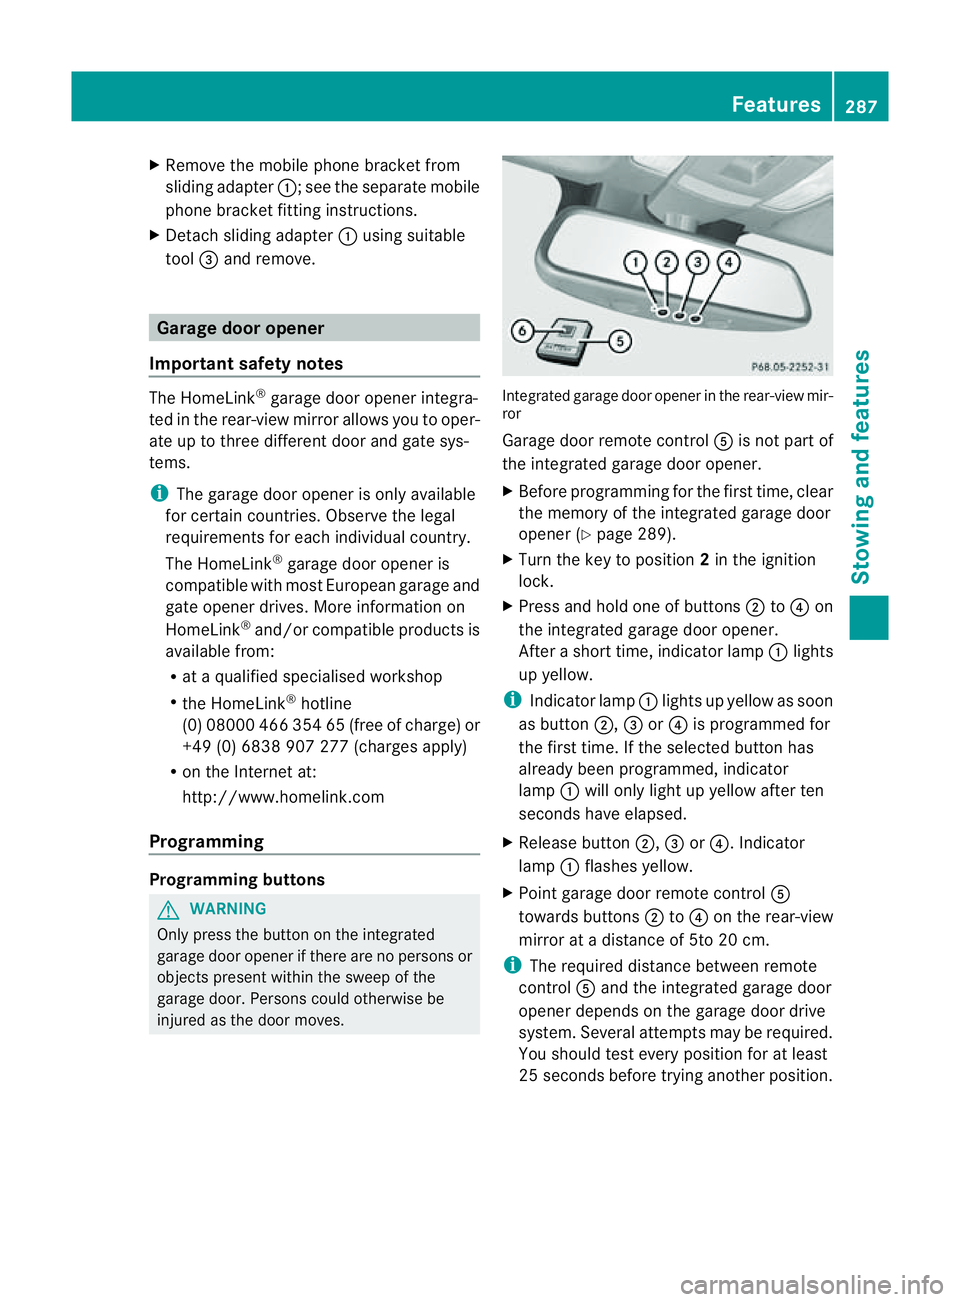
injured as the door moves. Integrated garage door opener in the rear-view mir-
ror
Garage door remote control Ais not part of
the integrated garage door opener.
X Before programming for the first time, clear
the memory of the integrated garage door
opener (Y page 289).
X Turn the key to position 2in the ignition
lock.
X Press and hold one of buttons ;to? on
the integrated garage door opener.
After ashort time, indicator lamp :lights
up yellow.
i Indicator lamp :lights up yellow as soon
as button ;,=or? is programmed for
the first time. If the selected button has
alreadyb een programmed, indicator
lamp :will only light up yellow after ten
seconds have elapsed.
X Release button ;,=or?.I ndicator
lamp :flashes yellow.
X Point garage door remote control A
towards buttons ;to? on the rear-view
mirror at adistance of 5to 20 cm.
i The required distance between remote
control Aand the integrated garage door
opener depends on the garage door drive
system. Several attemptsm ay be required.
You should test every positio nfor at least
25 seconds before trying another position. Features
287Stowing and features Z
Page 291 of 373
X
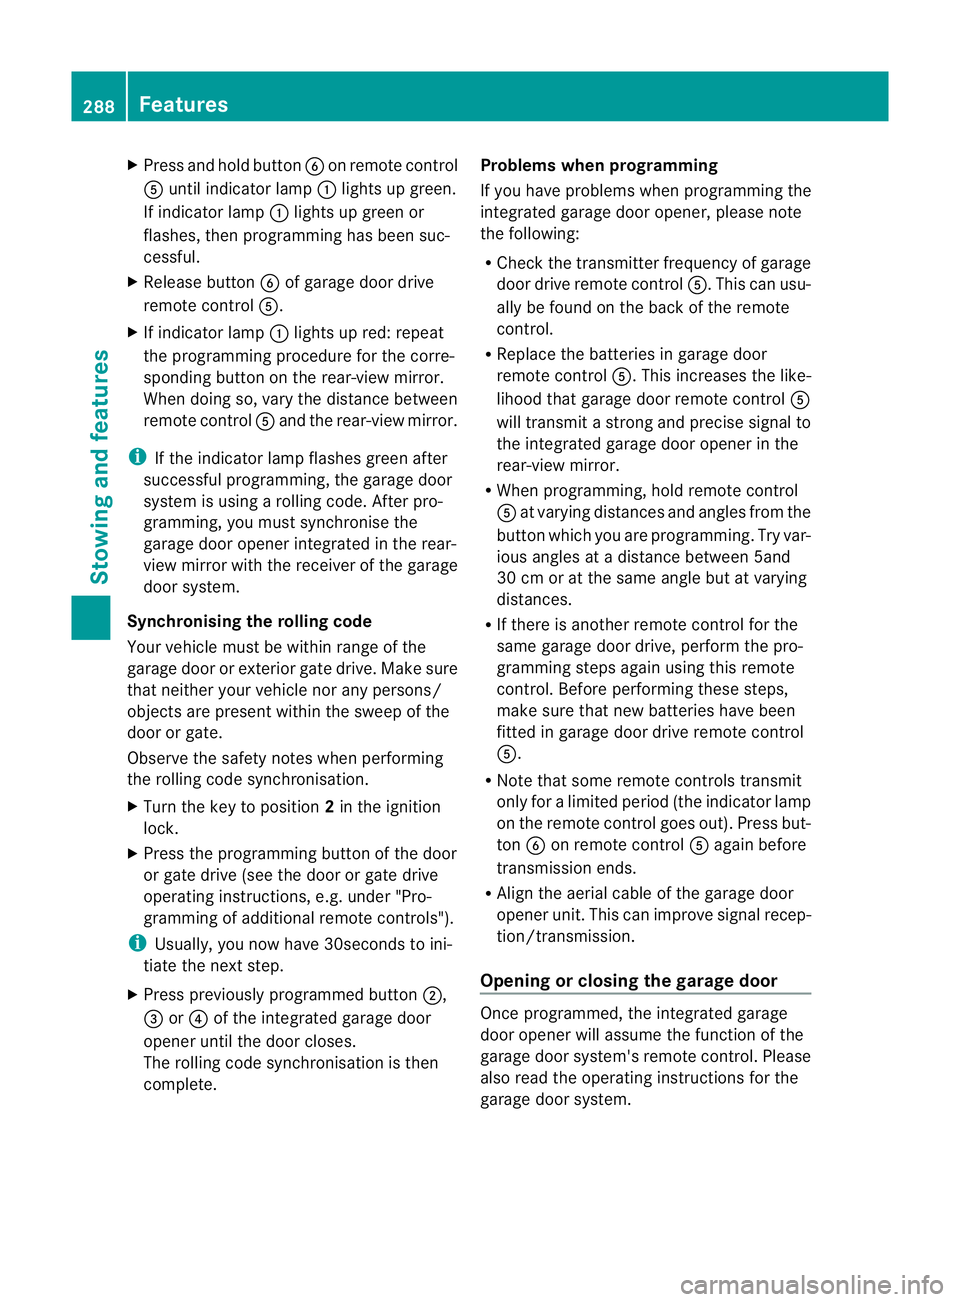
Press and hold button Bon remot econtrol
A until indicator lamp :lights up green.
If indicator lamp :lights up green or
flashes, then programming has been suc-
cessful.
X Release button Bof garage door drive
remote control A.
X If indicator lamp :lights up red: repeat
the programming procedure for the corre-
sponding button on the rear-view mirror.
When doing so, vary the distance between
remote control Aand the rear-view mirror.
i If the indicator lamp flashes green after
successful programming, the garage door
system is using arolling code. After pro-
gramming, you must synchronise the
garage door opener integrated in the rear-
view mirror with the receiver of the garage
door system.
Synchronising the rolling code
Your vehicle must be within range of the
garage door or exterior gate drive. Make sure
that neither your vehicle nor any persons/
object sare present within the sweep of the
door or gate.
Observe the safety notes when performing
the rolling code synchronisation.
X Turn the key to position 2in the ignition
lock.
X Press the programming button of the door
or gate drive (see the door or gate drive
operating instructions, e.g. under "Pro-
gramming of additional remote controls").
i Usually ,you now have 30seconds to ini-
tiate the next step.
X Press previously programmed button ;,
= or? of the integrated garage door
opener until the door closes.
The rolling code synchronisation is then
complete. Problems when programming
If you have problems when programming the
integrated garage door opener, please note
the following:
R
Check the transmitter frequency of garage
door drive remote control A.This can usu-
ally be found on the back of the remote
control.
R Replace the batteries in garage door
remote control A.This increases the like-
lihood that garage door remote control A
will transmit astronga nd precise signal to
the integrated garage door opener in the
rear-view mirror.
R When programming, hold remote control
A at varying distances and angles from the
button which you are programming. Try var-
ious angles at adistance between 5and
30 cm or at the same angle but at varying
distances.
R If there is another remote control for the
same garage door drive, perform the pro-
gramming steps again using this remote
control. Before performing these steps,
make sure that new batteries have been
fitted in garage door drive remote control
A.
R Note that some remote controls transmit
only for alimited period (the indicator lamp
on the remote control goes out). Press but-
ton Bon remote control Aagain before
transmission ends.
R Align the aerial cable of the garage door
opener unit. This can improve signal recep-
tion/transmission.
Opening or closing the garage door Once programmed, the integrated garage
door opener will assume the function of the
garage door system's remote control. Please
also read the operating instructions for the
garage door system.288
FeaturesStowing and features
Page 292 of 373
X
Turn the key to position 2in the ignition
lock.
X Press button ;,=or? which you have
programmed to operate the garage door.
Garage door system with afixed code: indi-
cator lamp :lights up green.
Garage door system with arolling code:
indicator lamp :flashes green.
i The transmitter will transmit asignal for
as long as the button is pressed. The trans-
mission is halted after amaximum of ten
seconds and indicator lamp :lights up
yellow. Press button ;,=or? again if
necessary.
Clearing the memory X
Turn the key to position 2in the ignition
lock.
X Press buttons ;and ?.
The indicator lamp lights up yellow.
X Press and hold buttons ;and ?until the
indicator lamp turns green.
i Make sure that you clear the memory of
the integrated garage door opener before
selling the vehicle.
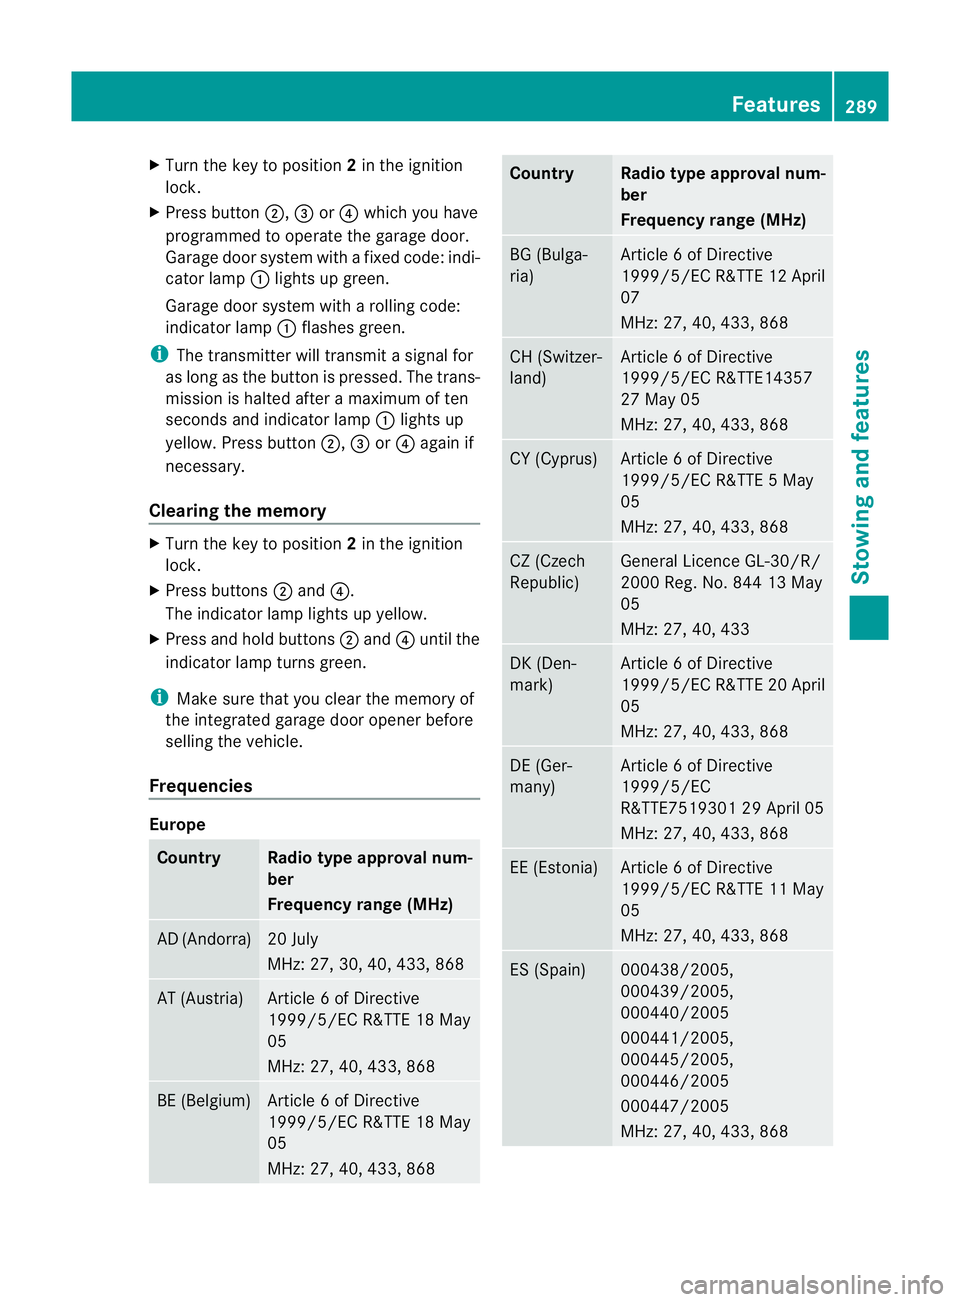
Frequencies Europe
Country Radio typea
pproval num-
ber
Frequency range (MHz) AD (Andorra) 20 July
MHz: 27, 30, 40, 433, 868
AT (Austria) Article
6ofDirective
1999/5/EC R&TTE 18 May
05
MHz: 27, 40, 433, 868 BE (Belgium) Article
6ofDirective
1999/5/EC R&TTE 18 May
05
MHz: 27, 40, 433, 868 Country Radio typea
pproval num-
ber
Frequency range (MHz) BG (Bulga-
ria) Article
6ofDirective
1999/5/EC R&TTE 12 April
07
MHz: 27, 40, 433, 868 CH (Switzer-
land) Article
6ofDirective
1999/5/EC R&TTE14357
27 May 05
MHz: 27, 40, 433, 868 CY (Cyprus) Article
6ofDirective
1999/5/EC R&TTE 5May
05
MHz: 27, 40, 433, 868 CZ (Czech
Republic) General Licenc
eGL-30/R/
2000 Reg. No. 844 13 May
05
MHz: 27, 40, 433 DK (Den-
mark) Article
6ofDirective
1999/5/EC R&TTE 20 April
05
MHz: 27, 40, 433, 868 DE (Ger-
many) Article
6ofDirective
1999/5/EC
R&TTE751930129A pril 05
MHz: 27, 40, 433, 868 EE (Estonia) Article
6ofDirective
1999/5/EC R&TTE 11 May
05
MHz: 27, 40, 433, 868 ES (Spain) 000438/2005,
000439/2005,
000440/2005
000441/2005,
000445/2005,
000446/2005
000447/2005
MHz: 27, 40, 433, 868 Features
289Stowing and features Z