2012 MERCEDES-BENZ CLS COUPE instrument panel
[x] Cancel search: instrument panelPage 10 of 373

Centre console
Lower section .................................. 35
Lowe rsection (AMG vehicles) ..........36
Uppe rsection .................................. 34
Changing bulbs
Important safety notes ..................119
Overview of bul btypes .................. 120
Reversing lamps ............................ 120
Child-proof locks
Important safety notes ....................61
Rea rdoors ....................................... 62
Children
In the vehicle ................................... 52
Restraint systems ............................ 52
Child seat
Automatic recognition .....................54
ISOFIX .............................................. 56
On the front-passenger sea t............ 54
Problem (malfunction) .....................58
Recommendations ...........................60
Suitable positions ............................ 58
Top Tether ....................................... 57
Cigarette lighter ................................ 283
Cleaning Mirro rturn signal ........................... 304
Climate control
Auxiliary heating/ventilatio n.......... 132
Controlling automatically ...............128
Convenience opening/closing
(air-recirculatio nmode) ................. 131
Cooling with aird ehumidification..127
Demisting the windows .................. 130
Demisting the windscree n............. 130
Important safety notes ..................124
Indicator lamp ................................ 128
Information on using
THERMOTRONIC automatic cli-
mate control .................................. 127
Notes on using THERMATI Cauto-
matic climate control .....................125
Overview of systems ......................124
Problems with cooling with air
dehumidification ............................ 128
Problem with the rear window
heating .......................................... 131
Rea rcontrol panel ......................... 126
Setting the aird istribution.............129
Setting the airflow .........................129Setting the airv
ents...................... 136
Setting the climate mode (AIR
FLOW) ............................................ 128
Setting the temperature ................128
Switching air-recirculation mode
on/off ............................................ 131
Switching on/off ........................... 127
Switching residua lheato n/off ......132
Switching the rear window heat-
ing on/off ...................................... 131
Switching the ZONE function on/
off .................................................. 130
THERMATI Cautomatic climate
control (2-zone) ............................. 125
THERMOTRONIC (3-zone) auto-
matic climate control .....................126
Cockpit
Overview .......................................... 28
see Instrument cluster
Collapsibl eemergency spare
wheel see Emergency spare wheel
COMAND display
Cleaning ......................................... 305
COMAND Online
see separate operating instructions
Combination switch ..........................113
Consumptio nstatistic s(on -board
computer) .......................................... 213
Convenience box ............................... 277
Convenience closing feature ..............89
Convenience opening/closing (air-
recirculation mode) ........................... 131
Convenience opening feature ............89
Coolan t(engine)
Checkin gthe level ......................... 299
Display message ............................ 240
Important safety notes ..................365
Temperature (on-board computer) .228
Temperature gauge ........................ 210
Warning lamp ................................. 267
Cooling
see Climate control
Cornerin glight function
Display message ............................ 237
Function/notes ............................. 115
Crash-responsive emergency light-
ing ....................................................... 119 Index
7
Page 17 of 373

Mirror
see Vanity mirror (in sun visor)
Mirrors
see Exterior mirrors
see Rear-view mirror
Mobile phone
Frequencies ................................... 357
Installatio n..................................... 357
Menu (on-board computer) ............217
Notes/placing in the bracket ......... 284
Sliding adapter ............................... 286
Transmission output (maximum ).... 357
Modifying the programming (key) .....78
MOExtende dtyres ............................ .313
Motorway mode ................................ 115
MP3 Operating ...................................... .216
see Separate operating instructions
Multifunctio ndisplay
Function/notes ............................. 211
Permanent displa y......................... 221
Multifunctio nsteering wheel
Operating the on-board computer .210
Overview .......................................... 33N
Navigation Menu (on-board computer) ............214
NECK-PRO head restraints
Operation ........................................ .46
Resettin gafter bein gtriggered ........47
NECK-PRO luxury head restraints
Operation ........................................ .46
Resettin gafter bein gtriggered ........47
Night View Assist Plus
Activating/deactivating .................195
Cleaning ......................................... 305
Function/notes ............................. 194
Problem (fault) ............................... 197
Notes on runnin ginanew vehicle ..140 O
Occupant safety Childre ninthe vehicle ..................... 52
Important safety notes ....................40
Odometer
see Total distance recorder
see Trip meter
Oil
see Engine oil
On-board computer
AMG menu ..................................... 228
Assistance menu ........................... 218
Audi omenu ................................... 215
Convenience submenu ..................226
Displaying aservice message ........300
Display messages ..........................231
DISTRONI CPLUS ........................... 176
Factory setting submenu ...............227
Heating submenu ........................... 225
Important safety notes ..................208
Instrument cluster submenu ..........221
Ligh tsubmenu ............................... 222
Menu overview .............................. 212
Message memory .......................... 231
Navigation menu ............................ 214
Operating the TV ............................ 216
Operating vide oDVD ..................... 216
Operation ....................................... 210
RACETIMER ................................... 228
Service menu ................................. 220
Settings menu ............................... 221
Standard displa y............................ 212
Telephone menu ............................ 217
Trip menu ...................................... 212
Vehicle submenu ........................... 224
Operatin gsystem
see On-board computer
Outside temperature display ...........210
Overhead control panel ......................37
Override feature Rea rside windows ........................... 62 P
Pain tcode .......................................... 359
Paintwork (cleaning instructions) ...303
Pani calarm .......................................... 4014
Index
Page 120 of 373

The system automatically adapts the dipped-
beam headlamp range depending on the dis-
tancetot he other vehicle. Oncet he system
no longer detect sany other vehicles, it reac-
tivates the main-beam headlamps.
The system's optical sensor is located behind
the windscreen near the overhead control
panel.
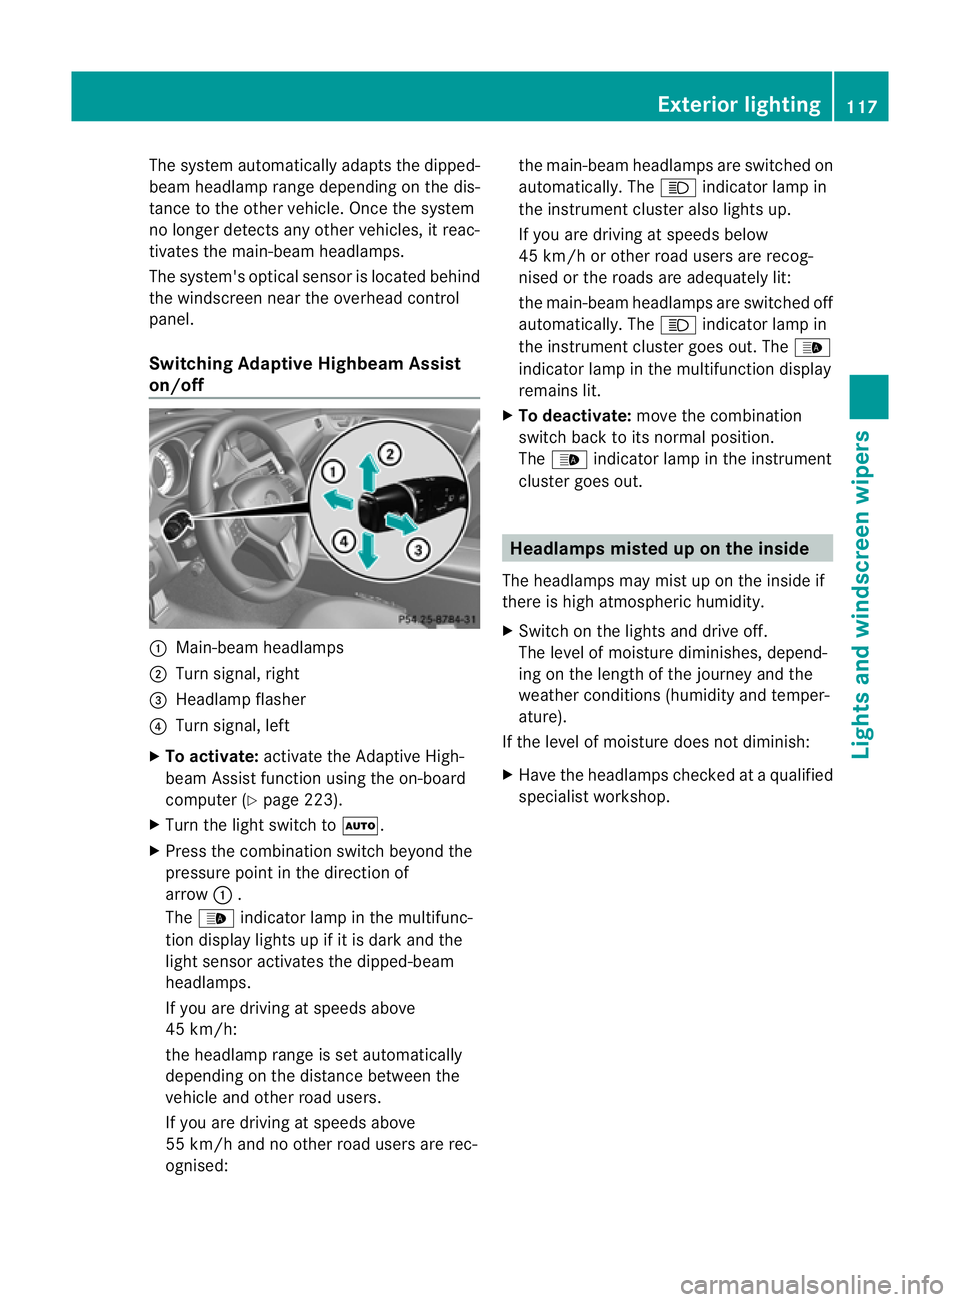
Switching Adaptive Highbeam Assist
on/off :
Main-beam headlamps
; Turn signal, right
= Headlamp flasher
? Turn signal, left
X To activate: activatethe Adaptive High-
beam Assist function using the on-board
computer (Y page 223).
X Turn the light switch to Ã.
X Press the combination switch beyond the
pressure point in the direction of
arrow :.
The _ indicator lamp in the multifunc-
tion display lights up if it is dark and the
light sensor activates the dipped-beam
headlamps.
If you are driving at speeds above
45 km/h:
the headlamp range is set automatically
depending on the distanc ebetween the
vehicle and other road users.
If you are driving at speeds above
55 km/ha nd no other road users are rec-
ognised: the main-beam headlamps are switched on
automatically. The
Kindicator lamp in
the instrument cluster also lights up.
If you are driving at speeds below
45 km/ho rother road users are recog-
nised or the roads are adequately lit:
the main-beam headlamps are switched off
automatically. The Kindicator lamp in
the instrument cluster goes out. The _
indicator lamp in the multifunction display
remains lit.
X To deactivate: move the combination
switch back to its normal position.
The _ indicator lamp in the instrument
cluster goes out. Headlamps misted up on the inside
The headlamps may mist up on the inside if
there is high atmospheric humidity.
X Switc hont he lights and drive off.
The level of moisture diminishes, depend-
ing on the length of the journey and the
weather conditions (humidity and temper-
ature).
If the level of moisture does not diminish:
X Have the headlamps checked at aqualified
specialist workshop. Exterior lighting
117Lights and windscreen wipers Z
Page 160 of 373

Refuelling
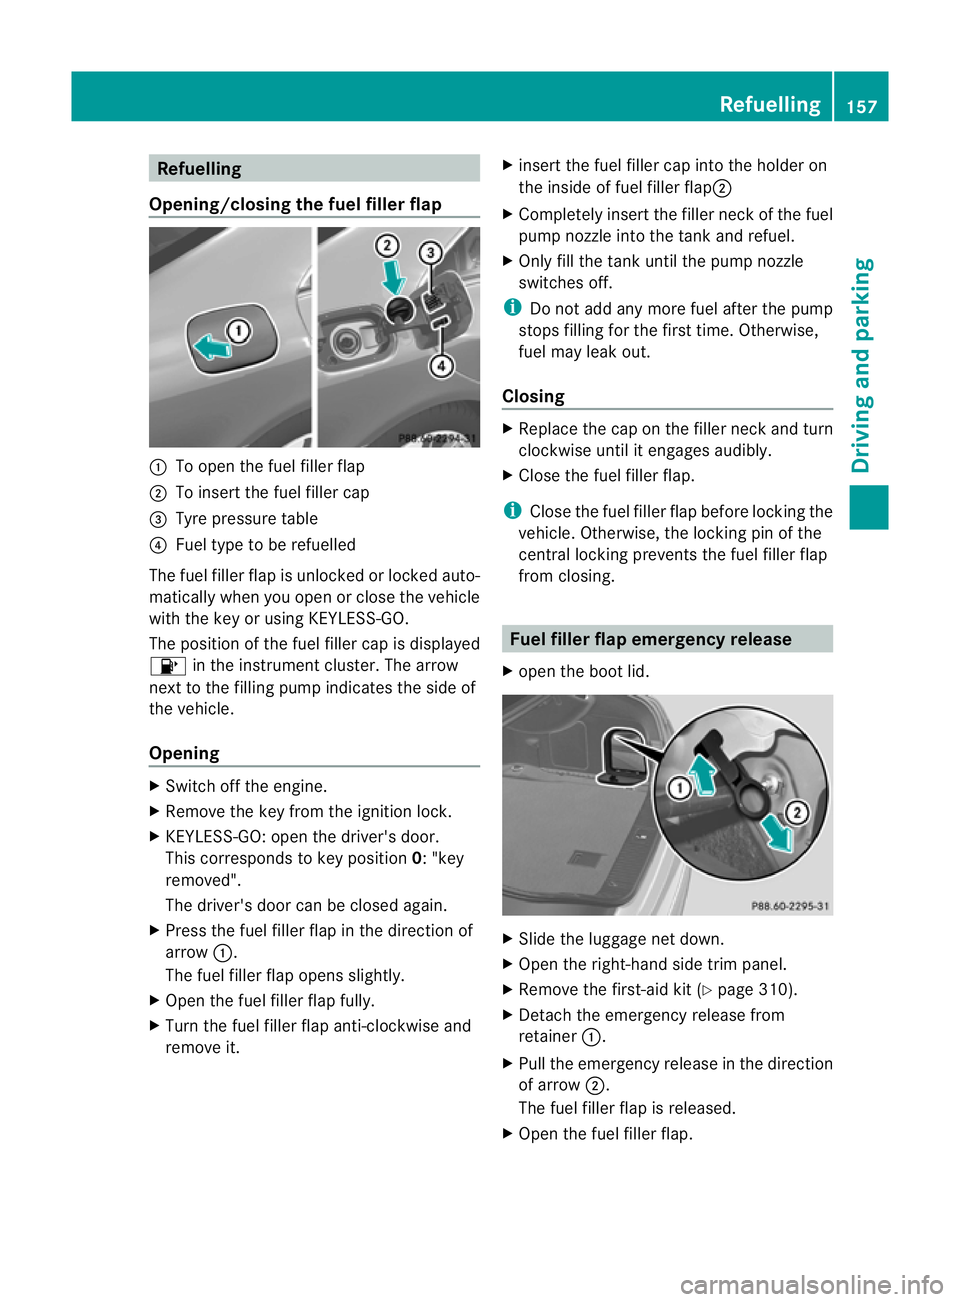
Opening/closing the fue lfille rflap :
To open the fuel filler flap
; To inser tthe fuel filler cap
= Tyre pressure table
? Fuel type to be refuelled
The fuel filler flap is unlocked or locked auto-
matically when you open or close the vehicle
with the key or using KEYLESS-GO.
The position of the fuel filler cap is displayed
8 in the instrumentc luster. The arrow
next to the filling pump indicates the side of
the vehicle.
Opening X
Switch off the engine.
X Remove the key from the ignition lock.
X KEYLESS-GO: open the driver's door.
This corresponds to key position 0:"key
removed".
The driver's door can be closed again.
X Press the fuel filler flap in the direction of
arrow :.
The fuel filler flap opens slightly.
X Open the fuel filler flap fully.
X Turn the fuel filler flap anti-clockwise and
remove it. X
insert the fuel filler cap into the holder on
the inside of fuel filler flap ;
X Completely insert the filler neck of the fuel
pump nozzle into the tank and refuel.
X Only fill the tank until the pump nozzle
switches off.
i Do not add any more fuel after the pump
stops filling for the first time. Otherwise,
fuel may leak out.
Closing X
Replace the cap on the filler neck and turn
clockwise until it engages audibly.
X Close the fuel filler flap.
i Close the fuel filler flap before locking the
vehicle. Otherwise, the locking pin of the
central locking prevents the fuel filler flap
from closing. Fuel filler flap emergency release
X open the boot lid. X
Slide the luggage net down.
X Open the right-hand side trim panel.
X Remove the first-aid kit (Y page 310).
X Detach the emergency release from
retainer :.
X Pull the emergency release in the direction
of arrow ;.
The fuel filler flap is released.
X Open the fuel filler flap. Refuelling
157Driving and parking Z
Page 213 of 373

?
Coolan ttemperature (Y page 210)
A Fuel gauge Coolant temperature gauge
The coolant temperature gauge is in the
instrument cluster on the left-hand side
(Y page 30).
Under normal operatin gconditions and with
the specified coolant level, the coolant tem-
perature may rise to 120 †.
At high outside temperatures and when driv-
ing uphill, the coolant temperature may rise
to the end of the scale. Rev counter
! Do not drive in the overrevving range.
Doin gsow ill damage the engine.
The red band in the rev counter indicates the
engine's overrevving range.
The fuel supply is interrupted to protec tthe
engine when the red band is reached. Outside temperature display
G
WARNING
At temperatures just above freezing point, the
street may be icy, especially in wooded areas
or on bridges. If you do not adapt your driving
style to the conditions, the vehicle could skid.
For this reason, adapt your driving style and
speed to the weather conditions.
The outside temperature displayisint he mul-
tifunction display( Ypage 211).
Changes in the outside temperature are dis-
played after ashort delay. Speedometer with segments
The segments in the speedometer indicate
which speed range is available.
R Cruise control activated (Y page 165):The segments light up from the stored
speed to the maximum speed.
R VariableS PEEDTRONIC activated
(Y page 168):
The segments light up from the start of the
scale to the selected limit speed.
R DISTRONIC PLUS activated (Y page 170):
One or two segments in the set speed
range light up.
R DISTRONIC PLUS detects avehicle in front:
The segments between the speed of the
vehicle in fron tand the stored speed light
up. Operatin
gthe on-board computer
Overview :
Multifunctio ndisplay
; Right control panel
= To switc honLINGUATRONIC; see the sep-
arate operating instructions
? Bac kbutton
A Left control panel 210
Display
sand operationOn-board computer and displays