2012 MERCEDES-BENZ CLS COUPE dimensions
[x] Cancel search: dimensionsPage 9 of 373
Bel
ttensioner
Activatio n......................................... 41
Functi on........................................... 51
Blin dSpot Assist
Activating/deactivating .................220
Display message ............................ 246
Notes/function .............................. 197
see Active Blind Spot Assist
Bluetooth ®
SAP V3 telephone mod-
ule see Separate operating instructions
Bonnet
Closing .......................................... .297
Display message ............................ 255
Opening ......................................... 296
Boot
Emergency release ..........................87
Important safety notes ....................85
Opening/closing (automatically
from inside) ...................................... 87
Opening/closing (automatically
from outside) ................................... 86
Opening/closing (manually from
outside) ............................................ 85
Boot lid
Display message ............................ 254
Opening/closing .............................. 85
Opening dimensions ......................366
Boot load (maximum) ........................ 366
Bottle holders .................................... 281
Box (boot) .......................................... .277
Brake Assist System see BAS (Brake Assist System)
Brake fluid
Display message ............................ 234
Notes ............................................. 365
Brake lamps
Adaptive .......................................... .65
Display message ............................ 238
Brakes
ABS .................................................. 63
BAS .................................................. 63
BAS PLUS ........................................ 64
Brake fluid (notes) .........................365
Display message ............................ 232
Driving tips .................................... 162
High-performance brake system ....163 Important safety notes
..................162
Parking brake ................................ 160
Warning lamp ................................. 260
Breakdown
see Flat tyre
see Towing away
Bulbs
see Changing bulbs C
Calling up afault
see Display messages
Car
see Vehicle
Care
Automatic car wash .......................301
Carpets .......................................... 307
Display ........................................... 305
Exterior lighting ............................. 304
Gea rors electo rlever .................... 306
High-pressure cleaner .................... 302
Interior ........................................... 305
Matt paintwork .............................. 303
Nigh tView Assist Plus ...................305
Notes ............................................. 301
Paint .............................................. 303
Plastic trim .................................... 306
Reversing camera ..........................305
Roo flining ...................................... 307
Seat bel t........................................ 307
Seat cover ..................................... 306
Sensors ......................................... 304
Steering wheel ............................... 306
Tai lpipes ....................................... 305
Trim pieces .................................... 306
Washing by hand ........................... 302
Wheels ........................................... 303
Windows ........................................ 304
Wiper blades .................................. 304
Wooden trim .................................. 306
Car wash (care) ................................. 301
CD player/CD changer(on-board
computer) .......................................... 216
Central locking Automatic locking (on-board com-
puter) ............................................. 225
Locking/unlocking (key ).................. 77 6
Index
Page 22 of 373
Type identificatio
nplate
see Vehicl eide ntificatio nplate
Tyr epressure
Calling up (on-board computer )..... 334
Display message ............................ 250
Not reached (TIREFIT) ....................315
Reached (TIREFIT) ..........................315
Recommended ............................... 331
Tyre pressure los swarning
Important safety notes ..................332
Restarting ...................................... 333
Tyre pressure monitor
Checking the tyre pressure elec-
tronically ........................................ 334
Function/notes ............................. 334
Restarting ...................................... 335
Warning lamp ................................. 270
Warning message .......................... 335
Tyres
Changing awheel .......................... 336
Checking ........................................ 329
Directio nofrotation ...................... 336
Display message ............................ 250
Important safety notes ..................328
MOExtended tyres .........................330
Replacing ....................................... 336
Service life ..................................... 329
Storing ........................................... 337
Tyr esize (data) .............................. 341
Tyr etread ...................................... 329
see Flat tyre U
Unladen weight ................................. 366
Unlocking Emergency unlocking .......................84
From insid ethe vehicle (central
unlocking button) ............................. 83 V
Vanity mirror (in sun visor) ..............281
Variable SPEEDTRONIC see SPEEDTRONIC
Vehicle
Correct use ...................................... 24
Data acquisition ............................... 24Display message
............................ 254
Electronics ..................................... 357
Equipment ....................................... 22
Implied warranty .............................. 24
Individua lsettings .......................... 221
Leaving parked up .........................161
Locking (in an emergency) ...............84
Locking (key )................................... 77
Lowering ........................................ 340
Pulling away ................................... 143
Raising ........................................... 338
Registration ..................................... 24
Securing from rolling away ............337
Towing away .................................. 320
Transporting .................................. 323
Unlocking (in an emergency) ...........84
Unlocking (key )................................ 77
Vehicle data ................................... 366
Vehicle data ....................................... 366
Vehicle dimensions ...........................366
Vehicle emergency locking ................84
Vehicle identification number see VIN
Vehicle identification plate ..............359
Vehicle level AIRMATIC ...................................... 181
AMG RIDE CONTROL sports sus-
pension .......................................... 183
Vehicle level (display message) .......243
Vehicle tool kit .................................. 311
Vehicle weights ................................. 366
Video Operating the DVD ......................... 216
VIN ...................................................... 359 W
Warning and indicator lamps ABS ................................................ 261
Brakes ........................................... 260
Distance warning signa l................. 269
ESP ®
.............................................. 263
ESP ®
OFF ....................................... 264
LIM (cruise control) ........................ 165
LIM (DISTRONIC PLUS) ..................172
LIM (variable SPEEDTRONIC )......... 168
Overview .................................. 32, 258
PASSENGER AIRBAG OFF ................54 Index
19
Page 88 of 373
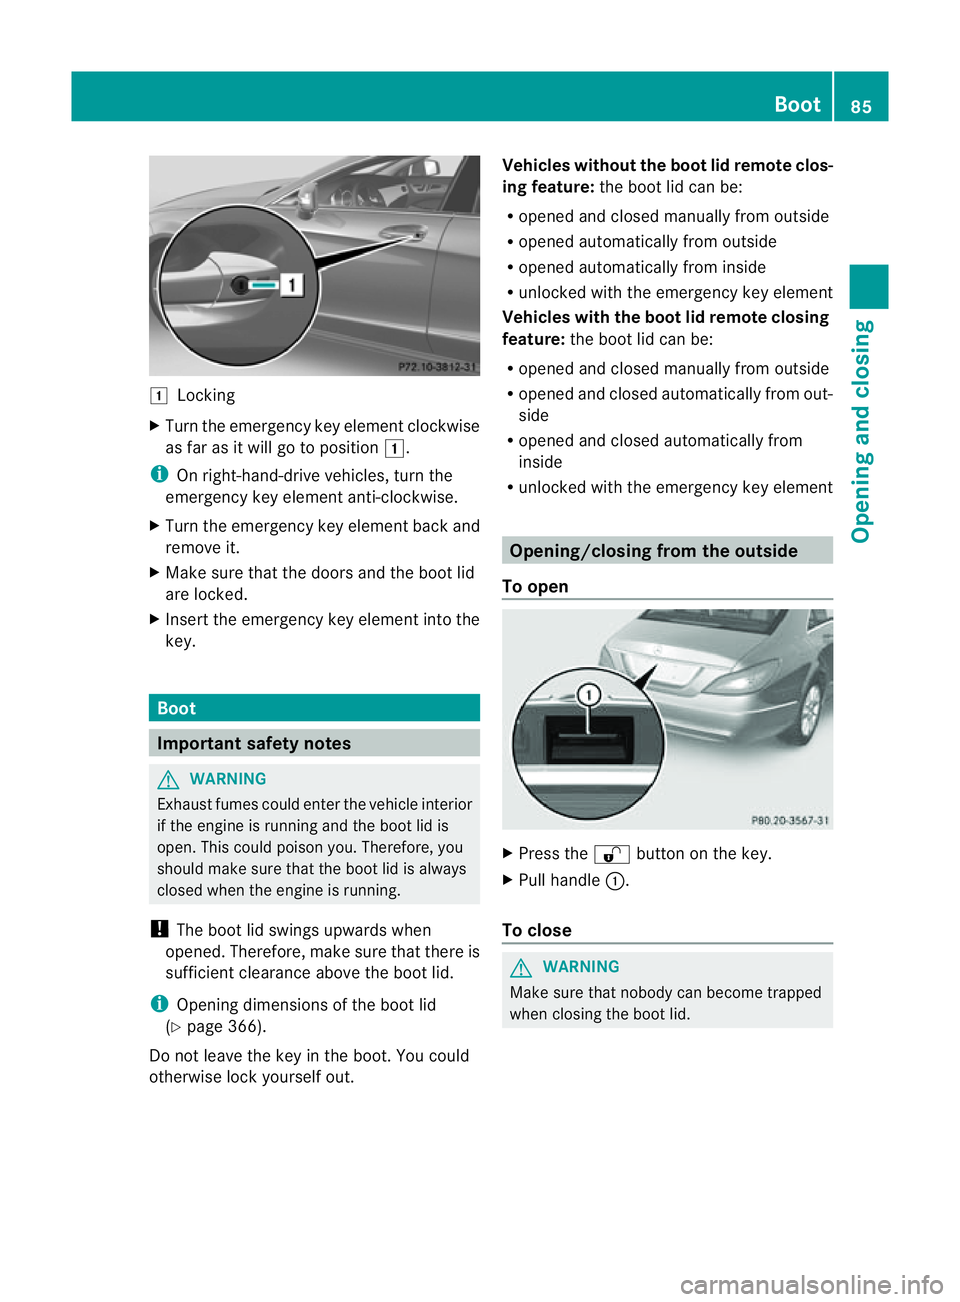
1
Locking
X Turn the emergency key element clockwise
as far as it willgotop osition1.
i On right-hand-drive vehicles, turn the
emergency key element anti-clockwise.
X Turn the emergency key element back and
remove it.
X Make sure that the doors and the boot lid
are locked.
X Insert the emergency key element into the
key. Boot
Important safety notes
G
WARNING
Exhaust fumes could enter the vehicle interior
if the engine is running and the boot lid is
open. This could poiso nyou. Therefore, you
should make sure that the boot lid is always
closed when the engine is running.
! The boot lid swings upwards when
opened. Therefore, make sure that there is
sufficient clearance above the boot lid.
i Opening dimensions of the boot lid
(Y page 366).
Do not leave the key in the boot. You could
otherwise lock yourself out. Vehicles without the boot lid remotec
los-
ing feature: the boot lid can be:
R opened and closed manually from outside
R opened automatically from outside
R opened automatically from inside
R unlocked with the emergenc ykey element
Vehicles with the boot lid remote closing
feature: the boot lid can be:
R opened and closed manually from outside
R opened and closed automatically from out-
side
R opened and closed automatically from
inside
R unlocked with the emergency key element Opening/closing from the outside
To open X
Press the %button on the key.
X Pull handle :.
To close G
WARNING
Make sure that nobody can become trapped
when closing the boot lid. Boot
85Opening and closing Z
Page 89 of 373
X
Pull the boot lid down using recess :.
X If necessary, lock the vehicle with
the & button on the key (Y page 77) or
with KEYLESS-GO (Y page 77).
i IfaK EYLESS-GO key is detected in the
boot, the boot lid cannot be locked. It then
opens again. Opening/closing automatically from
the outside
Important safety notes G
WARNING
Only for the United Kingdom: if the vehicle
has been locked with the key or with KEY-
LESS-GO, the double lock function is activa-
ted as standard. It is then not possible to open
the doors from inside the vehicle.
Therefore, do not leave any people behind in
the vehicle, particularly children, elderly peo-
ple or people requiring special assistance. As
ar esult, they may not be able to free them-
selves in the event of an emergency. They
could be seriously or even fatally injured by
prolonged exposure to extremely high or low
temperatures, for example. In this case, res-
cuing people from outside the vehicle is diffi-
cult.
Deactivate the interior motion sensor before
you lock the vehicle. The doors can then be
opened from the inside after the vehicle has
been locked from the outside. G
WARNING
Monito rthe boot lid opening and closing pro-
cedures to make sure that nobody can
become trapped. To stop the opening or clos-
ing procedure, press the closing button on the
boot lid again or pull the handle on the outside
of the boot lid.
! The boot lid swings upwards when
opened. Therefore, make sure that there is
sufficient clearance above the boot lid.
i Opening dimensions of the boot lid
(Y page 366).
To open You can open the boot lid automatically using
the key or the handle in the boot lid.
X
Press and hold the Fbutton on the key
until the boot lid opens.
or
X If the boot is unlocked, pull the boot lid
handle and release it again immediately
(Y page 85).
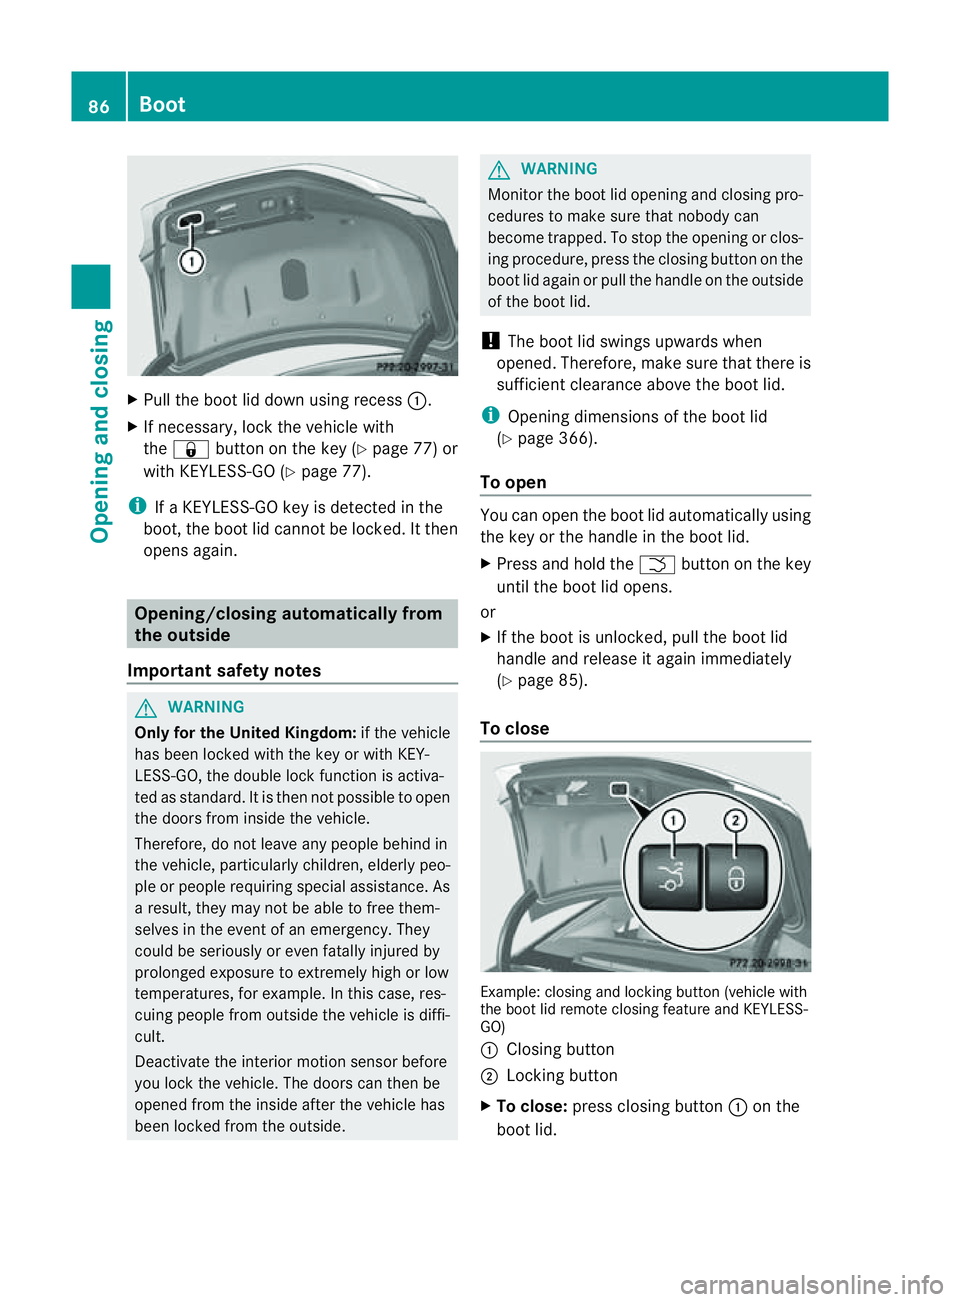
To close Example: closing and locking button (vehicle with
the boot lid remote closing feature and KEYLESS-
GO)
:
Closing button
; Lockingb utton
X To close: press closing button :on the
boot lid. 86
BootOpening and closing
Page 90 of 373
Vehicles with the boot li
dremot eclosing
featur eand KEYLESS-GO: you can simulta-
neously clos eand lock th eboot lid.
X Pres slocking button ;on th eboot lid.
i If you leave aKEYLESS-GO key in the
boot ,the boot lid will not lock. Opening/closing automatically from
th ei nside
Important safety notes G
WARNING
Monito rthe boot lid closing procedure to
make sure that nobody can become trapped.
Release the boot lid remote operating button
to stop the closing procedure.
i Opening dimensions of the boot lid
(Y page 366).
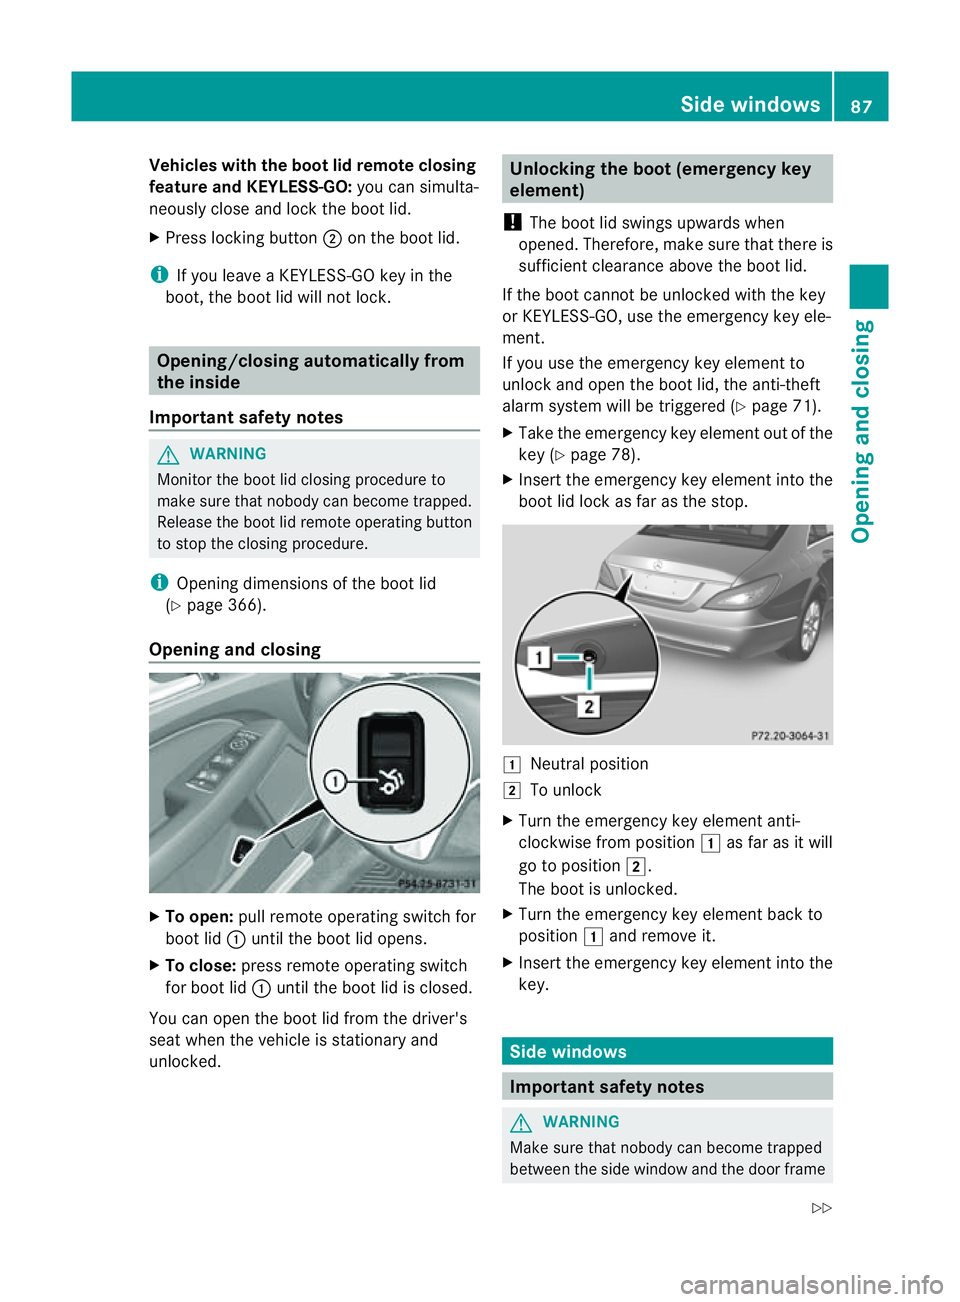
Opening and closing X
To open: pull remote operating switch for
boot lid :until the boot lid opens.
X To close: press remote operating switch
for boot lid :until the boot lid is closed.
You can open the boot lid from the driver's
seat when the vehicle is stationary and
unlocked. Unlocking the boot (emergency key
element)
! The boot lid swings upwards when
opened. Therefore, make sure that there is
sufficient clearance above the boot lid.
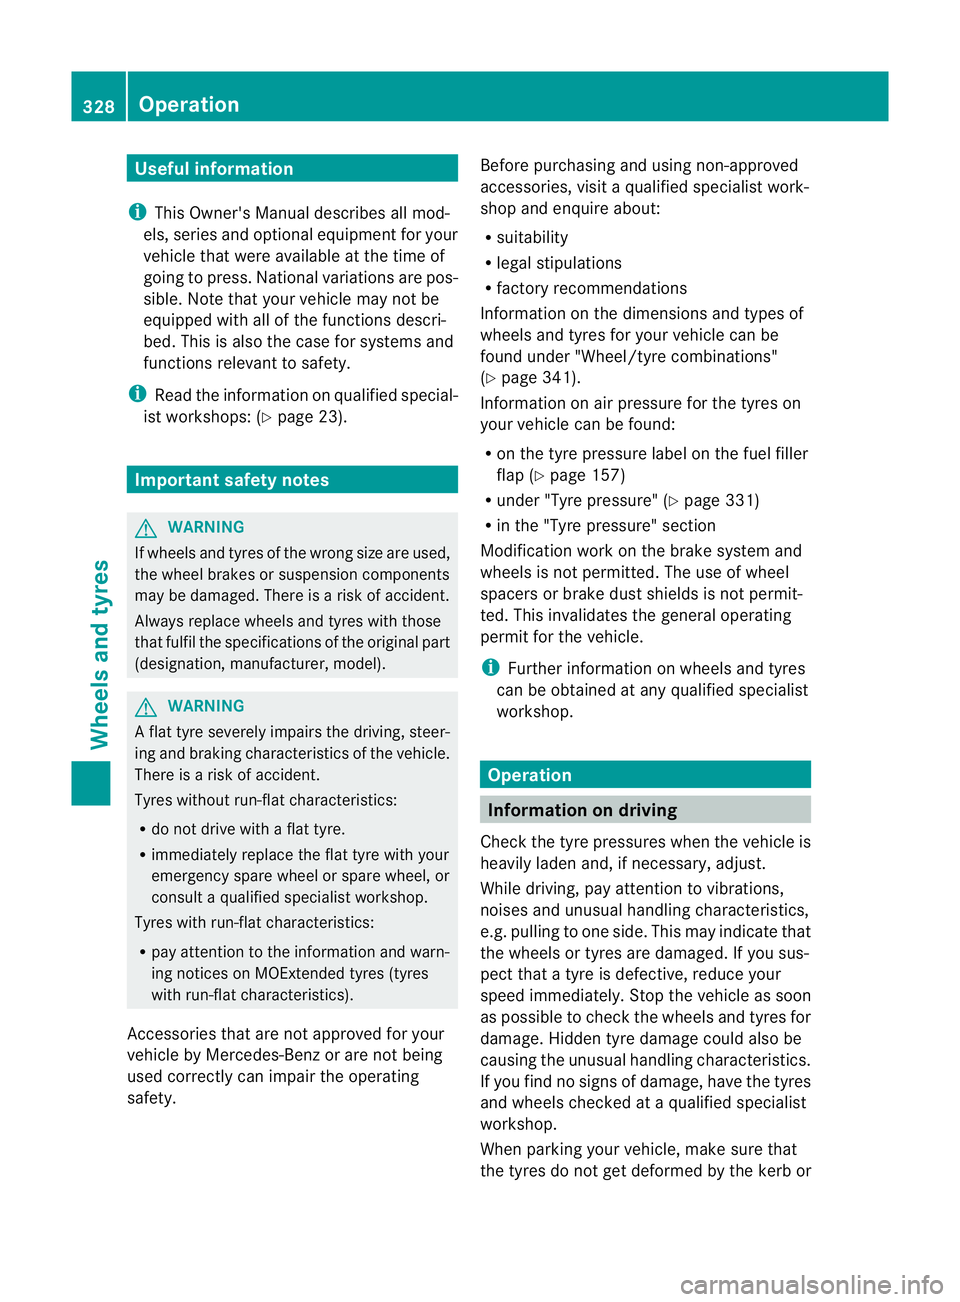
If the boot cannot be unlocked with the key
or KEYLESS-GO, use the emergency key ele-
ment.
If you use the emergency key element to
unlock and open the boot lid, the anti-theft
alarm system will be triggered (Y page 71).
X Take the emergency key element out of the
key (Y page 78).
X Insert the emergency key element into the
boot lid lock as far as the stop. 1
Neutral position
2 To unlock
X Turn the emergency key element anti-
clockwise from position 1as far as it will
go to position 2.
The boot is unlocked.
X Turn the emergency key element back to
position 1and remove it.
X Insert the emergency key element into the
key. Side windows
Important safety notes
G
WARNING
Make sure that nobody can become trapped
between the side window and the door frame Side windows
87Opening and closing
Z
Page 331 of 373
Useful information
i This Owner's Manual describes all mod-
els, series and optional equipment for your
vehicle that were available at the time of
going to press. National variation sare pos-
sible. Not ethat your vehicle may not be
equipped with all of the function sdescri-
bed. This is also the case for system sand
function srelevan ttosafety.
i Read the information on qualified special-
ist workshops: (Y page 23). Important safet
ynotes G
WARNING
If wheels and tyres of the wrong size are used,
the wheel brakes or suspension components
may be damaged. There is arisk of accident.
Always replac ewheels and tyre swith those
that fulfil the specifications of the original part
(designation ,manufacturer, model). G
WARNING
Af lat tyre severely impairs the driving, steer-
ing and braking characteristics of the vehicle.
There is arisk of accident.
Tyres without run-flat characteristics:
R do not drive with aflat tyre.
R immediately replac ethe flat tyre with your
emergenc yspare wheel or spare wheel, or
consult aqualified specialist workshop.
Tyres with run-flat characteristics:
R pay attention to the information and warn-
ing notices on MOExtended tyre s(tyres
with run-flat characteristics).
Accessories that are not approved for your
vehicle by Mercedes-Ben zorare not being
usedc orrectly can impair the operating
safety. Before purchasing and using non-approved
accessories, visit aqualified specialist work-
shop and enquire about:
R suitability
R lega lstipulations
R factory recommendations
Information on the dimensions and types of
wheels and tyres for yourv ehicle can be
found under "Wheel/tyre combinations"
(Y page 341).
Information on air pressure for the tyres on
your vehicle can be found:
R on the tyre pressure label on the fuel filler
flap (Y page 157)
R under "Tyre pressure" (Y page 331)
R in the "Tyre pressure" section
Modification work on the brake system and
wheels is not permitted. The use of wheel
spacers or brake dust shields is not permit-
ted. This invalidates the general operating
permit for the vehicle.
i Further information on wheels and tyres
can be obtained at any qualified specialist
workshop. Operation
Information on driving
Check the tyre pressures when the vehicle is
heavily laden and, if necessary, adjust.
While driving, pay attention to vibrations,
noises and unusual handling characteristics,
e.g. pulling to one side. This may indicat ethat
the wheels or tyres are damaged. If you sus-
pect that atyre is defective, reduce your
speed immediately. Stop the vehicle as soon
as possible to chec kthe wheels and tyres for
damage. Hidden tyre damage could also be
causing the unusual handling characteristics.
If you find no signs of damage, have the tyres
and wheels checked at aqualified specialist
workshop.
When parking your vehicle, make sure that
the tyres do not get deformed by the kerb or 328
OperationWheels and tyres
Page 339 of 373
Country Radio type approval number
Brazil 1489-10-4415
Dubai TRA, Registered NO
0016161/08
TRA, Registered NO
0016162/08
Morocco MR5527 ANRT 2010
/27. April
2010
MR5526 ANRT 2010/ 27. April
2010 Philip-
pines ESD-1105558C
Singa-
pore Compliance with IDA Standard
N0140-09
South
Africa TA-2008/1068
TA-2008/1069
Changing
awheel Flat tyre
You can find information on wha ttodointhe
event of aflat tyre in the "Breakdown assis-
tance" section (Y page 312). You will also find
information on driving with MOExtended
tyres in the event of aflat tyre.
You can find information on what to do in the
event of aflat tyre in the "Breakdown assis-
tance" section (Y page 312). You will also find
information on driving with MOExtended
tyres in the event of aflat tyre. Interchanging the wheels
G
WARNING
Interchangin gthe front and rear wheels may
severely impair the driving characteristics if
the wheels or tyres have different dimensions.
The wheel brakes or suspension components
may also be damaged. There is arisk of acci-
dent. Interchange front and rear wheels only if the
wheels and tyres are of the same dimensions.
! On vehicles fitted with atyre pressure
monitor, electronic components are loca-
ted in the wheel.
Tyre-fitting tools should not be applied in
the area of the valve, as this could damage
the electronic components.
Only have tyres changed at aqualified spe-
cialist workshop.
Interchangin gthe front and rear wheels of
differing dimensions can render the general
operating permit invalid.
Observe the instructions and safety notes in
the "Fittin gawheel" section (Y page 337).
The wear pattern sonthe front and rear tyres
differ, depending on the operating conditions.
Interchange the wheels before aclear wear
pattern has formed on the tyres. Frontt yres
typically wear more on the shoulders and the
rear tyres in the centre.
On vehicles that have the same size front and
rear wheels, you can interchange the wheels
every 5000km to 10,000 km depending on
the degree of tyre wear. Maintain the direc-
tion of tyre rotation.
Clean the contact surfaces of the wheel and
the brake disc thoroughly every time awheel
is interchanged. Check the tyre pressure and,
if necessary, restart the tyre pressure loss
warning system or the tyre pressure monitor. Direction of rotation
Tyres with aspecified direction of rotation
have additional benefits, e.g. if there is arisk
of aquaplaning. You will only gain these ben-
efits if the correc tdirection of rotation is
observed.
An arrow on the sidewal lofthe tyre indicates
its correc tdirection of rotation. 336
Changing
awheelWheels and tyres
Page 354 of 373
Emergency spare wheel
Important safety notes
G
WARNING
The wheel/tyr edimension sand th etyret ype
of th espar ew heel/emergency spar ewheel
and th ewheel to be replaced may differ. Fit-
tin gas parew heel/emergency spar ewheel
may severel yimpair th edriving characteris-
tics. Ther eisarisk of accident.
To prevent hazardous situations:
R Adap tyour driving style accordingly and
drive carefully.
R Never fit more than one spare wheel/emer-
gency spare wheel if the dimesions are dif-
ferent to those of the wheel being replaced.
R Only use aspare wheel/emergency spare
wheel briefly if the dimesions are different
to those of the wheel being replaced.
R Do not switch off ESP ®
.
R Have the spare wheel/emergency spare
wheel in question replaced at the nearest
qualified specialist workshop. Make sure
that the wheel/tyre dimensions and tyre
type are correct.
When using an emergenc yspare wheel or
spare wheel of adifferent size, you must not
exceed the maximum speed of 80 km/h.
Snow chains must not be fitted to emergency
spare wheels. General notes
You should regularly check the pressure of all
your tyres, including the emergenc yspare
wheel, particularly prior to long trips, and cor-
rect the pressure as necessary (Y page 331).
The applicabl evalue is found on the wheel or
under "Technical data" (Y page 354).
An emergenc yspare wheel may also be fitted
against the direction of rotation .Observe the
time restriction on use as well as the speed
limitation specified on the emergency spare
wheel. Replace the tyres after six years at the latest,
regardless of wear. This also applies to the
emergency spare wheel.
i
When you are drivin gwith the collapsible
emergency spare wheel fitted, the tyre
pressure loss warning system or the tyre
pressure monitor cannot function reliably.
Only restart the tyre pressure loss warning
system/tyre pressure monitor when the
defective wheel has been replaced with a
new wheel.
Vehicles with tyr epressure monitor:
after mounting an emergency spare wheel,
the system may still display the tyre pres-
sure of the removed wheel for afew
minutes. The value displayed for the moun-
ted emergency spare wheel is not the same
as the curren ttyre pressure of the emer-
genc yspare wheel. Removing the "Minispare" emer-
gency spar
ewheel/collapsible emer-
gency spar ewheel
Removing the "Minispare" emergency
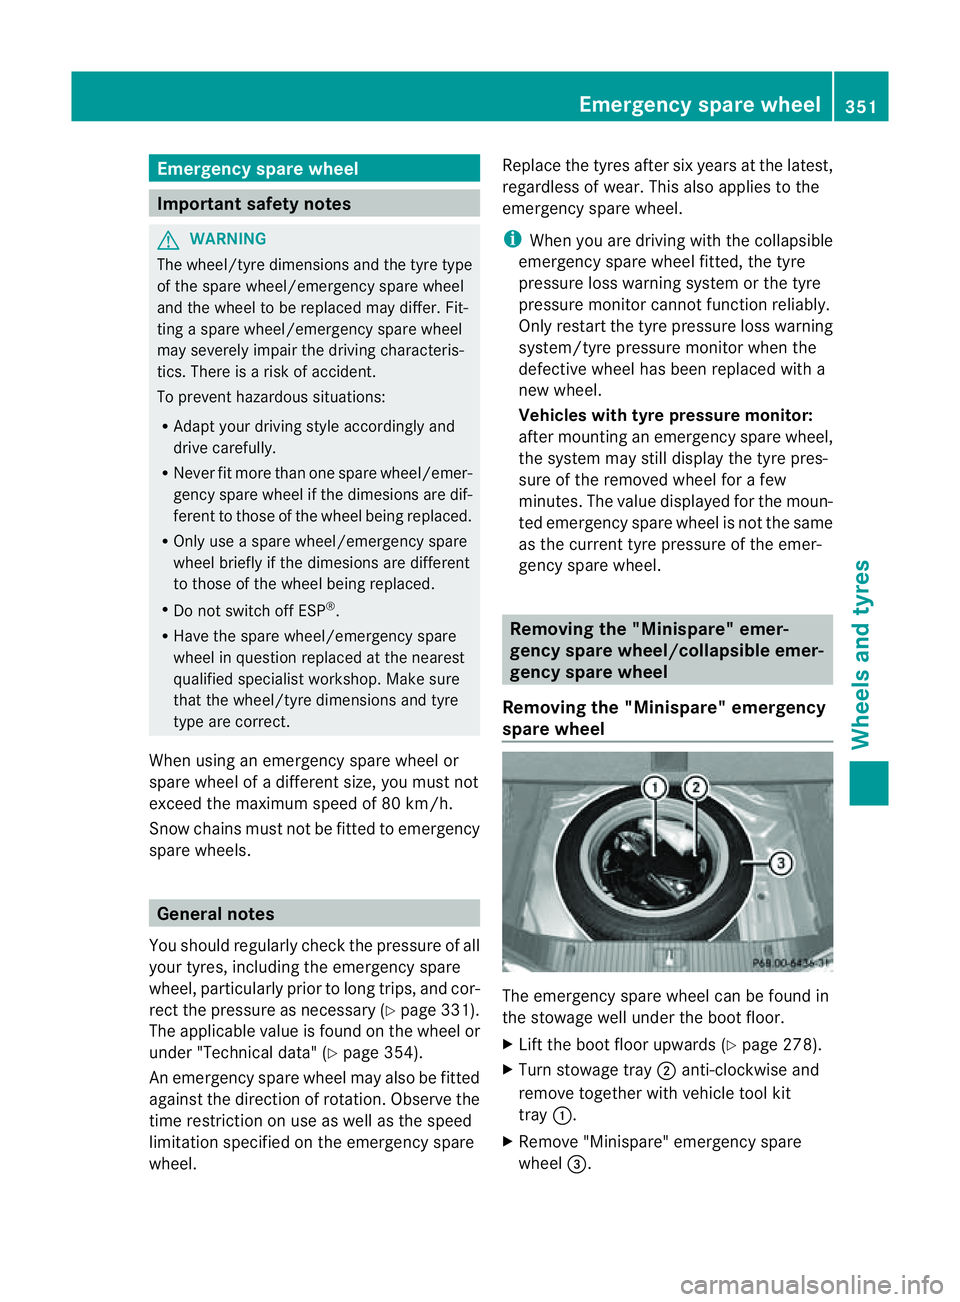
spar ewheel The emergency spare wheel can be found in
the stowage well under the boot floor.
X Lift the boot floor upwards (Y page 278).
X Turn stowage tray ;anti-clockwise and
remov etogether with vehicle tool kit
tray :.
X Remove "Minispare" emergency spare
wheel =. Emergency spare wheel
351Wheels and tyres Z