2012 MERCEDES-BENZ CLS COUPE set clock
[x] Cancel search: set clockPage 87 of 373
Automati
clocking feature X
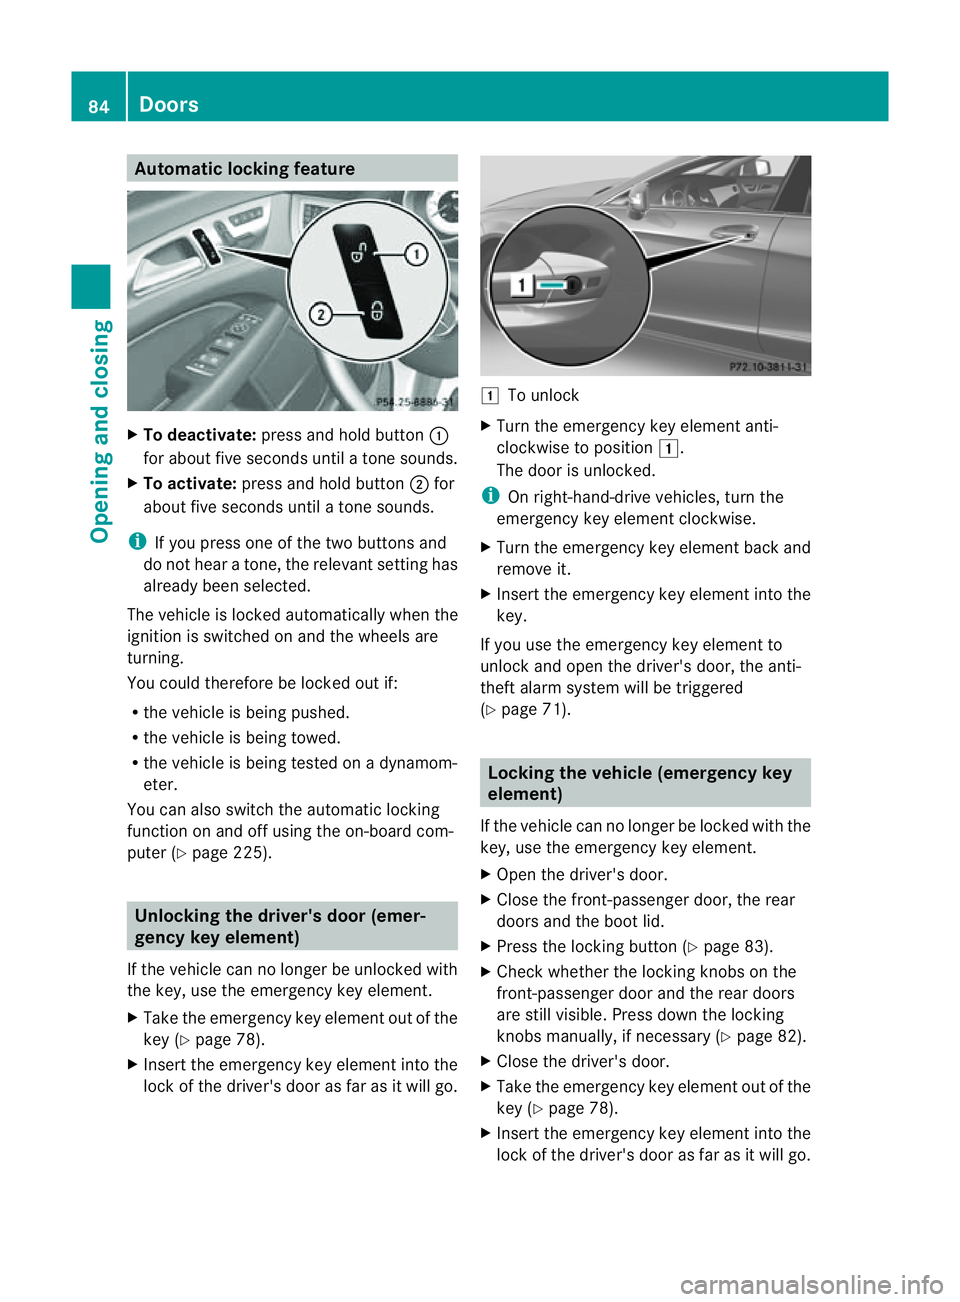
To deactivate: press and hold button :
for about fiv eseconds until atones ounds.
X To activate: press and hold button ;for
about fiv eseconds until atones ounds.
i If you press on eofthe tw obuttons and
do not hear aton e, th erelevant settin ghas
already been selected.
The vehicle is locked automatically when the
ignitio nisswitched on and the wheels are
turning.
You could therefore be locked out if:
R the vehicle is being pushed.
R the vehicle is being towed.
R the vehicle is being tested on adynamom-
eter.
You can also switch the automatic locking
function on and off using the on-board com-
puter (Y page 225). Unlocking the driver's door (emer-
gencyk
ey element)
If th evehicle can no longer be unlocked with
th ek ey, use th eemergency key element.
X Take th eemergency key element out of the
key (Y page 78).
X Inser tthe emergency key element into the
lock of the driver's door as far as it will go. 1
To unlock
X Turn the emergency key element anti-
clockwise to position 1.
The door is unlocked.
i On right-hand-drive vehicles, turn the
emergency key element clockwise.
X Turn the emergency key element back and
remove it.
X Insert the emergency key element into the
key.
If you use the emergency key element to
unlock and open the driver's door, the anti-
theft alarm system will be triggered
(Y page 71). Locking the vehicle (emergency key
element)
If the vehicle can no longer be locked with the
key, use the emergency key element.
X Open the driver's door.
X Close the front-passenger door, the rear
doors and the boot lid.
X Press the locking button (Y page 83).
X Check whether the locking knobs on the
front-passenger door and the rear doors
are still visible. Press down the locking
knobs manually,ifn ecessary (Ypage 82).
X Close the driver's door.
X Take the emergency key element out of the
key (Y page 78).
X Insert the emergency key element into the
lock of the driver's door as far as it will go. 84
DoorsOpening and closing
Page 123 of 373
change them. Otherwise, yo
ucould be burned
if yo utouch them.
Kee pbulbs outoft he reach of children. Oth-
erwise, they could damage the bulbs, for
example, and injure themselves.
Never use abulb which has been dropped.
Such abulb may break or even explode and
injure you.
Halogen bulbs are pressurised and can
explode when you change them, particularly
if they are very hot. You should therefore wear
eye protection and gloves when you are
changing them.
There are bulbs other than xenon and LED
bulbs that you cannot replace. Replace only
the bulbs listed (Y page 120). Have the bulbs
that you cannot replace yourself changed at
aq ualified specialist workshop.
If you require assistance changing bulbs, con-
sult aqualified specialist workshop.
Do not touch the glass tube of new bulbs with
your bare hands. Even minor contamination
can burn into the glass surface and reduce
the service life of the bulbs. Always use alint-
free cloth or only touch the base of the bulb
when fitting.
Only use bulbs of the correct type.
If the new bulb still does not light up, consult
aq ualified specialist workshop.
Bulbs and lamps are an important aspect of
vehicle safety. You must therefore make sure
that these function correctly at all times.
Have the headlamp settingc hecked regularly.Overview of bulb replacement
–bulbs
You can replace the following bulbs. The
details for the bul btype can be found in the
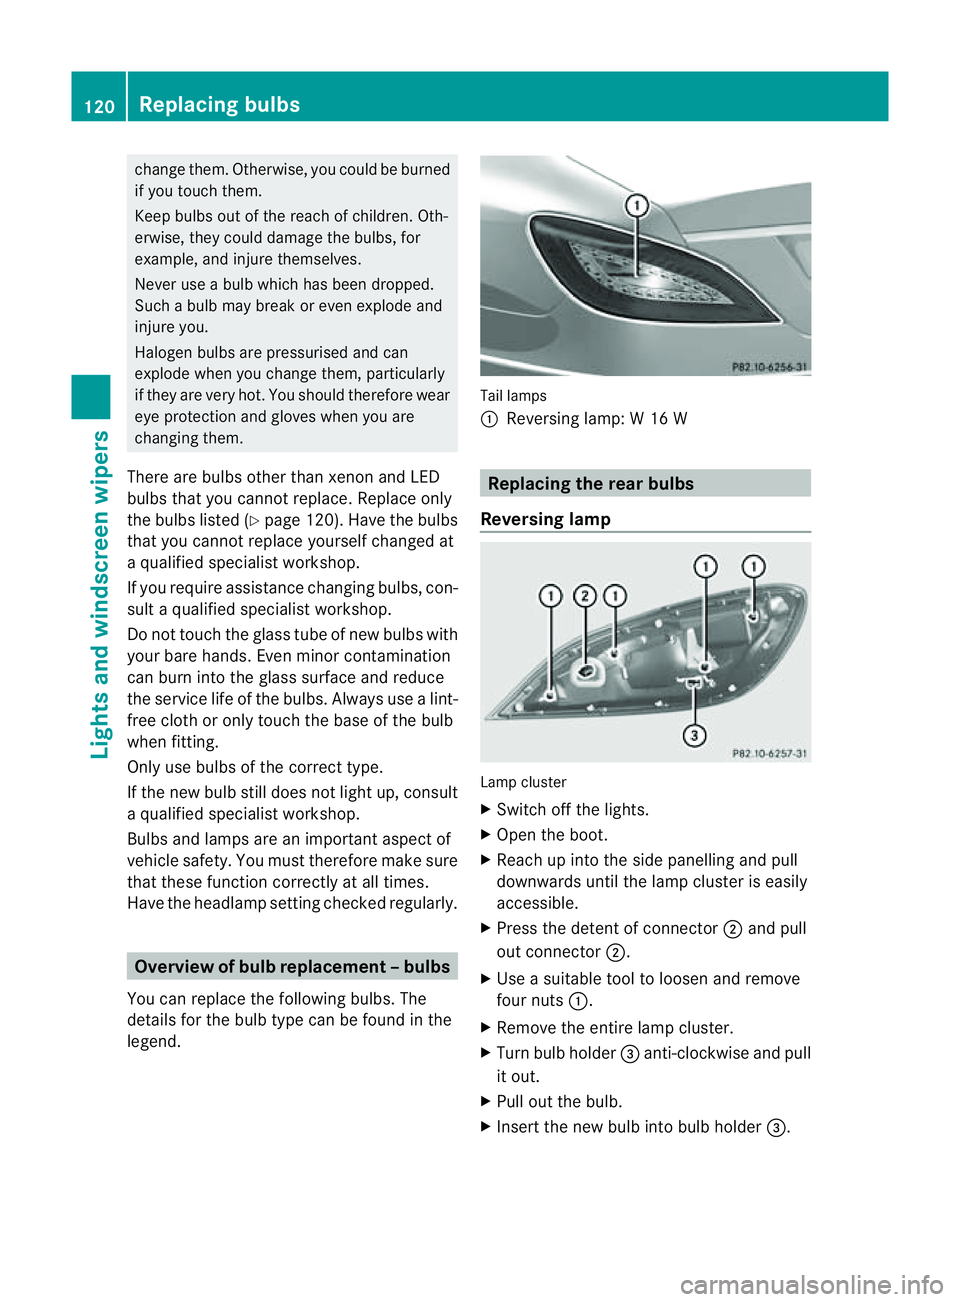
legend. Tai
llamps
: Reversing lamp: W16W Replacing the rear bulbs
Reversing lamp Lamp cluster
X
Switch off the lights.
X Open the boot.
X Reach up into the side panelling and pull
downward suntil the lamp cluster is easily
accessib le.
X Press the detent of connector ;and pull
out connector ;.
X Use asuitabl etool to loosen and remove
four nuts :.
X Remove the entire lamp cluster.
X Turn bul bholder =anti-clockwise and pull
it out.
X Pul lout the bulb.
X Insert the new bul binto bul bholder =. 120
Replacing bulbsLights and windscreen wipers
Page 124 of 373
X
Insert bulbh older=into the lamp and turn
it clockwise.
X Reinsert the lamp cluster.
X Tighten four nuts :.
X Push in connector ;until it engages.
X Insert the side panelling. Windscreen wipers
Switching the windscreen wipers on/
off G
WARNING
The windscree nwill not longer be wiped prop-
erly if the wiper blades are worn .This could
prevent you from observing the traffic condi-
tions, thereby causing an accident. Replace
the wiper blades twice ayear, ideally in spring
and autumn.
! Do not operate the windscreen wipers
when the windscreen is dry, as this could
damage the wiper blades. Moreover, dust
that has collected on the windscreen can
scratcht he glass if wiping takes place when
the windscreen is dry.
If it is necessary to switch on the wind-
screen wipers in dry weather conditions,
always operate them using washer fluid.
! If the windscreen wipers leave smears on
the windscreen after the vehicle has been
washed in an automatic car wash, this may
be due to wax or other residue. Cleant he
windscreen with washer fluid after an auto-
matic car wash.
! Intermittent wiping with rain sensor: due
to optical influences and the windscreen
becoming dirty in dry weather conditions,
the windscreen wipers may be activated
inadvertently. This could damage the wind-
screen wiper blades or scratcht he wind-
screen.
For this reason, you should always switch
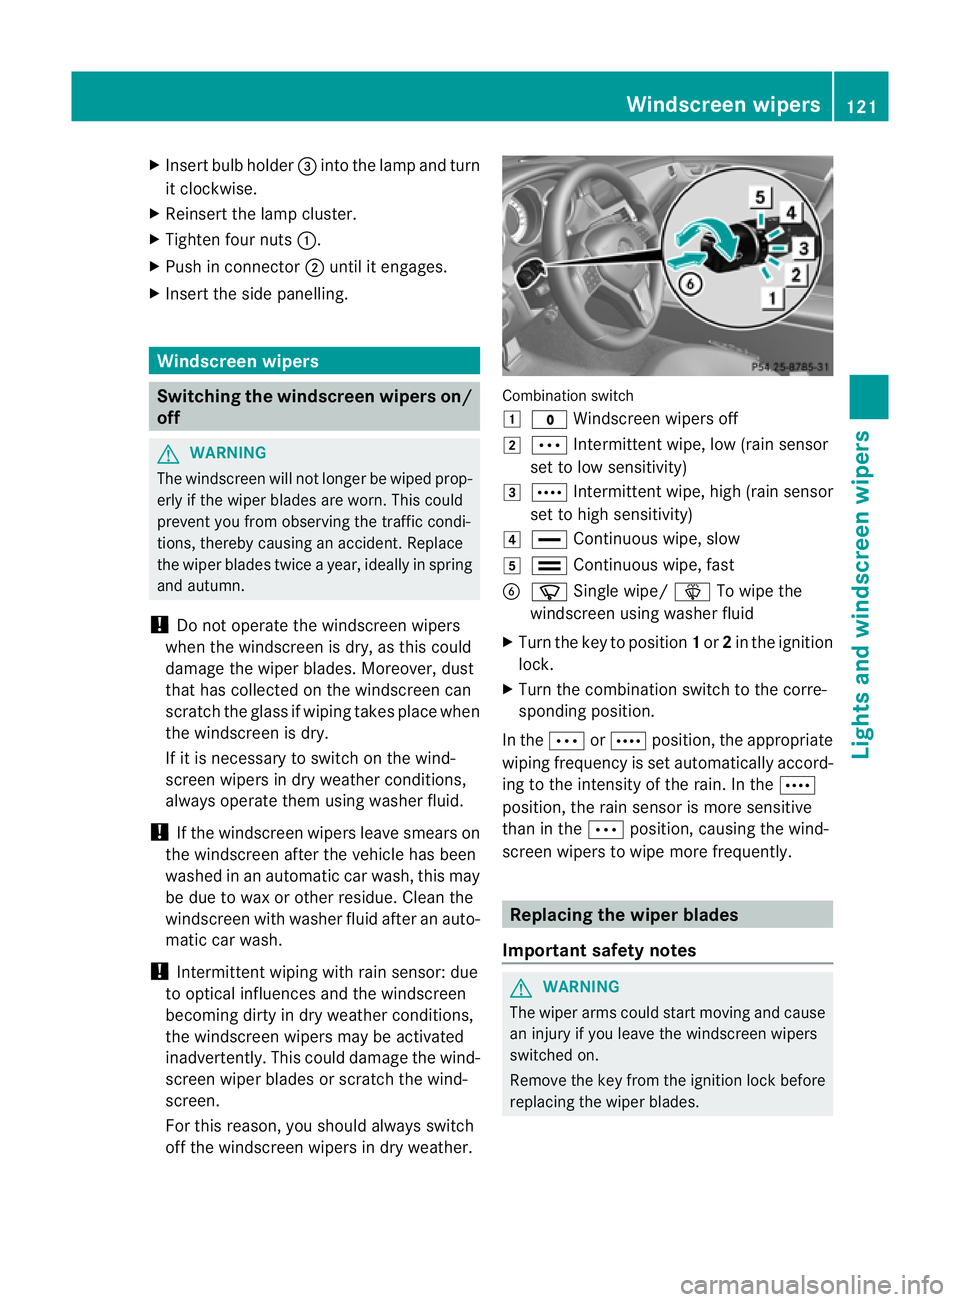
off the windscreen wipers in dry weather. Combination switch
1
$ Windscreen wipers off
2 Ä Intermittent wipe, low (rain sensor
set to low sensitivity)
3 Å Intermittent wipe, high (rain sensor
set to high sensitivity)
4 ° Continuous wipe, slow
5 ¯ Continuous wipe, fast
B í Single wipe/ îTo wipe the
windscreen using washer fluid
X Turn the key to position 1or 2in the ignition
lock.
X Turn the combination switch to the corre-
sponding position.
In the ÄorÅ position, the appropriate
wiping frequency is set automatically accord-
ing to the intensity of the rain. In the Å
position, the rain sensor is more sensitive
than in the Äposition, causing the wind-
screen wipers to wipe more frequently. Replacing the wiper blades
Important safety notes G
WARNING
The wiper arms could start moving and cause
an injury if you leave the windscreen wipers
switched on.
Remove the key from the ignition lock before
replacing the wiper blades. Windscreen wipers
121Lights and windscreen wipers Z
Page 131 of 373
Switching on/off
X
To activate: press the¿button.
The indicator lamp in the ¿button lights
up.
X To deactivate: press the¿button.
The indicator lamp in the ¿button goes
out. The cooling with air dehumidification
function has adelayed switch-of ffeature.
Problems with the cooling with air
dehumidification function When you press the
¿button ,the indica-
tor lamp in the button flashes three times or
remains off. You can no longer switch on the
cooling with air dehumidification function.
X Visit aqualified specialist workshop. Setting climat
econtrol to automatic
mode
In automatic mode, the set temperature is
maintained automatically at aconstan tlevel.
The system automatically regulates the tem-
perature of the dispensed air, the airflow and
the air distribution.
Automatic mode will achieve optimal opera-
tion if cooling with air dehumidification is also
activated. If desired, cooling with air dehu-
midification can be deactivated.
X Turn the key to position 2in the ignition
lock.
X Set the desired temperature.
X To activate: press theÃbutton.
The indicator lamp in the Ãbutton lights
up. Automatic air distribution and airflow
are activated.
i THERMOTRONIC automatic climate con-
trol: when automatic mode is activated, you
can select aclimate mode (Y page 128).X
To switch off: press the_button.
or
X Press the IorK button.
The indicator lamp in the Ãbutton goes
out. Setting the climat
emode
In automatic mode you can select the follow-
ing climate modes:
FOCUS high airflow that is set slightly cooler
MEDIUM medium airflow, standard setting
DIFFUSEl ow airflow that is set slightly
warmer and with less of adraught
X Turn the key to position 2in the ignition
lock.
X Press the Ãbutton.
X Press the ñbutton repeatedly until the
desired climate mode appears in the dis-
play. Setting the temperature
THERMATIC automatic climate control Different temperatures can be set for the
driver's and front-passenge rsides.
X Turn the key to position 2in the ignition
lock.
X To increase/reduce: turnc ontrol :or
B clockwise or anti-clockwise
(Y page 125).
Only change the temperature settin gin
small increments. Start at 22 †. 128
Operating thec
limate control systemClimate control
Page 132 of 373
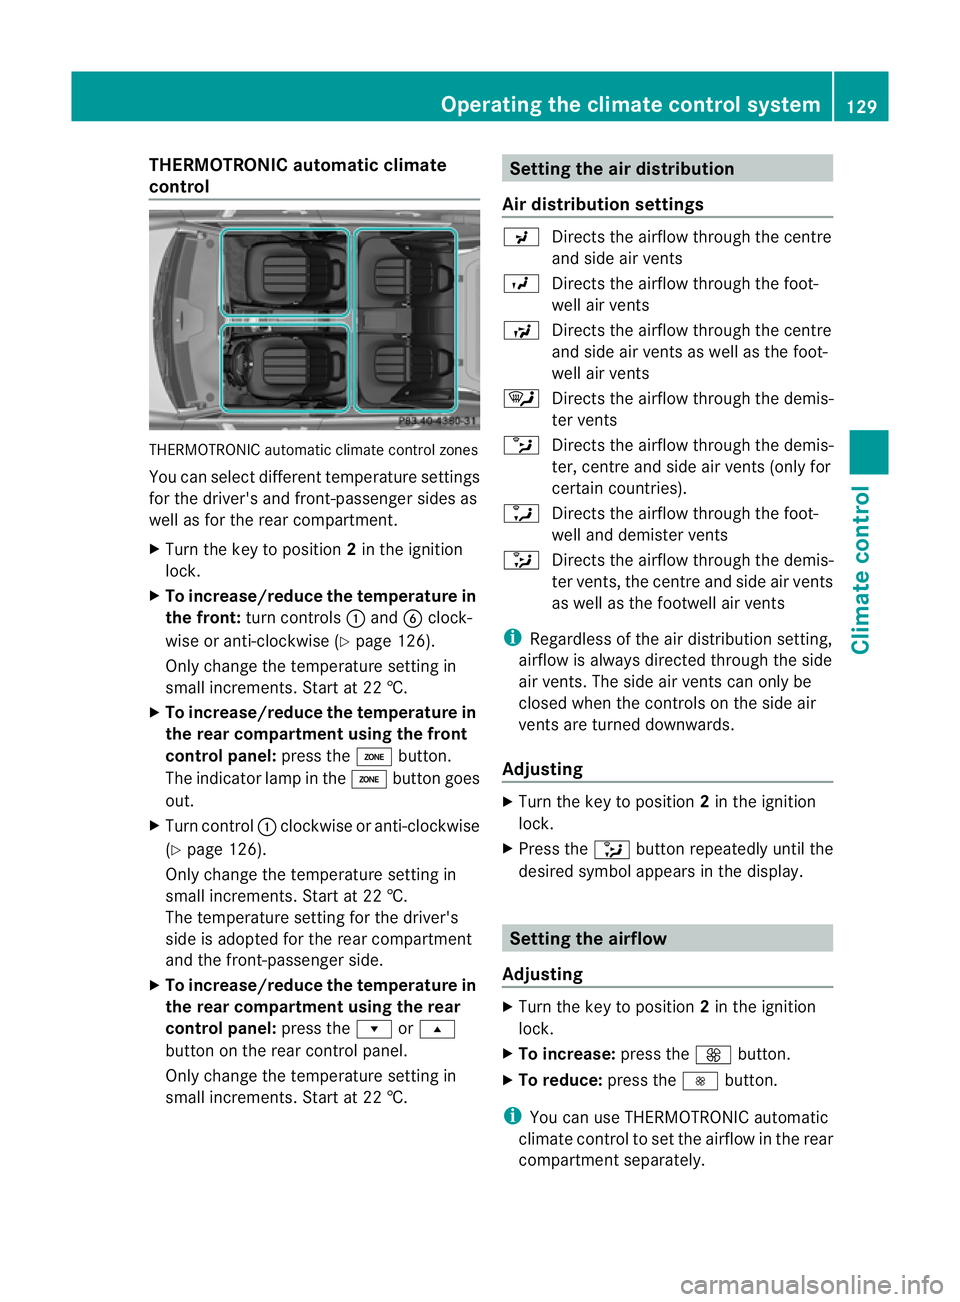
THERMOTRONI
Cautomatic climate
control THERMOTRONIC automatic climate control zones
Yo uc an select different temperatur esettings
for the driver's and front-passenge rsides as
well as for the rear compartment.
X Turn the key to position 2in the ignition
lock.
X To increase/reduce th etemperatur ein
th ef ront: turnc ontrols :and Bclock-
wise or anti-clockwise (Y page 126).
Only change the temperature settin gin
small increments. Start at 22 †.
X To increase/reduce th etemperatur ein
th er earc ompartment using th efront
control panel: press theábutton.
The indicator lamp in the ábutton goes
out.
X Turn control :clockwise or anti-clockwise
(Y page 126).
Only change the temperature settin gin
small increments. Start at 22 †.
The temperature settin gfor the driver's
side is adopted for the rear compartment
and the front-passenger side.
X To increase/reduce th etemperatur ein
th er earc ompartment using th erear
control panel: press therors
button on the rear control panel.
Only change the temperature settin gin
small increments. Start at 22 †. Setting th
eair distribution
Air distribution settings P
Directsthe airflow through the centre
and side air vents
O Directsthe airflow through the foot-
well air vents
S Directsthe airflow through the centre
and side air vents as well as the foot-
well air vents
¯ Directsthe airflow through the demis-
ter vents
b Directsthe airflow through the demis-
ter ,centr eand side air vents (only for
certain countries).
a Directsthe airflow through the foot-
well and demister vents
_ Directsthe airflow through the demis-
ter vents ,the centr eand side ai rvents
as well as the footwell air vents
i Regardless of the air distribution setting,
airflow is alway sdirected through the side
air vents. The side air vent scan only be
closed when the controls on the side air
vent sare turned downwards.
Adjusting X
Turn the key to position 2in the ignition
lock.
X Press the _button repeatedly until the
desired symbol appears in the display. Setting the airflow
Adjusting X
Turn the key to position 2in the ignition
lock.
X To increase: press theKbutton.
X To reduce: press theIbutton.
i You can use THERMOTRONIC automatic
climate control to set the airflow in the rear
compartment separately. Operating thec
limatecontrol system
129Climatecontrol Z
Page 133 of 373
Switching the ZONE function on/off
X To switch on: press theábutton.
The indicator lamp above the ábutton
lights up.
THERMATIC automatic climate control: the
temperature settingf or the driver's side is
not adopted for the front-passenger side.
THERMOTRONIC automatic climate con-
trol: the temperature settingf or the driver's
side is not adopted for the front-passenger
side and the rear compartment.
X To switch off: press theábutton.
The indicator lamp above the ábutton
goes out.
THERMATIC automatic climate control: the
temperature settingf or the driver's side is
adopted for the front-passenger side.
THERMOTRONIC automatic climate con-
trol: the temperature settingf or the driver's
side is adopted for the front-passenger side
and the rear compartment. Demisting the windscreen
You can use this function to demist the wind-
screen or to demist the inside of the wind-
screen and the side windows.
Switch off the "demisting" function as soon
as the windscreen is clear again.
X Turn the key to position 2in the ignition
lock.
X To activate: press the¬button.
The indicator lamp in the ¬button lights
up.
The climate control system switches to the
following functions:
R heating with dehumidification on
R high airflow (depending on the outside
temperature)
R high temperature (depending on the out-
side temperature) R
air distribution to the windscreen and
front side windows
R air-recirculation mode off
X To deactivate: press the¬button.
The indicator lamp in the ¬button goes
out. The previous settings are reactivated.
The heating with air dehumidification func-
tion remains on. Air-recirculation mode
remains deactivated.
or
X Press the Ãbutton.
The indicator lamp in the ¬button goes
out. Airflow and air distribution are set to
automatic mode.
or
X Turn controls :orB clockwise or anti-
clockwise (Y page 125) (THERMATIC auto-
matic climate control), (Y page 126)
(THERMOTRONIC automatic climate con-
trol ).
or
X Press the KorI button. Demisting the windows
Windows misted up on the inside X
Activate the ¿cooling with air dehu-
midification function.
X Activate automatic mode Ã.
X If the windows continue to mist up, activate
the demisting function (Y page 130).
i You should only select this settingu ntil
the windscreen is clear again.
Windows misted up on the outside X
Press the _button repeatedly until the
P orO symbol appears in the dis-
play.
i You should only select this settingu ntil
the windscreen is clear again. 130
Operating the climate control systemClimate control
Page 140 of 373
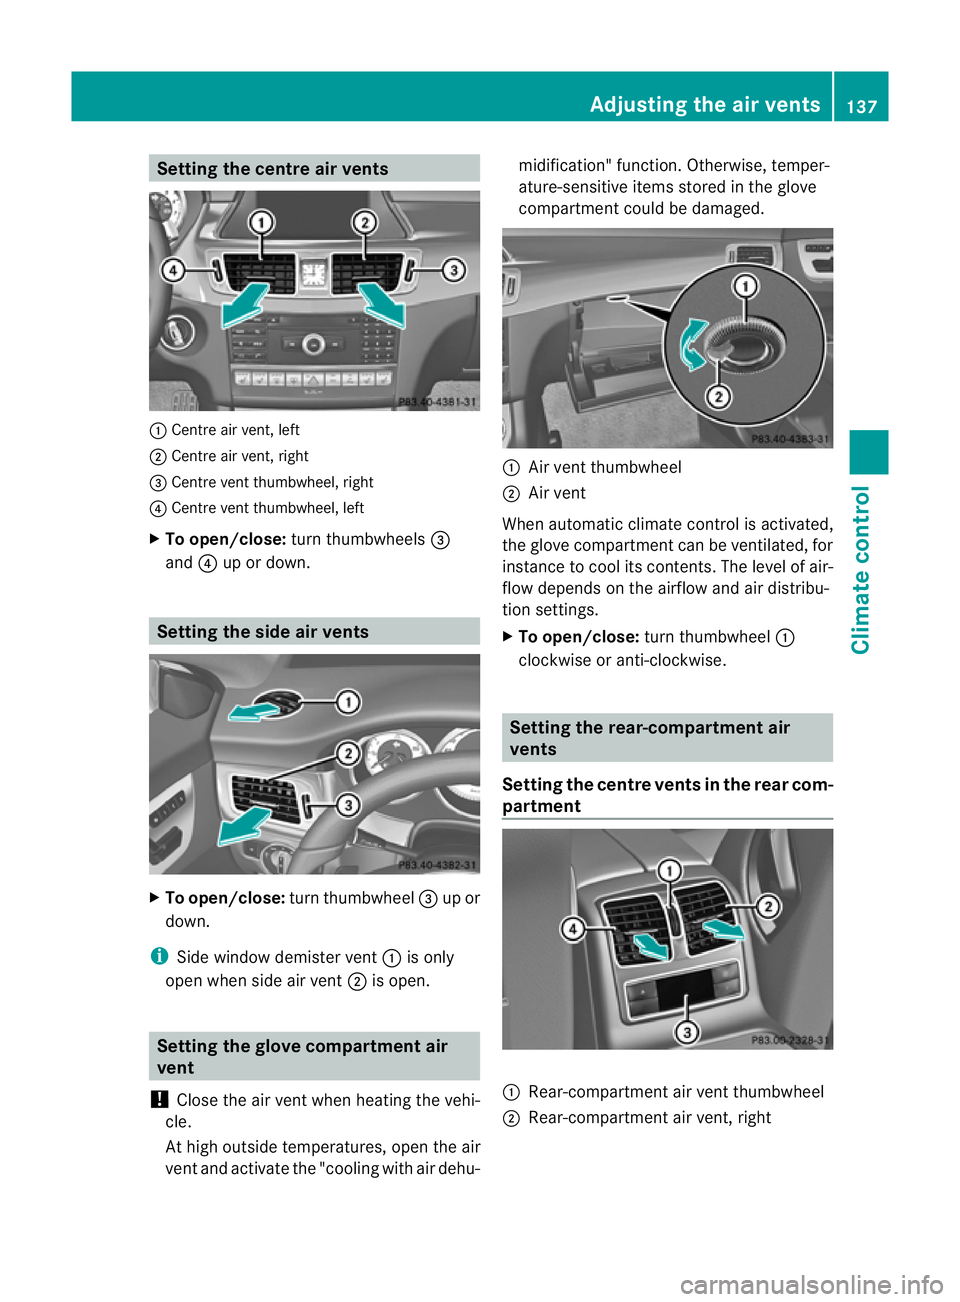
Setting the centre air vents
:
Centre air vent, left
; Centre air vent, right
= Centre vent thumbwheel, right
? Centre vent thumbwheel, left
X To open/close: turn thumbwheels =
and ?up or down. Setting the side air vents
X
To open/close: turn thumbwheel =up or
down.
i Side window demister vent :is only
open when side air vent ;is open. Setting the glove compartment air
vent
! Close the air vent when heating the vehi-
cle.
At high outside temperatures, open the air
vent and activate the "cooling with air dehu- midification" function. Otherwise, temper-
ature-sensitive items stored in the glove
compartmen
tcould be damaged. :
Air vent thumbwheel
; Air vent
When automatic climate control is activated,
the glove compartment can be ventilated, for
instance to cool its contents.T he level of air-
flow depends on the airflow and air distribu-
tion settings.
X To open/close: turn thumbwheel :
clockwise or anti-clockwise. Setting the rear-compartment air
vents
Setting the centre vents in the rear com-
partment :
Rear-compartment air vent thumbwheel
; Rear-compartment air vent,r ight Adjusting the air vents
137Climatecontrol Z
Page 321 of 373
Otherwise, the vehicle's electronic sys-
tem may be damaged.
R in vehicles with automatic transmission,
the transmission is locked in position P
after disconnecting the battery. The vehi-
cle is secured against rolling away. You
can then no longer move the vehicle.
The battery and the cover of the positive
terminal clamp must be fitted securely dur-
ing operation.
In order for the battery to achieve the maxi-
mum possibles ervice life, it must always be
sufficiently charged.
The vehicle battery, like other batteries, can
discharge over time if you do not use the
vehicle. In such cases, have the battery dis-
connected at aqualified specialist workshop.
You can also charge the battery with a
charger recommended by Mercedes-Benz.
For more information, please contact aquali-
fied specialist workshop.
Have the battery charge checked more fre-
quently if you use the vehicle mainly for short
trips or if you leave it standing idle for a
lengthy period. Consult aqualified specialist
workshop if you wish to leave your vehicle
parked up for along period of time.
i When you park the vehicle, remove the
key if you do not require any electrical con-
sumers. The vehicle will then use very little
energy, thus conserving battery power.
i After an interruption of the power supply,
e.g. the battery was discharged, you have
to:
R set the clock. Information on setting the
clock can be found in the separate oper-
ating instructions.
On vehicles with COMAND Online and a
navigation system, the clock is set auto-
matically.
R reset the function for folding the exterior
mirrors in/out automatically, by folding
the mirrors out once (Y page 106). Charging the battery
G
WARNING
Only charge the battery in awell-ventilated
area. As the battery is being charged, gases
can escape and generate minor explosions.
This could injure you and other persons or
cause damage to the paintwork or acid cor-
rosion on the vehicle.
You can obtain information on battery charg-
ers which allow the battery to be charged
while still installed from aqualified specialist
workshop. G
WARNING
There is arisk of acid burns during the charg-
ing process due to the gases which escape
from the battery. Do not lean over the battery
during the charging process. G
WARNING
Battery acid is caustic. Avoid contact with the
skin, eyes or clothing.
! Only charge the installed battery with a
battery charger which has been tested and
approved by Mercedes-Benz.T hese battery
chargers allow the battery to be charged
while still installed in the vehicle.
! Only use battery chargers with amaxi-
mum charging voltage of 14.8 V.
! Only charge the battery using the jump-
start connection point.
The jump-starting connection point is in the
engine compartment( Ypage 319).
Read the battery charger's operating instruc-
tions before charging the battery.
X Open the bonnet (Y page 296).
X Connect the battery charger to the positive
terminal and earth point in the same order
as when connecting the donor battery in
the jump-starting procedure
(Y page 319). 318
Battery (vehicle)Breakdown assistance