2012 MERCEDES-BENZ CLS COUPE door lock
[x] Cancel search: door lockPage 305 of 373
R
Vehicles with akey:
do not remove the key from the ignition
lock. Do not open the driver's door or
front-passenger door when the engine is
switched off. Otherwise, the automatic
transmission selects park position P
automatically and locks the wheels. You
can prevent this by shifting the auto-
matic transmission to Nbeforehand.
R Vehicles with KEYLESS-GO:
do not open the driver's door or front-
passenger door when the engine is
switched off. Otherwise, the automatic
transmission selects park position P
automatically and locks the wheels.
Observe the following to make sure that the
automatic transmission stays in position N:
X Make sure the vehicle is stationary and the
ignition is switched off.
X Turn the key to position 2(Ypage 141) in
the ignition lock.
Use the key instead of the Start/Stop but-
ton on vehicles with KEYLESS-GO.
X Depress and hold the brake pedal.
X Shift the automatic transmission to posi-
tion N.
X Release the brake pedal.
X Release the electric parking brake.
X Switch off the ignition and leave the key in
the ignition lock.
You can wash the vehicle in an automatic car
wash from the very start.
Wash off excess dirt before cleaning the vehi-
cle in an automatic car wash.
After using an automatic car wash, wipe off
wax from the windscreen and the wiper
blades. This will prevent smears and reduce
wiping noises caused by residueont he wind-
screen.
Washing by hand In some countries, washing by hand is only
allowed at specially equipped washing bays. Observe the legal requirements for each indi-
vidual country.
X Do not use hot water and do not wash the
vehicle in direct sunlight.
X Use asoft sponge to clean.
X Use amild cleaning agent, such as acar
shampoo approved by Mercedes-Benz.
X Thoroughly hose down the vehicle with a
gentle jet of water.
X Do not point the water jet directly towards
the air inlet.
X Use plenty of water and rinse out the
sponge frequently.
X Rinse the vehicle with clean water and dry
thoroughly with achamois.
X Do not let the cleaning agent dry on the
paintwork.
When using the vehicle in winter, remove all
traces of road salt deposits carefully and as
soon as possible.
High-pressure cleaninge quipment G
WARNING
Do not use high-pressure cleaners with circu-
lar-jet nozzles (dirt grinders) to clean your
vehicle, in particular the tyres. You could oth-
erwise damage the tyres and cause an acci-
dent.
! Always maintain adistance of at least
30 cm between the vehicle and the high-
pressure cleaner nozzle. Information about
the correct distance is available from the
equipment manufacturer.
Move the high-pressure cleaner nozzle
around when cleaning your vehicle.
Do not aim directly at any of the following:
R tyres
R door gaps, roof gaps, jointse tc.
R electrical components
R battery
R connectors
R lights 302
CareMaintenance and care
Page 315 of 373
The vehicle tool kit contains:
R
Foldable wheel chock
R Fuse allocation chart
R Jack
R Centrin gpin
R One pair of gloves
R Wheel wrench
R Towing eye
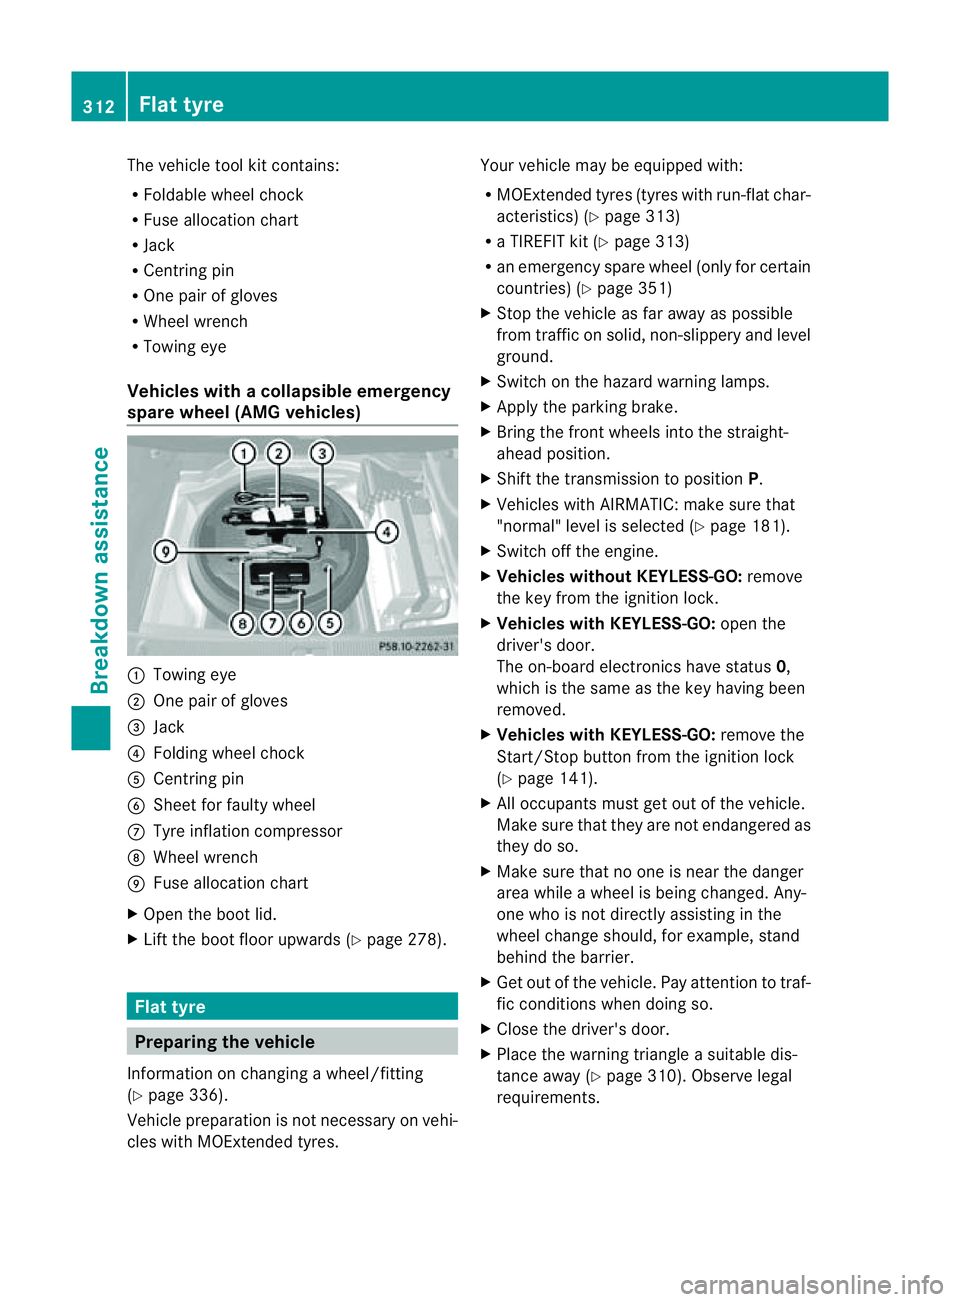
Vehicles with acollapsible emergency
spare wheel (AMG vehicles) :
Towin geye
; Onep air of gloves
= Jack
? Folding wheel chock
A Centrin gpin
B Sheet for fault ywheel
C Tyre inflatio ncompressor
D Wheel wrench
E Fuse allocation chart
X Open the boot lid.
X Lift the boot floor upwards (Y page 278).Flat tyre
Preparing the vehicle
Information on changing awheel/fitting
(Y page 336).
Vehicle preparation is not necessary on vehi-
cles with MOExtended tyres. Your vehicle may be equipped with:
R
MOExtended tyres (tyres with run-flat char-
acteristics) (Y page 313)
R aT IREFIT kit (Y page 313)
R an emergenc yspare wheel (only for certain
countries) (Y page 351)
X Stop the vehicle as far away as possible
from traffic on solid, non-slippery and level
ground.
X Switch on the hazard warning lamps.
X Apply the parking brake.
X Bring the front wheels into the straight-
ahead position.
X Shift the transmission to position P.
X Vehicles with AIRMATIC: make sure that
"normal" level is selected (Y page 181).
X Switch off the engine.
X Vehicles without KEYLESS-GO: remove
the key from the ignition lock.
X Vehicles with KEYLESS-GO: open the
driver's door.
The on-board electronics have status 0,
which is the same as the key having been
removed.
X Vehicles with KEYLESS-GO: remove the
Start/Stop button from the ignition lock
(Y page 141).
X All occupant smust get out of the vehicle.
Make sure that they are not endangered as
they do so.
X Make sure that no one is near the danger
area while awheel is being changed. Any-
one who is not directly assisting in the
wheel change should, for example, stand
behind the barrier.
X Get out of the vehicle. Pay attention to traf-
fic conditions when doing so.
X Close the driver's door.
X Place the warning triangle asuitable dis-
tancea way (Y page 310). Observe legal
requirements. 312
Flat tyreBreakdown assistance
Page 324 of 373
Befor
etowing away ,make sur ethat the steer-
ing can be move dand is not locked.
If yo utow or tow-start another vehicle, its
weigh tmustn ot excee dthe maximum per-
missible gros svehicle weigh tofyour vehicle. G
WARNING
The vehicle is braked when the HOLD function
or DISTRONIC PLUS is activated. Therefore,
deactivate HOLD and DISTRONIC PLUS if the
vehicle is to be towed.
! Only secure the tow rope or towing bar to
the towing eyes. The vehicle may otherwise
be damaged.
! Observe the following points when towing
with atow rope:
R secure the tow rope on the same side on
both vehicles.
R the tow rope must not be longer than is
legally permitted. It should be marked in
the middle, e.g. with awhite cloth
(30 x30c m) so thatothe rroad users are
aware that avehicle is being towed.
R the tow rope may only be attached to the
towing eyes.
R observe the brake lamps of the towing
vehicle while driving. Always maintain a
distance so that the tow rope does not
sag.
R do not use steel cables or chains to tow
your vehicle. The vehicle could be dam-
aged.
! Do not use the towing eye for recovery,
this could damage the vehicle. If in doubt,
recover the vehicle with acrane.
! When towing, pulla wayslowly and
smoothly .Ifthe tractive power is too high,
the vehicles could be damaged.
! To tow vehicles with KEYLESS-GO, use
the key instead of the Start/Stop button.
The automatic transmission may otherwise
switch to position Pwhen you open the driver's or front-passenger door which
could damage the transmission.
! You may tow the vehicle for amaximum
of 50km.At owing speed of 50 km/h must
not be exceeded.
For towing distances over 50 km, the entire
vehicle must be lifted up and transported.
! If you tow or tow-start another vehicle, its
weight must not exceed the maximum per-
missible gross vehicle weight of your vehi-
cle.
Information on your vehicle's gross vehicle
weight rating can be found on the vehicle
identification plate (Y page 359).
Observe the legal requirements for the rele-
vant countries when towing.
It is better to have the vehicle transported
than to have it towed.
If the vehicle has suffered transmission dam-
age, have it transported on atransporter or
trailer.
The automatic transmission must be in posi-
tion Nwhen the vehicle is being towed.
The battery must be connected and charged.
Otherwise, you:
R cannot turn the key in the ignition lock to
position 2
R cannot shift the automatic transmission to
position N
i Deactivate the automatic locking feature
(Y page 84). You could otherwise be locked
out when pushing or towing the vehicle.
Deactivate tow-away protection
(Y page 71) before the vehicle is towed. Fitting/removing the towing eye
Fitting the towing eye G
WARNING
The exhaust tail pipe may be hot. You could
burn yourself if you touch the tail pipe. Be Towing and tow-starting
321Breakdown assistance
Z
Page 326 of 373
much more effort to brake and steer the vehi-
cle. Adapt yours tyleofd rivingaccordingly.
It is important tha tyou observe the safety
instructions when towing away your vehicle
(Y page 320).
The automatic transmission automatically
shifts to position Pwhen you open the driver's
or front-passenger door or when you remove
the key from the ignition lock. In order to
ensure that the automatic transmission stays
in position Nwhen towing the vehicle, you
must observe the following points:
X Make sure that the vehicle is stationary and
that the key is in position 0in the ignition
lock.
X Turn the key to position 2in the ignition
lock.
On vehicles with KEYLESS-GO, use the key
instead of the Start/Stop button
(Y page 141).
X Depress and hold the brake pedal.
X Shift the automatic transmission to posi-
tion N.
X Release the brake pedal.
X Release the parking brake.
X Switch on the hazard warning lamps
(Y page 114).
X Leave the key in position 2in the ignition
lock.
i When towing with the hazard warning
lamps switched on, use the combination
switch as usual to signal achange of direc-
tion. In this case, only the turn signals for
the desired direction flash. When the com-
bination switch is reset, the hazard warning
lamps start flashing again. Transporting the vehicle
! Only lash the vehicle down by the wheels
or wheel rims, not by parts of the vehicle
such as axle or steering components. Oth-
erwise, the vehicle could be damaged. The towing eye can be used to pull the vehicle
onto atrailer or transporter for transporting
purposes.
X Turn the key to position 2in the ignition
lock.
X Shift the automatic transmission to posi-
tion N.
As soon as the vehicle is loaded:
X Prevent the vehicle from rolling away by
applying the parking brake.
X Shift the automatic transmission to posi-
tion P.
X Turn the key in the ignition lock to position
0and remove the key from the ignition
lock.
X Secure the vehicle. Notes for 4MATIC vehicles
! Vehicles with 4MATIC must not be towed
with the front or rear axle raised; otherwise,
the transmission may be damaged.
If the vehicle has transmission damage or
damage to the front or rear axle, have it trans-
ported on atransporter or trailer.
In the event of damage to the electrical
system
If the battery is defective, the automatic
transmission will be locked in position P.To
shift the automatic transmission to position
N,y ou must provide power to the vehicle's
electrical system in the same way as when
jump-starting (Y page 319).
Have the vehicle transported on atransporter
or trailer. Tow-starting (emergency engine
starting)
! Vehicles with automatic transmission
must not be tow-started. The transmission
may otherwise be damaged. Towing and tow-starting
323Breakdown assistance Z
Page 340 of 373
Storing wheels
Storew heels that are not being used in acool,
dry and preferably dark place. Protect the
tyres against oil, grease, petrol and diesel. Cleaning the wheels
G
WARNING
The water jet of circular-jet nozzles (dirt grind-
ers) can cause damage not visible from the
outside to tyres or chassis components. Com-
ponentsd amaged in this way can unexpect-
edly fail. There is arisk of an accident.
Do not use high-pressure cleaners with circu-
lar-jet nozzles to clean the vehicle. Have dam-
aged tyres or chassis components replaced
immediately. Fitting
awheel
Preparing the vehicle X
Stop the vehicle on solid, non-slippery and
leve lground.
X Apply the parking brake.
X Bring the front wheels into the straight-
ahead position.
X Shift the transmission to position P.
X Vehicles with AIRMATIC :make sure that
"normal" leve lisselecte d(Ypage 181).
X Switch off th eengine.
X Vehicles without KEYLESS-GO: remove
th ek eyfrom th eignition lock.
X Vehicles with KEYLESS-GO: open the
driver' sdoor.
The on-board electronics have status 0,
whic hist hesame as th ekeyhaving been
removed.
X Vehicles with KEYLESS-GO: remove the
Start/Sto pbutto nfromt heignition lock
(Y page 141). X
If included in th evehicle equipment,
remove th etyre-chang etoolkit from the
vehicle.
X Secure th evehicle to preven titfrom rolling
away.
i Apart from certain country-specific varia-
tions, the vehicles are not equipped with a
tyre-change tool kit. Some tools for chang-
ing awhee lare specific to the vehicle. For
more information on which tools are
required to perform awhee lchange on your
vehicle, consult aqualified specialist work-
shop.
Necessary wheel-changing tools can
include, for example:
R jack
R whee lchock
R whee lwrench
Securing the vehicle agains trolling
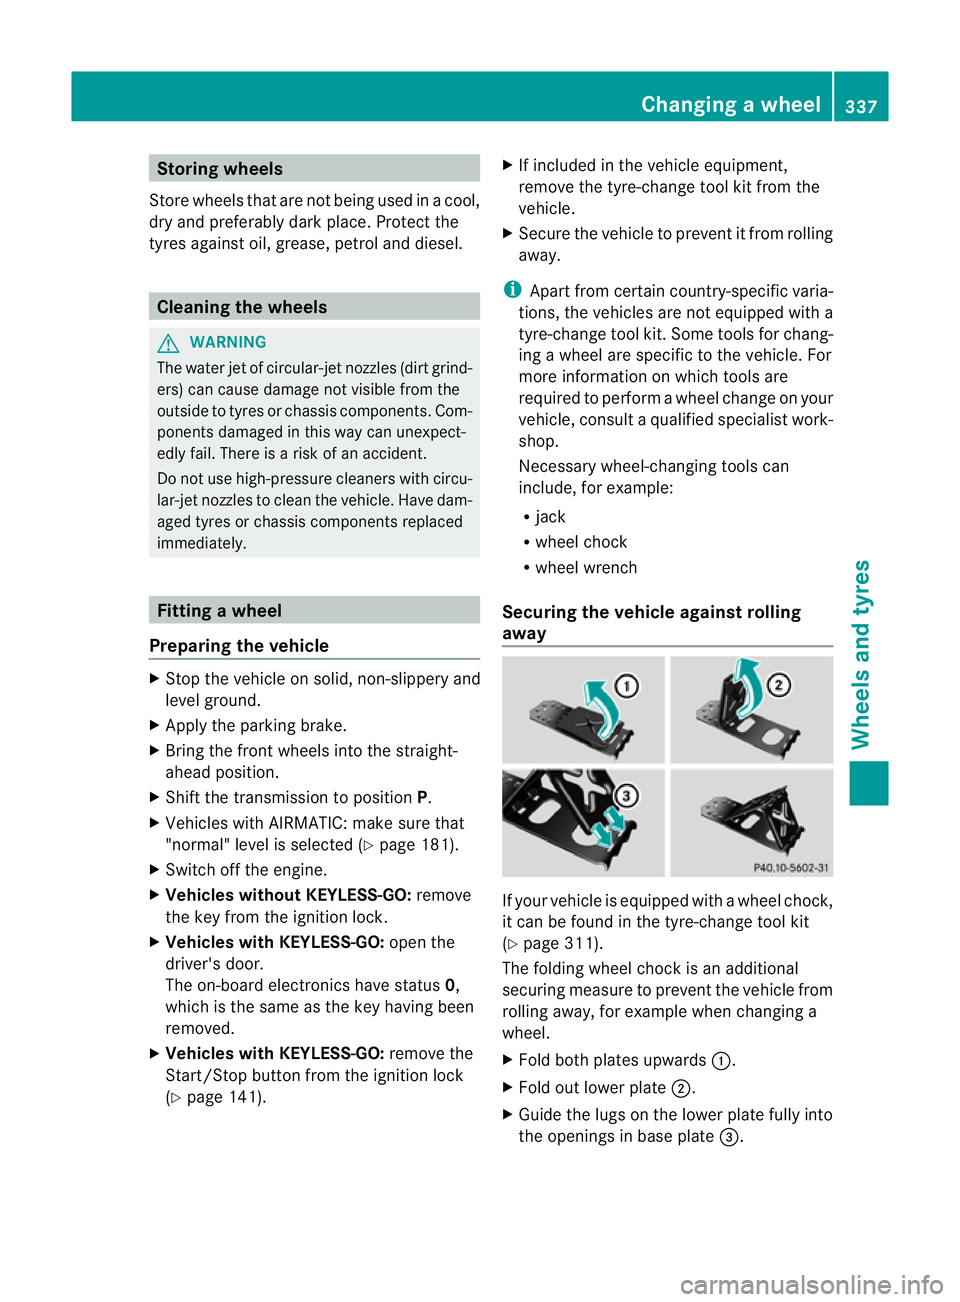
away If your vehicle is equipped with
awheel chock,
it can be foun dinthetyre-change tool kit
(Y page 311).
The folding wheel chock is an additional
securin gmeasur etoprevent th evehicle from
rollin gaway, for example when changin ga
wheel.
X Fold bot hplates upwards :.
X Fold out lower plate ;.
X Guide th elugs on th elower plat efully into
th eo pening sinbase plate =. Changing
awheel
337Wheels and tyres Z
Page 341 of 373
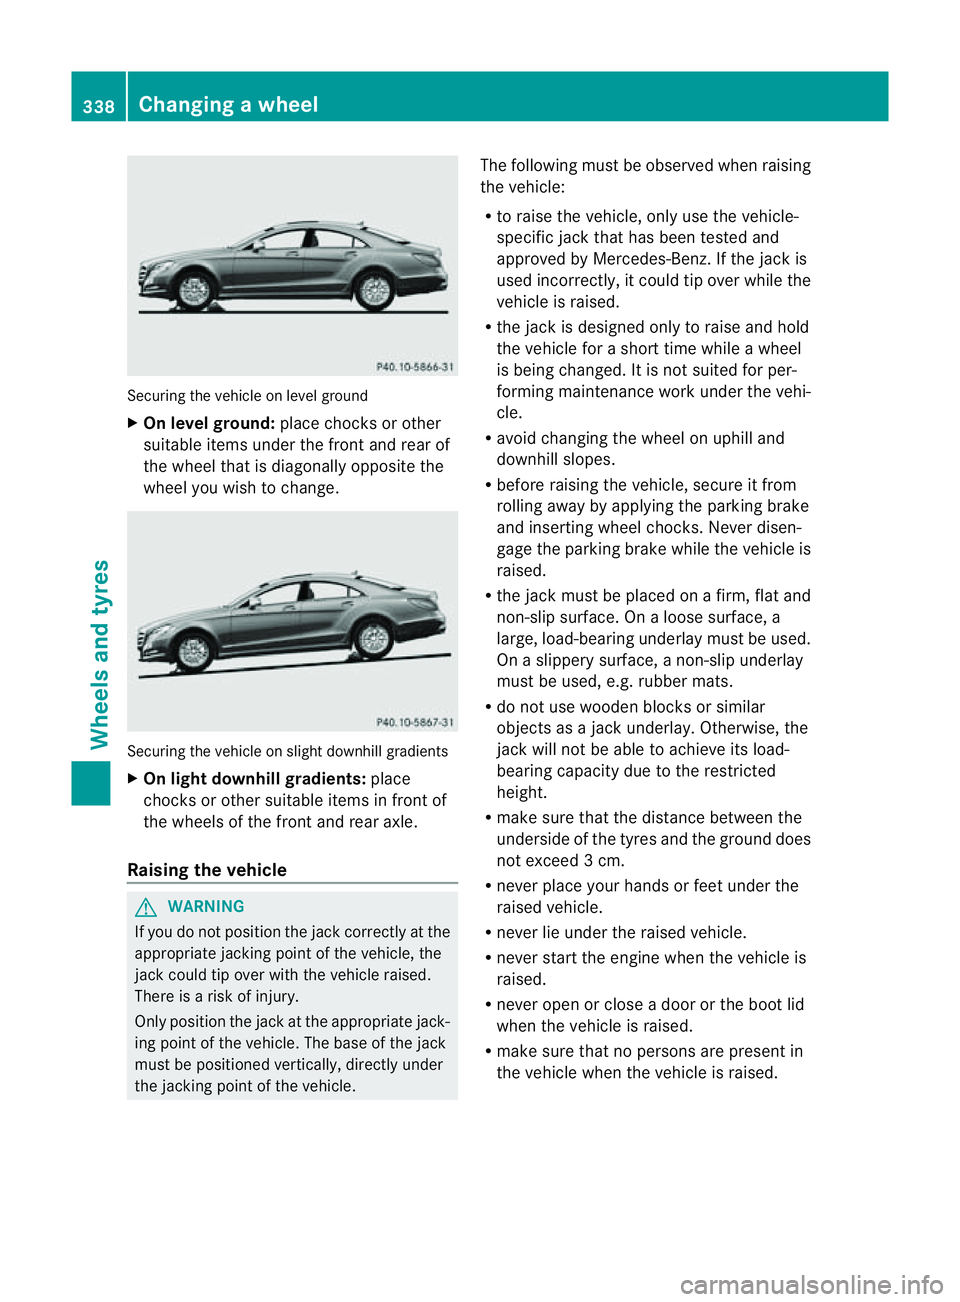
Securing the vehicle on level ground
X
On level ground: place chocks or other
suitabl eitem sunder the front and rea rof
the whee ltha tisd iagonally opposite the
wheel you wish to change. Securing the vehicle on slight downhill gradients
X
On light downhill gradients: place
chocks or other suitablei tems in front of
the wheels of the front and rear axle.
Raising the vehicle G
WARNING
If you do not position the jack correctly at the
appropriate jacking point of the vehicle, the
jack could tip over with the vehicle raised.
There is arisk of injury.
Only position the jack at the appropriate jack-
ing point of the vehicle. The base of the jack
must be positioned vertically, directly under
the jacking point of the vehicle. The following must be observed when raising
the vehicle:
R
to raise the vehicle, only use the vehicle-
specific jack that has been tested and
approved by Mercedes-Benz.Ift he jack is
used incorrectly, it could tip over while the
vehicle is raised.
R the jack is designed only to raise and hold
the vehicle for ashort time while awheel
is being changed. It is not suited for per-
forming maintenance work under the vehi-
cle.
R avoid changing the wheel on uphilla nd
downhill slopes.
R before raising the vehicle, secure it from
rolling awaybya pplying the parking brake
and inserting wheel chocks. Never disen-
gage the parking brake while the vehicle is
raised.
R the jack must be placed on afirm, flat and
non-slip surface. On aloose surface, a
large, load-bearing underlay must be used.
On aslippery surface, anon-slip underlay
must be used, e.g. rubber mats.
R do not use wooden blocks or similar
objects as ajack underlay.O therwise, the
jack will no tbea ble to achiev eits load-
bearin gcapacity due to the restricted
height.
R mak esure that the distanc ebetween the
underside of the tyre sand the groun ddoes
not exceed 3cm.
R never place your hands or feet under the
raised vehicle.
R never lie under the raised vehicle.
R never start the engine when the vehicle is
raised.
R never open or clos eadoor or the boot lid
when the vehicle is raised.
R mak esure that no persons are present in
the vehicle when the vehicle is raised. 338
Changin
gawheelWheels and tyres