2012 MERCEDES-BENZ CLS COUPE door lock
[x] Cancel search: door lockPage 122 of 373
The interior lighting automatically switches
on if you:
R unlock the vehicle
R open adoor
R remove the key from the ignition lock
The interior lighting is activated for ashort
time when the key is removed from the igni-
tion lock. You can activat ethis delayed
switch-off using the on-board computer
(Y page 224).
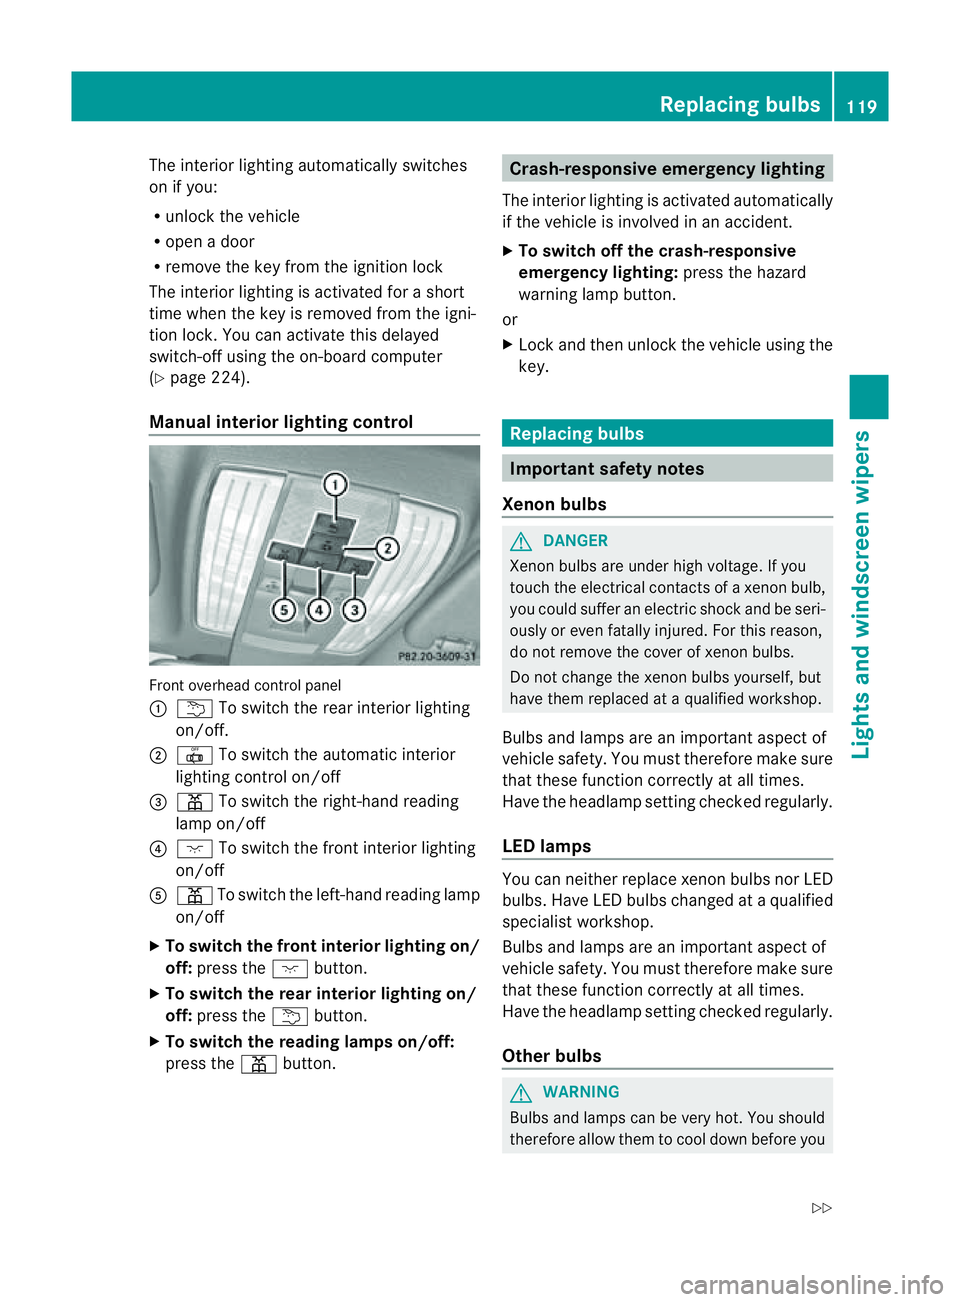
Manua linterior lighting control Fronto
verhead control panel
: u To switch the rear interior lighting
on/off.
; | To switch the automatic interior
lighting control on/off
= p To switch the right-hand reading
lamp on/off
? c To switch the fronti nterior lighting
on/off
A p To switch the left-hand reading lamp
on/off
X To switch the front interior lighting on/
off: press the cbutton.
X To switch the rear interior lighting on/
off: press the ubutton.
X To switch the reading lampso n/off:
press the pbutton. Crash-responsive emergency lighting
The interior lighting is activated automatically
if the vehicle is involved in an accident.
X To switch off the crash-responsive
emergency lighting: press the hazard
warning lamp button.
or
X Lock and then unlock the vehicle using the
key. Replacing bulbs
Important safety notes
Xenon bulbs G
DANGER
Xenon bulbs are under high voltage. If you
touch the electrical contacts of axenon bulb,
you could suffer an electric shock and be seri-
ously or even fatally injured. For this reason,
do not remove the cover of xenon bulbs.
Do not change the xenon bulbs yourself, but
have them replaced at aqualified workshop.
Bulbs and lamps are an importan taspect of
vehicle safety. You must therefore make sure
that these function correctly at all times.
Have the headlamp setting checked regularly.
LED lamps You can neither replace xenon bulbsn
or LED
bulbs. Have LED bulbsc hanged ataqualified
specialist workshop.
Bulbs and lamps are an important aspect of
vehicle safety. You must therefore make sure
that these function correctly at all times.
Have the headlamp setting checked regularly.
Other bulbs G
WARNING
Bulbs and lamps can be very hot. You should
therefore allow them to cool down before you Replacing bulbs
119Lights and windscreen wipers
Z
Page 125 of 373
!
Never open the bonnet if awindscreen
wiper arm has been folded awayf rom the
windscreen.
Never fold awindscreen wiper arm without
aw iper bladeb ack onto the windscreen.
Hold the windscreen wiper arm firmly when
you change the wiper blade. If you release
the windscreen wiper arm without awiper
bladea nd it falls onto the windscreen, the
windscreen may be damagedbyt he force
of the impact.
Mercedes-Benz recommends that you have
the wiper blades changed at aqualified
specialist workshop.
! To avoi ddamaging th ewindscree nwiper
blades, mak esure that you touc honly the
wiper arm of the windscreen wiper.
Replacing th ewiper blades Removing th
ewiper blades
X Remove the key fro mthe ignition lock or
tur nthe key to position 0(KEYLESS-GO).
X Fold the wiper arm away from the wind-
screen until it engages. X
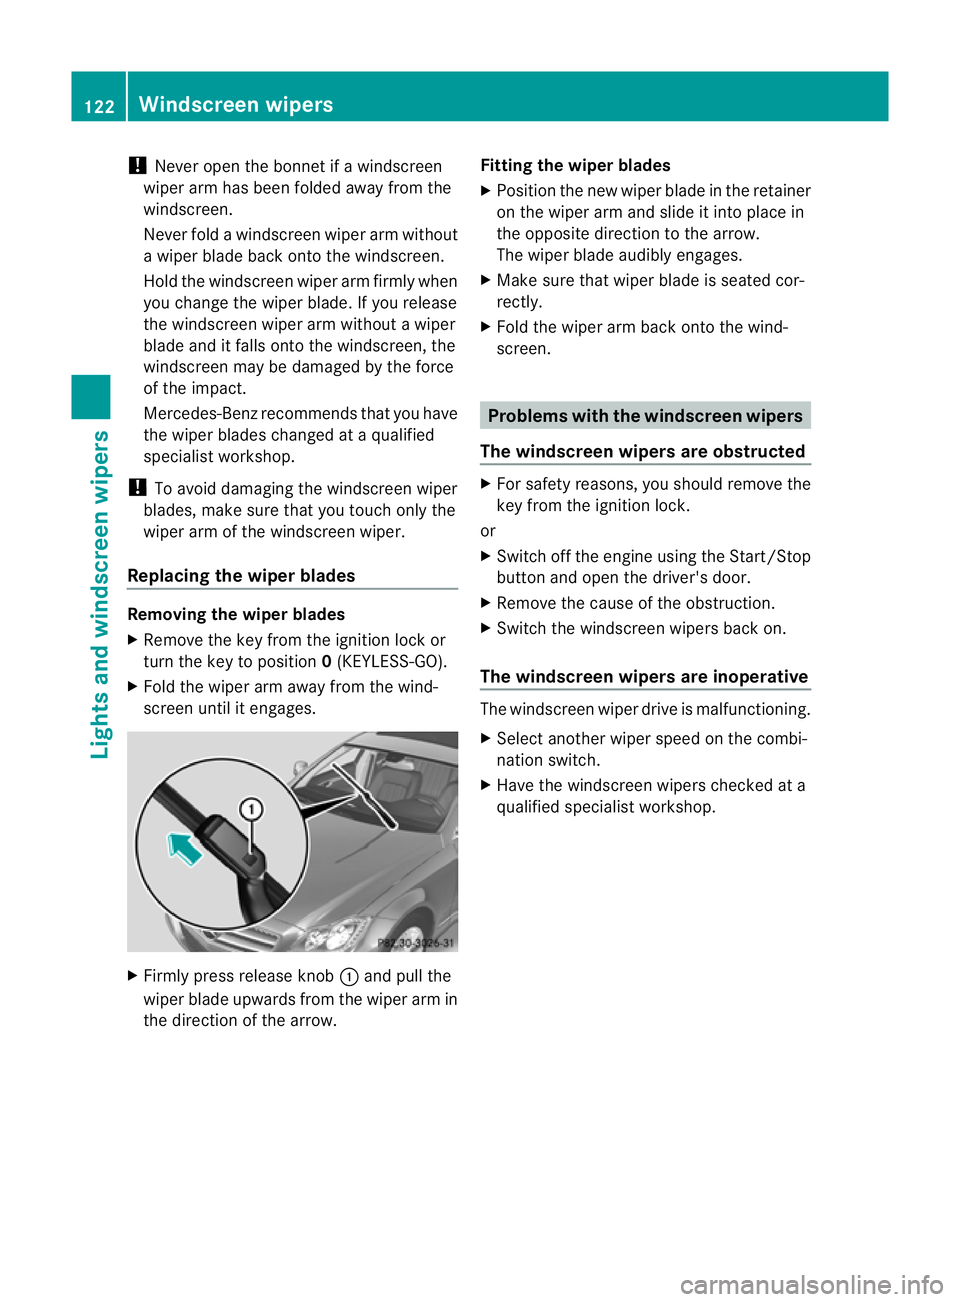
Firmly press release knob :and pull the
wiper blade upwards from the wiper arm in
the direction of the arrow. Fitting the wiper blades
X
Position the new wiper blade in the retainer
on the wiper arm and slide it into place in
the opposite direction to the arrow.
The wiper blade audibly engages.
X Make sure that wiper blade is seated cor-
rectly.
X Fold the wiper arm back onto the wind-
screen. Problems with the windscreen wipers
The windscreen wipers are obstructed X
For safety reasons, you should remove the
key from the ignition lock.
or
X Switch off the engine using the Start/Stop
button and open the driver's door.
X Remove the cause of the obstruction.
X Switch the windscreen wipers back on.
The windscreen wipers are inoperative The windscreen wiper drive is malfunctioning.
X
Select another wiper speed on the combi-
nation switch.
X Have the windscreen wipers checked at a
qualified specialist workshop. 122
Windscreen wipersLights and windscreen wipers
Page 134 of 373
Rear windo
wheating
Switchin gon/off G
WARNING
Clea rall windows of ice or sno wbefor esetting
off .O therwise, impaire dvisibility could
endanger yo uand others.
Th er earw indow heatin ghasah igh current
draw. You should therefore switc hitoff as
soon as the window is clear .Itotherwise
switches off automaticall yafter several
minutes.
If the battery voltag eistoo low, the rea rwin-
dow heatin gmay switc hoff.
X Turn the key to position 2in the ignition
lock.
X Press the ¤button.
The indicator lamp in the ¤button lights
up or goes out.
Problems with th erearw indow heating The rear window heatin
ghas switched off
prematurely or cannot be activated.
X Switch off any consumers that are not
required, e.g. readin glamps or interior
lighting.
When the battery is sufficiently charged,
the rear window heatin gisactivate dagain
automatically. Activating/deactivating air-recircula-
tion mode G
WARNING
Only switc hover to air-recirculatio nmode
briefly at low outside temperatures. Other-
wise, the windows could mist up, thus impair-
ing visibility and endangering yourself and
others. This may prevent you from observing
the traffic conditions, thereby causing an
accident. You can deactivate the flow of fresh air if
unpleasant odours are entering the vehicle
from outside. The air already inside the vehi-
cle will then be recirculated.
The operation of air-recirculation mode is the
same for all control panels.
X
Turn the key to position 2in the ignition
lock.
X To activate: press thegbutton.
The indicator lamp in the gbutton lights
up.
i In the event of high pollution levels 1
or at
high outside temperatures, air-recircula-
tion mode is automatically activated. When
air-recirculation mode is activated auto-
matically, the indicator lamp above the
g button does not light up.
Outside air is added after about
30 minutes.
X To deactivate: press thegbutton.
The indicator lamp in the gbutton goes
out.
i Air-recirculation mode deactivates auto-
matically:
R after approximately five minutes at out-
side temperatures below approximately
5†
R after approximately five minutes if cool-
ing with air dehumidification is deactiva-
ted
R after approximately 30 minutes at out-
side temperatures above approximately
5† Convenience opening/closing using
the air-recirculation button
G
WARNING
Make sure that nobody can become trapped
between the side window and the door frame
as the side windows are opened and closed.
Make sure that all object sand body parts are
clear of the side windows when they are being
1 THERMOTRONIC automatic climate contro lonly. Operatin
gthe climate contro lsystem
131Climate control
Z
Page 145 of 373
Pressing the Start/Stop button several times
in succession corresponds to the different
key positions in the ignition lock. This is only
the case if you are not depressing the brake
pedal.
If you depress the brake pedal and press the
Start/Stop button ,the engine start simmedi-
ately.
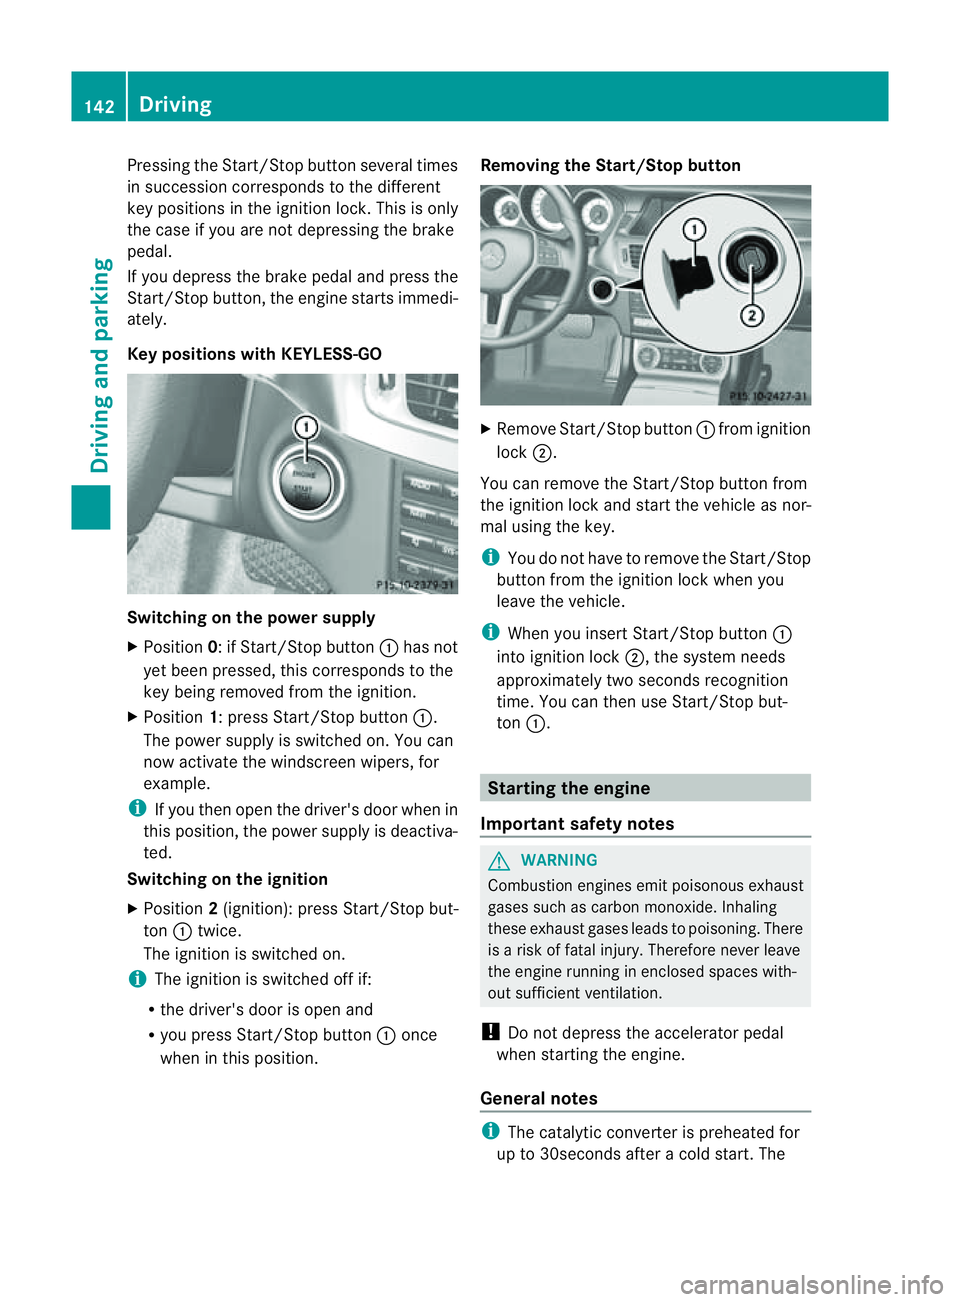
Key positions with KEYLESS-GO Switching on the power supply
X
Position 0:ifStart/Stop button :has not
yet been pressed, this corresponds to the
key being removed from the ignition.
X Position 1:press Start/Stop button :.
The power supply is switched on. You can
now activat ethe windscreen wipers, for
example.
i If you then open the driver's door when in
this position, the power supply is deactiva-
ted.
Switching on the ignition
X Position 2(ignition): press Start/Stop but-
ton :twice.
The ignition is switched on.
i The ignition is switched off if:
R the driver's door is open and
R you press Start/Stop button :once
when in this position. Removing the Start/Stop button
X
Remove Start/Stop button :from ignition
lock ;.
You can remove the Start/Stop button from
the ignition lock and start the vehicle as nor-
mal using the key.
i You do not have to remove the Start/Stop
button from the ignition lock when you
leave the vehicle.
i When you insert Start/Stop button :
into ignition lock ;,the system needs
approximately two seconds recognition
time. You can then use Start/Stop but-
ton :. Starting the engine
Important safety notes G
WARNING
Combustion engines emit poisonous exhaust
gases such as carbon monoxide. Inhaling
these exhaust gases leads to poisoning. There
is ar isk of fatal injury. Therefore never leave
the engine runnin ginenclosed spaces with-
out sufficient ventilation.
! Do not depress the accelerator pedal
when starting the engine.
General notes i
The catalytic converter is preheated for
up to 30seconds after acold start .The 142
DrivingDriving and parking
Page 146 of 373
sound of the engine may change during this
time.
Automatic transmission X
Shift the transmission to position P.
The transmission position displayint he
multifunction displays howsP.
i You can also start the engine when the
transmission is in position N.
Starting procedurew ith the keyi
To start the engine using the key instead
of KEYLESS-GO, pull the Start/Stop button
out of the ignition lock.
X To startap etrol engine: turn the key to
position 3in the ignition lock
(Y page 141) and release it as soon as the
engine is running.
X To startad iesel engine: turn the key to
position 2in the ignition lock
(Y page 141).
The % preglow indicator lamp in the
instrumen tcluster light sup.
X When the %erlischt, den Schlüssel auf
Stellung 3(Ypage 141 )and release it as
soon as the engine is running.
i You can start the engine without preglow
if the engine is warm.
Using KEYLESS-GO to start th eengine G
WARNING
Your vehicle can be started using avalid KEY-
LESS-GO key. For this reason ,children should
never be left unsupervised in the vehicle.
Always tak ethe key with you when leavin gthe
vehicle, even if you are only leavin gitfor a
shor ttime.
i The Start/Stop button can be used to
start the vehicle manually without inserting
the key int othe ignition lock .The key must
be in the vehicle and the Start/Stop button
must be inserted in the ignition lock. This mode for startingt
he engine operates inde-
pendently of the ECO start/stop automatic
engine start function.
X Depress the brake pedal and keep it
depressed.
X To startap etrol engine: pressthe Start/
Stop button (Y page 141) once.
The engine starts.
X To start adiesel engine: press the Start/
Stop button (Y page 141)once.
Preglow is activated and the engin estarts. Pulling away
Automatic transmission G
WARNING
If the engin espeed is above the idling speed
and you engage transmission position Dor
R,t he vehicle could pull away suddenly. There
is ar isk of an accident.
When engagin gtransmission position Dor R,
always firmly depress the brake pedal and do
not simultaneously accelerate.
X Depress the brake pedal and keep it
depressed.
X Shif tthe transmission to position Dor R.
X Release the parking brake (Y page 160).
X Release the brake pedal.
X Carefully depress the accelerator pedal.
i It is only possible to shift the transmission
from position Pto the desired position if
you depress the brake pedal. Only then is
the parking lock released.
i The vehicle locks centrally once you have
pulleda way.The locking knobs in the doors
drop down.
You can open the doors from the inside at
any time.
You can also deactivate the automatic lock-
ing feature (Y page 225). Driving
143Driving and parking Z
Page 153 of 373
i
The automatic transmission shifts auto-
matically into park position Pif you:
R open the driver's door when the vehicle
is stationary and the transmission is in
position Dor R
R open the driver's door when driving at
very low speed with the transmission in
position Dor R
i Depress the brake and push the DIRECT
SELECT lever up or down to disengage the
parking lock. The transmission is in neutral
N.
If you want to shift from park position P
directly to Ror D:
R depress the brake and
R push the DIRECT SELECT lever up or
down past the first point of resistance.
Engaging reverse gear R !
Only shift the automatic transmission to
R when the vehicle is stationary.
X Push the DIRECT SELECT lever up past the
first point of resistance.
Neutral Nwith ECO start/stop function
activated The ECO start/stop function switches the
engine off automatically when the vehicle is
stationary if the vehicle is braked to
astand-
still in neutral N.
For further information on the ECO start/stop
function, see (Y page 144).
Shifting to neutral (N) X
Push the DIRECT SELECT lever up or down
to the first point of resistance.
Drive position Dwith ECO start/stop
function activated The ECO start/stop function switches the
engine off automatically when the vehicle is braked to
astandstill in transmission posi-
tion D.
For further information on the ECO start/stop
function, see (Y page 144).
Engaging drive position D X
Push the DIRECT SELECT lever down past
the first point of resistance. Transmission positions
B
Park position
This prevent
sthe vehicle from roll-
ing away when stopped. Do not
shift the transmission into position
P(Y page 159) unless the vehicle
is stationary.
The automatic transmission shifts
to Pautomatically if you:
R remove the key
R switch off the engine when in R
or Dand open one of the front
doors C
Reverse gear
Only shift the transmission to
R
when the vehicle is stationary. 150
Automatic transmissionDriving and parking
Page 160 of 373
Refuelling
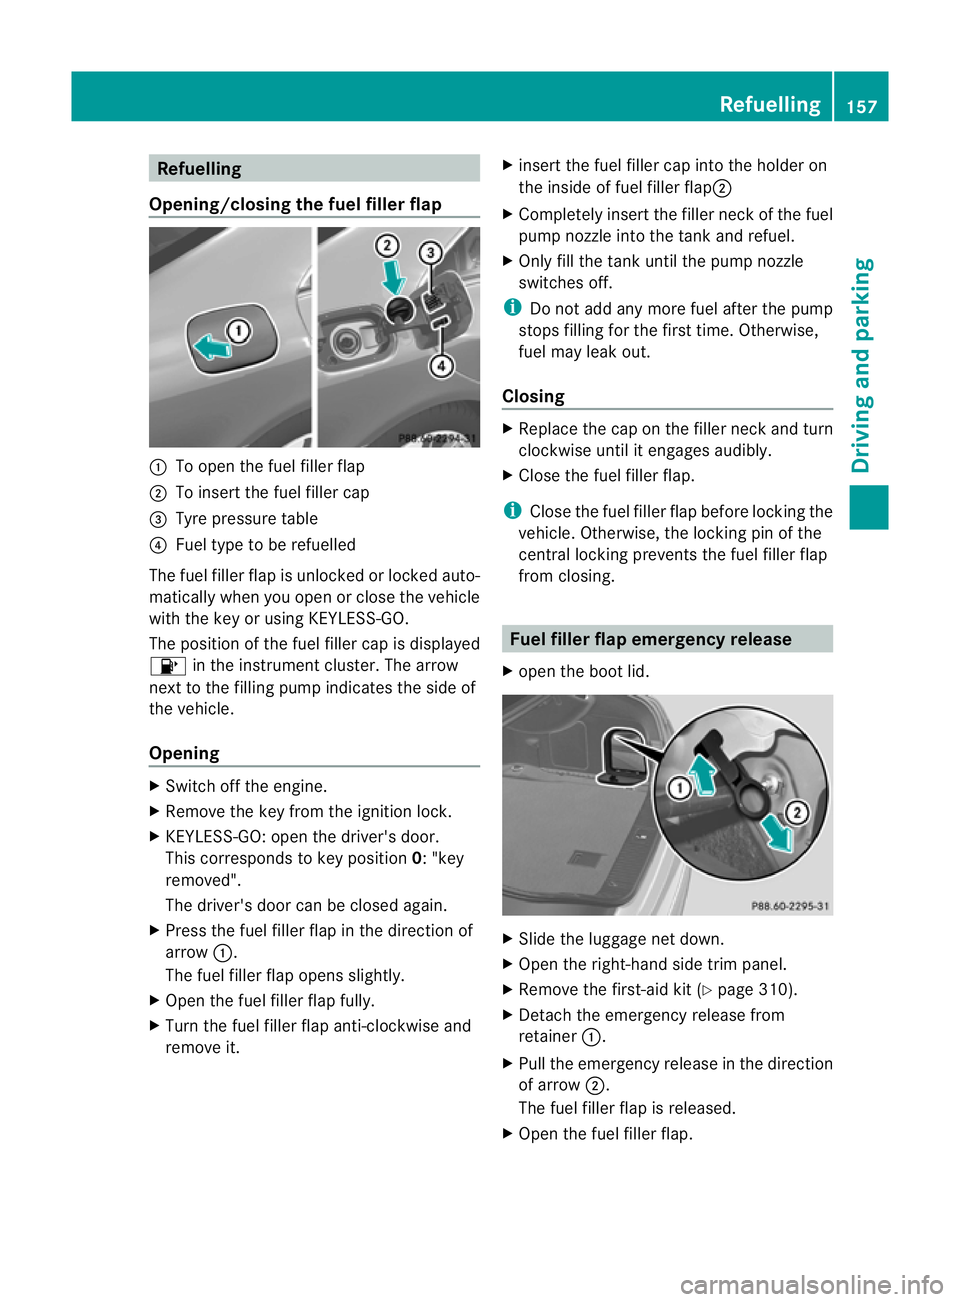
Opening/closing the fue lfille rflap :
To open the fuel filler flap
; To inser tthe fuel filler cap
= Tyre pressure table
? Fuel type to be refuelled
The fuel filler flap is unlocked or locked auto-
matically when you open or close the vehicle
with the key or using KEYLESS-GO.
The position of the fuel filler cap is displayed
8 in the instrumentc luster. The arrow
next to the filling pump indicates the side of
the vehicle.
Opening X
Switch off the engine.
X Remove the key from the ignition lock.
X KEYLESS-GO: open the driver's door.
This corresponds to key position 0:"key
removed".
The driver's door can be closed again.
X Press the fuel filler flap in the direction of
arrow :.
The fuel filler flap opens slightly.
X Open the fuel filler flap fully.
X Turn the fuel filler flap anti-clockwise and
remove it. X
insert the fuel filler cap into the holder on
the inside of fuel filler flap ;
X Completely insert the filler neck of the fuel
pump nozzle into the tank and refuel.
X Only fill the tank until the pump nozzle
switches off.
i Do not add any more fuel after the pump
stops filling for the first time. Otherwise,
fuel may leak out.
Closing X
Replace the cap on the filler neck and turn
clockwise until it engages audibly.
X Close the fuel filler flap.
i Close the fuel filler flap before locking the
vehicle. Otherwise, the locking pin of the
central locking prevents the fuel filler flap
from closing. Fuel filler flap emergency release
X open the boot lid. X
Slide the luggage net down.
X Open the right-hand side trim panel.
X Remove the first-aid kit (Y page 310).
X Detach the emergency release from
retainer :.
X Pull the emergency release in the direction
of arrow ;.
The fuel filler flap is released.
X Open the fuel filler flap. Refuelling
157Driving and parking Z
Page 163 of 373
Switching off the engine
Vehicles with automatic transmission X
Firmly depress the parking brake.
X All vehicles (except AMG vehicles): shift
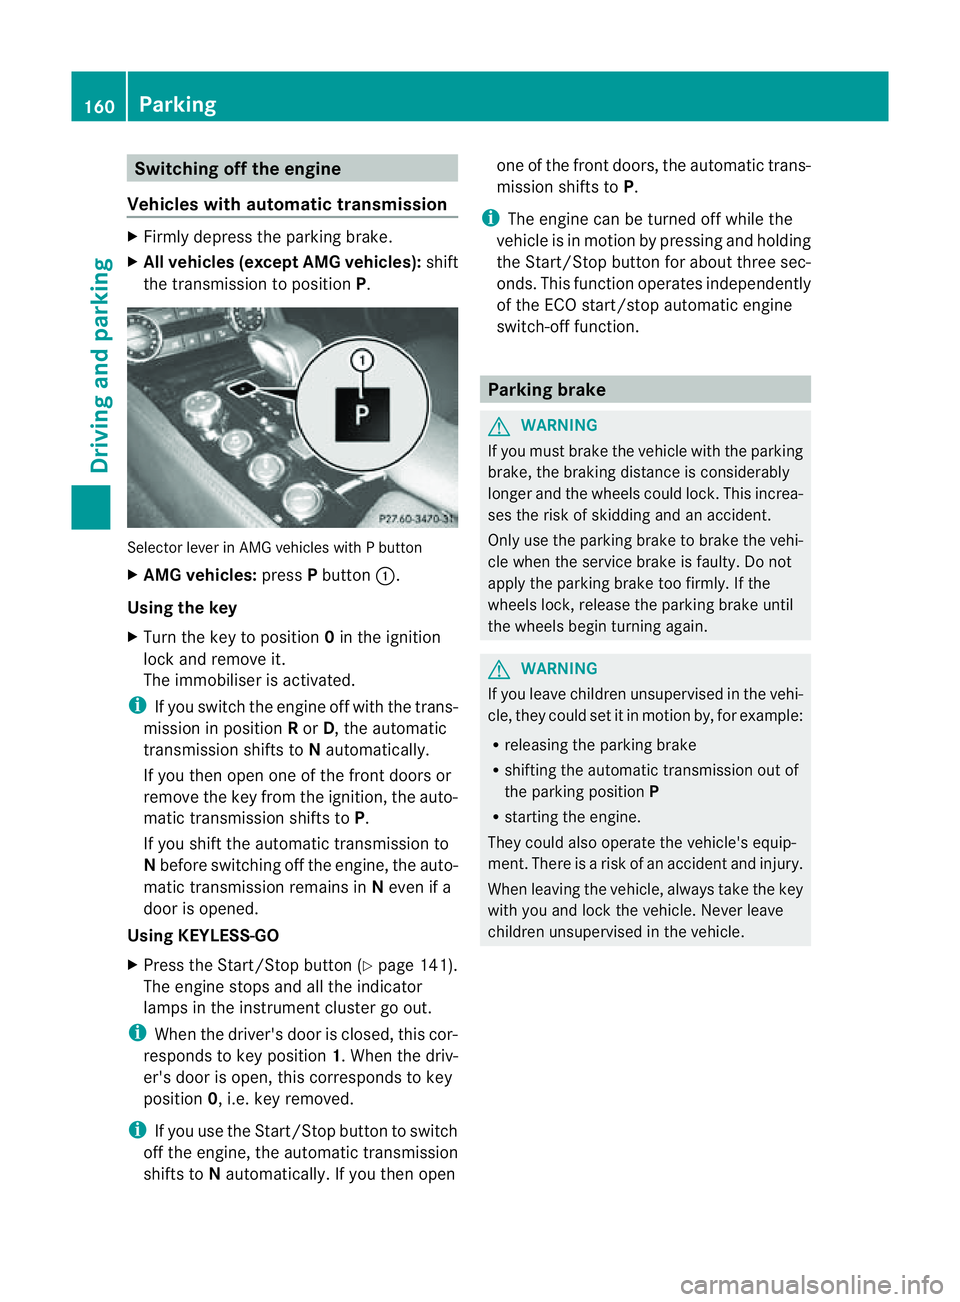
the transmission to position P.Selector lever in AMG vehicles with
Pbutton
X AMG vehicles: pressPbutton :.
Using the key
X Turn the key to position 0in the ignition
lock and remove it.
The immobiliser is activated.
i If you switch the engine off with the trans-
mission in position Ror D,t he automatic
transmission shifts to Nautomatically.
If you then open one of the front doors or
remove the key from the ignition, the auto-
matic transmission shifts to P.
If you shift the automatic transmission to
N before switching off the engine, the auto-
matic transmission remains in Neven if a
door is opened.
Using KEYLESS-GO
X Press the Start/Stop button (Y page 141).
The engine stops and all the indicator
lamps in the instrumen tcluster go out.
i When the driver's door is closed, this cor-
responds to key position 1.When the driv-
er's door is open ,this corresponds to key
position 0,i.e. key removed.
i If you use the Start/Stop button to switch
off the engine, the automatic transmission
shift stoNautomatically. If you the nopen one of the fron
tdoors, the automatic trans-
mission shifts to P.
i The engine can be turned off while the
vehicle is in motion by pressing and holding
the Start/Stop button for about three sec-
onds. This function operates independently
of the ECO start/stop automatic engine
switch-off function. Parking brake
G
WARNING
If you must brake the vehicle with the parking
brake, the braking distance is considerably
longer and the wheels could lock. This increa-
ses the risk of skidding and an accident.
Only use the parking brake to brake the vehi-
cle when the service brake is faulty. Do not
apply the parking brake too firmly. If the
wheels lock, release the parking brake until
the wheels begin turnin gagain. G
WARNING
If you leave children unsupervised in the vehi-
cle, they could set it in motion by, for example:
R releasing the parking brake
R shifting the automatic transmission out of
the parking position P
R starting the engine.
They could also operate the vehicle's equip-
ment.T here isarisk of an accident and injury.
When leaving the vehicle, always take the key
with you and lock the vehicle. Never leave
children unsupervised in the vehicle. 160
ParkingDriving and parking