Page 193 of 252
 for vehicles with fixed service intervalsPetrol enginesSpecificationCapacity1.4 l/92 kW TSIVW 501 01, VW 502 003.6
1.8 l/112, 118 kW TSI
VW 502 00
4.6
applies to Rus")
Specifications and capacity (in l) for vehicles with fixed service intervalsPetrol enginesSpecificationCapacity1.4 l/92 kW TSIVW 501 01, VW 502 003.6
1.8 l/112, 118 kW TSI
VW 502 00
4.6
applies to RussiaSAE 0W-30
VW 502 00 / 505 00
2.0 l/147 kW TSI
VW 502 00
4.6
applies to Russia SAE 0W-30
VW 502 00 / 505 003.6 l/191 kW FSIVW 502 005.5Diesel engines a)SpecificationCapacity1.6 l/77 kW TDI CRVW 507 004.32.0 ltr/103 kW TDI CR DPFVW 507 004.32.0 ltr/125 kW TDI CR DPFVW 507 004.3a)
Engine oil VW 505 01 can optionally be used in diesel engines
without DPF
CAUTION
■
If the above engine oils are not available, a different engine oil can be used in
an emergency. To prevent damage to the engine, a maximum of 0.5 litres only
of the following engine oils may be used until the next oil change: ■ For petrol engine models: ACEA A3/ACEA B4 or API SN/API SM;
■ For diesel engine models: ACEA C3 or API CJ-4.
Checking the oil level
Fig. 166
Principle sketch: Dipstick
Read and observe and on page 189 first.
The dipstick indicates the engine oil level » Fig. 166.
Checking the oil level
Ensure that the vehicle is positioned on a level surface and the engine has
reached its operating temperature.
›
Switch off the engine.
Wait a few minutes until the engine oil flows back into the sump.
›
Open the bonnet.
›
Pull out the dipstick.
›
Wipe the dipstick with a clean cloth and insert it again to the stop.
›
Pull the dipstick out again and check the oil level.
Oil level within range
A
No oil must be refilled.
Oil level within range
B
Oil can be refilled. The oil level may lie in range
A
.
Oil level within range
C
The engine must be topped up with oil so that the oil level at least reaches
range
B
.
The engine burns some oil. The oil consumption may be as much as 0.5 l/1 000
km depending on your style of driving and the conditions under which you op-
erate your vehicle. Consumption may be slightly higher than this during the
first 5 000 kilometres.
The oil level must be checked at regular intervals. We recommend it be
checked after each time you refuel or prior to making a long journey.
We recommend maintaining the oil level within the range
A
, but not above , if
the engine has been operating at high loads, for example, during a lengthy
motorway trip during the summer months, towing a trailer or negotiating a
high mountain pass.
The warning light in the instrument cluster will indicate whether the oil level is
too low » page 37 ,
Engine oil level
. Check the oil level using the dipstick as
soon as possible. Add oil accordingly.
CAUTION
The oil level must never be above the A range » Fig. 166 – there is a risk of
damaging the exhaust system!190General Maintenance
Page 194 of 252

ReplenishingRead and observe
and on page 189 first.
›
Check the oil level » page 190.
›
Unscrew the cap of the engine oil filler opening » Fig. 164 on page 188 .
›
Replenish the oil in portions of 0.5 litres in accordance with the correct speci-
fications » page 189 .
›
Check the oil level » page 190.
›
Carefully screw on the oil filler opening cap and push the dipstick in fully.
Coolant
Introduction
This chapter contains information on the following subjects:
Capacity
191
Checking the coolant level
192
Replenishing
192
The coolant consists of water with coolant additive. This mixture guarantees
antifreeze protection, protects the cooling/heater system against corrosion
and prevents lime formation.
Vehicles exported to countries with a mild climate are already factory-filled
with a coolant which offers antifreeze protection down to about -25 ℃. In
these countries, the concentration of coolant additive should be at least 40%.
Vehicles exported to countries with a cold climate are already factory-filled
with a coolant which offers antifreeze protection down to about -35 °C. In
these countries, the concentration of coolant additive should be at least 50%.
If a higher concentration of antifreeze is required for climatic reasons, the con-
centration of coolant additive can be increased up to a maximum of 60% (anti-
freeze protection down to approx. -40 °C).
When refilling, only use the same antifreeze identified on the coolant expan-
sion vessel » Fig. 167 on page 192 .
WARNINGThe engine compartment of your car is a hazardous area. The following
warning instructions must be followed at all times when working in the en- gine compartment » page 186.
CAUTION
■
Do not continue if for some reason it is not possible to fill with coolant un-
der the current circumstances! Switch off the engine and seek assistance from
a specialist garage.■
If the expansion tank is empty, do not top up with coolant. The system could
ventilate - there is a risk of engine damage,
do not continue driving! Switch
off the engine and seek assistance from a specialist garage.
■
The concentration of coolant additive in the coolant must never be under
40%.
■
Over 60% of coolant additive in the coolant reduces the antifreeze protec-
tion and cooling effect.
■
A coolant additive that does not comply with the correct specifications can
significantly reduce the corrosion protection.
■
Any faults resulting from corrosion may cause a loss of coolant and can con-
sequently result in major engine damage!
■
Do not fill the coolant above the mark
A
» Fig. 167 on page 192 .
■
If a fault causes the engine to overheat, we recommend visiting a specialist
garage, as otherwise serious engine damage may occur.
■
Additional headlights and other attached components in front of the air inlet
impair the cooling efficiency of the coolant.
■
Never cover the radiator - there is a risk of the engine overheating.
Capacity
Read and observe
and on page 191 first.
Coolant capacity (in litres) 1)
Petrol enginesCapacity1.4 l/92 kW TSI7.71.8 l/112 kW TSI
1.8 l/118 kW TSI8.6 1)
The coolant capacity is approximately 1 Litre greater on vehicles that are fitted with an auxiliary heater
(auxiliary heating and ventilation).
191Inspecting and replenishing
Page 195 of 252

Petrol enginesCapacity2.0 l/147 kW TSI8.63.6 l/191 kW FSI9.0Diesel enginesCapacity1.6 l/77 kW TDI CR8.42.0 l/103 kW TDI CR8.42.0 l/125 kW TDI CR8.4
Checking the coolant level
Fig. 167
Engine compartment: Coolant
expansion reservoir
Read and observe and on page 191 first.
The coolant expansion reservoir is located in the engine compart-
ment » Fig. 167 .
Explanation of graphic » Fig. 167
Mark for the maximum permissible coolant level
Mark for the lowest permissible coolant level
The coolant level should be kept between the marks
A
and
B
.
If the coolant level is above the mark
A,
no coolant may be topped up.
If the coolant level is below the mark
B,
the coolant must be topped up.
Checking the level
›
Switch off the engine.
›
Open the bonnet.
›
Check the level of coolant in the coolant expansion bottle. » Fig. 167.
Check the coolant level only when the engine is cold.
ABIf the engine is warm, the test result may be inaccurate. The level can also be
above the mark A » Fig. 167 .
If the coolant level in the coolant expansion tank is too low, this is indicated by
the warning light
illuminating in the instrument cluster » page 36,
Cool-
ant . We still recommend inspecting the coolant level directly at the reservoir
from time to time.
Loss of coolant
A loss of coolant is first and foremost an indication of a leak in the system. Do
not merely top up the coolant. Have the cooling system checked by a specialist
garage.
Replenishing
Read and observe
and on page 191 first.
The coolant expansion tank must always contain a small amount of cool-
ant » page 191, in section Introduction .
›
Switch off the engine.
›
Allow the engine to cool.
›
Place a cloth over the cap of the coolant expansion tank and carefully un-
screw the cap.
›
Replenish the coolant.
›
Turn the cap until it clicks into place.
CAUTION
■ Only top up with new coolant.■Do not use an alternative additive if the specified coolant is not available. In
this case, use only water and have the correct mixing ratio of water and cool-
ant additive restored by a specialist garage as soon as possible.
Brake fluid
Introduction
This chapter contains information on the following subjects:
Checking the brake fluid level
193
Changing
193
192General Maintenance
Page 196 of 252

WARNING■The engine compartment of your car is a hazardous area. The following
warning instructions must be followed at all times when working in the en-
gine compartment » page 186.■
Do not continue your journey if the fluid level has fallen below the MIN
marking » Fig. 168 on page 193 - there is a risk of an accident. Seek help
from a specialist garage.
■
Do not use used brake fluid - the function of the brake system may be im-
paired – risk of accident!
CAUTION
Brake fluid damages the paintwork of the vehicle.
Note
■ The brake fluid is changed as part of a compulsory inspection service.■We recommend using brake fluids from the ŠKODA Original Accessories
range.
Checking the brake fluid level
Fig. 168
Engine compartment: Brake fluid
reservoir
Read and observe and on page 193 first.
The brake fluid reservoir is located in the engine compartment » Fig. 168.
›
Switch off the engine.
›
Open the bonnet.
›
Check the level of brake fluid in the reservoir » Fig. 168.
The level must be between the “MIN” and “MAX” markings.
A slight drop in the fluid level results in operation due to normal wear-and-tear
and the automatic adjustment of the brake pads.
There may be an indication of a leak in the brake system, however, if the fluid
level drops significantly within a short time or if it drops below the “MIN” mark- ing.
If the brake fluid level is too low, this is indicated by the warning light
» page 35 ,
Brake system illuminating in the instrument cluster.
Changing
Read and observe
and on page 193 first.
Brake fluid absorbs moisture. Over time it therefore absorbs moisture from the
environment.
Excessive water in the brake fluid may be the cause of corrosion in the brake
system.
The water content lowers the boiling point of the brake fluid.
The brake fluid must comply with the following standards or specifications: › VW 50114;
› FMVSS 116 DOT4.
Vehicle battery
Introduction
This chapter contains information on the following subjects:
Open cover
195
Checking the battery electrolyte level
195
Charging
196
Replacing
196
Disconnecting or reconnecting
196
Automatic load deactivation
197
Warning symbols on the vehicle battery
SymbolMeaningAlways wear eye protection.Battery acid is severely caustic. Always wear gloves and eye pro-
tection. 193Inspecting and replenishing
Page 197 of 252

SymbolMeaningKeep fire, sparks, open flames and lit cigarettes well clear of the
vehicle battery.When charging the vehicle battery, a highly explosive gas mixture
is produced.Keep children away from the vehicle battery.WARNINGThere is risk of injuries, poisoning, chemical burns, explosions or fire when
working on the battery and on the electrical system. It is essential to com-
ply with the generally applicable rules of safety as well as the warning in-
structions outlined below.■
Keep the vehicle battery away from people who are not completely inde-
pendent, especially children.
■
Do not tilt the battery otherwise battery electrolyte may flow out of the
battery vent openings. Protect your eyes by wearing safety goggles or a
face shield – risk of blindness!
■
Always wear protective gloves, eye and skin protection when handling
the vehicle battery.
■
The battery acid is strongly corrosive and must, therefore, be handled
with the greatest of care.
■
Corrosive fumes in the air irritate the air passages and lead to conjunctivi-
tis and inflammation of the air passages in the lungs.
■
Battery acid corrodes dental enamel and, if it comes into contact with the
skin, causes deep wounds that take a long time to heal. Repeated contact
with diluted acids causes skin diseases (inflammations, ulcers, skin cracks).
■
If any battery acid comes into contact with your eyes, rinse the affected
eye immediately with clean water for several minutes and consult a doctor
immediately!
■
Splashes of acid on your skin or clothes should be neutralised as soon as
possible using soap suds and then rinsed with plenty of water. If you swal-
low battery acid, consult a doctor immediately!
WARNING■ It is prohibited to work with naked flames or lights.■It is prohibited to smoke or carry out any activities that produce sparks.■
Never use a damaged vehicle battery – risk of explosion!
WARNING (Continued)■Never charge a frozen or thawed vehicle battery – risk of explosion and
chemical burns!■
Replace a frozen vehicle battery.
■
Never jump-start vehicle batteries with insufficient acid levels – risk of
explosion and chemical burns.
WARNING■ When you charge a battery, hydrogen is released, and a highly explosive
gas mixture is also produced. An explosion can be caused through sparkling
over during unclamping or loosening of the cable plug while the ignition is
on.■
Creating a bridge between the poles on the battery (e.g. with a metal ob-
ject or cable) creates a short circuit - risk of melting the lead bars, and risk
of explosion, battery fire and acid splashes.
■
Avoid creating sparks when working with cables and electrical devices.
Strong sparking represents a risk of injury.
■
Before carrying out any work on the electrical system, switch off the en-
gine, the ignition and all electrical components and disconnect the negative
terminal (-) on the battery.
CAUTION
Improper handling of the battery can lead to damage. We recommend having
all work on the vehicle battery carried out by a specialist garage.
CAUTION
■ The vehicle battery must only be disconnected if the ignition is switched off,
otherwise the vehicle's electrical system (electronic components) can be dam-
aged. When disconnecting the battery from the electrical system, first of all
disconnect the negative terminal (-) of the battery, and then the positive ter-
minal (+).■
When connecting the battery to the electrical system, first of all connect the
positive terminal (+) of the battery, and then the negative terminal (-). Under
no circumstances must the battery cables be connected incorrectly – risk of a
cable fire.
■
Ensure that battery acid does not come into contact with the bodywork – risk
of damage to the paintwork.
■
Do not place the battery in direct daylight in order to protect the vehicle bat-
tery housing from the effects of ultra-violet light.
194General Maintenance
Page 198 of 252
 also in idle state")
■If the vehicle has not been driven for more than 3 to 4 weeks, the battery will
discharge. This is because certain electrical components consume electricity
(e. g. control units) also in idle state. Prevent the battery from discharging by
disconnecting the battery's negative terminal (-) or continuously charging the
battery with a very low charging current.■
If the vehicle is frequently used for making short trips, the vehicle battery
will not have time to charge up sufficiently and may discharge.
For the sake of the environment
A vehicle battery that has been removed is a special type of hazardous waste.
These must be disposed of in accordance with national legal regulations.
Note
You should replace batteries older than 5 years.
Open cover
Fig. 169
Polyester cover of the vehicle battery / plastic cover of the vehi-
cle battery
Read and observe
and on page 194 first.
The battery is located in the engine compartment, with some equipment under
a polyester cover » Fig. 169or in the left side compartment of the luggage com-
partment » page 101 .
Battery in the engine compartment
›
Open the battery cover in the direction of the arrow » Fig. 169 -
or press
the catch on the side of the battery cover in the direction » Fig. 169 -
.
›
fold the cover up and remove.
The battery cover is installed in reverse order.
Battery in the boot
The battery is located in the left side compartment with the symbol
» page 101 .
Checking the battery electrolyte level
Fig. 170
Vehicle battery: Electrolyte level
indicator
Read and observe and on page 194 first.
On vehicles with a vehicle battery fitted with a colour indicator, » Fig. 170 the
colouring of the display can indicate the acidic level.
Air bubbles can influence the colour of the indicator. For this reason carefully knock on the indicator before carrying out the check.
› Black colour - electrolyte level is correct.
› Colourless or light yellow colour - electrolyte level too low, the battery must
be replaced.
Vehicles with a START STOP system are fitted with a battery control unit for
checking the energy level for the recurring engine start.
We recommend that you have the acid level checked regularly by a specialist garage, especially in the following cases.
› High external temperatures.
› Longer day trips.
› After each charge.
Winter time
The vehicle battery only has some of its starting power at low temperatures. A
discharged vehicle battery may freeze at temperatures just below 0 °C .
We therefore recommend that you have the battery checked and, if necessary,
recharged by a specialist garage before the start of the winter.
195Inspecting and replenishing
Page 199 of 252

CAUTIONFor technical reasons, on vehicles with the description “AGM”, the electrolyte
level cannot be checked.
Note
The battery acid level is also checked regularly by a specialist garage as part of
the inspection service.
Charging
Read and observe
and on page 194 first.
A properly charged vehicle battery is essential for reliably starting the engine.
›
Switch off the ignition and all of the electrical components.
›
Disconnect both battery cables (“negative” first, then “positive”) only when“rapid charging” the battery.
›
Attach the terminal clamps of the charger to the battery terminals (red =
“positive”, black = “negative”).
›
Plug the mains cable of the charger into the power socket and switch the
charger on.
›
Once charging is complete: Switch off the charger and remove the mains ca-
ble from the power socket.
›
Only then disconnect the charger's terminal clamps.
›
Reconnect the cables to the battery (first “positive”, then “negative”).
It is not necessary to disconnect the battery cables if you are recharging the
vehicle battery using low amperages (for example from a mini-charger). Refer
to the charger manufacturer's instructions .
A charging current of 0.1 multiple of the total vehicle battery capacity (or low-
er) must be used until full charging is achieved.
Both cables must be disconnected before charging the battery with high
amperages, known as “ rapid charging”.
The vent plugs of the vehicle battery should not be opened for charging.
WARNING“Quick-charging” the vehicle battery is dangerous and requires a special
charger and specialist knowledge.CAUTIONOn vehicles with the START/STOP system, the pole terminal of the charger
must not be connected directly to the negative terminal of the vehicle battery,
but only to the engine earth » page 212, Jump-starting in vehicles with the
START STOP system .
Note
We therefore recommend that vehicle batteries be rapid charged by a special-
ist garage.
Replacing
Read and observe
and on page 194 first.
The new vehicle battery must have the same capacity, voltage, current and
size as the original battery. Suitable vehicle battery types can be purchased
from a specialist garage.
We recommend having the battery replaced by a specialist garage, where the
new vehicle battery will be installed properly and the original battery will be
disposed of in accordance with national regulations.
Disconnecting or reconnecting
Read and observe
and on page 194 first.
The following functions are initially deactivated or are no longer able to oper-
ate faultlessly after the vehicle battery has been disconnected and reconnec-
ted.
FunctionOperating measureElectrical power window (operational faults)» page 64Panoramic sliding roof (operational faults)» page 218Enter the radio/navigation system code
number» User manual of the radio
or » user manual of the naviga-
tion systemSetting the clock» page 32Data in the multifunction display are de-
leted.» page 44 196General Maintenance
Page 200 of 252

NoteWe recommend having the vehicle checked by a specialist garage in order to
ensure full functionality of all electrical systems.
Automatic load deactivation
Read and observe
and on page 194 first.
The vehicle voltage control unit automatically prevents the battery from dis-
charging when the battery is put under high levels of strain. This may be no-
ticed from the following.
› The idling speed is raised to allow the generator to deliver more electricity to
the electrical system.
› Where necessary, large convenience consumers such as seat heaters and
rear window heaters have their power limited or are shut off completely in
the event of an emergency.
CAUTION
■ Despite such intervention by the vehicle electric system management, the
vehicle battery may be drained. For example, when the ignition is switched on
a long time with the engine turned off or the side or parking lights are turned
on during longer parking.■
Consumers that are supplied via a 12-V power socket can cause the vehicle
battery to discharge when the ignition is switched off.
Note
Driving comfort is not impaired by consumers being deactivated. The driver is
often not aware of it having taken place.Wheels
Tyres and wheel rims
Introduction
This chapter contains information on the following subjects:
Service life of tyres
198
Unidirectional tyres
199
Spare and temporary spare wheel
200
Full wheel trim
200
Wheel bolts
201
Only use tyres or wheel rims that have been approved by ŠKODA for your mod-
el of vehicle.
WARNINGThe national legal regulations must be observed for the use of tyres.WARNINGInstructions for the use of tyres■For the first 500 km, new tyres do not yet provide optimum grip, and ap-
propriate care should therefore be taken when driving – risk of accident!■
For reasons of driving safety, do not replace tyres individually.
■
Never exceed the maximum permissible load bearing capacity of moun-
ted tyres.
■
Never exceed the maximum permissible speed for the mounted tyres.
■
An incorrect wheel alignment at the front or rear impairs handling.
■
Unusual vibrations or pulling of the vehicle to one side could be a sign of
tyre damage. If there is any doubt that a wheel is damaged, immediately re-
duce your speed and stop! If no external damage is evident, drive slowly
and carefully to the nearest specialist garage to have the vehicle checked.
WARNINGInformation regarding tyre damage or wear■Never use tyres if you do not know anything about the condition and age.■
Never drive with damaged tyres – there is the risk of an accident occur-
ring.
197Wheels
 1
1 2
2 3
3 4
4 5
5 6
6 7
7 8
8 9
9 10
10 11
11 12
12 13
13 14
14 15
15 16
16 17
17 18
18 19
19 20
20 21
21 22
22 23
23 24
24 25
25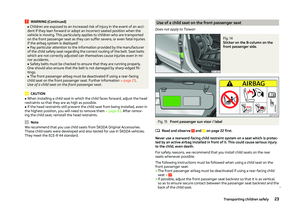 26
26 27
27 28
28 29
29 30
30 31
31 32
32 33
33 34
34 35
35 36
36 37
37 38
38 39
39 40
40 41
41 42
42 43
43 44
44 45
45 46
46 47
47 48
48 49
49 50
50 51
51 52
52 53
53 54
54 55
55 56
56 57
57 58
58 59
59 60
60 61
61 62
62 63
63 64
64 65
65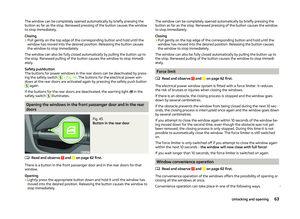 66
66 67
67 68
68 69
69 70
70 71
71 72
72 73
73 74
74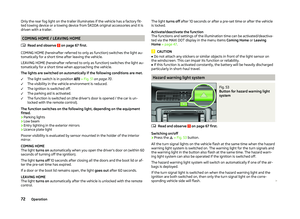 75
75 76
76 77
77 78
78 79
79 80
80 81
81 82
82 83
83 84
84 85
85 86
86 87
87 88
88 89
89 90
90 91
91 92
92 93
93 94
94 95
95 96
96 97
97 98
98 99
99 100
100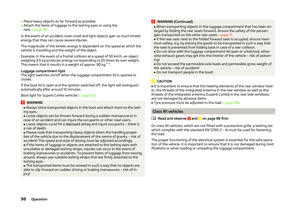 101
101 102
102 103
103 104
104 105
105 106
106 107
107 108
108 109
109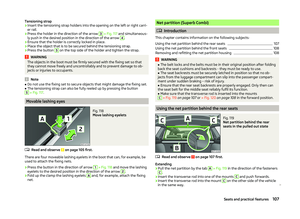 110
110 111
111 112
112 113
113 114
114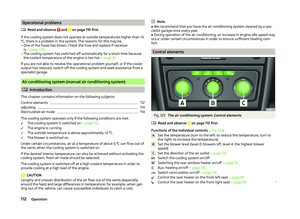 115
115 116
116 117
117 118
118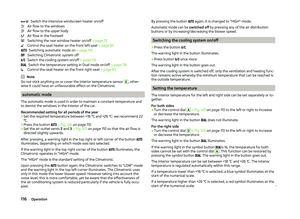 119
119 120
120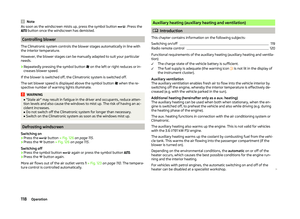 121
121 122
122 123
123 124
124 125
125 126
126 127
127 128
128 129
129 130
130 131
131 132
132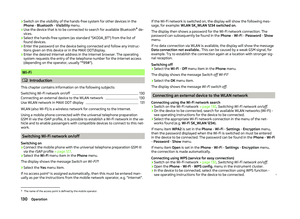 133
133 134
134 135
135 136
136 137
137 138
138 139
139 140
140 141
141 142
142 143
143 144
144 145
145 146
146 147
147 148
148 149
149 150
150 151
151 152
152 153
153 154
154 155
155 156
156 157
157 158
158 159
159 160
160 161
161 162
162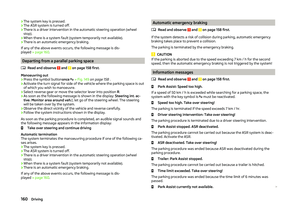 163
163 164
164 165
165 166
166 167
167 168
168 169
169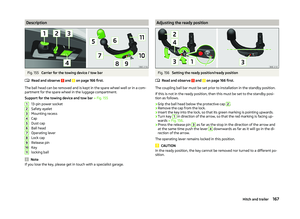 170
170 171
171 172
172 173
173 174
174 175
175 176
176 177
177 178
178 179
179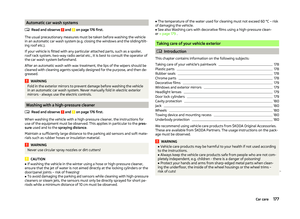 180
180 181
181 182
182 183
183 184
184 185
185 186
186 187
187 188
188 189
189 190
190 191
191 192
192 193
193 194
194 195
195 196
196 197
197 198
198 199
199 200
200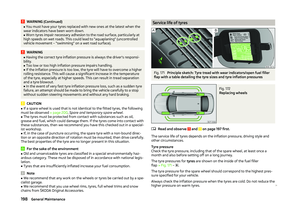 201
201 202
202 203
203 204
204 205
205 206
206 207
207 208
208 209
209 210
210 211
211 212
212 213
213 214
214 215
215 216
216 217
217 218
218 219
219 220
220 221
221 222
222 223
223 224
224 225
225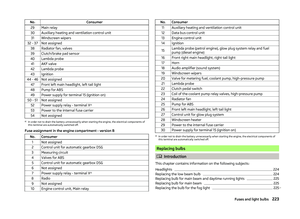 226
226 227
227 228
228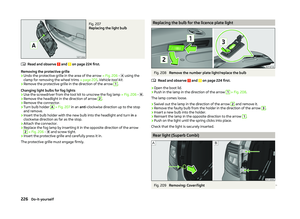 229
229 230
230 231
231 232
232 233
233 234
234 235
235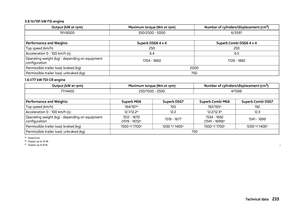 236
236 237
237 238
238 239
239 240
240 241
241 242
242 243
243 244
244 245
245 246
246 247
247 248
248 249
249 250
250 251
251