Page 121 of 252

NoteAs soon as the windscreen mists up, press the symbol button . Press the
button once the windscreen has demisted.
Controlling blower
The Climatronic system controls the blower stages automatically in line with
the interior temperature.
However, the blower stages can be manually adapted to suit your particular
needs.
›
Repeatedly pressing the symbol button on the left or right reduces or in-
creases blower speed.
If the blower is switched off, the Climatronic system is switched off.
The set blower speed is displayed above the symbol button when the re-
spective number of warning lights illuminate.
WARNING■ “Stale air” may result in fatigue in the driver and occupants, reduce atten-
tion levels and also cause the windows to mist up. The risk of having an ac-
cident increases.■
Do not switch off the Climatronic system for longer than necessary.
■
Switch on the Climatronic system as soon as the windows mist up.
Defrosting windscreen
Switching on
›
Press the
button » Fig. 126 on page 115 .
›
Press the
button » Fig. 126 on page 115 .
Switching off
›
Press the symbol button
again or press the symbol button
.
›
Press the
button again.
More air flows out of the air outlet vents 1 » Fig. 123 on page 110 . The tempera-
ture control is controlled automatically.
Auxiliary heating (auxiliary heating and ventilation)
Introduction
This chapter contains information on the following subjects:
Switching on/off
119
Radio remote control
120
Functional requirements of the auxiliary heating (auxiliary heating and ventila-
tion)
The charge state of the vehicle battery is sufficient.
The fuel supply is adequate (the warning icon is not lit in the display of
the instrument cluster).
Auxiliary ventilation
The auxiliary ventilation enables fresh air to flow into the vehicle interior by
switching off the engine, whereby the interior temperature is effectively de-
creased (e.g. with the vehicle parked in the sun).
Additional heating (hereinafter only as a aux. heating)
The auxiliary heating can be used when both when stationary, when the en-
gine is switched off, to preheat the vehicle and also while driving (e.g. during
the heating phase of the engine).
The aux. heating functions in connection with the air conditioning system or
Climatronic.
The auxiliary heating also warms up the engine. This is not valid for vehicles
with the 3.6 l/191 kW FSI engine.
The auxiliary heating warms up the coolant by combusting fuel from the vehi-
cle tank. This warms the air flowing into the passenger compartment (if the
blower is turned on).
Depending on the environmental conditions, the automatic on or off of the
heater occurs, which causes the best possible conditions for the engine run-
ning and the interior heating.
For vehicles with petrol engines, the automatic switching on and off of the
heater can be disabled at a specialist workshop.
118Operation
Page 122 of 252
 – risk of poisoning!■
The auxiliary heating must not be allowed to run during refuelling – risk
of fire.
�")
WARNING■The auxiliary heating must never be operated in closed rooms (e.g. garag-
es) – risk of poisoning!■
The auxiliary heating must not be allowed to run during refuelling – risk
of fire.
■
The exhaust pipe of the auxiliary heating is located on the underside of
the vehicle. If you want to use the heater, then the car should not be
parked in places where the exhaust gases can come into contact with flam- mable materials such as dry grass, undergrowth, leaves, spilled fuel or simi-
lar - Risk of fire.
CAUTION
■ The running auxiliary heater consumes fuel from the vehicle tank and auto-
matically controls the filling level. If only a low quantity of fuel is present in the
fuel tank, the auxiliary heating switches off.■
The exhaust pipe of the auxiliary heating, which is located on the underside
of the vehicle, must not be clogged and the exhaust flow must not be blocked.
■
If the auxiliary heating is running, the vehicle battery discharges. If the auxili-
ary heating and ventilation has been operated several times over a longer peri-
od, the vehicle must be driven a few kilometres in order to recharge the vehi-
cle battery.
■
The air inlet in front of the windscreen must be free (e.g. of ice, snow or
leaves) to ensure that the auxiliary heating operates properly.
Note
■ The auxiliary heating switches on the blower B » Fig. 125 on page 112
or » Fig. 126 on page 115 only if it has achieved a coolant temperature of ap-
prox. 50 °C.■
At low outside temperatures, this can result in a formation of water vapour in
the area of the engine compartment. This is quite normal and is not an operat-
ing problem.
■
So that warm air can flow into the vehicle interior after switching on the aux-
iliary heating, you must maintain the comfort temperature normally selected
by you, leave the fan switched on and leave the air outlet vents in an open po-
sition. It is recommended to put the air flow in the position
or
.
Switching on/offFig. 127
Button for switching on/off the system directly on the operating
part of the air conditioning/Climatronic
Read and observe
and on page 119 first.
The auxiliary heating can be switched on/off as follows.
Manually switching on using the button on the operating part of the manual air conditioning/Cli-
matronic. The warning light in the button illuminates » Fig. 127.
by using the radio remote control » page 120.
Manually switching off using the button on the operating part of the manual air conditioning/Cli-
matronic. The warning light in the button goes out » Fig. 127,
by using the radio remote control » page 120.
After switching off the auxiliary heating, the coolant pump still runs for a short period.
Automatic switching on/off
The following menu items can be selected from the Aux. heating menu item in
the information display » page 47 (depending on the vehicle equipment):
■ Day of the week - set the current day of the week;
■ Running time - Set the required running time in 5 minute increments. The
running time can be 10 to 60 minutes.
■ Mode - Set the desired heating/ventilation mode;
119Air conditioning system
Page 123 of 252
 can be set for switching on the auxiliary
heating. An empty position can be foun")
■Starting time 1 , Starting time 2 , Starting time 3 - for each pre-set time, the
day and the time (hour and minute) can be set for switching on the auxiliary
heating. An empty position can be found between Sunday and Monday when
selecting the day. If this empty position is selected, the activation is per-
formed without taking into account the day.
■ Activate - Activate pre-set mode;
■ Deactivate - Deactivate pre-set mode;
■ Factory settings - Restore factory settings
■ Back - Return to main menu
Only one programmed pre-set time can be active.
The last programmed pre-set time remains active.
After the auxiliary heating activates automatically at the set time, it is neces-
sary to pre-set a time again.
If the menu item Back is selected or no changes are made on the display for
longer than 10 seconds, the set values are stored, but the pre-set time is not
activated.
The system switches itself off at the end of the running time set under the
menu item Running time .
Note
A warning light on the button » Fig. 127 illuminates when the system is run-
ning.
Radio remote control
Fig. 128
Auxiliary heater: Radio remote
control
Read and observe and on page 119 first.
Explanation of graphic » Fig. 128
Aerial
Warning light
Switch on the auxiliary heating
Switch off the auxiliary heating
The transmitter and the battery are housed in the housing of the remote con- trol. The receiver is located in the interior of the vehicle.
When the battery is fully charged, the range of the remote control is a few
hundred metres. Obstacles between the remote control and the vehicle, bad
weather conditions and a weaker battery in the remote control can clearly re-
duce the range.
To switch the auxiliary heating on or off, hold the remote control vertically,
with the aerial
A
pointing upwards. The antenna must not be covered with
the fingers or the palm of the hand during this process.
The auxiliary heating can only be switched on/off safely using the radio re-
mote control, if the distance between the radio remote control and the vehicle
is at least 2 m.
After pressing the button, the warning light in the remote control gives the
user different kinds of feedback:
Display warning light B » Fig. 128MeaningLights up green for around 2 seconds.The auxiliary heating has been
switched on.Lights up red for around 2 seconds.The auxiliary heating has been
switched off.Slowly flashes green for around 2 sec-
onds.The ignition signal was not received.Quickly flashes green for around 2
seconds.The auxiliary heating is blocked, e. g
because the tank is nearly empty or
there is a fault in the auxiliary heat-
ing.Flashes red for around 2 seconds.The switch off signal was not re-
ceived.Lights up orange for around 2 sec-
onds, then green or red.The battery is weak, however the
switching on or off signal was re-
ceived. AB120Operation
Page 124 of 252

Display warning light B » Fig. 128MeaningLights up orange for around 2 sec-
onds, then flashes green or red.The battery is weak, however the
switching on or off signal was not re-
ceived.Flashes orange for around 5 seconds.The battery is discharged, however
the switching on or off signal was not
received.
Replace the battery » page 216.
CAUTION
The radio remote control comprises electronic components and must therefore
be protected against water, severe impacts and direct sunlight.Communication and multimedia
General information
Introduction
This chapter contains information on the following subjects:
Mobile phones and two-way radio systems
121
Universal telephone preinstallation (hands-free)
122
Operating the phone on the multifunction steering wheel
122
Symbols in the MAXI DOT display
123
Phone Phonebook
124
Mobile phones and two-way radio systems
ŠKODA permits the operation of mobile phones and two-way radio systems
with a professionally installed external aerial and a maximum transmission
power of up to 10 watts.
Please ask at a specialist workshop about installing and operating mobile
phones and two-way radio systems that have a transmission power of more
than 10 W.
Operating mobile phones or two-way radio systems may interfere with the
functionality of the electronic systems in your vehicle.
This could be for the following reasons.
› no external aerial.
› external aerial incorrectly installed.
› transmission power greater than 10 watts.
WARNING■
If a mobile phone or a two-way radio system is operated in a vehicle with-
out an external aerial or an external aerial which has been installed incor-
rectly, this can increase the strength of the electromagnetic field inside the
vehicle.■
Two-way radio systems, mobile phones or mounts must not be installed
on airbag covers or within the immediate deployment range of the airbags.
121Communication and multimedia
Page 125 of 252
■Never leave a mobile phone on a seat, on the dash panel or in any area
where it can become a projectile during a sudden braking manoeuvre, an
accident or a collision — risk of")
WARNING (Continued)■Never leave a mobile phone on a seat, on the dash panel or in any area
where it can become a projectile during a sudden braking manoeuvre, an
accident or a collision — risk of injury.■
Before transport of the vehicle by air, the Bluetooth ®
function must be
switched off by a specialist company.
Universal telephone preinstallation (hands-free)
The universal telephone preinstallation (hands-free system) includes a con-
venience mode for the mobile phone via voice control, the multifunction steer-
ing wheel and the radio or navigation system.
WARNING■ Concentrate fully at all times on your driving! As the driver, you are fully
responsible for the operation of your vehicle.■
Only use the device in such a way that you are in full control of your vehi-
cle in every traffic situation – there is the risk of accidents!
■
The national regulations for using a mobile phone in a vehicle must be
observed.
Note■ We recommend that mobile phones and two-way radio systems be installed
in the vehicle by a specialist workshop.■
Not all mobile phones that enable Bluetooth ®
communication are compatible
with the universal telephone preinstallation GSM II or GSM III. Ask a ŠKODA
Partner whether your phone is compatible with the universal telephone prepa-
ration GSM II or GSM III.
■
The range of the Bluetooth ®
connection to the hands-free system is restric-
ted to the vehicle interior. The range is dependent on local factors, e.g. obsta-
cles between the devices and mutual interferences with other devices. If your
mobile phone is in a jacket pocket, for example, this can lead to difficulties
when establishing a connection with the hands-free-system or transferring
data.
Operating the phone on the multifunction steering wheel
Fig. 129
Multifunction steering wheel: Control buttons for the telephone
There are buttons in the steering wheel for easy operation of the basic func-
tions of the phone » Fig. 129 so that the driver is distracted from the traffic as
little as possible when using the phone.
This applies only if your vehicle has been equipped with the universal tele-
phone installation at the factory.
The buttons control the functions for the operating mode of the current tele-
phone.
If the side lights are switched on, the buttons on the multifunction steering
wheel are illuminated. 122Operation
Page 126 of 252
1Turn upwardsIncrease volume1Turn downwardsDecrease volume2Press brieflyAccept a call/end a call
Display of the basic Phone menu → Ma")
Button/wheel
» Fig. 129ActionFunction
1Press briefly(MUTE )1Turn upwardsIncrease volume1Turn downwardsDecrease volume2Press brieflyAccept a call/end a call
Display of the basic Phone menu → Main Phone menu → List of dialled numbers → Call selected contact2Press button for a long period
of timeReject the incoming call3Turn up/downPrevious / next menu item3Press brieflyConfirm selected menu item3Press button for a long periodof timeContinuously display first letter of the phone book3Quickly turn upwardsTo the previous initial letter in the telephone book3Quickly turn downwardsTo the next initial letter in the telephone book4Press brieflyReturn to previous level in the menu4Press button for a long periodof timeExit telephone menu
Symbols in the MAXI DOT display
SymbolMeaningValid forCharge status of the telephone battery a)GSM II, GSM IIISignal strengtha)GSM II, GSM IIIA phone is connected with the hands-free system.GSM II, GSM III when connected via the HFP profileThe hands-free system is visible to other devicesGSM II, GSM III when connected via the HFP profileA phone is connected with the hands-free system.GSM III when connected via the rSAP profileThe hands-free system is visible to other devicesGSM III when connected via the rSAP profileA multimedia unit is connected to the hands-free systemGSM II, GSM IIIA UMTS network is availableGSM IIIInternet connection via the hands-free systemGSM III when connected via the rSAP profilea)
This function is only supported by some mobile phones.
123Communication and multimedia
Page 127 of 252

Phone Phonebook
A phone phonebook is part of the hands-free system. This phone phonebook
can be used depending on the type of mobile phone.
After the telephone's first connection to the hands-free system, the phone
book from the phone and the SIM card loads into the hands-free memory.
Each time the telephone has established a new connection with the hands-
free system, an update of the relevant phone book is performed. The updating
can take a few minutes. During this period, the available phone book is the one
stored at the previous update. Newly stored telephone numbers are only
shown after the updating has ended.
The update is interrupted if a telephone event (e.g. incoming or outgoing call,
voice control dialogue) occurs during the updating procedure. After the tele-
phone event has ended, the updating starts anew.
GSM II
The internal phonebook provides 2,500 free memory locations. Each contact
can contain up to 4 numbers.
On vehicles fitted with the Columbus navigation system, a maximum of 1,200
telephone contacts are shown on the display of this appliance.
If the number of loaded contacts exceeds 2,500, the phone book is not com-
plete.
GSM III
The internal phonebook provides 2000 free memory locations. Each contact
can contain up to 5 numbers.
On vehicles fitted with the Columbus navigation system, a maximum of 1000
telephone contacts are shown on the display of this appliance.
If the mobile phone's telephone book has more than 2,000 contacts, the fol- lowing message will appear in the MAXI DOTdisplay:
Phone book not fully loadedUniversal telephone preinstallation GSM II
Introduction
This chapter contains information on the following subjects:
Connecting the mobile phone to the hands-free system
124
Telephone operation in the MAXI DOT display
125
The universal telephone preinstallation GSM II comprises the following func- tions.
› Phone Phonebook
» page 124.
› Convenience operation of the telephone via the multifunction steering
wheel » page 122 .
› Telephone operation in the MAXI DOT display
» page 122.
› Voice control of the telephone
» page 131.
› Music playback from the telephone or other multimedia units
» page 134.
All communication between a mobile phone and your vehicle's hands-free sys-
tem is established with the help of Bluetooth ®
technology.
Note
The following guidelines must be observed » page 121, Mobile phones and
two-way radio systems .
Connecting the mobile phone to the hands-free system
To connect a mobile phone with the hands-free system, the two devices must
be paired. Detailed information on this is provided in the operating instructions
for your mobile phone.
The following steps must be carried out for the connection.
›
Activate Bluetooth ®
and the visibility of your mobile phone on your tele-
phone.
›
Switch on the ignition.
›
Select the Phone - New user menu in the MAXI DOT display and wait until
the hands-free system has completed the search.
›
Select the phone you wish to connect from the list of units found.
›
Confirm the PIN 1)
.
1)
Depending on the Bluetooth®
version on the mobile phone, an automatically generated 6-digit PIN (SSP)
is either displayed, or the PIN 1234 has to be entered manually.
124Operation
Page 128 of 252
 on the display
of the mobile phone, enter the PIN 1)
within 30 seconds and wait, until the
connection is established 2)
.›
To finish pa")
›If the hands-free system announces (as standard
SKODA_BT) on the display
of the mobile phone, enter the PIN 1)
within 30 seconds and wait, until the
connection is established 2)
.›
To finish pairing, confirm the creation of the new user profile in the MAXI
DOT display.
If there is no free space available to create a new user profile, delete an exist-
ing user profile.
During the connecting procedure, no other mobile phone may be connected
with the hands-free system.
Up to four mobile phones can be paired with the hands-free system, whereby
only one mobile phone can communicate with the hands-free system.
The visibility of the hands-free system is automatically switched off 3 minutes
after the ignition is switched on and is also deactivated when the mobile
phone has connected to the hands-free system.
Restoring the visibility of the hands-free system
If you have not managed to connect your mobile phone with the hands-free
system within 3 minutes of switching on the ignition, the visibility of the
hands-free system can be re-established for 3 minutes in the following ways.
› By turning the ignition off and on.
› By turning voice control off and on.
› In the
Bluetooth - Visibility menu in the MAXI DOT display.
Creating a connection with an already paired mobile phone
After switching on the ignition, the connection is automatically established for the already paired mobile phone 2)
. Check on your mobile phone if the automatic
connection has been established.
Disconnecting the connection
› By withdrawing the ignition key.
› By disconnecting the hands-free system in the mobile phone.
› By disconnecting the user in the
Bluetooth - Users menu item in the MAXI
DOT display.
Solving connection problems
If the hands-free system reports No paired phone found, check the operating
status of the mobile phone.
› Is the mobile phone switched on?
› Is the PIN code entered?
› Is Bluetooth ®
active?
› Is the visibility of the mobile phone active?
› Has the mobile phone already been paired with the hands-free system?
Telephone operation in the MAXI DOT display
The following menu items can be selected from the Phone menu.
■ Phone book
■ Dial number 3)
■ Call register
■ Voice mailbox
■ Bluetooth 3)
■ Settings 4)
■ Back
Phone book
The Phone book menu item lists the contacts downloaded from the telephone
memory and the mobile phone SIM card.
Dial number
Any telephone number can be entered in the Dial number menu item. The re-
quired numbers must be selected one after the other using adjustment wheel
and confirmed by pressing the adjustment wheel. You can select digits 0 - 9,
symbols ,
, #
and the Cancel, Call and Delete functions.
1)
Depending on the Bluetooth®
version on the mobile phone, an automatically generated 6-digit PIN (SSP)
is either displayed, or the PIN 1234 has to be entered manually.
2)
Some mobile phones have a menu, in which the authorisation for establishing a Bluetooth ®
connection
is completed by inputting a code. If the authorisation input is required, it must always be performed
when re-establishing the Bluetooth connection.
3)
On vehicles fitted with the Amundsen+ navigation system, this function can be accessed via the naviga-
tion system menu; refer to the » Operating instructions for the Amundsen+ navigation system .
4)
This function is not available in vehicles fitted with the Amundsen+ navigation system.
125Communication and multimedia
 1
1 2
2 3
3 4
4 5
5 6
6 7
7 8
8 9
9 10
10 11
11 12
12 13
13 14
14 15
15 16
16 17
17 18
18 19
19 20
20 21
21 22
22 23
23 24
24 25
25 26
26 27
27 28
28 29
29 30
30 31
31 32
32 33
33 34
34 35
35 36
36 37
37 38
38 39
39 40
40 41
41 42
42 43
43 44
44 45
45 46
46 47
47 48
48 49
49 50
50 51
51 52
52 53
53 54
54 55
55 56
56 57
57 58
58 59
59 60
60 61
61 62
62 63
63 64
64 65
65 66
66 67
67 68
68 69
69 70
70 71
71 72
72 73
73 74
74 75
75 76
76 77
77 78
78 79
79 80
80 81
81 82
82 83
83 84
84 85
85 86
86 87
87 88
88 89
89 90
90 91
91 92
92 93
93 94
94 95
95 96
96 97
97 98
98 99
99 100
100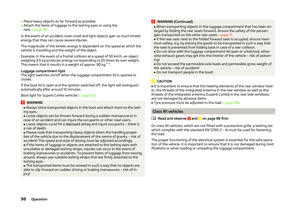 101
101 102
102 103
103 104
104 105
105 106
106 107
107 108
108 109
109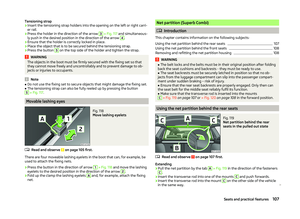 110
110 111
111 112
112 113
113 114
114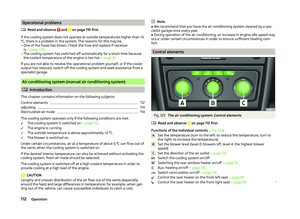 115
115 116
116 117
117 118
118 119
119 120
120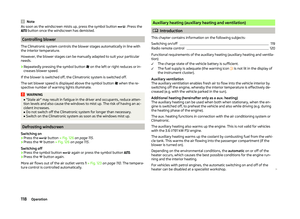 121
121 122
122 123
123 124
124 125
125 126
126 127
127 128
128 129
129 130
130 131
131 132
132 133
133 134
134 135
135 136
136 137
137 138
138 139
139 140
140 141
141 142
142 143
143 144
144 145
145 146
146 147
147 148
148 149
149 150
150 151
151 152
152 153
153 154
154 155
155 156
156 157
157 158
158 159
159 160
160 161
161 162
162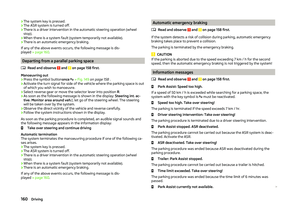 163
163 164
164 165
165 166
166 167
167 168
168 169
169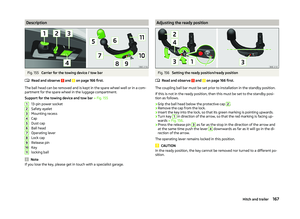 170
170 171
171 172
172 173
173 174
174 175
175 176
176 177
177 178
178 179
179 180
180 181
181 182
182 183
183 184
184 185
185 186
186 187
187 188
188 189
189 190
190 191
191 192
192 193
193 194
194 195
195 196
196 197
197 198
198 199
199 200
200 201
201 202
202 203
203 204
204 205
205 206
206 207
207 208
208 209
209 210
210 211
211 212
212 213
213 214
214 215
215 216
216 217
217 218
218 219
219 220
220 221
221 222
222 223
223 224
224 225
225 226
226 227
227 228
228 229
229 230
230 231
231 232
232 233
233 234
234 235
235 236
236 237
237 238
238 239
239 240
240 241
241 242
242 243
243 244
244 245
245 246
246 247
247 248
248 249
249 250
250 251
251