2011 Peugeot Partner Owner's Manual - RHD (UK, Australia)
-
 1
1 -
 2
2 -
 3
3 -
 4
4 -
 5
5 -
 6
6 -
 7
7 -
 8
8 -
 9
9 -
 10
10 -
 11
11 -
 12
12 -
 13
13 -
 14
14 -
 15
15 -
 16
16 -
 17
17 -
 18
18 -
 19
19 -
 20
20 -
 21
21 -
 22
22 -
 23
23 -
 24
24 -
 25
25 -
 26
26 -
 27
27 -
 28
28 -
 29
29 -
 30
30 -
 31
31 -
 32
32 -
 33
33 -
 34
34 -
 35
35 -
 36
36 -
 37
37 -
 38
38 -
 39
39 -
 40
40 -
 41
41 -
 42
42 -
 43
43 -
 44
44 -
 45
45 -
 46
46 -
 47
47 -
 48
48 -
 49
49 -
 50
50 -
 51
51 -
 52
52 -
 53
53 -
 54
54 -
 55
55 -
 56
56 -
 57
57 -
 58
58 -
 59
59 -
 60
60 -
 61
61 -
 62
62 -
 63
63 -
 64
64 -
 65
65 -
 66
66 -
 67
67 -
 68
68 -
 69
69 -
 70
70 -
 71
71 -
 72
72 -
 73
73 -
 74
74 -
 75
75 -
 76
76 -
 77
77 -
 78
78 -
 79
79 -
 80
80 -
 81
81 -
 82
82 -
 83
83 -
 84
84 -
 85
85 -
 86
86 -
 87
87 -
 88
88 -
 89
89 -
 90
90 -
 91
91 -
 92
92 -
 93
93 -
 94
94 -
 95
95 -
 96
96 -
 97
97 -
 98
98 -
 99
99 -
 100
100 -
 101
101 -
 102
102 -
 103
103 -
 104
104 -
 105
105 -
 106
106 -
 107
107 -
 108
108 -
 109
109 -
 110
110 -
 111
111 -
 112
112 -
 113
113 -
 114
114 -
 115
115 -
 116
116 -
 117
117 -
 118
118 -
 119
119 -
 120
120 -
 121
121 -
 122
122 -
 123
123 -
 124
124 -
 125
125 -
 126
126 -
 127
127 -
 128
128 -
 129
129 -
 130
130 -
 131
131 -
 132
132 -
 133
133 -
 134
134 -
 135
135 -
 136
136 -
 137
137 -
 138
138 -
 139
139 -
 140
140 -
 141
141 -
 142
142 -
 143
143 -
 144
144 -
 145
145 -
 146
146 -
 147
147 -
 148
148 -
 149
149 -
 150
150 -
 151
151 -
 152
152 -
 153
153 -
 154
154 -
 155
155 -
 156
156 -
 157
157 -
 158
158 -
 159
159 -
 160
160 -
 161
161 -
 162
162 -
 163
163 -
 164
164 -
 165
165 -
 166
166 -
 167
167 -
 168
168 -
 169
169 -
 170
170 -
 171
171 -
 172
172 -
 173
173 -
 174
174 -
 175
175 -
 176
176 -
 177
177 -
 178
178 -
 179
179 -
 180
180 -
 181
181 -
 182
182 -
 183
183 -
 184
184 -
 185
185 -
 186
186 -
 187
187 -
 188
188 -
 189
189 -
 190
190 -
 191
191 -
 192
192 -
 193
193 -
 194
194 -
 195
195 -
 196
196 -
 197
197 -
 198
198 -
 199
199
 63
EASE OF USE and COMFOR
T
33
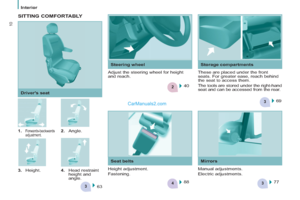
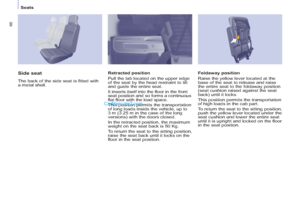
Seats
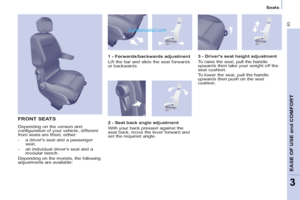
FRONT SEATS
Depending on the version and
confi guration of your vehicle, different
front seats are fi tted, either:
- a drivers seat a")
 64
Seats
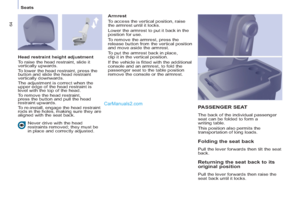
Never drive with the head
restraints removed; they must be
in place and correctly adjusted.
PASSENGER SEAT
The back of the individual passenger
seat can be folded to form a
writi")
 65
EASE OF USE and COMFOR
T
33
Seats
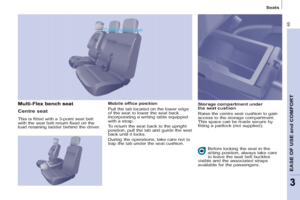
Mobile offi ce position
Pull the tab located on the lower edge
of the seat to lower the seat back
incorporating a writing table equipped
with")
 66
Seats
Foldaway position
Raise the yellow lever located at the
base of the seat to release and raise
the entire seat to the foldaway position
(seat cushion raised against the seat
back) u")
 67
EASE OF USE and COMFOR
T
33
Seats
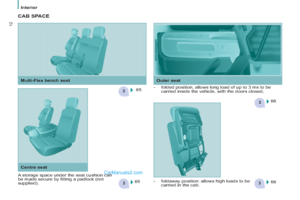
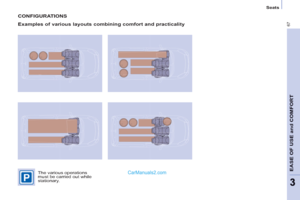
CONFIGURATIONS
Examples of various layouts combining comfort and practicality
The various operations
must be carried out while
stationary.")
 68
Practical information
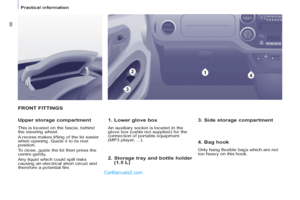
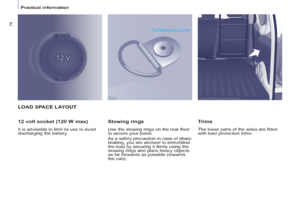
FRONT FITTINGS
1. Lower glove box
An auxiliary socket is located in the
glove box (cable not supplied) for the
connection of portable equipment
(MP3 player")
 69
EASE OF USE and COMFOR
T
33
Practical information
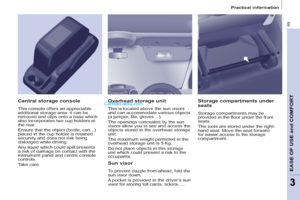
Overhead storage unit
This is located above the sun visors
and can accommodate various objects
(a jumper, fi le, gloves ...).")
 70
Practical information
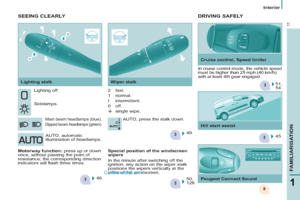
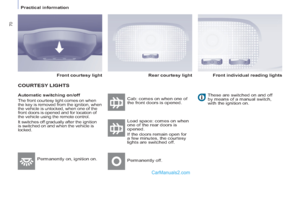
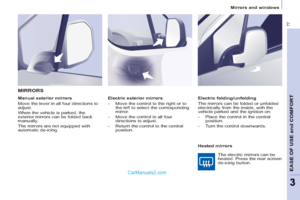
Automatic switching on/off
The front courtesy light comes on when
the key is removed from the ignition, when
the vehicle is unlocked, when one of the
front")