Page 4 of 200
2
Contents
Key 15
Remote control 15
Alarm 17
Doors 18
Rear roof fl ap 22
Tailgate 23
Central locking 24
Instrument panel 25
Adjusting the time 26
Warning lamps 27
Fuel gauge 33
Coolant 33
Tyre under-infl ation
detection 34
Service indicator 35
Lighting rheostat 36
Gearbox 37
Gear shift indicator 37
6-speed electronic
gearbox system 38
Steering
wheel adjustment 40
Stop & Start 41
Starting and stopping 44
Hill start assist 45
Lighting
control 46
wipers 49
Cruise control 51
Speed limiter 54
Heating/Manual
air conditioning 57
automatic 59
De-icing and demisting 61
Front seats 63
Individual
passenger seat 64
Multi-Flex bench seat 65
Confi gurations 67
Front fi ttings 68
Courtesy lights 70
Torch 71
Crew cab 72
Load space 74
Roof bars 76
Mirrors 77
Toll cards/
car park tickets 78
Electric windows 79
Presentation4
Communication4
Exterior 6
Instruments
and controls8
Centre console9
Sitting comfortably 10
Seeing clearly 11
Driving safely 11
Cab space 12
Load space 13
Ventilation 14
Hazard warning lamps 80
Parking brake 80
Parking assistance 81
Anti-lock braking system
(ABS) 83
Emergency braking
assistance 83
Traction control (ASR)
and stability control
(ESP) 84
Grip control 85
Seat belts 88
Airbags 90
Passenger
airbag deactivation 93
Child seats 94
Recommended seats 95
Installing child seats
using the seat belt 96
2. READY TO SET OFF
15-45
4. SAFETY
80-97
1. FAMILIARISATION
4-14
3. EASE OF USE and
COMFORT 46-79
Page 9 of 200
4
2c
2e
7b
7a
2d8
2e
7b
2c
7a4
2d
8
7
1
FAMILIARISATION
20
22
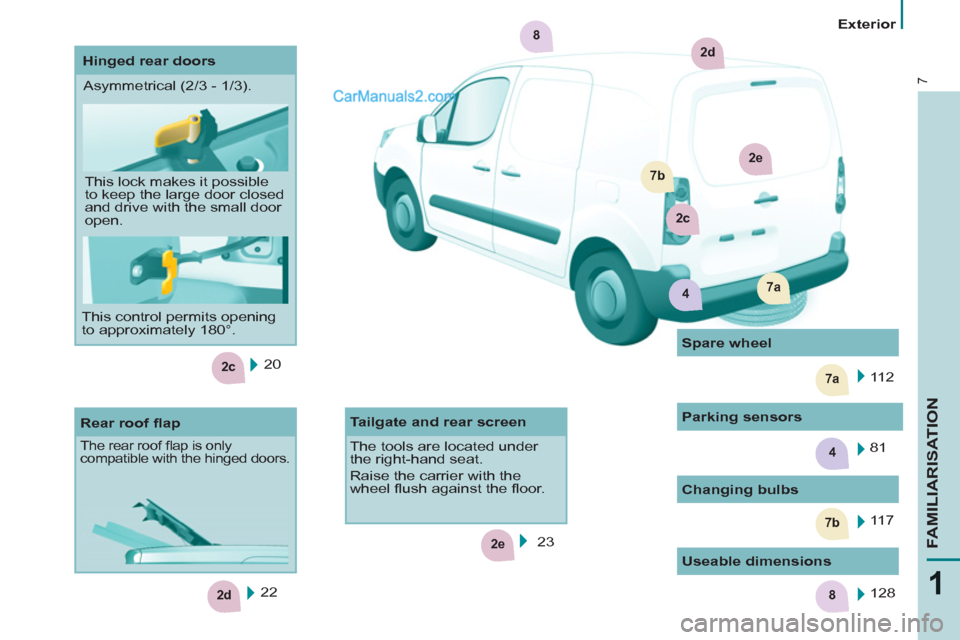
Rear roof fl ap
The rear roof fl ap is only
compatible with the hinged doors.
Changing bulbs
11 7 11 2
Spare wheel
Hinged rear doors
Tailgate and rear screen
The tools are located under
the right-hand seat.
Raise the carrier with the
wheel fl ush against the fl oor.
23 Asymmetrical (2/3 - 1/3).
This lock makes it possible
to keep the large door closed
and drive with the small door
open.
This control permits opening
to approximately 180°.
Useable dimensions
128
Parking sensors
81
Exterior
Page 25 of 200
23
Access
READY TO SET OFF
2
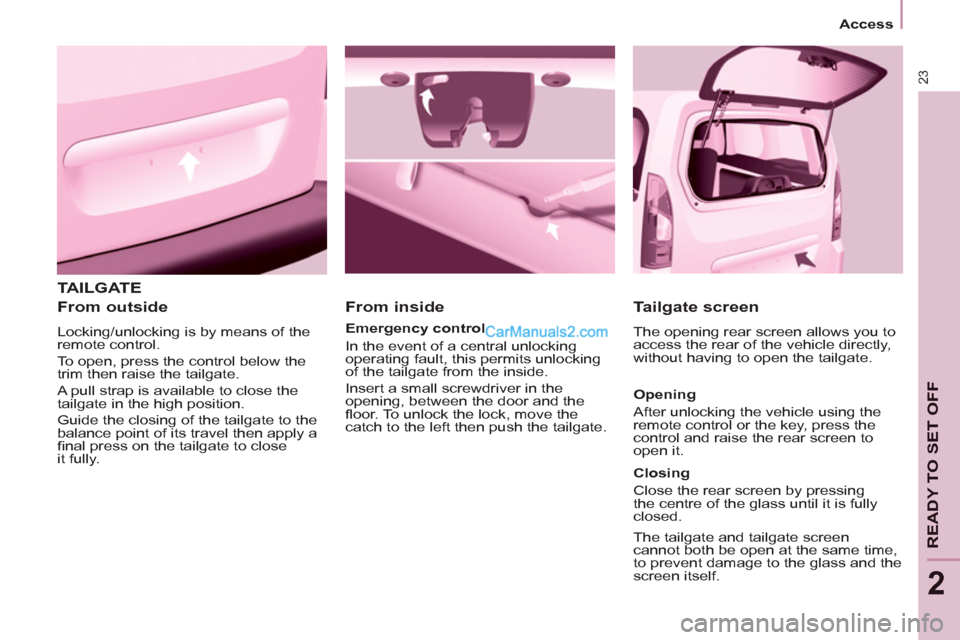
TAILGATE
From outside
Locking/unlocking is by means of the
remote control.
To open, press the control below the
trim then raise the tailgate.
A pull strap is available to close the
tailgate in the high position.
Guide the closing of the tailgate to the
balance point of its travel then apply a
fi nal press on the tailgate to close
it fully.
From inside
Emergency control
In the event of a central unlocking
operating fault, this permits unlocking
of the tailgate from the inside.
Insert a small screwdriver in the
opening, between the door and the
fl oor. To unlock the lock, move the
catch to the left then push the tailgate.
Tailgate screen
The opening rear screen allows you to
access the rear of the vehicle directly,
without having to open the tailgate.
Opening
After unlocking the vehicle using the
remote control or the key, press the
control and raise the rear screen to
open it.
Closing
Close the rear screen by pressing
the centre of the glass until it is fully
closed.
The tailgate and tailgate screen
cannot both be open at the same time,
to prevent damage to the glass and the
screen itself.
Page 102 of 200
100
Equipment
Anti-theft alarm, window
etching, fi rst aid kit, high
visibility vest, front and rear
parking sensors, warning
triangle, security bolts for alloy
wheels
Front seat covers compatible
with airbags, bench, rubber
mats, carpet mats, snow chains,
blind, tailgate bicycle carrier, ...
Audio equipment, hands-free
kit, speakers, CD changer,
satellite navigation system,
USB Box, Video kit, ... To prevent the mat from becoming
caught under the pedals:
- ensure that the mat and its fi xings
are positioned correctly,
- never fi t one mat on top of another.
Regardless of the audio and telematic
equipment offered on the market,
the technical constraints associated
with the fi tting of equipment of these
families of products mean that the
special features of the equipment and
its compatibility with the capacities of
the your vehicle's standard equipment
must be taken into account. Please
contact a PEUGEOT dealer for
more information before fi tting such
equipment.
Maximum weights on bars
- Roof rack: 120 Kg.
- Transverse bars on roof: 100 Kg.
- Transverse bars on longitudinal
bars: 75 Kg.
Installation of radiocommunication
transmitters
Before installing accessory
radiocommunication transmitters with
an external aerial on your vehicle, you
are advised to contact a representative
of the PEUGEOT marque.
The PEUGEOT dealer network will
inform you of the specifi cations
(frequency band, maximum output
power, aerial position, specifi c
installation conditions) of the
transmitters which can be fi tted, in
accordance with the Motor Vehicle
Electromagnetic Compatibility Directive
(2004/104/CE).
Front mud fl aps, rear mud
fl aps, 15/17 inch alloy wheels,
wheelarch trim, leather steering
wheel, ...
Screenwash, interior and
exterior cleaning and
maintenance products,
replacement bulbs, ...
The fi tting of electrical equipment
or accessories which are not
recommended by Automobiles
PEUGEOT may result in the failure
of your vehicle's electronic system.
Please note this specifi c warning. You
are advised to contact a representative
of the Marque to be shown the range
of recommended equipment and
accessories.
Depending on the country in which
the vehicle is sold or operated, it is
compulsory to have a high visibility
safety jacket, warning triangle and
replacement bulbs available in the
vehicle.
"Active Fleet Data" Telematic unit
Connected directly to the heart of the
vehicle (multiplexed network: "Full CAN"),
the telematic unit, by means of a "ready to
use" service, permits the sending in real
time of information such as:
- distance travelled,
- distance remaining before the next
service,
- warnings and faults (oil level,
coolant level, oil temperature,
coolant temperature, etc...).
This enables "Fleet" managers
to optimise the monitoring and
management of their professional
vehicles.
According to country, contact
a PEUGEOT dealer for further
information.
Page 122 of 200
120
Changing a bulb
For more information concerning the
bulbs, refer to the "Types of bulb".
1.
Brake lamps/sidelamps
Type B
, P21/5W - 21/5W
2.
Direction indicators
Type B
, PY21W - 21W (amber)
3.
Reversing lamps
Type B
, P21W - 21W
4.
Foglamps
Type B
, P21W - 21W
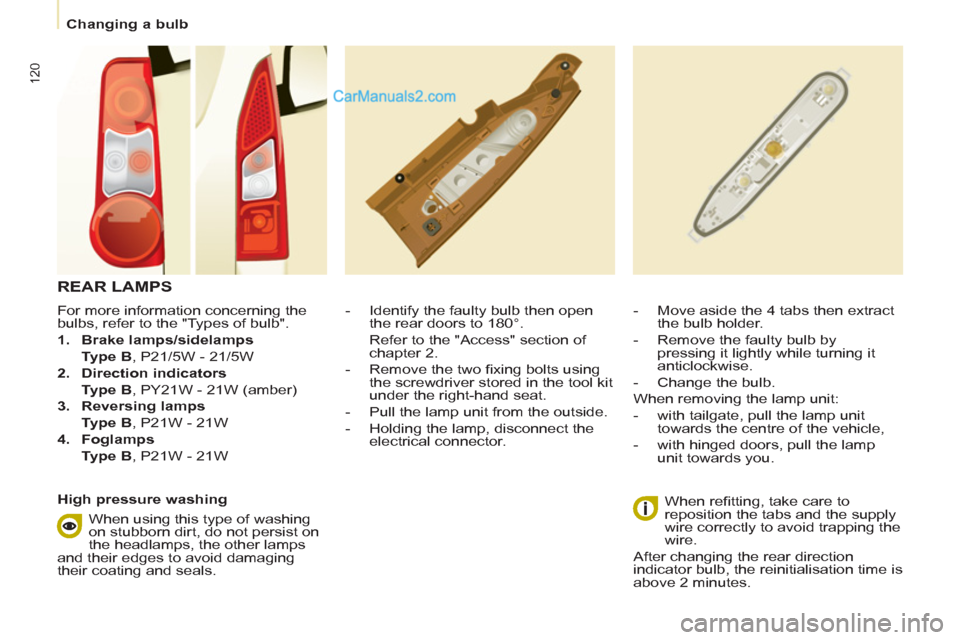
- Identify the faulty bulb then open
the rear doors to 180°.
Refer to the "Access" section of
chapter 2.
- Remove the two fi xing bolts using
the screwdriver stored in the tool kit
under the right-hand seat.
- Pull the lamp unit from the outside.
- Holding the lamp, disconnect the
electrical connector.
- Move aside the 4 tabs then extract
the bulb holder.
- Remove the faulty bulb by
pressing it lightly while turning it
anticlockwise.
- Change the bulb.
When removing the lamp unit:
- with tailgate, pull the lamp unit
towards the centre of the vehicle,
- with hinged doors, pull the lamp
unit towards you.
When refi tting, take care to
reposition the tabs and the supply
wire correctly to avoid trapping the
wire.
After changing the rear direction
indicator bulb, the reinitialisation time is
above 2 minutes.
REAR LAMPS
High pressure washing
When using this type of washing
on stubborn dirt, do not persist on
the headlamps, the other lamps
and their edges to avoid damaging
their coating and seals.
Page 123 of 200
121
QUICK HELP
7
Changing a bulb
NUMBER PLATE LAMPS
- Unscrew the two nuts.
- Push the pins.
- If necessary, disconnect the
connector to remove the light.
- Change the bulb.
With tailgate
- Move aside the plastic lens using a
screwdriver.
- Change the bulb.
- Replace the plastic lens and press
on it.
THIRD BRAKE LIGHT
Ty p e A
, W16W - 16W
With hinged doors
- Unclip the interior trim.
- Disconnect the connector by
moving aside its tab.
- Turn the bulb holder a quarter turn
anticlockwise.
- Change the bulb.
- Put the bulb holder back in place
and reconnect the connector.
- Put the trim back in place.
Type A
, W5W - 5W
Page 132 of 200
130
Dimensions
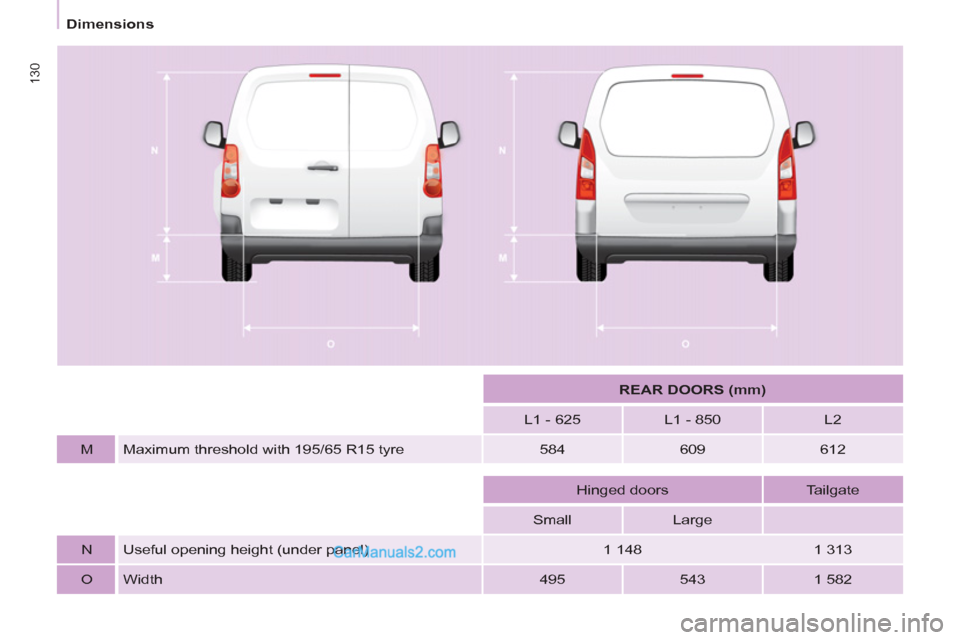
REAR DOORS (mm)
L1 - 625
L1 - 850
L2
M Maximum threshold with 195/65 R15 tyre
584
609
612
Hinged doors
Tailgate
Small
Large
N Useful opening height (under panel)
1 148
1 313
O Width
495
543
1 582
Page 133 of 200
131
TECHNICAL DAT
A
8
Dimensions
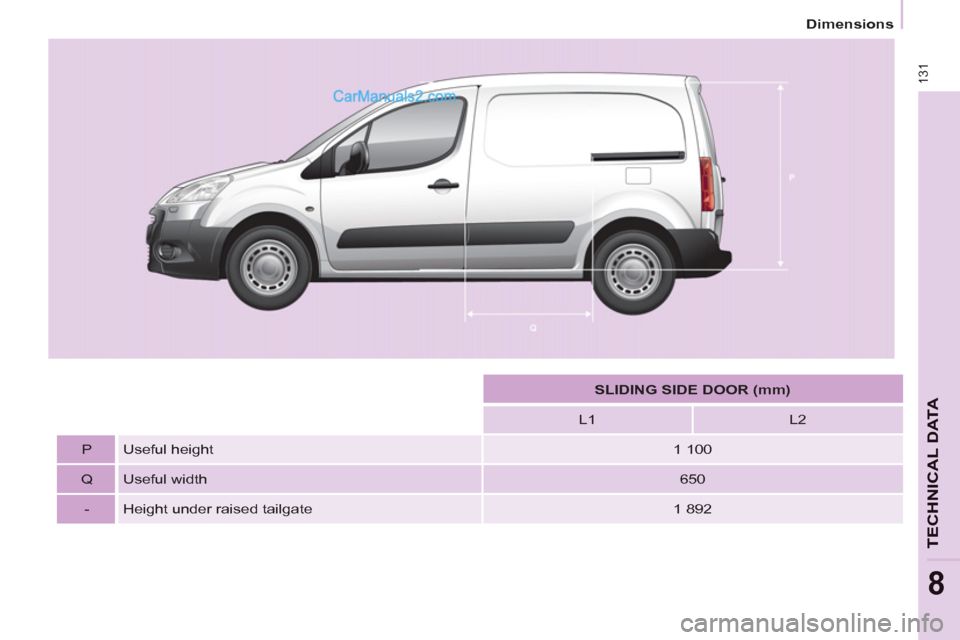
SLIDING SIDE DOOR (mm)
L1
L2
P
Useful height
1 100
Q
Useful width
650
-
Height under raised tailgate
1 892