Page 228 of 3787
A/T SHIFT LOCK SYSTEMAT-211
< SERVICE INFORMATION >
DE
F
G H
I
J
K L
M A
B
AT
N
O P
3. Check continuity between A/T shift selector harness connector terminal 6 and ground.
4. Connect A/T shift selector harness connector.
OK or NG
OK >> Replace shift lock solenoid and park position switch assembly. Refer to AT-216, "
A/T Shift Selector Disas-
sembly and Assembly".
NG >> Repair open circuit or short to ground or short to power in harness or connectors.
Continuity should exist.
SCIA7937E
Revision: May 2010
2011 Versa
Page 230 of 3787
SHIFT CONTROL SYSTEMAT-213
< SERVICE INFORMATION >
DE
F
G H
I
J
K L
M A
B
AT
N
O P
SHIFT CONTROL SYSTEM
A/T Shift Selector Removal and InstallationINFOID:0000000005928272
A/T SHIFT SELECTOR COMPONENTS
CONTROL CABLE COMPONENTS
1. Shift selector handle 2. Shift selector handle cover 3. Shift selector handle clip
4. Overdrive control switch 5. Shift selector handle finisher 6. Shift selector handle button
7. Shift selector handle spring 8. Position indicator plate 9. Position lamp
10. Dust cover 11. Bracket12. Shift lock solenoid and park posi-
tion switch assembly
13. A/T shift selector harness con- nector 14. Plate
15. A/T shift selector assembly
WCIA0638E
Revision: May 2010 2011 Versa
Page 231 of 3787
AT-214
< SERVICE INFORMATION >
SHIFT CONTROL SYSTEM
REMOVAL
CAUTION:
Make sure that parking brake is applied before removal/installation.
1. Place the shift selector in the “N” position.
2. Remove the center console assembly. Refer to IP-11
.
3. Disconnect the A/T shift selector harness connector (1).
4. Remove the key interlock cable from the A/T shift selector assembly. Refer to AT-219, "
Removal and Installation".
5. Remove the bolts (A) from the A/T shift selector assembly (1).
6. Remove exhaust front tube, center muffler and heat plates. Refer to EM-141
.
1. Shift selector handle 2. A/T shift selector assembly 3. Lock plate
4. Floor panel 5. Shift selector control cable 6. Bracket
7. Lock plate 8. Lock nut 9. A/T assembly
10. Bracket 11. Bracket
WCIA0640E
SCIA6965E
WCIA0609E
Revision: May 2010 2011 Versa
Page 232 of 3787
SHIFT CONTROL SYSTEMAT-215
< SERVICE INFORMATION >
DE
F
G H
I
J
K L
M A
B
AT
N
O P
7. Remove the plate (1) from the A/T shift selector assembly. : Vehicle front
8. Remove the lock plate (1) from the shift selector control cable (2).
: Vehicle front
9. Remove the shift selector control cable (2) from the A/T shift selector assembly.
10. Insert suitable tool at points (A) and (B) as shown, and press both tabs (E) and (F) at the front (C) and rear (D) slightly toward
the center of the A/T shift select or assembly to remove the A/T
shift selector assembly from the underside of the vehicle.
: Vehicle front
INSTALLATION
Installation is in the reverse order of removal.
SCIA6967E
SCIA6968E
SCIA6970E
Revision: May 2010 2011 Versa
Page 233 of 3787

AT-216
< SERVICE INFORMATION >
SHIFT CONTROL SYSTEM
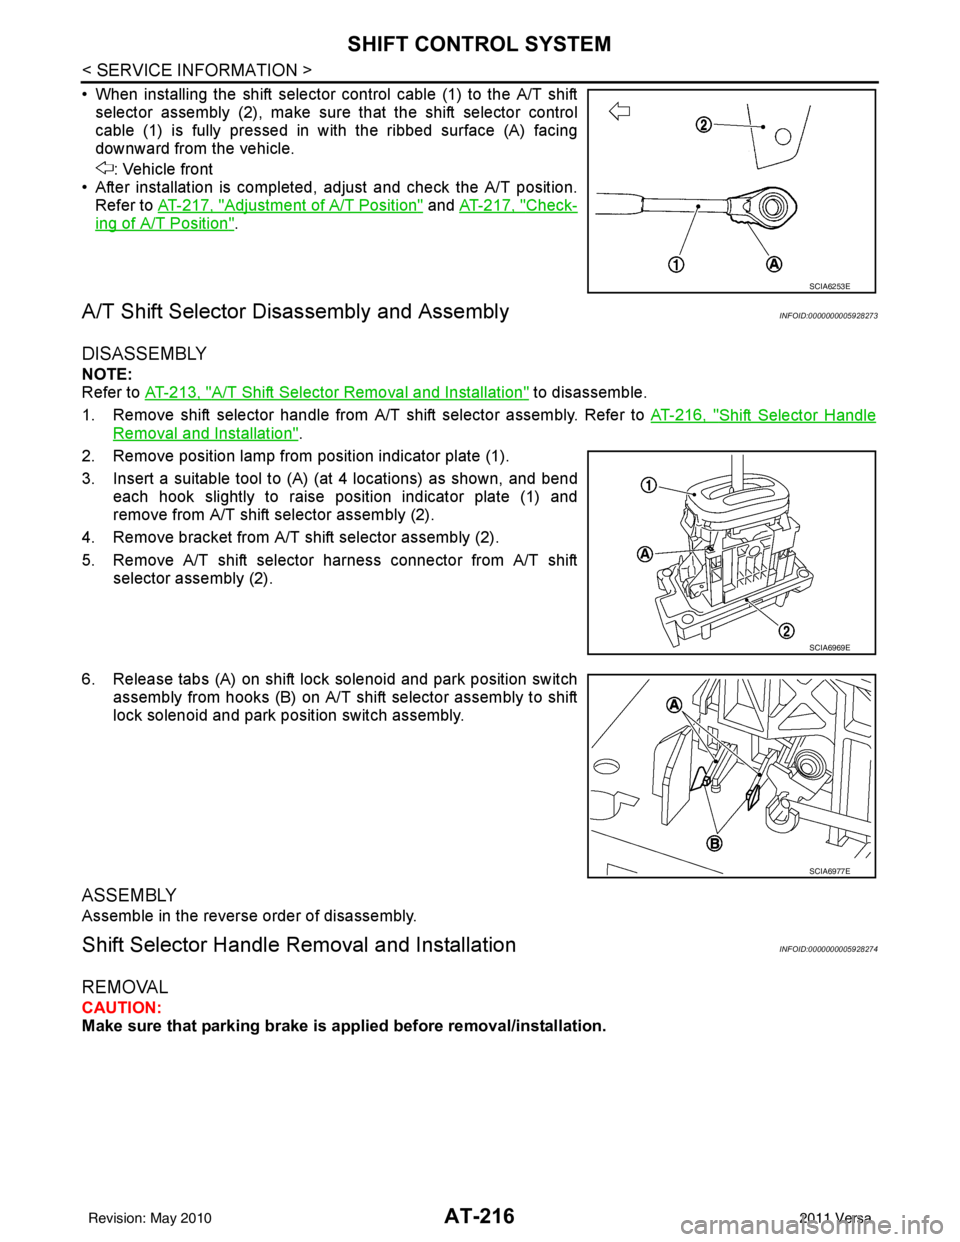
• When installing the shift selector control cable (1) to the A/T shiftselector assembly (2), make sure that the shift selector control
cable (1) is fully pressed in with the ribbed surface (A) facing
downward from the vehicle.
: Vehicle front
• After installation is completed, adjust and check the A/T position. Refer to AT-217, "
Adjustment of A/T Position" and AT-217, "Check-
ing of A/T Position".
A/T Shift Selector Di sassembly and AssemblyINFOID:0000000005928273
DISASSEMBLY
NOTE:
Refer to AT-213, "
A/T Shift Selector Removal and Installation" to disassemble.
1. Remove shift selector handle from A/T shift selector assembly. Refer to AT-216, "
Shift Selector Handle
Removal and Installation".
2. Remove position lamp from position indicator plate (1).
3. Insert a suitable tool to (A) (at 4 locations) as shown, and bend each hook slightly to raise position indicator plate (1) and
remove from A/T shift selector assembly (2).
4. Remove bracket from A/T shift selector assembly (2).
5. Remove A/T shift selector harness connector from A/T shift selector assembly (2).
6. Release tabs (A) on shift lock solenoid and park position switch assembly from hooks (B) on A/T shift selector assembly to shift
lock solenoid and park position switch assembly.
ASSEMBLY
Assemble in the reverse order of disassembly.
Shift Selector Handle Removal and InstallationINFOID:0000000005928274
REMOVAL
CAUTION:
Make sure that parking brake is applied before removal/installation.
SCIA6253E
SCIA6969E
SCIA6977E
Revision: May 2010 2011 Versa
Page 235 of 3787
AT-218
< SERVICE INFORMATION >
SHIFT CONTROL SYSTEM
5. The method of operating shift selector to individual positions cor-rectly should be as shown.
• (A): Press shift selector handle button to operate shift selector,while depressing the brake pedal.
• (B): Press shift selector handle button to operate shift selector.
• (C): Shift selector can be operated without pressing shift selector handle button.
6. Confirm back-up lamps illuminate only when shift selector is placed in “R” position. Confirm back-up lamps do not illuminate
when shift selector is in “P” or “N” position even if it is pushed
toward “R” position without pressing shift selector handle button.
7. Confirm engine can only be started with shift selector in “P” and “N” positions.
8. Make sure A/T is locked completely in “P” position.
WCIA0636E
Revision: May 2010 2011 Versa
Page 236 of 3787
KEY INTERLOCK CABLEAT-219
< SERVICE INFORMATION >
DE
F
G H
I
J
K L
M A
B
AT
N
O P
KEY INTERLOCK CABLE
Removal and InstallationINFOID:0000000005928277
COMPONENTS
REMOVAL
CAUTION:
Make sure that parking brake is applie d before removal and installation.
1. Place the shift selector in the “N” position.
2. Remove the shift selector handle. Refer to AT-216, "
Shift Selector Handle Removal and Installation".
3. Remove the center console assembly. Refer to IP-11
.
4. Slide the slider (A) toward the casing cap (B) while pressing tabs (C) on the slider to separate the slider (A) from the adjust holder
(D).
5. Remove the casing cap (B) from the cable bracket on the A/T shift selector assembly.
6. Remove the key interlock cable from the key interlock rod (E).
1. Key interlock cable 2. Key cylinder3. A/T shift selector assembly
A. Lock plate B. HolderC. Clip
D. Slider E. Key interlock rodF. Adjust holder
G. C a s i n g c a p
WCIA0621E
SCIA6975E
Revision: May 2010 2011 Versa
Page 237 of 3787

AT-220
< SERVICE INFORMATION >
KEY INTERLOCK CABLE
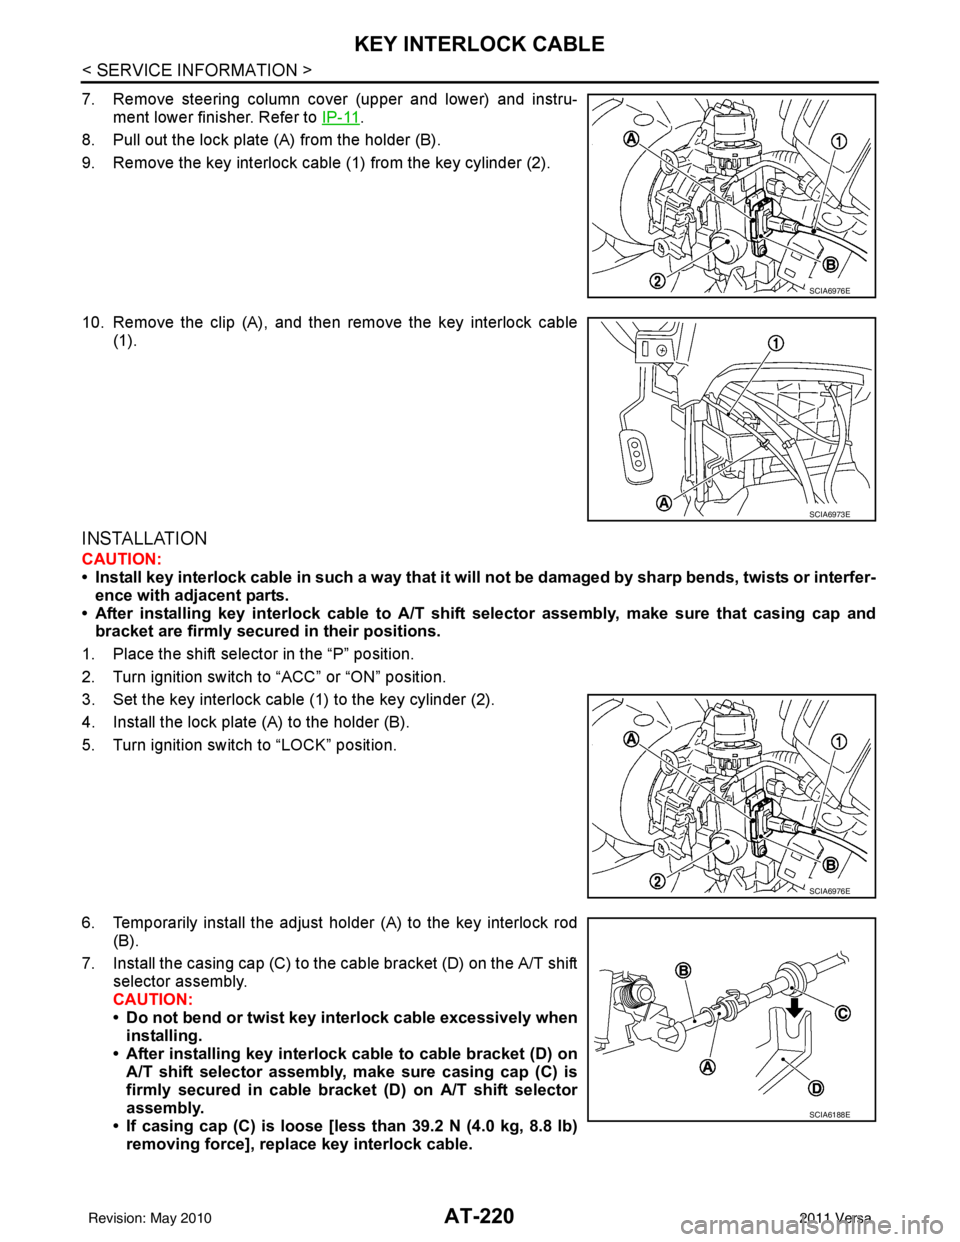
7. Remove steering column cover (upper and lower) and instru-ment lower finisher. Refer to IP-11
.
8. Pull out the lock plate (A) from the holder (B).
9. Remove the key interlock cable (1) from the key cylinder (2).
10. Remove the clip (A), and then remove the key interlock cable (1).
INSTALLATION
CAUTION:
• Install key interlock cable in such a way that it will not be damaged by sharp bends, twists or interfer-
ence with adjacent parts.
• After installing key interlock cable to A/T shift selector assembly, make sure that casing cap and bracket are firmly secured in their positions.
1. Place the shift selector in the “P” position.
2. Turn ignition switch to “ACC” or “ON” position.
3. Set the key interlock cable (1) to the key cylinder (2).
4. Install the lock plate (A) to the holder (B).
5. Turn ignition switch to “LOCK” position.
6. Temporarily install the adjust holder (A) to the key interlock rod (B).
7. Install the casing cap (C) to the cable bracket (D) on the A/T shift selector assembly.
CAUTION:
• Do not bend or twist key interlock cable excessively wheninstalling.
• After installing key interlock cable to cable bracket (D) on A/T shift selector assembly, make sure casing cap (C) is
firmly secured in cable bracket (D) on A/T shift selector
assembly.
• If casing cap (C) is loose [less than 39.2 N (4.0 kg, 8.8 lb)
removing force], replace key interlock cable.
SCIA6976E
SCIA6973E
SCIA6976E
SCIA6188E
Revision: May 2010 2011 Versa