2011 NISSAN LATIO spare tire
[x] Cancel search: spare tirePage 6 of 3787
2011
QUICK REFERENCE INDEX: VERSA
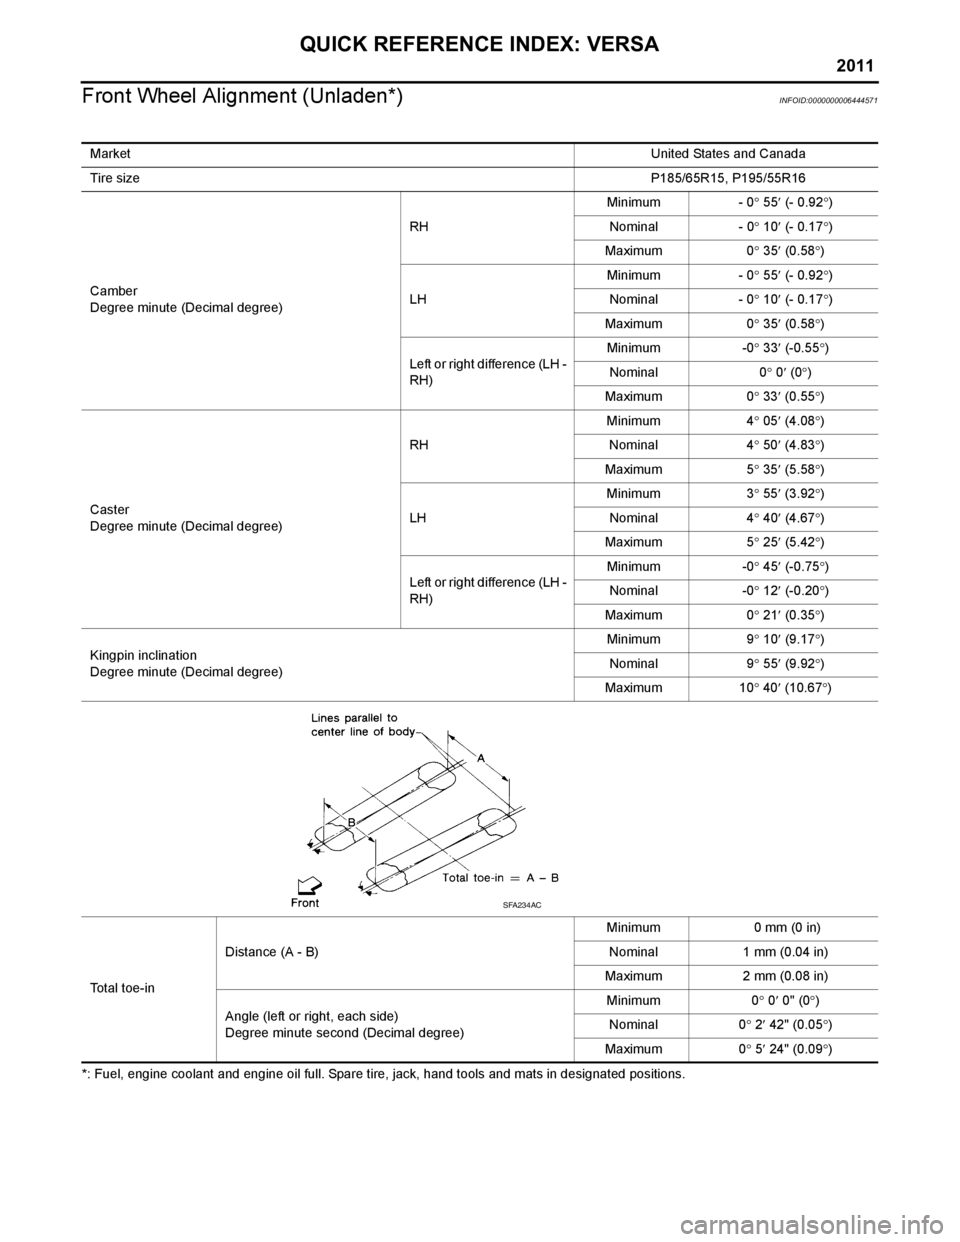
Front Wheel Alignment (Unladen*)
INFOID:0000000006444571
*: Fuel, engine coolant and engine oil full. Spare tire, jack, hand tools and mats in designated positions. Market
United States and Canada
Tire size P185/65R15, P195/55R16
Camber
Degree minute (Decimal degree) RH
Minimum - 0
° 55′ (- 0.92 °)
Nominal - 0 ° 10′ (- 0.17 °)
Maximum 0 ° 35′ (0.58 °)
LH Minimum - 0
° 55′ (- 0.92 °)
Nominal - 0 ° 10′ (- 0.17 °)
Maximum 0 ° 35′ (0.58 °)
Left or right difference (LH -
RH) Minimum -0
° 33′ (-0.55 °)
Nominal 0 ° 0 ′ (0 °)
Maximum 0 ° 33′ (0.55 °)
Caster
Degree minute (Decimal degree) RH
Minimum
4° 05′ (4.08 °)
Nominal 4° 50′ (4.83 °)
Maximum 5° 35′ (5.58 °)
LH Minimum
3° 55′ (3.
92 °)
Nominal 4° 40′ (4.67 °)
Maximum 5° 25′ (5.42 °)
Left or right difference (LH -
RH) Minimum
-0° 45′ (-0.75 °)
Nominal -0° 12′ (-0.20 °)
Maximum 0° 21′ (0.35 °)
Kingpin inclination
Degree minute (Decimal degree) Minimum
9° 10′ (9.17 °)
Nominal 9° 55′ (9.92 °)
Maximum 10° 40′ (10.67 °)
Total toe-in Distance (A - B)
Minimum
0 mm (0 in)
Nominal 1 mm (0.04 in)
Maximum 2 mm (0.08 in)
Angle (left or right, each side)
Degree minute second (Decimal degree) Minimum
0° 0 ′ 0" (0 °)
Nominal 0° 2 ′ 42" (0.05 °)
Maximum 0° 5 ′ 24" (0.09 °)
SFA234AC
Page 7 of 3787
QUICK REFERENCE INDEX: VERSA
2011
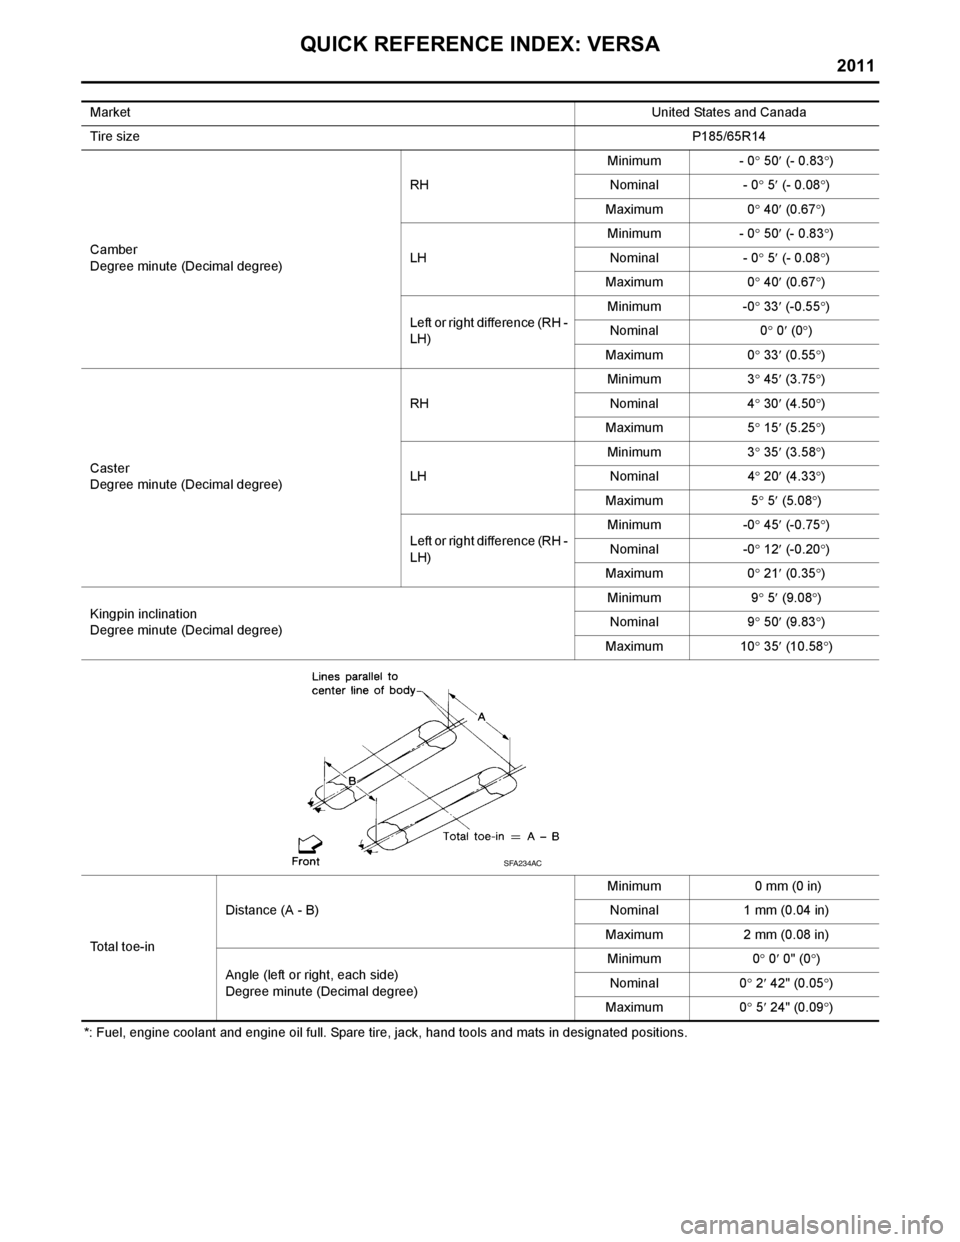
*: Fuel, engine coolant and engine oil full. Spare tire, jack, hand tools and mats in designated positions.Market
United States and Canada
Tire size P185/65R14
Camber
Degree minute (Decimal degree) RH
Minimum - 0°
50′ (- 0.83 °)
Nominal - 0 ° 5 ′ (- 0.08 °)
Maximum 0 ° 40 ′ (0.67 °)
LH Minimum
- 0° 50′ (- 0.83 °)
Nominal - 0° 5 ′ (- 0.08 °)
Maximum 0° 40 ′ (0.67 °)
Left or right difference (RH -
LH) Minimum
-0° 33 ′ (-0.55 °)
Nominal 0° 0 ′ (0 °)
Maximum 0° 33 ′ (0.55 °)
Caster
Degree minute (Decimal degree) RH
Minimum
3° 45 ′ (3.75 °)
Nominal 4° 30 ′ (4.50 °)
Maximum 5° 15 ′ (5.25 °)
LH Minimum
3° 35 ′ (3
.58 °)
Nominal 4° 20 ′ (4.33 °)
Maximum 5° 5 ′ (5.08 °)
Left or right difference (RH -
LH) Minimum
-0° 45 ′ (-0.75 °)
Nominal -0° 12 ′ (-0.20 °)
Maximum 0° 21 ′ (0.35 °)
Kingpin inclination
Degree minute (Decimal degree) Minimum
9° 5 ′ (9.08 °)
Nominal 9° 50 ′ (9.83 °)
Maximum 10° 35 ′ (10.58 °)
Total toe-in Distance (A - B)
Minimum
0 mm (0 in)
Nominal 1 mm (0.04 in)
Maximum 2 mm (0.08 in)
Angle (left or right, each side)
Degree minute (Decimal degree) Minimum
0° 0 ′ 0" (0 °)
Nominal 0° 2 ′ 42" (0.05 °)
Maximum 0° 5 ′ 24" (0.09 °)
SFA234AC
Page 8 of 3787
2011
QUICK REFERENCE INDEX: VERSA
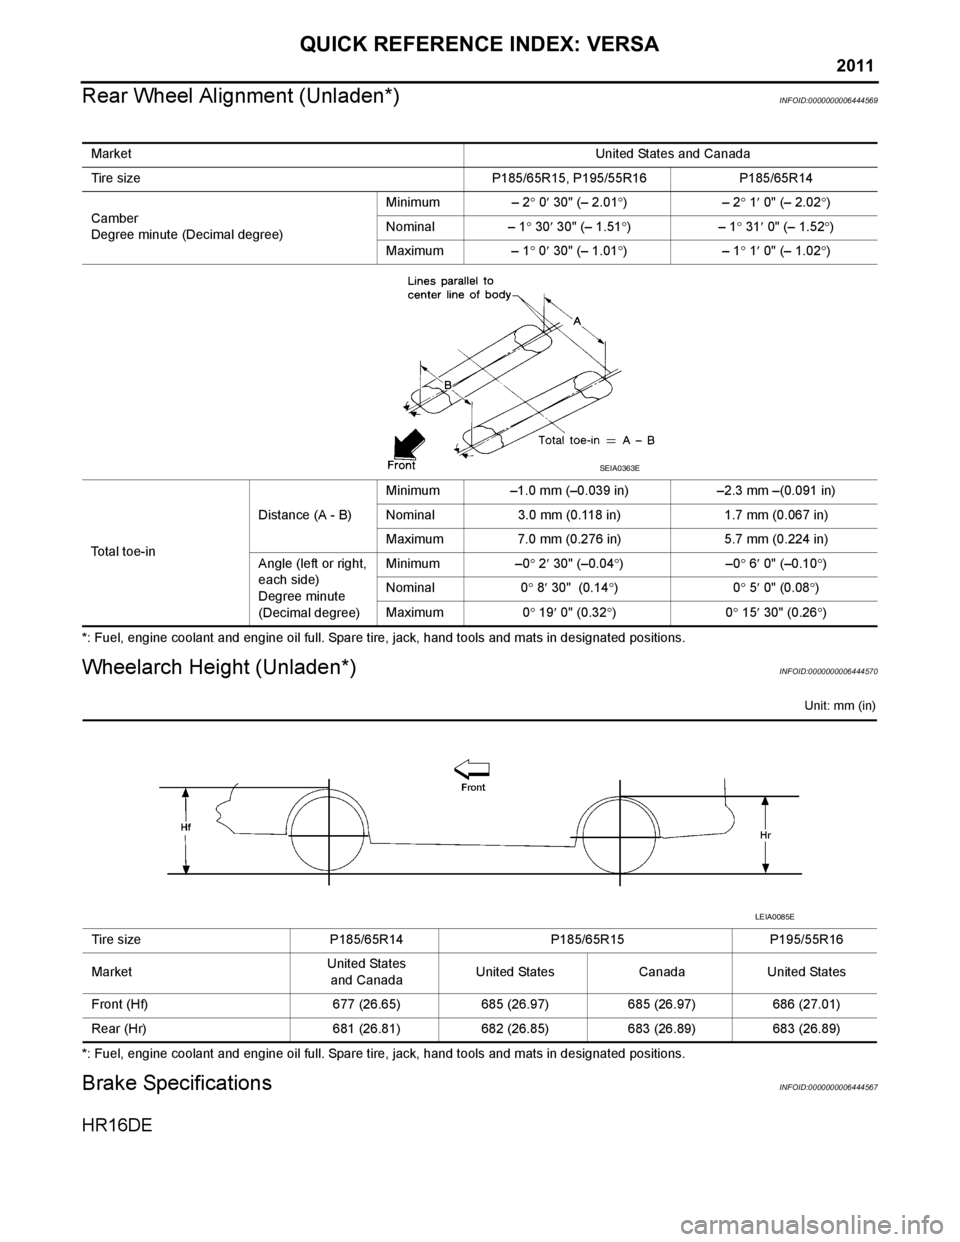
Rear Wheel Alignment (Unladen*)
INFOID:0000000006444569
*: Fuel, engine coolant and engine oil full. Spare tire, jack, hand tools and mats in designated positions.
Wheelarch Height (Unladen*)INFOID:0000000006444570
Unit: mm (in)
*: Fuel, engine coolant and engine oil full. Spare tire, jack, hand tools and mats in designated positions.
Brake SpecificationsINFOID:0000000006444567
HR16DE
Market United States and Canada
Tire size P185/65R15, P195/55R16P185/65R14
Camber
Degree minute (Decimal degree) Minimum
– 2° 0 ′ 30" (– 2.01 °)– 2° 1 ′ 0" (– 2.02 °)
Nominal – 1° 30 ′ 30" (– 1.51 °)– 1° 31 ′ 0" (– 1.52 °)
Maximum – 1° 0 ′ 30" (– 1.01 °)– 1° 1 ′ 0" (– 1.02 °)
Total toe-in Distance (A - B)
Minimum
–1.0 mm (–0.039 in) –2.3 mm –(0.091 in)
Nominal 3.0 mm (0.118 in) 1.7 mm (0.067 in)
Maximum 7.0 mm (0.276 in) 5.7 mm (0.224 in)
Angle (left or right,
each side)
Degree minute
(Decimal degree) Minimum
–0° 2 ′ 30" (–0.04 °)– 0° 6 ′ 0" (–0.10 °)
Nominal 0° 8 ′ 30" (0.14 °)0 ° 5 ′ 0" (0.08 °)
Maximum 0° 19 ′ 0" (0.32 °)0 ° 15 ′ 30" (0.26 °)
SEIA0363E
Tire size P185/65R14P185/65R15P195/55R16
Market United States
and Canada United States
CanadaUnited States
Front (Hf) 677 (26.65)685 (26.97)685 (26.97)686 (27.01)
Rear (Hr) 681 (26.81)682 (26.85)683 (26.89)683 (26.89)
LEIA0085E
Page 2688 of 3787
PRECAUTIONSFSU-3
< SERVICE INFORMATION >
C
DF
G H
I
J
K L
M A
B
FSU
N
O P
5. When the repair work is completed, return the ignition switch to the ″LOCK ″ position before connecting
the battery cables. (At this time, the steering lock mechanism will engage).
6. Perform a self-diagnosis check of al l control units using CONSULT-III.
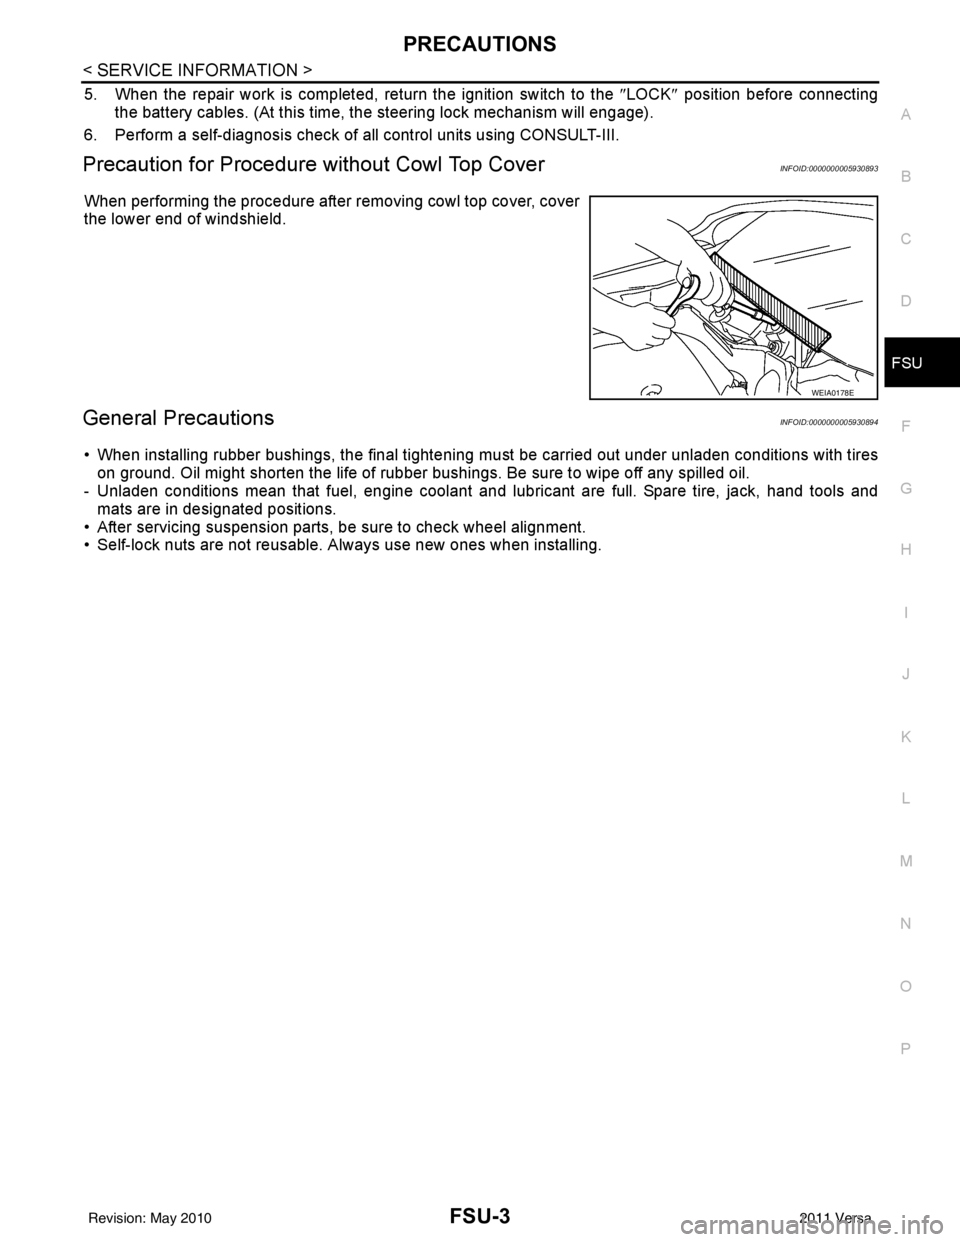
Precaution for Procedure without Cowl Top CoverINFOID:0000000005930893
When performing the procedure after removing cowl top cover, cover
the lower end of windshield.
General PrecautionsINFOID:0000000005930894
• When installing rubber bushings, the final tightening mu st be carried out under unladen conditions with tires
on ground. Oil might shorten the life of rubber bushings. Be sure to wipe off any spilled oil.
- Unladen conditions mean that fuel, engine coolant and l ubricant are full. Spare tire, jack, hand tools and
mats are in designated positions.
• After servicing suspension parts, be sure to check wheel alignment.
• Self-lock nuts are not reusable. A lways use new ones when installing.
WEIA0178E
Revision: May 2010 2011 Versa
Page 2692 of 3787
FRONT SUSPENSION ASSEMBLYFSU-7
< SERVICE INFORMATION >
C
DF
G H
I
J
K L
M A
B
FSU
N
O P
FRONT SUSPENSION ASSEMBLY
On-Vehicle Inspection and ServiceINFOID:0000000005930898
Make sure the mounting conditions (looseness, back lash) of each component and component conditions
(wear, damage) are normal.
INSPECTION OF LOWER BALL JOINT END PLAY
1. Set front wheels in a straight-ahead position. Do not depress brake pedal.
2. Place an iron bar or similar tool between transverse link and steering knuckle.
3. Measure axial end play by prying it up and down.
CAUTION:
Be careful not to damage ball joint boot. Do not damage the installation position by applying
excessive force.
STRUT INSPECTION
Check for oil leakage, damage and replace as necessary.
Wheel Alignment InspectionINFOID:0000000005930899
PRELIMINARY INSPECTION
WARNING:
Always adjust the alignment with the vehicle on a flat surface.
NOTE:
If alignment is out of specification, inspect and replace any damaged or worn rear suspension parts before
making any adjustments.
1. Check and adjust the wheel alignment with the vehicle under unladen conditions. “Unladen conditions”
means that the fuel, coolant, and lubricant are full; and that the spare tire, jack, hand tools and mats are in
their designated positions.
2. Check the tires for incorrect air pressure and excessive wear.
3. Check the wheels for run out and damage. Refer to WT-6, "
Inspection".
4. Check the wheel bearing axial end play. Refer to FAX-6, "
On-Vehicle Inspection and Service".
5. Check the shock absorbers for leaks or damage.
6. Check each mounting point of the suspension components for any excessive looseness or damage.
7. Check each link, arm, and the suspension member for any damage.
8. Check the vehicle height. Refer to FSU-19, "
Wheelarch Height (Unladen*)".
GENERAL INFORMATION AND RECOMMENDATIONS
1. A Four-Wheel Thrust Alignment should be performed.
• This type of alignment is re commended for any NISSAN vehicle.
• The four-wheel “thrust” process helps ensure that the vehicle is properly aligned and the steering wheel
is centered.
• The alignment machine itself should be ca pable of accepting any NISSAN vehicle.
• The alignment machine should be checked to ensure that it is level.
2. Make sure the alignment machine is properly calibrated. • Your alignment machine should be regularly calibrated in order to give correct information.
• Check with the manufacturer of your specific a lignment machine for their recommended Service/Cali-
bration Schedule.
THE ALIGNMENT PROCESS
IMPORTANT: Use only the alignment specifications listed in this Service Manual. Refer to FSU-17, "Wheel
Alignment (Unladen*)".
1. When displaying the alignment settings, many alignm ent machines use “indicators”: (Green/red, plus or
minus, Go/No Go). Do NOT use these indicators.
• The alignment specifications programmed into your alignment machine that operate these indicators may not be correct.Axial end play : 0 mm (0 in)
Revision: May 2010
2011 Versa
Page 2702 of 3787
SERVICE DATA AND SPECIFICATIONS (SDS)FSU-17
< SERVICE INFORMATION >
C
DF
G H
I
J
K L
M A
B
FSU
N
O P
SERVICE DATA AND SPECIFICATIONS (SDS)
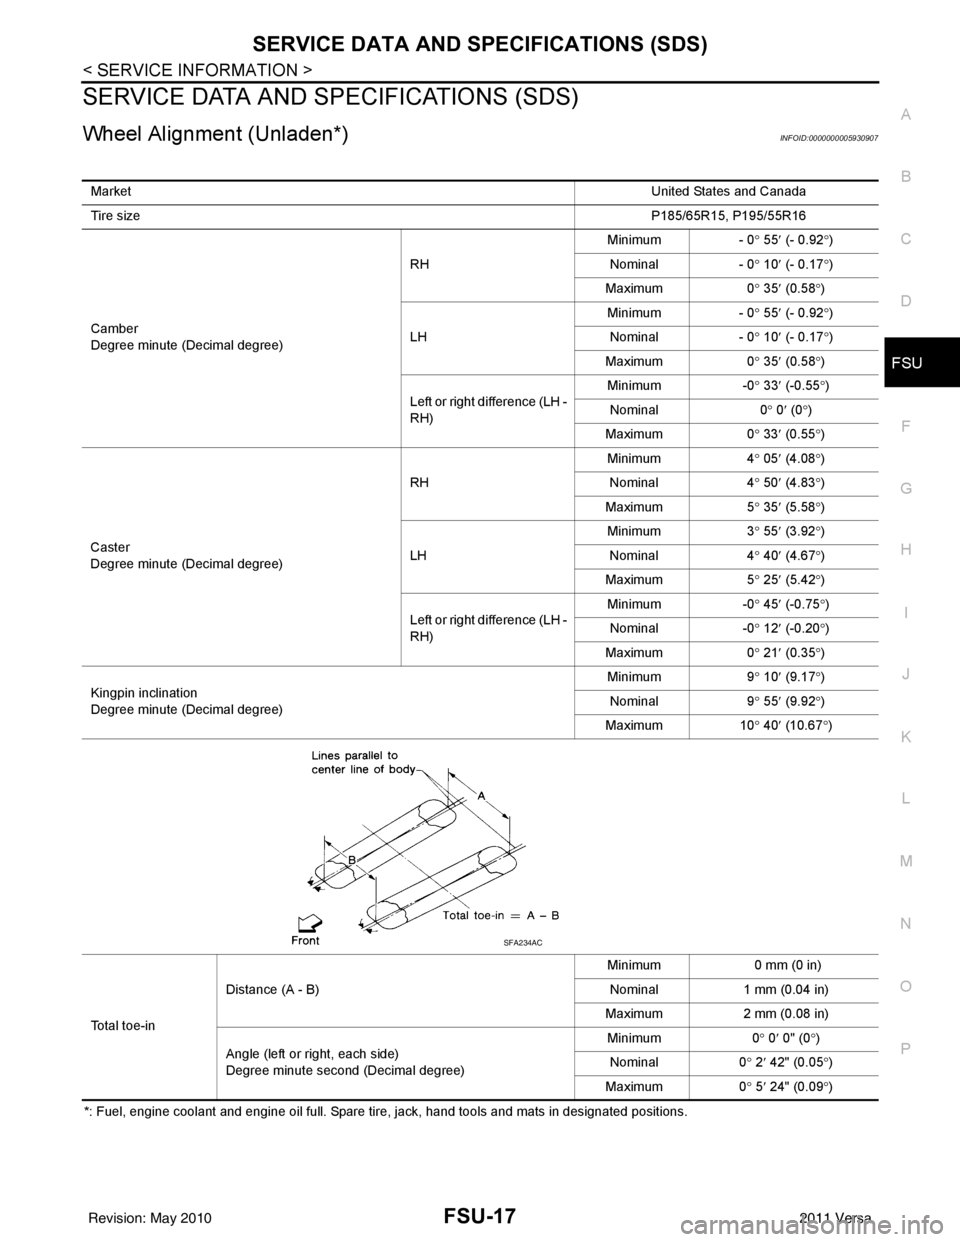
Wheel Alignment (Unladen*)INFOID:0000000005930907
*: Fuel, engine coolant and engine oil full. Spare tire, jack, hand tools and mats in designated positions. Market
United States and Canada
Tire size P185/65R15, P195/55R16
Camber
Degree minute (Decimal degree) RH
Minimum - 0
° 55 ′ (- 0.92 °)
Nominal - 0 ° 10 ′ (- 0.17 °)
Maximum 0 ° 35 ′ (0.58 °)
LH Minimum
- 0° 55 ′ (- 0.92 °)
Nominal - 0° 10 ′ (- 0.17 °)
Maximum 0° 35 ′ (0.58 °)
Left or right difference (LH -
RH) Minimum
-0° 33 ′ (-0.55 °)
Nominal 0° 0 ′ (0 °)
Maximum 0° 33 ′ (0.55 °)
Caster
Degree minute (Decimal degree) RH
Minimum
4° 05 ′ (4.08 °)
Nominal 4° 50 ′ (4.83 °)
Maximum 5° 35 ′ (5.58 °)
LH Minimum
3° 55 ′ (3.92 °)
Nominal 4
° 40 ′ (4.67 °)
Ma xi
mum 5° 25 ′ (5.42 °)
Left or right difference (LH -
RH) Minimum
-0° 45 ′ (-0.75 °)
Nominal -0° 12 ′ (-0.20 °)
Maximum 0° 21 ′ (0.35 °)
Kingpin inclination
Degree minute (Decimal degree) Minimum
9° 10 ′ (9.17 °)
Nominal 9° 55 ′ (9.92 °)
Maximum 10° 40 ′ (10.67 °)
Total toe-in Distance (A - B)
Minimum
0 mm (0 in)
Nominal 1 mm (0.04 in)
Maximum 2 mm (0.08 in)
Angle (left or right, each side)
Degree minute second (Decimal degree) Minimum
0° 0 ′ 0" (0 °)
Nominal 0° 2 ′ 42" (0.05 °)
Maximum 0° 5 ′ 24" (0.09 °)
SFA234AC
Revision: May 2010 2011 Versa
Page 2703 of 3787

FSU-18
< SERVICE INFORMATION >
SERVICE DATA AND SPECIFICATIONS (SDS)
*: Fuel, engine coolant and engine oil full. Spare tire, jack, hand tools and mats in designated positions.
Ball JointINFOID:0000000005930908
MarketUnited States and Canada
Tire size P185/65R14
Camber
Degree minute (Decimal degree) RH
Minimum
- 0° 50 ′ (- 0.83 °)
Nominal - 0° 5 ′ (- 0.08 °)
Maximum 0° 40 ′ (0.67 °)
LH Minimum
- 0° 50 ′ (- 0.83 °)
Nominal - 0° 5 ′ (- 0.08 °)
Maximum 0° 40 ′ (0.67 °)
Left or right difference (RH -
LH) Minimum
-0° 33 ′ (-0.55 °)
Nominal 0° 0 ′ (0 °)
Maximum 0° 33 ′ (0.55 °)
Caster
Degree minute (Decimal degree) RH
Minimum
3° 45 ′ (3.75 °)
Nominal 4° 30 ′ (4.50 °)
Maximum 5° 15 ′ (5.25 °)
LH Minimum
3° 35 ′ (3 .58
°)
Nominal 4° 20 ′ (4.3
3°)
Maximum 5° 5 ′ (5.08 °)
Left or right difference (RH -
LH) Minimum
-0° 45 ′ (-0.75 °)
Nominal -0° 12 ′ (-0.20 °)
Maximum 0° 21 ′ (0.35 °)
Kingpin inclination
Degree minute (Decimal degree) Minimum
9° 5 ′ (9.08 °)
Nominal 9° 50 ′ (9.83 °)
Maximum 10° 35 ′ (10.58 °)
To t a l t o e - i n Distance (A - B)
Minimum
0 mm (0 in)
Nominal 1 mm (0.04 in)
Maximum 2 mm (0.08 in)
Angle (left or right, each side)
Degree minute (Decimal degree) Minimum
0° 0 ′ 0" (0 °)
Nominal 0° 2 ′ 42" (0.05 °)
Maximum 0° 5 ′ 24" (0.09 °)
SFA234AC
Swing torque 0.5 - 4.9 N·m (0.06 - 0.49 kg-m, 5 - 43 in-lb)
Measurement on spring balance 15.4 - 150.8 N (1.6 - 15.4 kg-f, 3.5 - 40 lb-f)
Axial end play 0 mm (0 in)
Revision: May 2010 2011 Versa
Page 2704 of 3787
SERVICE DATA AND SPECIFICATIONS (SDS)FSU-19
< SERVICE INFORMATION >
C
DF
G H
I
J
K L
M A
B
FSU
N
O P
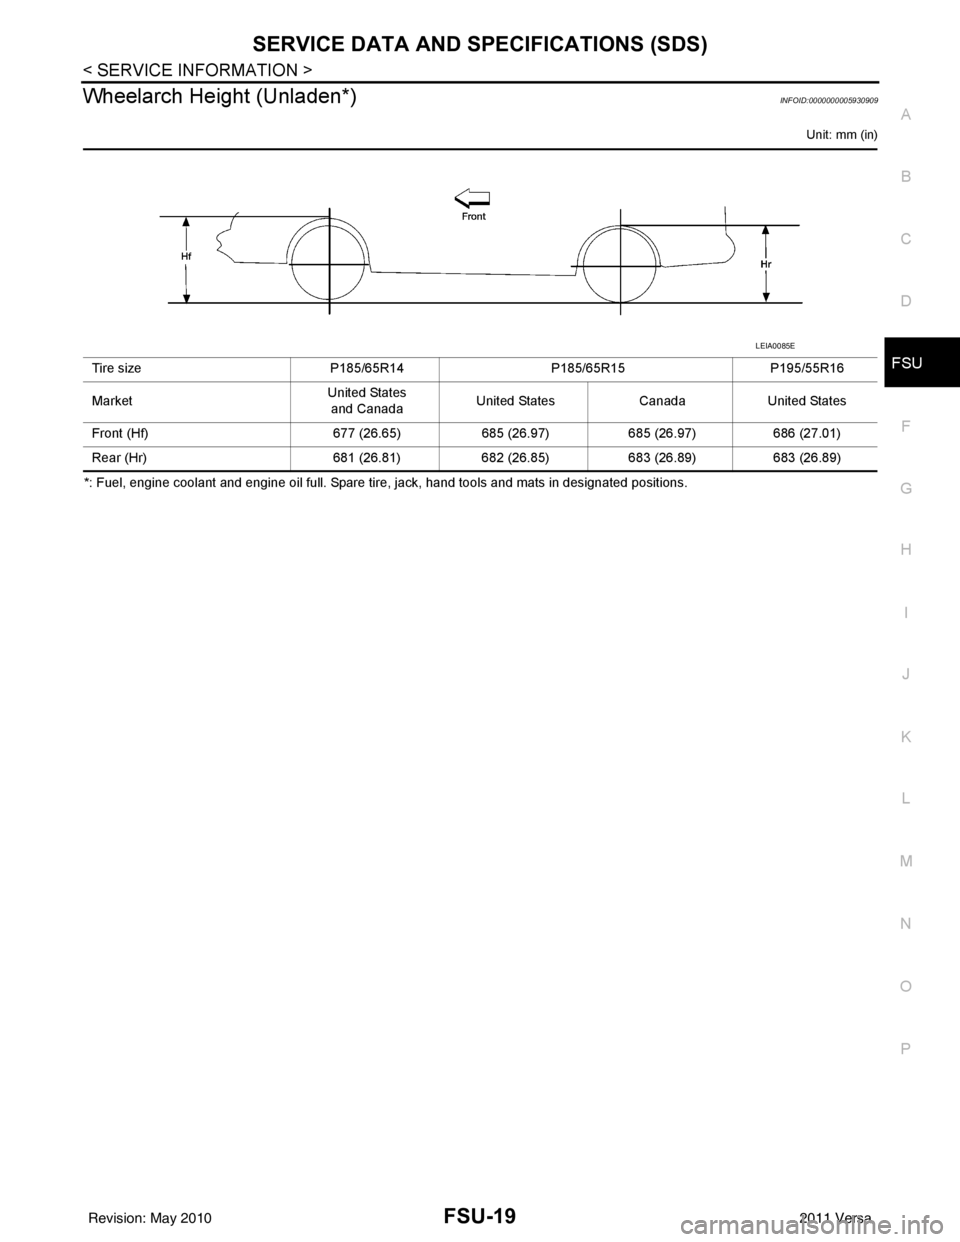
Wheelarch Height (Unladen*)INFOID:0000000005930909
Unit: mm (in)
*: Fuel, engine coolant and engine oil full. Spare tire, jack, hand tools and mats in designated positions. Tire size
P185/65R14P185/65R15P195/55R16
Market United States
and Canada United States
CanadaUnited States
Front (Hf) 677 (26.65)685 (26.97)685 (26.97)686 (27.01)
Rear (Hr) 681 (26.81)682 (26.85)683 (26.89)683 (26.89)
LEIA0085E
Revision: May 2010 2011 Versa