Page 262 of 3787
OVERHAULAT-245
< SERVICE INFORMATION >
DE
F
G H
I
J
K L
M A
B
AT
N
O P
Without ABS
19. Clip 20. O-ring21. O-ring
22. Oil pump housing oil seal 23. Oil pump housing24. Outer gear
25. Inner gear 26. Oil pump cover27. Seal ring
28. Oil pump assembly
SCIA7957E
1. Pinion mate gear thrust washer 2. Pinion mate gear 3. Pinion mate shaft
4. Lock pin 5. Side gear6. Side gear thrust washer
Revision: May 2010 2011 Versa
Page 266 of 3787
OVERHAULAT-249
< SERVICE INFORMATION >
DE
F
G H
I
J
K L
M A
B
AT
N
O P
1. Snap ring 2. Governor cap3. O-ring
4. Lock nut 5. Anchor end pin6. Transaxle case
7. Reduction pinion gear bearing 8. Reduction pinion gear 9. Brake band
10. Snap ring 11. Radial needle bearing12. Seal ring
13. Bearing retainer 14. O-ring15. Servo release accumulator piston
16. Return spring 17. Control valve assembly18. Oil pan gasket
SCIA7959E
Revision: May 2010 2011 Versa
Page 267 of 3787

AT-250
< SERVICE INFORMATION >
OVERHAUL
Oil Channel
INFOID:0000000005928286
HR16DE ENGINE MODELS
19. Oil pan 20. Drain plug gasket21. Drain plug
22. Magnet 23. Oil pan bolt24. Snap ring
25. O-ring 26. O-ring27. N-D accumulator piston
28. Return spring 29. O-ring 30. Lip seal
31. Input speed sensor 32. O-ring 33. Retaining pin
34. Detent spring 35. Retaining pin 36. Manual shaft
37. Manual shaft oil seal 38. Manual plate 39. Parking rod plate
40. Parking rod 41. OD servo piston retainer42. Snap ring
43. O-ring 44. OD servo piston45. D-ring
46. Servo piston retainer 47. O-ring48. E-ring
49. Spring retainer 50. OD servo return spring 51. D-ring
52. Band servo piston 53. Band servo thrust washer 54. Band servo piston stem
55. 2nd servo return spring 56. Transmission range switch57. Parking shaft
58. Return spring 59. Thrust needle bearing60. Seal ring
61. Output shaft 62. Output shaft bearing63. Output shaft adjusting shim
64. Side cover 65. Side cover bolt 66. Lock nut
67. Idler gear 68. Idler gear bearing69. Reduction pinion gear adjusting
shim
70. Parking actuator support 71. Parking pawl 72. LH differential side oil seal
73. Output speed sensor
: Apply Genuine Anaerobic Liquid Gasket or equivalent.
Revision: May 2010 2011 Versa
Page 274 of 3787
DISASSEMBLYAT-257
< SERVICE INFORMATION >
DE
F
G H
I
J
K L
M A
B
AT
N
O P
DISASSEMBLY
DisassemblyINFOID:0000000005928289
1. Drain ATF through drain hole.
2. Remove drain plug gasket from drain plug.
3. Remove torque converter.
4. Check torque converter one-way clutch using check tool as shown.
a. Insert check tool into groove of bearing support built into one- way clutch outer race.
b. When fixing bearing support with check tool, rotate one-way clutch spline using screwdriver.
c. Check that inner race rotates clockwise only. If not, replace torque converter assembly.
SCIA0003E
SAT008D
SAT009D
Revision: May 2010 2011 Versa
Page 281 of 3787
AT-264
< SERVICE INFORMATION >
DISASSEMBLY
a. Remove O-ring from input shaft assembly (high clutch drum).
b. Remove oil pump assembly bolts, and then remove oil pumpassembly (1) from transaxle case.
c. Remove O-ring from oil pump assembly (1).
d. Remove bearing race (1) and thrust washer (2) from oil pump assembly (3).
30. Remove brake band according to the following procedures.
a. Loosen lock nut (1), and then remove anchor end pin (2) and lock nut (1) as a set from transaxle case.
SCIA5634E
SCIA6036J
SCIA6957E
SCIA6037J
Revision: May 2010 2011 Versa
Page 285 of 3787

AT-268
< SERVICE INFORMATION >
DISASSEMBLY
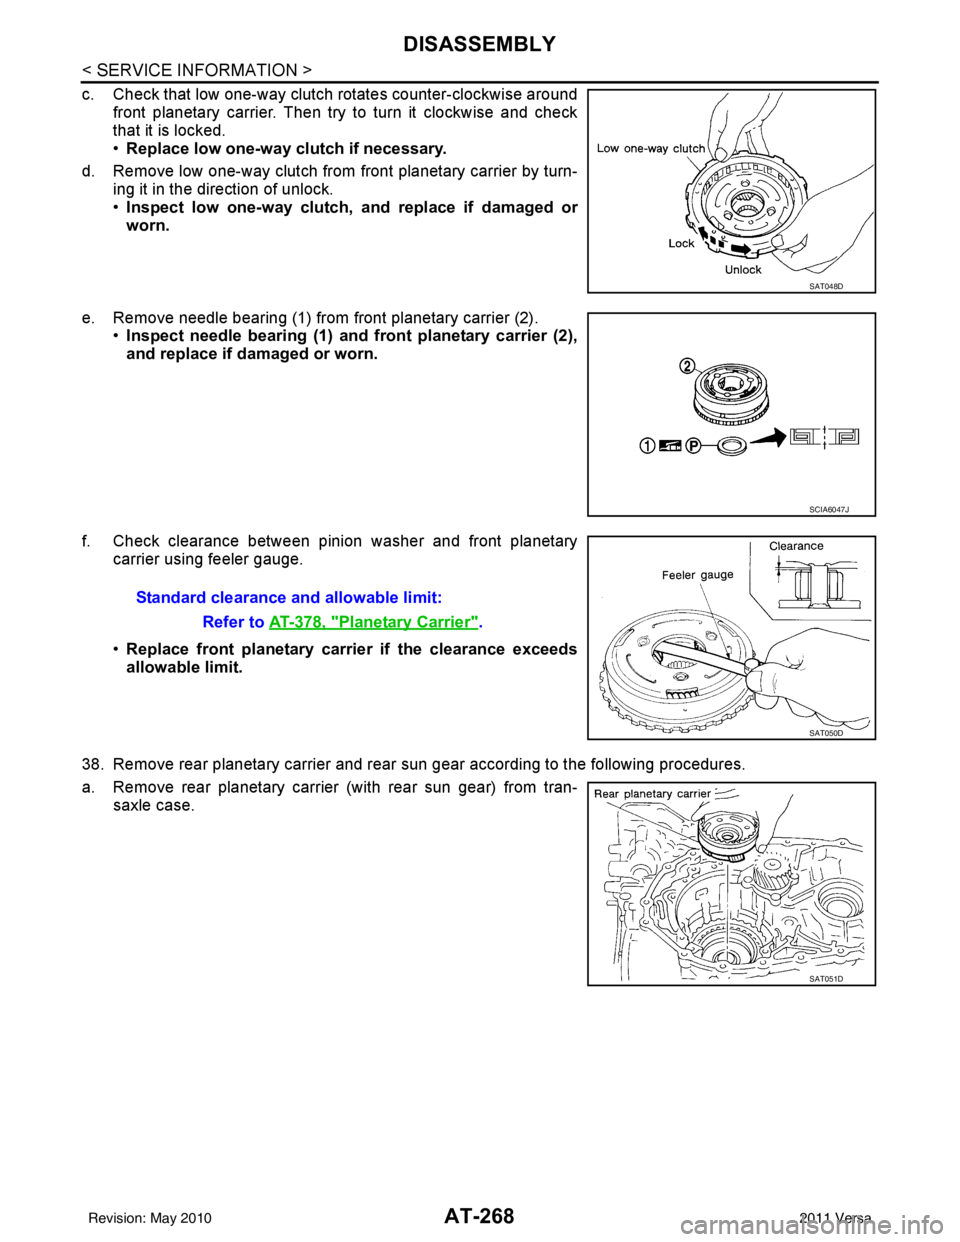
c. Check that low one-way clutch rotates counter-clockwise aroundfront planetary carrier. Then try to turn it clockwise and check
that it is locked.
•Replace low one-way clutch if necessary.
d. Remove low one-way clutch from front planetary carrier by turn- ing it in the direction of unlock.
•Inspect low one-way clutch, and replace if damaged or
worn.
e. Remove needle bearing (1) from front planetary carrier (2). •Inspect needle bearing (1) and front planetary carrier (2),
and replace if damaged or worn.
f. Check clearance between pinion washer and front planetary carrier using feeler gauge.
•Replace front planetary carrier if the clearance exceeds
allowable limit.
38. Remove rear planetary carrier and rear sun gear according to the following procedures.
a. Remove rear planetary carrier (with rear sun gear) from tran- saxle case.
SAT048D
SCIA6047J
Standard clearance and allowable limit:
Refer to AT-378, "
Planetary Carrier".
SAT050D
SAT051D
Revision: May 2010 2011 Versa
Page 288 of 3787
DISASSEMBLYAT-271
< SERVICE INFORMATION >
DE
F
G H
I
J
K L
M A
B
AT
N
O P
i. Remove side cover bolts (1), then remove side cover by lightly tapping it with a soft hammer.
CAUTION:
Be careful not to damage cover.
ii. Remove side cover gasket from side cover.
iii. Set manual shaft in "P" position to lock idler gear and output gear.
iv. Unlock both idler gear and output gear lock nuts with a suitable tool.
v. Remove idler gear and output gear lock nuts.
vi. Remove out put gear (1) and idler gear (2) using Tool (A).
vii. Removing reduction pinion gear and output shaft from transaxle case.
viii. Remove reduction pinion gear adjusting shim (1) from reduction pinion gear (2).
ix. Remove output gear adjusting spacer (3) from output shaft (4).
b. MR18DE engine models.
SCIA6039J
SAT704D
Tool number : ST27180001 (J-25726-A)
SCIA6991E
SCIA5902J
Revision: May 2010 2011 Versa
Page 290 of 3787
DISASSEMBLYAT-273
< SERVICE INFORMATION >
DE
F
G H
I
J
K L
M A
B
AT
N
O P
v. Remove needle bearing. •Check needle bearing, and replace if damaged or worn.
vi. Set manual shaft to “P” position to lock idler gear.
vii. Unlock idler gear lock nut with pin punch.
viii. Remove idler gear lock nut.
ix. Remove idler gear using Tool.
x. Remove reduction pinion gear.
xi. Remove reduction pinion gear adjusting shim from reduction pinion gear.
SCIA4879E
SAT037F
SAT061D
Tool number : ST27180001 (J-25726-A)
SCIA5380E
SCIA4880E
Revision: May 2010 2011 Versa