Page 3341 of 5598

INL-74
< REMOVAL AND INSTALLATION >
STEP LAMP
STEP LAMP
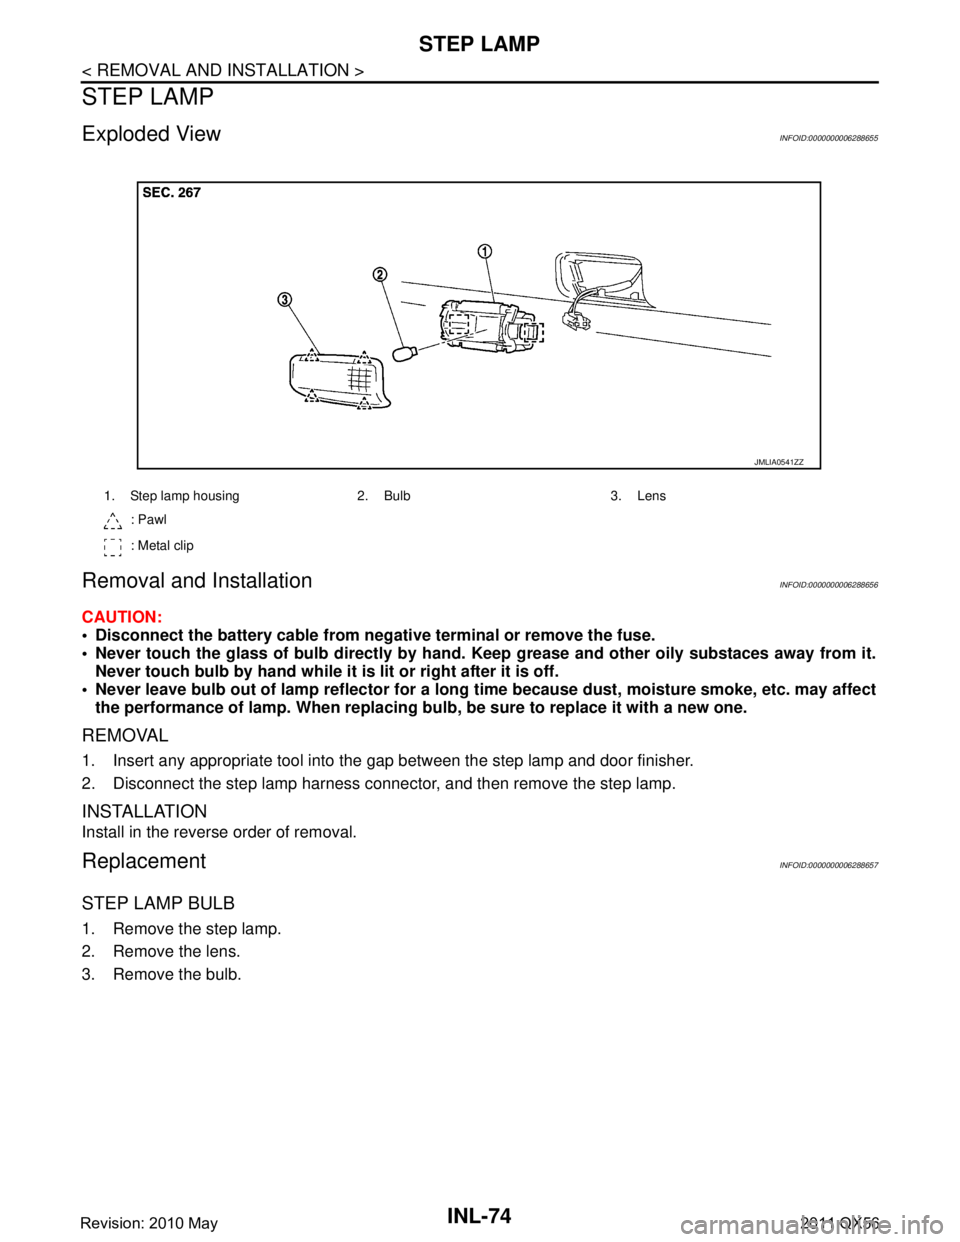
Exploded ViewINFOID:0000000006288655
Removal and InstallationINFOID:0000000006288656
CAUTION:
Disconnect the battery cable from negative terminal or remove the fuse.
Never touch the glass of bulb directly by hand. Keep grease and other oily substaces away from it.
Never touch bulb by hand while it is lit or right after it is off.
Never leave bulb out of lamp reflector for a long ti me because dust, moisture smoke, etc. may affect
the performance of lamp. When replacing bu lb, be sure to replace it with a new one.
REMOVAL
1. Insert any appropriate tool into the gap between the step lamp and door finisher.
2. Disconnect the step lamp harness connector, and then remove the step lamp.
INSTALLATION
Install in the reverse order of removal.
ReplacementINFOID:0000000006288657
STEP LAMP BULB
1. Remove the step lamp.
2. Remove the lens.
3. Remove the bulb.
1. Step lamp housing 2. Bulb 3. Lens
: Pawl
: Metal clip
JMLIA0541ZZ
Revision: 2010 May2011 QX56
Page 3342 of 5598
MOOD LAMPINL-75
< REMOVAL AND INSTALLATION >
C
DE
F
G H
I
J
K
M A
B
INL
N
O P
MOOD LAMP
FRONT DOOR ARMREST
FRONT DOOR ARMREST : Exploded ViewINFOID:0000000006288658
FRONT DOOR ARMREST : ReplacementINFOID:0000000006288659
CAUTION:
Disconnect the battery cable from negative terminal or remove the fuse.
Never touch the glass of bulb directly by hand. Keep grease and other oily substaces away from it.
Never touch bulb by hand while it is lit or right after it is off.
Never leave bulb out of lamp reflector for a long time because dust, moisture smoke, etc. may affect
the performance of lamp. When replacing bu lb, be sure to replace it with a new one.
MOOD LAMP
1. Remove front door finisher. Refer to INT-14, "Removal and Installation".
2. Remove the mood lamp from front door finisher.
REAR DOOR ARMREST
REAR DOOR ARMREST : Exploded ViewINFOID:0000000006288660
1. Mood lamp
JMLIA1054ZZ
1. Mood lamp
JMLIA1055ZZ
Revision: 2010 May2011 QX56
Page 3343 of 5598
INL-76
< REMOVAL AND INSTALLATION >
MOOD LAMP
REAR DOOR ARMREST : Replacement
INFOID:0000000006288661
CAUTION:
Disconnect the battery cable from negative terminal or remove the fuse.
Never touch the glass of bulb directly by hand. Keep grease and other oily substaces away from it.
Never touch bulb by hand while it is lit or right after it is off.
Never leave bulb out of lamp reflector for a long ti me because dust, moisture smoke, etc. may affect
the performance of lamp. When replacing bu lb, be sure to replace it with a new one.
MOOD LAMP
1. Remove rear door finisher. Refer to INT-14, "Removal and Installation".
2. Remove the mood lamp from rear door finisher.
Revision: 2010 May2011 QX56
Page 3344 of 5598
PERSONAL LAMPINL-77
< REMOVAL AND INSTALLATION >
C
DE
F
G H
I
J
K
M A
B
INL
N
O P
PERSONAL LAMP
Exploded ViewINFOID:0000000006288662
Removal and InstallationINFOID:0000000006288663
CAUTION:
Disconnect the battery cable from negative terminal or remove the fuse.
Never touch the glass of bulb directly by hand. Keep grease and other oily substaces away from it.
Never touch bulb by hand while it is lit or right after it is off.
Never leave bulb out of lamp reflector for a long time because dust, moisture smoke, etc. may affect
the performance of lamp. When replacing bu lb, be sure to replace it with a new one.
Replace the personal lamp case as a set (LH a nd RH). After removing the headlining assembly,
remove the personal lamp case.
REMOVAL
1. Remove headlining assembly. Refer to INT-29, "Removal and Installation".
1. Personal lamp case 2. Bulb 3. Lens
4. Personal lamp finisher
: Pawl
JMLIA1053ZZ
Revision: 2010 May2011 QX56
Page 3345 of 5598
INL-78
< REMOVAL AND INSTALLATION >
PERSONAL LAMP
2. Press the pawls (B) on both sides as shown in the figure using asmall flat-bladed screwdriver (A), and then pull out personal
lamp case (2) from personal lamp finisher (1).
INSTALLATION
Install in the reverse order of removal.
ReplacementINFOID:0000000006288664
CAUTION:
Disconnect the battery negative terminal or remove the fuse.
Never touch the glass of bu lb directly by hand. Keep grease an d other oily matters away from it.
Never touch bulb by hand while it is lit or right after being turned off.
Never leave bulb out of lamp reflector for a long ti me because dust, moisture smoke, etc. may affect
the performance of lamp. When replacing bulb, be sure to replace it with new one.
PERSONAL LAMP BULB
1. Insert any appropriate tool into the gap between the lens, and then remove the lens.
2. Remove the bulb.
JMLIA1058ZZ
Revision: 2010 May2011 QX56
Page 3346 of 5598

PUDDLE LAMPINL-79
< REMOVAL AND INSTALLATION >
C
DE
F
G H
I
J
K
M A
B
INL
N
O P
PUDDLE LAMP
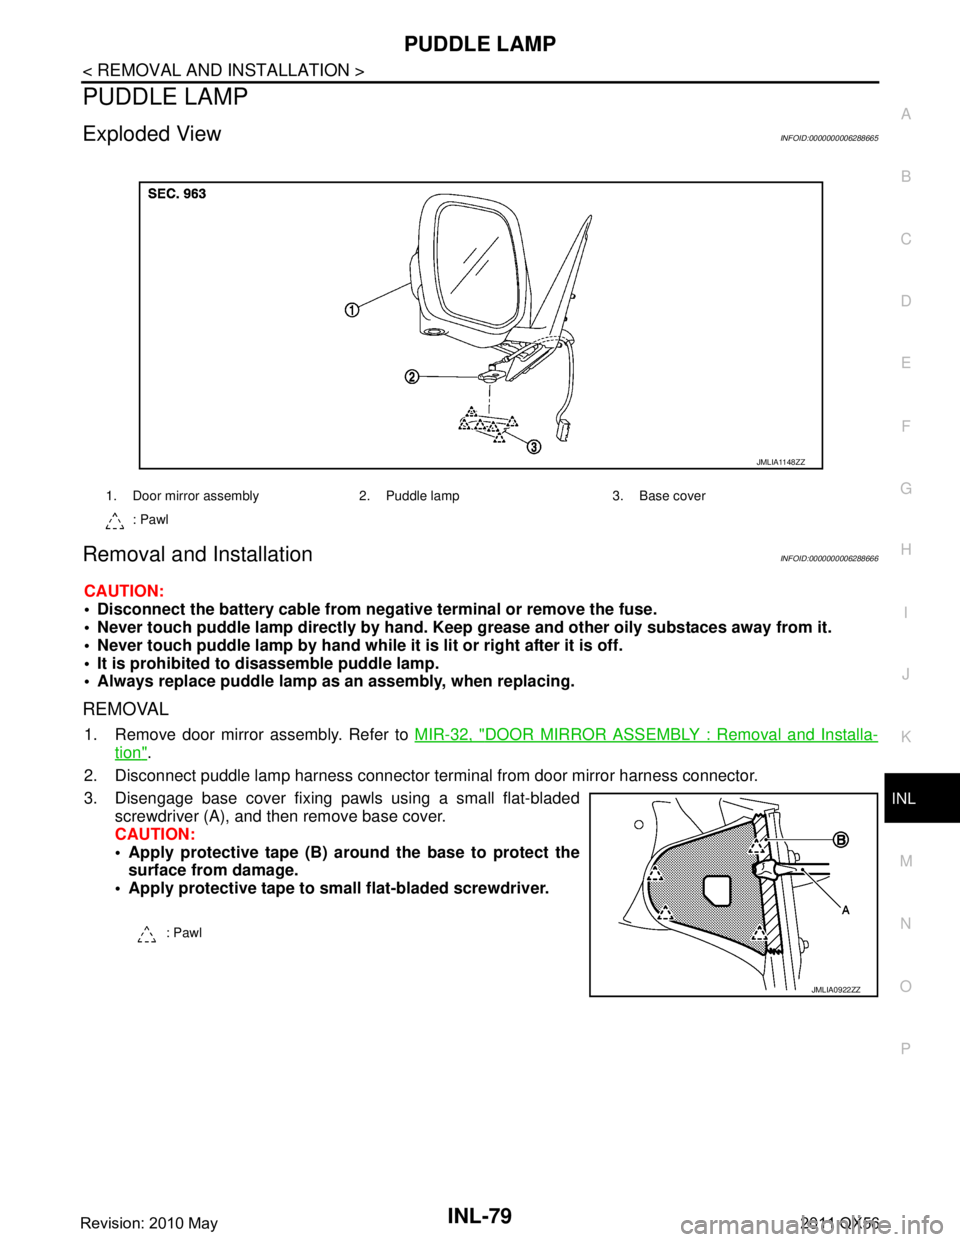
Exploded ViewINFOID:0000000006288665
Removal and InstallationINFOID:0000000006288666
CAUTION:
Disconnect the battery cable from negative terminal or remove the fuse.
Never touch puddle lamp directly by hand. Keep grease and other oily substaces away from it.
Never touch puddle lamp by hand while it is lit or right after it is off.
It is prohibited to disassemble puddle lamp.
Always replace puddle lamp as an assembly, when replacing.
REMOVAL
1. Remove door mirror assembly. Refer to MIR-32, "DOOR MIRROR ASSEMBLY : Removal and Installa-
tion".
2. Disconnect puddle lamp harness connector te rminal from door mirror harness connector.
3. Disengage base cover fixing pawls using a small flat-bladed screwdriver (A), and then remove base cover.
CAUTION:
Apply protective tape (B) around the base to protect thesurface from damage.
Apply protective tape to small flat-bladed screwdriver.
1. Door mirror assembly 2. Puddle lamp 3. Base cover
: Pawl
JMLIA1148ZZ
: Pawl
JMLIA0922ZZ
Revision: 2010 May2011 QX56
Page 3348 of 5598

LUGGAGE ROOM LAMPINL-81
< REMOVAL AND INSTALLATION >
C
DE
F
G H
I
J
K
M A
B
INL
N
O P
LUGGAGE ROOM LAMP
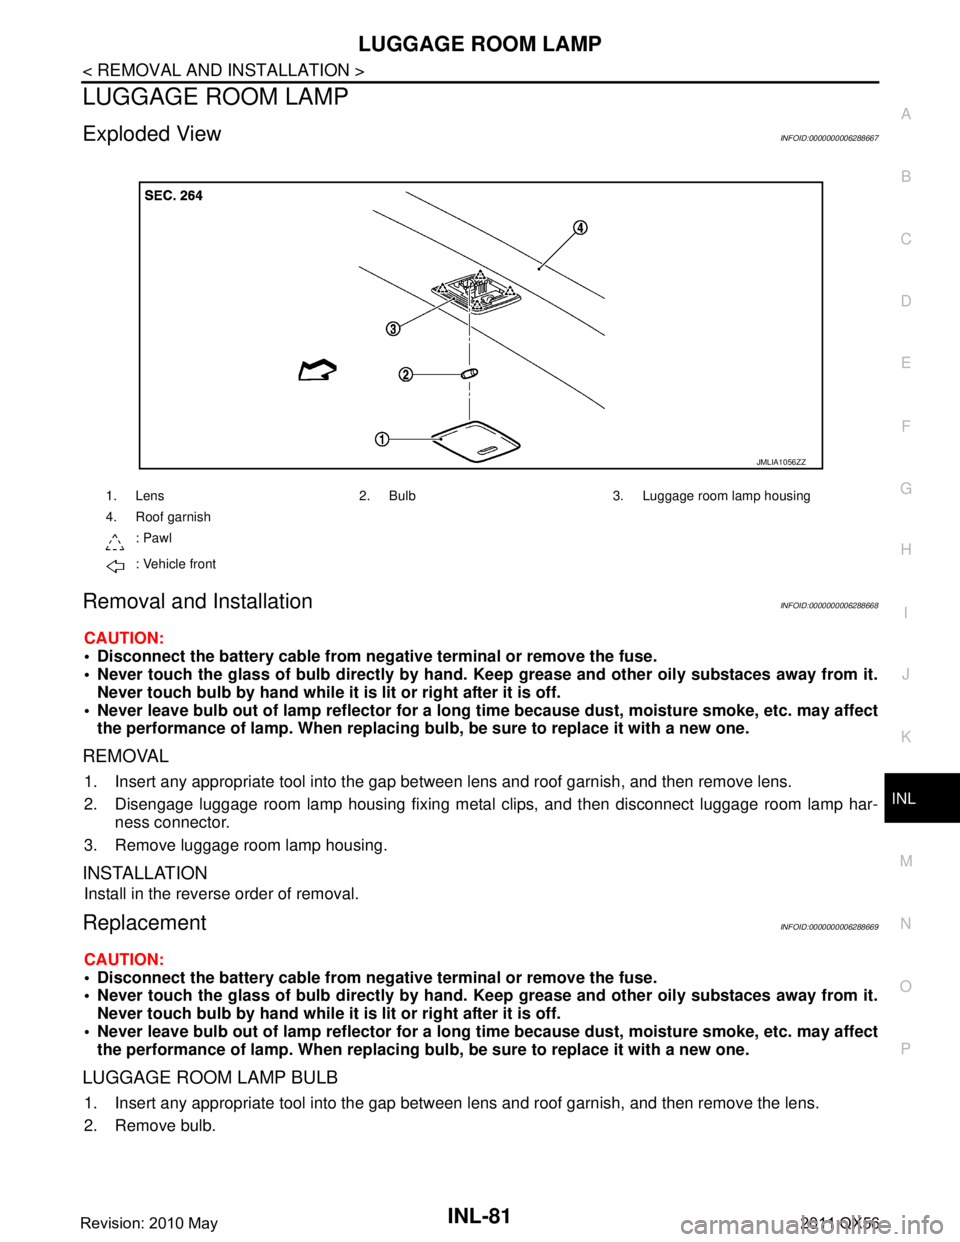
Exploded ViewINFOID:0000000006288667
Removal and InstallationINFOID:0000000006288668
CAUTION:
Disconnect the battery cable from negative terminal or remove the fuse.
Never touch the glass of bulb directly by hand. Keep grease and other oily substaces away from it.
Never touch bulb by hand while it is lit or right after it is off.
Never leave bulb out of lamp reflector for a long time because dust, moisture smoke, etc. may affect
the performance of lamp. When replacing bu lb, be sure to replace it with a new one.
REMOVAL
1. Insert any appropriate tool into the gap betw een lens and roof garnish, and then remove lens.
2. Disengage luggage room lamp housing fixing metal clips, and then disconnect luggage room lamp har- ness connector.
3. Remove luggage room lamp housing.
INSTALLATION
Install in the reverse order of removal.
ReplacementINFOID:0000000006288669
CAUTION:
Disconnect the battery cable from negative terminal or remove the fuse.
Never touch the glass of bulb directly by hand. Keep grease and other oily substaces away from it.
Never touch bulb by hand while it is lit or right after it is off.
Never leave bulb out of lamp reflector for a long time because dust, moisture smoke, etc. may affect
the performance of lamp. When replacing bu lb, be sure to replace it with a new one.
LUGGAGE ROOM LAMP BULB
1. Insert any appropriate tool into the gap between lens and roof garnish, and then remove the lens.
2. Remove bulb.
1. Lens 2. Bulb 3. Luggage room lamp housing
4. Roof garnish
: Pawl
: Vehicle front
JMLIA1056ZZ
Revision: 2010 May2011 QX56
Page 3404 of 5598

IP-14
< REMOVAL AND INSTALLATION >
INSTRUMENT PANEL ASSEMBLY
Removal and Installation
INFOID:0000000006113098
WORK STEP
When removing instrument panel assembly, combination meter, front display unit, AV control unit, instrument
finisher A, instrument fini sher B, and center console assembly take st eps as per the order shown in the follow-
ing chart.
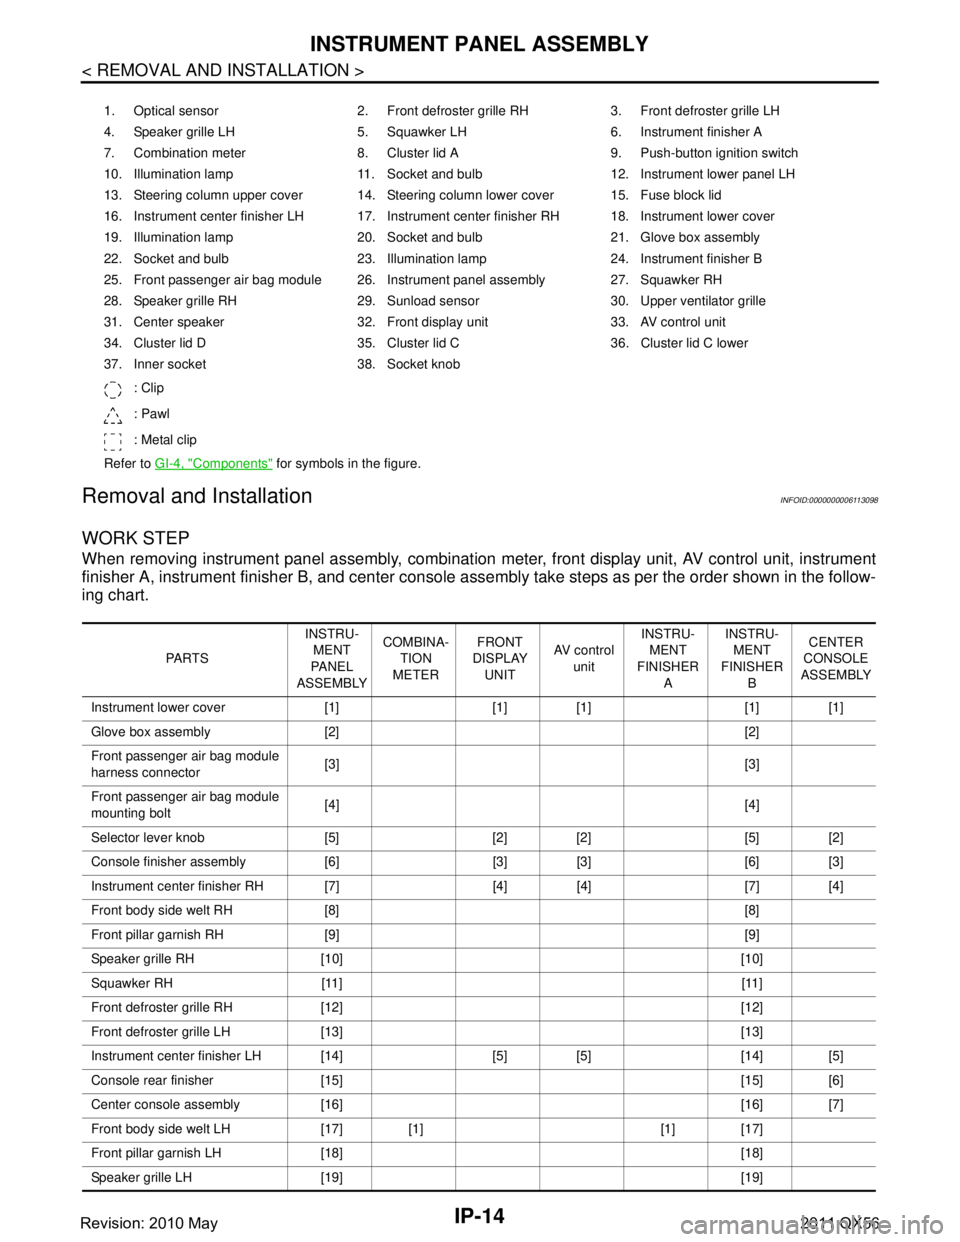
1. Optical sensor 2. Front defroster grille RH 3. Front defroster grille LH
4. Speaker grille LH 5. Squawker LH 6. Instrument finisher A
7. Combination meter 8. Cluster lid A 9. Push-button ignition switch
10. Illumination lamp 11. Socket and bulb 12. Instrument lower panel LH
13. Steering column upper cover 14. Steering column lower cover 15. Fuse block lid
16. Instrument center finisher LH 17. Instrument center finisher RH 18. Instrument lower cover
19. Illumination lamp 20. Socket and bulb 21. Glove box assembly
22. Socket and bulb 23. Illumination lamp 24. Instrument finisher B
25. Front passenger air bag module 26. Instrument panel assembly 27. Squawker RH
28. Speaker grille RH 29. Sunload sensor 30. Upper ventilator grille
31. Center speaker 32. Front display unit 33. AV control unit
34. Cluster lid D 35. Cluster lid C 36. Cluster lid C lower
37. Inner socket 38. Socket knob
: Clip
: Pawl
: Metal clip
Refer to GI-4, "
Components" for symbols in the figure.
PA R T S INSTRU-
MENT
PA N E L
ASSEMBLY COMBINA-
TION
METER FRONT
DISPLAY
UNIT AV c o n t r o l
unit INSTRU-
MENT
FINISHER A INSTRU-
MENT
FINISHER B CENTER
CONSOLE
ASSEMBLY
Instrument lower cover [1] [1] [1] [1] [1]
Glove box assembly [2] [2]
Front passenger air bag module
harness connector [3] [3]
Front passenger air bag module
mounting bolt [4] [4]
Selector lever knob [5] [2] [2] [5] [2]
Console finisher assembly [6] [3] [3] [6] [3]
Instrument center finisher RH [7] [4] [4] [7] [4]
Front body side welt RH [8] [8]
Front pillar garnish RH [9] [9]
Speaker grille RH [10] [10]
Squawker RH [11] [11]
Front defroster grille RH [12] [12]
Front defroster grille LH [13] [13]
Instrument center finisher LH [14] [5] [5] [14] [5]
Console rear finisher [15] [15] [6]
Center console assembly [16] [16] [7]
Front body side welt LH [17] [1] [1] [17]
Front pillar garnish LH [18] [18]
Speaker grille LH [19] [19]
Revision: 2010 May2011 QX56