2011 INFINITI QX56 fuse
[x] Cancel search: fusePage 2848 of 5598
![INFINITI QX56 2011 Factory Service Manual
EXL-138
< REMOVAL AND INSTALLATION >[XENON TYPE]
REAR COMBINATION LAMP
REAR COMBINATION LAMP
Exploded ViewINFOID:0000000006369482
REMOVAL
DISASSEMBLY
Removal and InstallationINFOID:0000000006369483
C INFINITI QX56 2011 Factory Service Manual
EXL-138
< REMOVAL AND INSTALLATION >[XENON TYPE]
REAR COMBINATION LAMP
REAR COMBINATION LAMP
Exploded ViewINFOID:0000000006369482
REMOVAL
DISASSEMBLY
Removal and InstallationINFOID:0000000006369483
C](/manual-img/42/57033/w960_57033-2847.png)
EXL-138
< REMOVAL AND INSTALLATION >[XENON TYPE]
REAR COMBINATION LAMP
REAR COMBINATION LAMP
Exploded ViewINFOID:0000000006369482
REMOVAL
DISASSEMBLY
Removal and InstallationINFOID:0000000006369483
CAUTION:
Disconnect the battery negative terminal or remove the fuse.
REMOVAL
1. Remove rear combination lamp finisher.
2. Remove rear combination lamp mounting bolts.
3. Pull rear combination lamp toward vehicle outside.
4. Disconnect rear combination lamp connector.
5. Remove rear combination lamp.
1. Rear combination lamp 2. Rear combination lamp finisher
:Pawl
JMLIA1118ZZ
1. Rear combination lamp 2. Rear turn signal bulb 3. Seal packing
4. Rear turn signal bulb socket 5. Rear combination lamp harness
JMLIA1119ZZ
Revision: 2010 May2011 QX56
Page 2851 of 5598
![INFINITI QX56 2011 Factory Service Manual
BACK-UP LAMPEXL-141
< REMOVAL AND INSTALLATION > [XENON TYPE]
C
D
E
F
G H
I
J
K
M A
B
EXL
N
O P
BACK-UP LAMP
Exploded ViewINFOID:0000000006369486
REMOVAL
DISASSEMBLY
Removal and InstallationINFOID:00 INFINITI QX56 2011 Factory Service Manual
BACK-UP LAMPEXL-141
< REMOVAL AND INSTALLATION > [XENON TYPE]
C
D
E
F
G H
I
J
K
M A
B
EXL
N
O P
BACK-UP LAMP
Exploded ViewINFOID:0000000006369486
REMOVAL
DISASSEMBLY
Removal and InstallationINFOID:00](/manual-img/42/57033/w960_57033-2850.png)
BACK-UP LAMPEXL-141
< REMOVAL AND INSTALLATION > [XENON TYPE]
C
D
E
F
G H
I
J
K
M A
B
EXL
N
O P
BACK-UP LAMP
Exploded ViewINFOID:0000000006369486
REMOVAL
DISASSEMBLY
Removal and InstallationINFOID:0000000006369487
CAUTION:
Disconnect the battery negative terminal or remove the fuse.
REMOVAL
1. Remove lamp mask. Refer to INT-39, "Exploded View".
2. Disconnect back-up lamp connector.
3. Remove back-up lamp mounting nuts, and then remove back-up lamp.
INSTALLATION
Install in the reverse order of removal.
1. Seal packing 2. Back-up lamp
Refer to GI-4, "
Components" for symbols not described above.
JMLIA1321ZZ
1. Back-up lamp 2. Back-up lamp bulb 3. Back-up lamp bulb socket
4. Tail lamp bulb socket 5. Tail lamp bulb
JMLIA1322ZZ
Revision: 2010 May2011 QX56
Page 2852 of 5598
![INFINITI QX56 2011 Factory Service Manual
EXL-142
< REMOVAL AND INSTALLATION >[XENON TYPE]
BACK-UP LAMP
Replacement
INFOID:0000000006369488
CAUTION:
Disconnect the battery negative terminal or remove the fuse.
Never touch the glass of bu INFINITI QX56 2011 Factory Service Manual
EXL-142
< REMOVAL AND INSTALLATION >[XENON TYPE]
BACK-UP LAMP
Replacement
INFOID:0000000006369488
CAUTION:
Disconnect the battery negative terminal or remove the fuse.
Never touch the glass of bu](/manual-img/42/57033/w960_57033-2851.png)
EXL-142
< REMOVAL AND INSTALLATION >[XENON TYPE]
BACK-UP LAMP
Replacement
INFOID:0000000006369488
CAUTION:
Disconnect the battery negative terminal or remove the fuse.
Never touch the glass of bu lb directly by hand. Keep grease an d other oily matters away from it.
Never touch bulb by hand while it is lit or right after being turned off.
Never leave bulb out of lamp reflector for a long ti me because dust, moisture smoke, etc. may affect
the performance of lamp. When replacing bulb, be sure to replace it with new one.
TAIL LAMP BULB
1. Remove lamp mask. Refer to INT-39, "Exploded View".
2. Disconnect tail lamp connector.
3. Tail bulb socket counterclockwise and unlock it.
4. Remove bulb from bulb socket.
BACK-UP LAMP BULB
1. Remove lamp mask. Refer to INT-39, "Exploded View".
2. Disconnect back-up lamp connector.
3. Turn bulb socket counterclockwise and unlock it.
4. Remove bulb from bulb socket.
Revision: 2010 May2011 QX56
Page 2853 of 5598
![INFINITI QX56 2011 Factory Service Manual
LICENSE PLATE LAMPEXL-143
< REMOVAL AND INSTALLATION > [XENON TYPE]
C
D
E
F
G H
I
J
K
M A
B
EXL
N
O P
LICENSE PLATE LAMP
Exploded ViewINFOID:0000000006369489
Removal and InstallationINFOID:0000000006 INFINITI QX56 2011 Factory Service Manual
LICENSE PLATE LAMPEXL-143
< REMOVAL AND INSTALLATION > [XENON TYPE]
C
D
E
F
G H
I
J
K
M A
B
EXL
N
O P
LICENSE PLATE LAMP
Exploded ViewINFOID:0000000006369489
Removal and InstallationINFOID:0000000006](/manual-img/42/57033/w960_57033-2852.png)
LICENSE PLATE LAMPEXL-143
< REMOVAL AND INSTALLATION > [XENON TYPE]
C
D
E
F
G H
I
J
K
M A
B
EXL
N
O P
LICENSE PLATE LAMP
Exploded ViewINFOID:0000000006369489
Removal and InstallationINFOID:0000000006369490
CAUTION:
Disconnect the battery negative terminal or remove the fuse.
REMOVAL
1. Remove back door trim. Refer to INT-39, "Removal and Installation".
2. Disconnect license plate lamp connector.
3. Remove back door finisher center upper.
4. Remove license plate lamp while pushing a resin clip, and then remove license plate lamp.
INSTALLATION
Install in the reverse order of removal.
ReplacementINFOID:0000000006369491
CAUTION:
Disconnect the battery negative terminal or remove the fuse.
Never touch the glass of bulb directly by hand. Keep grease and other oily matters away from it.
Never touch bulb by hand while it is lit or right after being turned off.
Never leave bulb out of lamp reflector for a long time because dust, moisture smoke, etc. may affect
the performance of lamp. When replacing bu lb, be sure to replace it with new one.
LICENSE PLATE LAMP BULB
1. Remove back door trim. Refer to INT-39, "Removal and Installation".
2. Disconnect license plate lamp connector.
1. License plate lamp harness 2. License plate lamp bulb socket 3. License plate lamp bulb
4. License plate lamp 5. Back door finisher center upper
JMLIA1122ZZ
Revision: 2010 May2011 QX56
Page 2974 of 5598

GI-10
< HOW TO USE THIS MANUAL >
HOW TO READ WIRING DIAGRAMS
Sample/Wiring Diagram -Example-
INFOID:0000000006282194
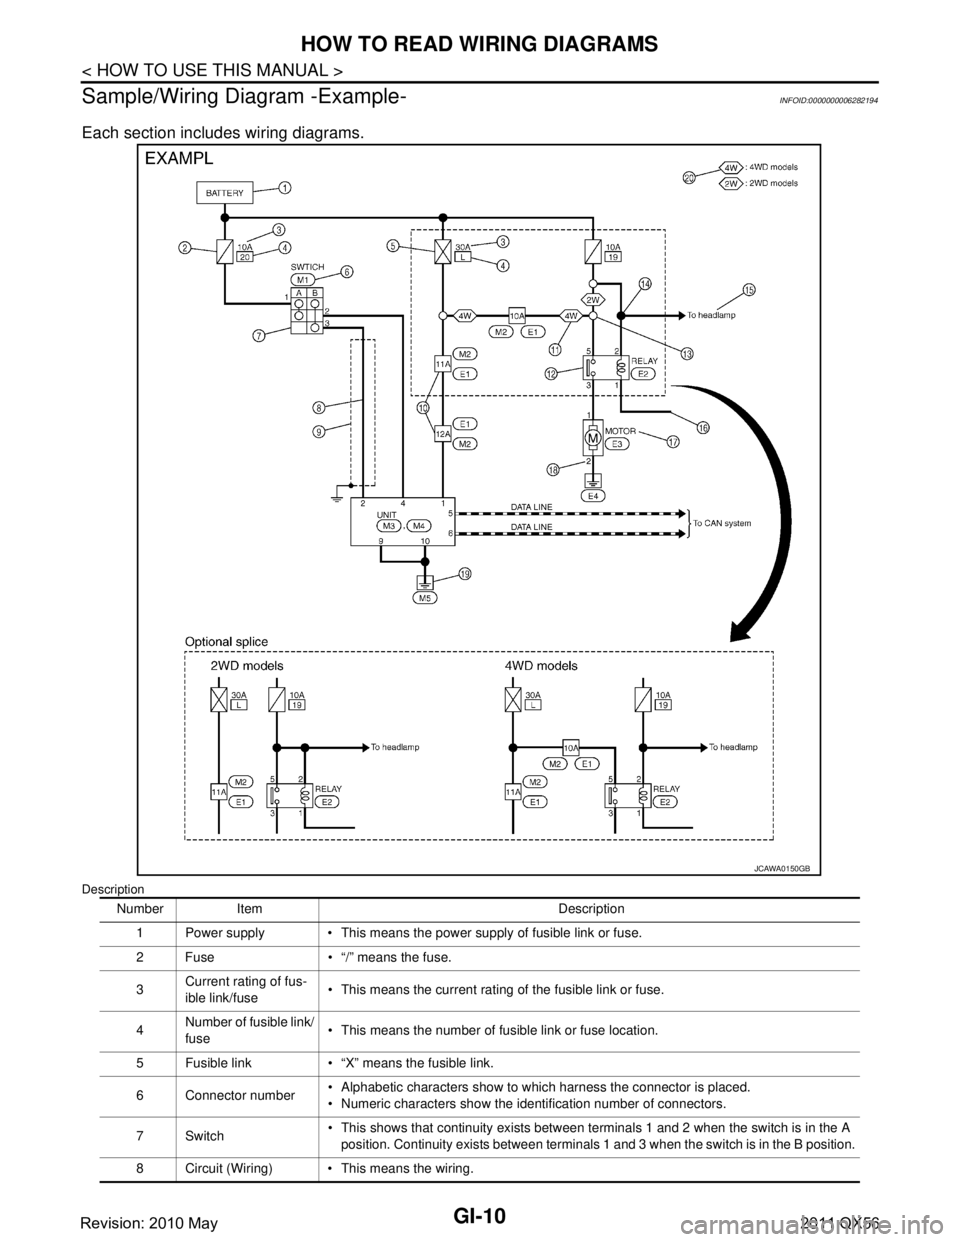
Each section includes wiring diagrams.
Description
JCAWA0150GB
Number Item Description 1 Power supply This means the power supply of fusible link or fuse.
2 Fuse “/” means the fuse.
3 Current rating of fus-
ible link/fuse This means the current rating of the fusible link or fuse.
4 Number of fusible link/
fuse
This means the number of fusible link or fuse location.
5 Fusible link “X” means the fusible link.
6 Connector number Alphabetic characters show to which harness the connector is placed.
Numeric characters show the identification number of connectors.
7Switch This shows that continuity exists between terminals 1 and 2 when the switch is in the A
position. Continuity exists between terminals 1 and 3 when the switch is in the B position.
8 Circuit (Wiring) This means the wiring.
Revision: 2010 May2011 QX56
Page 2990 of 5598

GI-26
< PRECAUTION >
PRECAUTIONS
PRECAUTION
PRECAUTIONS
DescriptionINFOID:0000000006280865
Observe the following precautions to ensure safe and proper servicing. These precautions are not
described in each individual section.
Precaution for Supplemental Restraint S ystem (SRS) "AIR BAG" and "SEAT BELT
PRE-TENSIONER"
INFOID:0000000006280866
The Supplemental Restraint System such as “A IR BAG” and “SEAT BELT PRE-TENSIONER”, used along
with a front seat belt, helps to reduce the risk or severi ty of injury to the driver and front passenger for certain
types of collision. This system includes seat belt switch inputs and dual stage front air bag modules. The SRS
system uses the seat belt switches to determine the front air bag deployment, and may only deploy one front
air bag, depending on the severity of a collision and w hether the front occupants are belted or unbelted.
Information necessary to service the system safely is included in the “SRS AIR BAG” and “SEAT BELT” of this
Service Manual.
WARNING:
To avoid rendering the SRS inopera tive, which could increase the risk of personal injury or death in
the event of a collision that would result in air bag inflation, all maintenance must be performed by
an authorized NISS AN/INFINITI dealer.
Improper maintenance, including in correct removal and installation of the SRS, can lead to personal
injury caused by unintent ional activation of the system. For re moval of Spiral Cable and Air Bag
Module, see the “SRS AIR BAG”.
Do not use electrical test equipmen t on any circuit related to the SRS unless instructed to in this
Service Manual. SRS wiring harnesses can be identi fied by yellow and/or orange harnesses or har-
ness connectors.
PRECAUTIONS WHEN USING POWER TOOLS (AIR OR ELECTRIC) AND HAMMERS
WARNING:
When working near the Air Bag Diagnosis Sensor Unit or other Air Bag System sensors with the
ignition ON or engine running, DO NOT use air or electric power tools or strike near the sensor(s)
with a hammer. Heavy vibration could activate the sensor(s) and deploy the air bag(s), possibly
causing serious injury.
When using air or electric power tools or hammers , always switch the ignition OFF, disconnect the
battery, and wait at least 3 minu tes before performing any service.
Precautions For Xenon Headlamp ServiceINFOID:0000000006280867
WARNING:
Comply with the following warnings to prevent any serious accident.
Disconnect the battery cable (negative terminal) or the power supply fuse before installing, remov-
ing, or touching the xenon headlamp (bulb included). The xenon headlamp contains high-voltage
generated parts.
Never work with wet hands.
Check the xenon headlamp ON-OFF status after assembling it to the vehicle. Never turn the xenon
headlamp ON in other conditions. Connect th e power supply to the vehicle-side connector.
(Turning it ON outside the lamp case m ay cause fire or visual impairments.)
Never touch the bulb glass immediately after turning it OFF. It is extremely hot.
CAUTION:
Comply with the following cautions to prevent any error and malfunction.
Install the xenon bulb securely. (Ins ufficient bulb socket installation may melt the bulb, the connec-
tor, the housing, etc. by high-v oltage leakage or corona discharge.)
Never perform HID circuit in spection with a tester.
Never touch the xenon bulb glass with ha nds. Never put oil and grease on it.
Dispose of the used xenon bulb after packing it in thick vinyl without breaking it.
Never wipe out dirt and cont amination with organic solven t (thinner, gasoline, etc.).
Revision: 2010 May2011 QX56
Page 3007 of 5598

SERVICE INFORMATION FOR ELECTRICAL INCIDENTGI-43
< BASIC INSPECTION >
C
DE
F
G H
I
J
K L
M B
GI
N
O P
Circuit InspectionINFOID:0000000006280855
DESCRIPTION
In general, testing electrical circuits is an easy task if it is approached in a logical and organized method. Before beginning it is important to have all available information on the system to be tested. Also, get a thor-
ough understanding of system operation. Then you will be able to use the appropriate equipment and follow
the correct test procedure.
You may have to simulate vehicle vibrations while te sting electrical components. Gently shake the wiring
harness or electrical component to do this.
NOTE:
Refer to GI-37, "
How to Check Terminal" to probe or check terminal.
TESTING FOR “OPENS” IN THE CIRCUIT
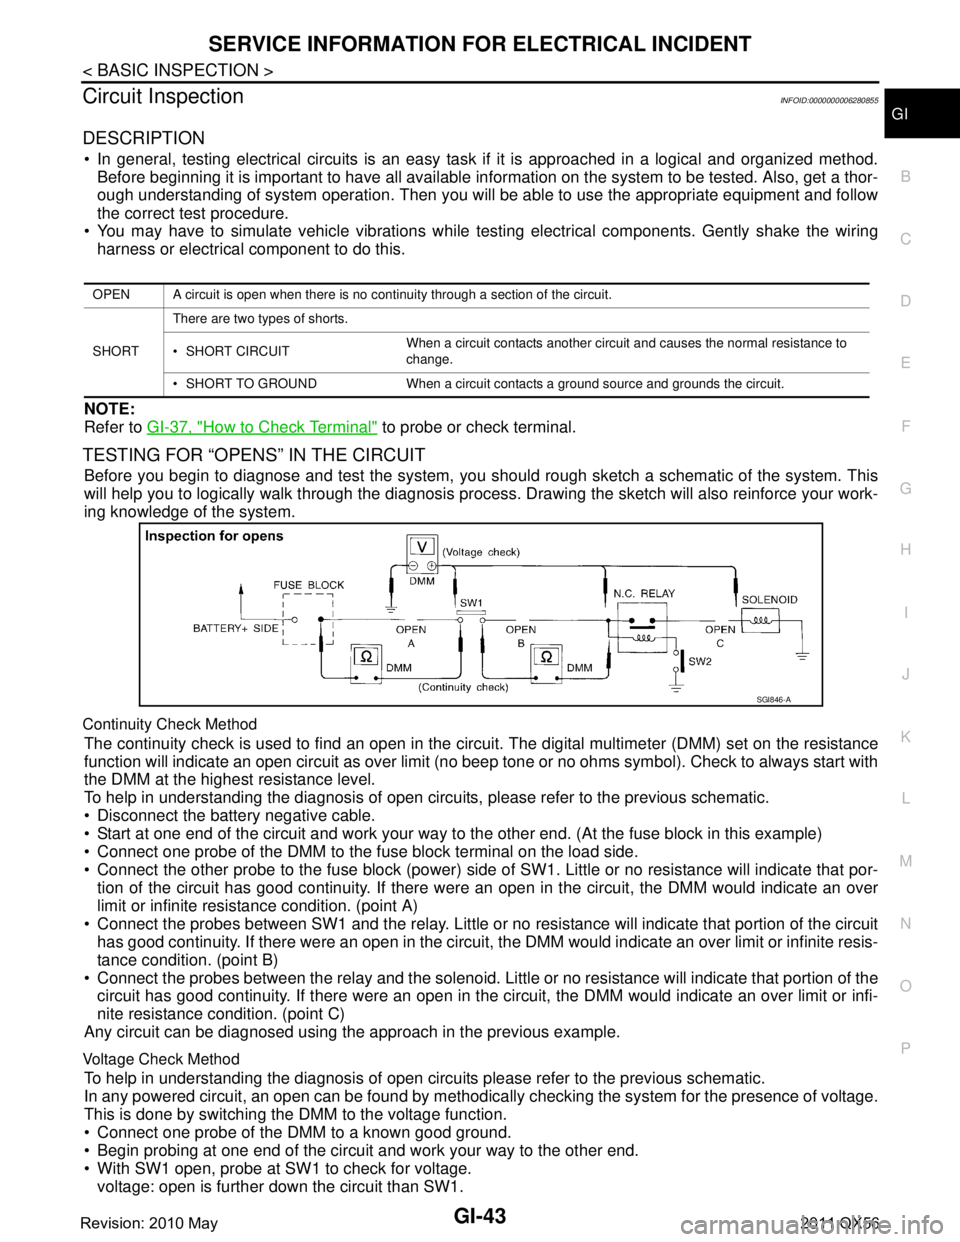
Before you begin to diagnose and test the system, you should rough sketch a schematic of the system. This
will help you to logically walk through the diagnosis process. Drawing the sketch will also reinforce your work-
ing knowledge of the system.
Continuity Check Method
The continuity check is used to find an open in the circui t. The digital multimeter (DMM) set on the resistance
function will indicate an open circuit as over limit (no beep tone or no ohms symbol). Check to always start with
the DMM at the highest resistance level.
To help in understanding the diagnosis of open circui ts, please refer to the previous schematic.
Disconnect the battery negative cable.
Start at one end of the circuit and work your way to the other end. (At the fuse block in this example)
Connect one probe of the DMM to the fuse block terminal on the load side.
Connect the other probe to the fuse block (power) side of SW1. Little or no resistance will indicate that por-
tion of the circuit has good continuity. If there were an open in the circuit, the DMM would indicate an over
limit or infinite resistance condition. (point A)
Connect the probes between SW1 and the relay. Little or no resistance will indicate that portion of the circuit
has good continuity. If there were an open in the circuit, t he DMM would indicate an over limit or infinite resis-
tance condition. (point B)
Connect the probes between the relay and the solenoid. Little or no resistance will indicate that portion of the
circuit has good continuity. If there were an open in the ci rcuit, the DMM would indicate an over limit or infi-
nite resistance condition. (point C)
Any circuit can be diagnosed using the approach in the previous example.
Voltage Check Method
To help in understanding the diagnosis of open circui ts please refer to the previous schematic.
In any powered circuit, an open can be found by methodica lly checking the system for the presence of voltage.
This is done by switching the DMM to the voltage function.
Connect one probe of the DMM to a known good ground.
Begin probing at one end of the circuit and work your way to the other end.
With SW1 open, probe at SW1 to check for voltage. voltage: open is further down the circuit than SW1.
OPEN A circuit is open when there is no continuity through a section of the circuit.
SHORT There are two types of shorts.
SHORT CIRCUIT
When a circuit contacts another circuit and causes the normal resistance to
change.
SHORT TO GROUND When a circuit contacts a ground source and grounds the circuit.
SGI846-A
Revision: 2010 May2011 QX56
Page 3008 of 5598

GI-44
< BASIC INSPECTION >
SERVICE INFORMATION FOR ELECTRICAL INCIDENT
no voltage: open is between fuse block and SW1 (point A).
Close SW1 and probe at relay. voltage: open is further down the circuit than the relay.
no voltage: open is between SW1 and relay (point B).
Close the relay and probe at the solenoid. voltage: open is further down the circuit than the solenoid.
no voltage: open is between relay and solenoid (point C).
Any powered circuit can be diagnosed using the approach in the previous example.
TESTING FOR “SHORTS” IN THE CIRCUIT
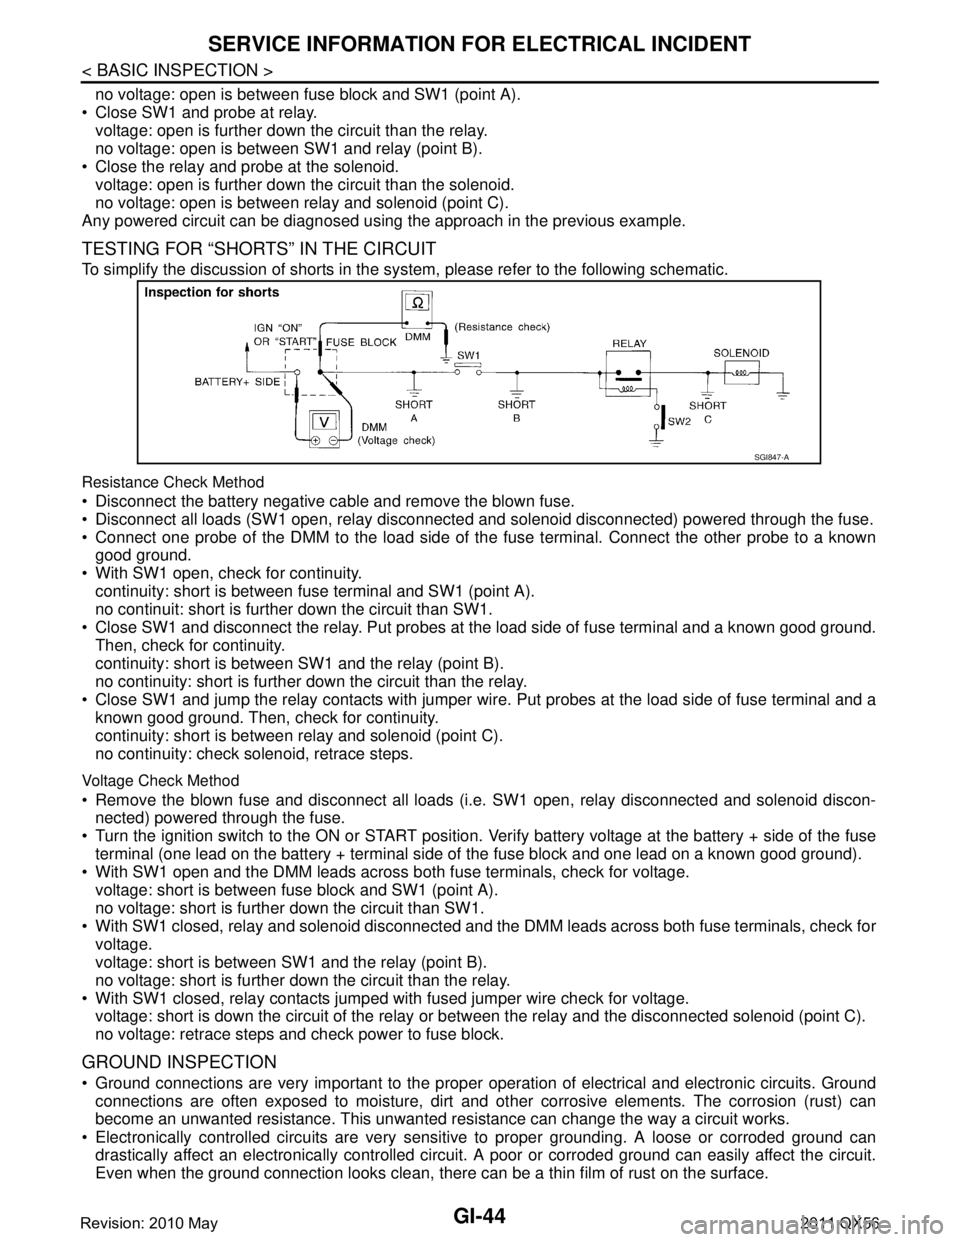
To simplify the discussion of shorts in the sy stem, please refer to the following schematic.
Resistance Check Method
Disconnect the battery negative cable and remove the blown fuse.
Disconnect all loads (SW1 open, relay disconnected and solenoid disconnected) powered through the fuse.
Connect one probe of the DMM to the load side of the fuse terminal. Connect the other probe to a known
good ground.
With SW1 open, check for continuity. continuity: short is between fuse terminal and SW1 (point A).
no continuit: short is further down the circuit than SW1.
Close SW1 and disconnect the relay. Put probes at the load side of fuse terminal and a known good ground. Then, check for continuity.
continuity: short is between SW1 and the relay (point B).
no continuity: short is further down the circuit than the relay.
Close SW1 and jump the relay contacts with jumper wir e. Put probes at the load side of fuse terminal and a
known good ground. Then, check for continuity.
continuity: short is between relay and solenoid (point C).
no continuity: check solenoid, retrace steps.
Voltage Check Method
Remove the blown fuse and disconnect all loads (i .e. SW1 open, relay disconnected and solenoid discon-
nected) powered through the fuse.
Turn the ignition switch to the ON or START position. Verify battery voltage at the battery + side of the fuse
terminal (one lead on the battery + terminal side of the fuse block and one lead on a known good ground).
With SW1 open and the DMM leads across both fuse terminals, check for voltage. voltage: short is between fuse block and SW1 (point A).
no voltage: short is further down the circuit than SW1.
With SW1 closed, relay and solenoid disconnected and the DMM leads across both fuse terminals, check for
voltage.
voltage: short is between SW1 and the relay (point B).
no voltage: short is further down the circuit than the relay.
With SW1 closed, relay contacts jumped with fused jumper wire check for voltage. voltage: short is down the circuit of the relay or between the relay and the disconnected solenoid (point C).
no voltage: retrace steps and check power to fuse block.
GROUND INSPECTION
Ground connections are very important to the proper operation of electrical and electronic circuits. Ground
connections are often exposed to moisture, dirt and other corrosive elements. The corrosion (rust) can
become an unwanted resistance. This unwanted resistance can change the way a circuit works.
Electronically controlled circuits are very sens itive to proper grounding. A loose or corroded ground can
drastically affect an electronically controlled circuit. A poor or corroded ground can easily affect the circuit.
Even when the ground connection looks clean, there c an be a thin film of rust on the surface.
SGI847-A
Revision: 2010 May2011 QX56