2011 INFINITI QX56 torque
[x] Cancel search: torquePage 2178 of 5598
![INFINITI QX56 2011 Factory Service Manual
EC-154
< BASIC INSPECTION >[VK56VD]
FUEL PRESSURE
4. Connect fuel hose for fuel pressure check (1) to fuel tube
(engine side) with clamp (2) as shown in the figure.
CAUTION:
Wipe off oil or dirt fr INFINITI QX56 2011 Factory Service Manual
EC-154
< BASIC INSPECTION >[VK56VD]
FUEL PRESSURE
4. Connect fuel hose for fuel pressure check (1) to fuel tube
(engine side) with clamp (2) as shown in the figure.
CAUTION:
Wipe off oil or dirt fr](/manual-img/42/57033/w960_57033-2177.png)
EC-154
< BASIC INSPECTION >[VK56VD]
FUEL PRESSURE
4. Connect fuel hose for fuel pressure check (1) to fuel tube
(engine side) with clamp (2) as shown in the figure.
CAUTION:
Wipe off oil or dirt from hose insertion part using clothmoistened with gasoline.
Apply proper amount of gasoli ne between top of the fuel
tube (3) and No.1 spool (4).
Insert fuel hose for fuel pressure check until it touches the No.1 spool on fuel tube.
Use NISSAN genuine hose clamp (part number: 16439
N4710 or 16439 40U00).
When reconnecting fuel line, always use new clamps.
Use a torque driver to tighten clamps.
Install hose clamp to the position within 1 - 2 mm (0.04 - 0.08 in).
Make sure that clamp screw does not contact adjacent parts.
5. Connect fuel tube adapter (C) to fuel feed hose (1) in the same manner as instructed in Step 4.
6. After connecting fuel hose for fuel pressure check, pull the hose with a force of approximately 98 N (10 kg,
22 lb) to confirm fuel tube does not come off.
7. Reinstall the part removed at Step 3. NOTE:
Install the part to allow smooth engine starts.
8. Turn ignition switch ON and check for fuel leakage.
9. Start engine and check for fuel leakage.
10. Read the indication of fuel pressure gauge. CAUTION:
Do not perform fuel pressure check with system operating. Fuel pressure gauge may indicate
false readings.
During fuel pressure check, confirm for fuel leakage from fuel connection every 3 minutes.
HIGH FUEL PRESSURE CHECK
NOTE:
Since the fuel pressure gauge kit cannot be connected, follow the method shown below to check high fuel
pressure.
WITH CONSULT-III
1. Start engine.
2. Check “FUEL PRES SEN V” in “DATA MONITOR” mode with CONSULT-III.
5 : No.2 spool
Tightening torque : 1.0 - 1.5 N·m (0.1 - 0.15 kg-m, 9 - 13 in-
lb)
A : Fuel pressure gauge
B : Fuel hose for fuel pressure check
PBIB2983E
JSBIA0491ZZ
At idling: Approximately 450 kPa (4.5 bar, 4.6 kg/cm2,
65 psi)
Revision: 2010 May2011 QX56
Page 2546 of 5598
![INFINITI QX56 2011 Factory Service Manual
EC-522
< DTC/CIRCUIT DIAGNOSIS >[VK56VD]
SNOW MODE SWITCH
SNOW MODE SWITCH
DescriptionINFOID:0000000006256403
The snow mode switch signal is sent to the combinat
ion meter from the snow mode switch. INFINITI QX56 2011 Factory Service Manual
EC-522
< DTC/CIRCUIT DIAGNOSIS >[VK56VD]
SNOW MODE SWITCH
SNOW MODE SWITCH
DescriptionINFOID:0000000006256403
The snow mode switch signal is sent to the combinat
ion meter from the snow mode switch.](/manual-img/42/57033/w960_57033-2545.png)
EC-522
< DTC/CIRCUIT DIAGNOSIS >[VK56VD]
SNOW MODE SWITCH
SNOW MODE SWITCH
DescriptionINFOID:0000000006256403
The snow mode switch signal is sent to the combinat
ion meter from the snow mode switch. The combination
meter then sends the signal to the ECM via the CAN communication line.
The snow mode is used for driving or starting the vehicle on snowy roads or slippery areas. If the snow mode
is activated, the vehicle speed will not accelerate as quickly as normal to avoid vehicle slip. In other words,
ECM controls rapid engine torque change by controlling t he electric throttle control actuator operating speed.
Component Function CheckINFOID:0000000006256404
1.CHECK SNOW MODE SWITCH FUNCTION
1. Turn ignition switch ON.
2. Select “SNOW MODE SW” in “DATA MONITOR” mode with CONSULT-III.
3. Check “SNOW MODE SW” indication under the following conditions.
Is the inspection result normal?
YES >> INSPECTION END
NO >> Go to EC-522, "
Diagnosis Procedure".
Diagnosis ProcedureINFOID:0000000006256405
1.CHECK DTC WITH COMBINATION METER
Refer to MWI-30, "
CONSULT-III Function".
Is the inspection result normal?
YES >> GO TO 2.
NO >> Go to MWI-57, "
Work flow".
2.CHECK SNOW MODE SWITCH POWER SUPPLY CIRCUIT
1. Turn ignition switch OFF.
2. Disconnect snow mode switch harness connector.
3. Turn ignition switch ON.
4. Check the voltage between snow mode switch harness connector and ground.
Is the inspection result normal?
YES >> GO TO 4.
NO >> GO TO 3.
3.DETECT MALFUNCTIONING PART
Check the following.
Fuse block harness connector M3
10 A fuse (No. 13)
Harness for open or short between snow mode switch and fuse.
>> Repair open circuit, short to ground or short to power in harness or connectors.
4.CHECK SNOW MODE SWITCH INPUT SIGNAL CIRCUIT FOR OPEN AND SHORT
1. Turn ignition switch OFF.
Monitor item Condition Indication
SNOW MODE SW Snow mode switch ON ON
OFF OFF
Snow mode switch
Ground Voltage
Connector Terminal
M54 12 Ground Battery voltage
Revision: 2010 May2011 QX56
Page 2566 of 5598

EM-4
< PRECAUTION >
PRECAUTIONS
If turning the steering wheel is required with the battery disconnected or discharged, follow the operation pro-
cedure below before starting the repair operation.
OPERATION PROCEDURE
1. Connect both battery cables.
NOTE:
Supply power using jumper cables if battery is discharged.
2. Turn the push-button ignition switch to ACC position. (At this time, the steering lock will be released.)
3. Disconnect both battery cables. The steering lock wi ll remain released with both battery cables discon-
nected and the steering wheel can be turned.
4. Perform the necessary repair operation.
5. When the repair work is completed, re-connect bot h battery cables. With the brake pedal released, turn
the push-button ignition switch from ACC position to ON position, then to LOCK position. (The steering
wheel will lock when the push-button igniti on switch is turned to LOCK position.)
6. Perform self-diagnosis check of all control units using CONSULT-III.
Precaution for Drain Engine Coolant and Engine OilINFOID:0000000006289509
Drain engine coolant and engine oil when engine is cooled.
Precaution for Disconnecting Fuel PipingINFOID:0000000006289510
Before starting work, check no fire or sp ark producing items are in the work area.
Release fuel pressure before disconnecting and disassembly.
After disconnecting pipes, plug openings to stop fuel leakage.
Precaution for Handling High Pressure Fuel SystemINFOID:0000000006289511
High pressure fuel system components are betw een high pressure fuel pump and fuel injector.
Always release fuel pressure and never start the engine when performing removal and installation.
When removing or installing parts without releasing fuel pressure, fuel may be splashed and, if fuel contacts
skin or eyes, it may cause inflammation.
Precaution for Removal and DisassemblyINFOID:0000000006289512
When instructed to use SST, use specified tools. Always be careful to work safely, avoid forceful or unin-
structed operations.
Exercise maximum care to avoid damage to mating or sliding surfaces.
Cover openings of engine system with tape or the equival ent, if necessary, to seal out foreign materials.
Mark and arrange disassembly parts in an organi zed way for easy troubleshooting and assembly.
When loosening nuts and bolts, as a basic rule, star t with the one furthest outside, then the one diagonally
opposite, and so on. If the order of loosening is specified, do exactly as specified. Power tools may be used
where noted in the step.
Precaution for Inspection, Repair and ReplacementINFOID:0000000006289513
Before repairing or replacing, thoroughly inspect parts. Inspect new replacement parts in the same way, and
replace if necessary.
Precaution for Assembly and InstallationINFOID:0000000006289514
Use torque wrench to tighten bolts or nuts to specification.
When tightening nuts and bolts, as a basic rule, equally tighten in several different steps starting with the
ones in center, then ones on inside and outside diagonally in this order. If the order of tightening is specified,
do exactly as specified.
Replace with new gasket, packing, oil seal or O-ring.
Thoroughly wash, clean, and air-blow each part. Carefully check engine oil or engine coolant passages for
any restriction and blockage.
Dowel pins are used for several parts alignment. When replacing and reassembling parts with dowel pins,
check that dowel pins are installed in the original position.
Revision: 2010 May2011 QX56
Page 2570 of 5598

EM-8
< PREPARATION >
PREPARATION
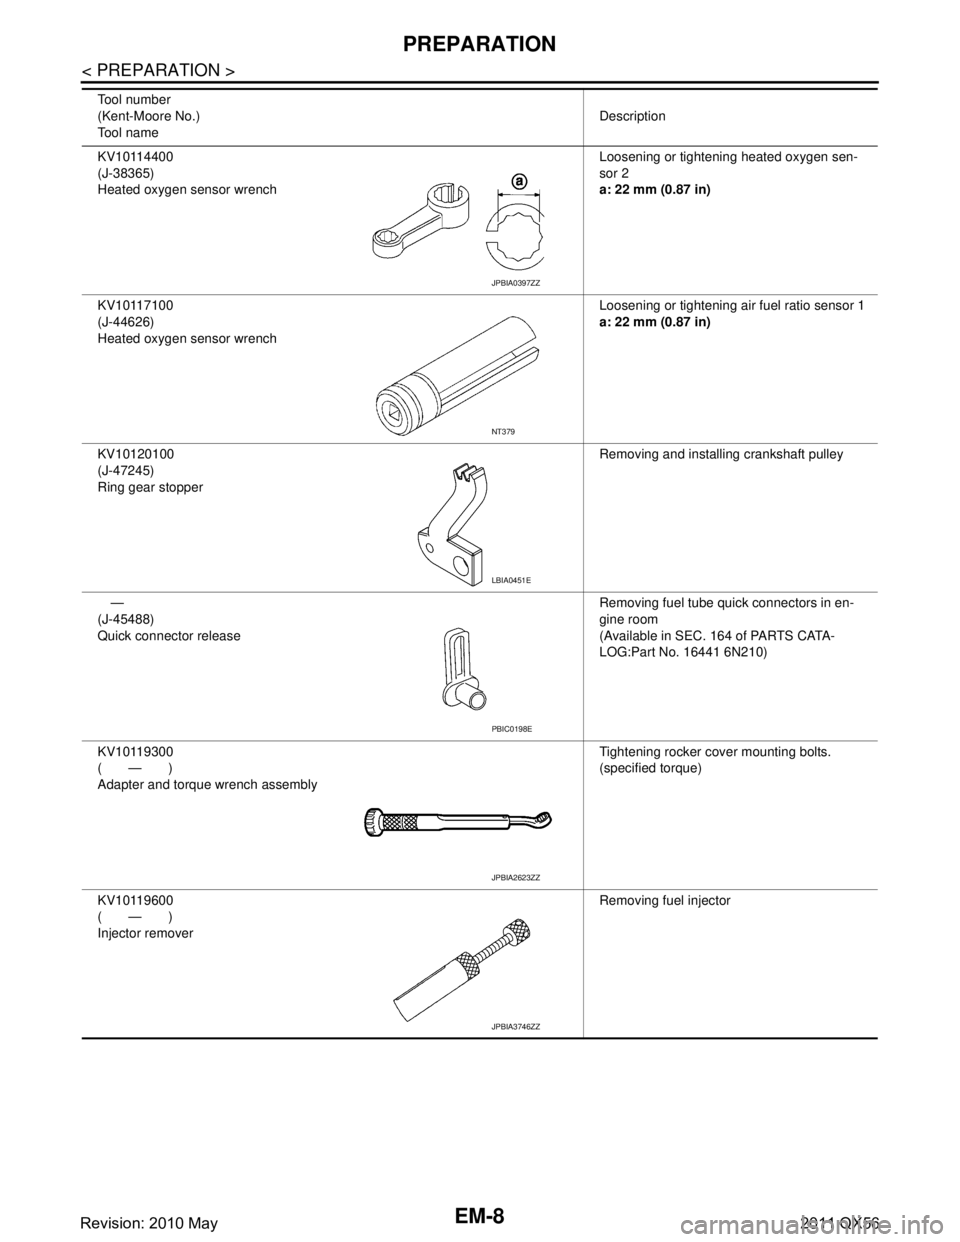
KV10114400
(J-38365)
Heated oxygen sensor wrenchLoosening or tightening heated oxygen sen-
sor 2
a: 22 mm (0.87 in)
KV10117100
(J-44626)
Heated oxygen sensor wrench Loosening or tightening air fuel ratio sensor 1
a: 22 mm (0.87 in)
KV10120100
(J-47245)
Ring gear stopper Removing and installing crankshaft pulley
—
(J-45488)
Quick connector release Removing fuel tube quick connectors in en-
gine room
(Available in SEC. 164 of PARTS CATA-
LOG:Part No. 16441 6N210)
KV10119300
(—)
Adapter and torque wrench assembly Tightening rocker cover mounting bolts.
(specified torque)
KV10119600
(—)
Injector remover Removing fuel injector
Tool number
(Kent-Moore No.)
Tool name
Description
JPBIA0397ZZ
NT379
LBIA0451E
PBIC0198E
JPBIA2623ZZ
JPBIA3746ZZ
Revision: 2010 May2011 QX56
Page 2590 of 5598

EM-28
< REMOVAL AND INSTALLATION >
AIR CLEANER AND AIR DUCT
Note the following item, and install in the reverse order of removal.
Align marks. Attach each joint. Screw clamps firmly.
InspectionINFOID:0000000006289540
INSPECTION AFTER REMOVAL
Inspect air duct assembly for crack or tear.
If damage is found, replace air duct assemblyClamp tightening torque
: 4.5 N·m (0.46 kg-m, 40 in-lb)
Revision: 2010 May2011 QX56
Page 2597 of 5598

ROCKER COVEREM-35
< REMOVAL AND INSTALLATION >
C
DE
F
G H
I
J
K L
M A
EM
NP
O
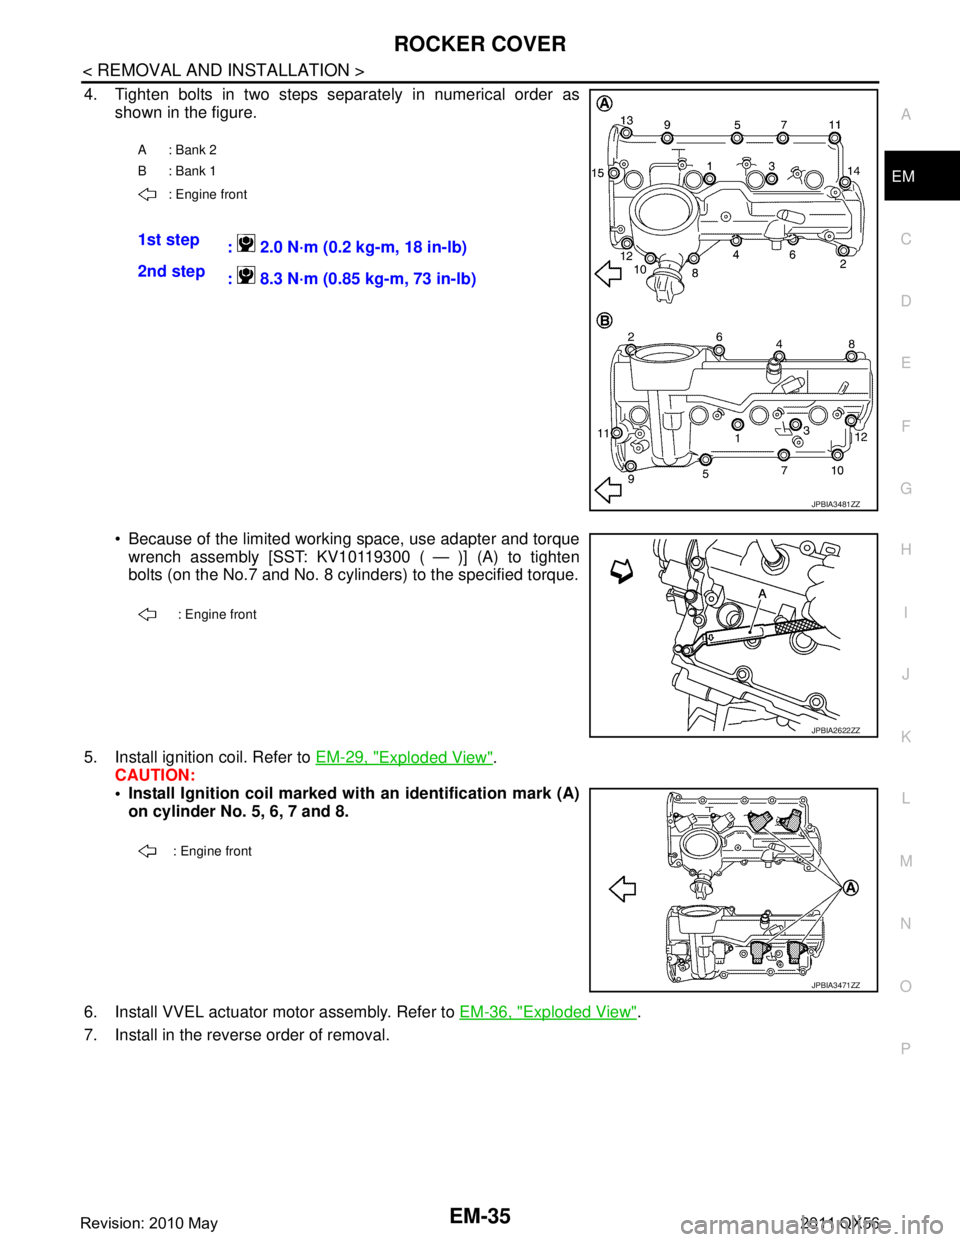
4. Tighten bolts in two steps separately in numerical order as
shown in the figure.
Because of the limited working space, use adapter and torquewrench assembly [SST: KV10119300 ( — )] (A) to tighten
bolts (on the No.7 and No. 8 cylinders) to the specified torque.
5. Install ignition coil. Refer to EM-29, "
Exploded View".
CAUTION:
Install Ignition coil marked with an identification mark (A)
on cylinder No. 5, 6, 7 and 8.
6. Install VVEL actuator motor assembly. Refer to EM-36, "
Exploded View".
7. Install in the reverse order of removal.
A: Bank 2
B: Bank 1
: Engine front
1st step : 2.0 N·m (0.2 kg-m, 18 in-lb)
2nd step : 8.3 N·m (0.85 kg-m, 73 in-lb)
JPBIA3481ZZ
: Engine front
JPBIA2622ZZ
: Engine front
JPBIA3471ZZ
Revision: 2010 May2011 QX56
Page 2604 of 5598

EM-42
< REMOVAL AND INSTALLATION >
EXHAUST MANIFOLD AND THREE WAY CATALYST
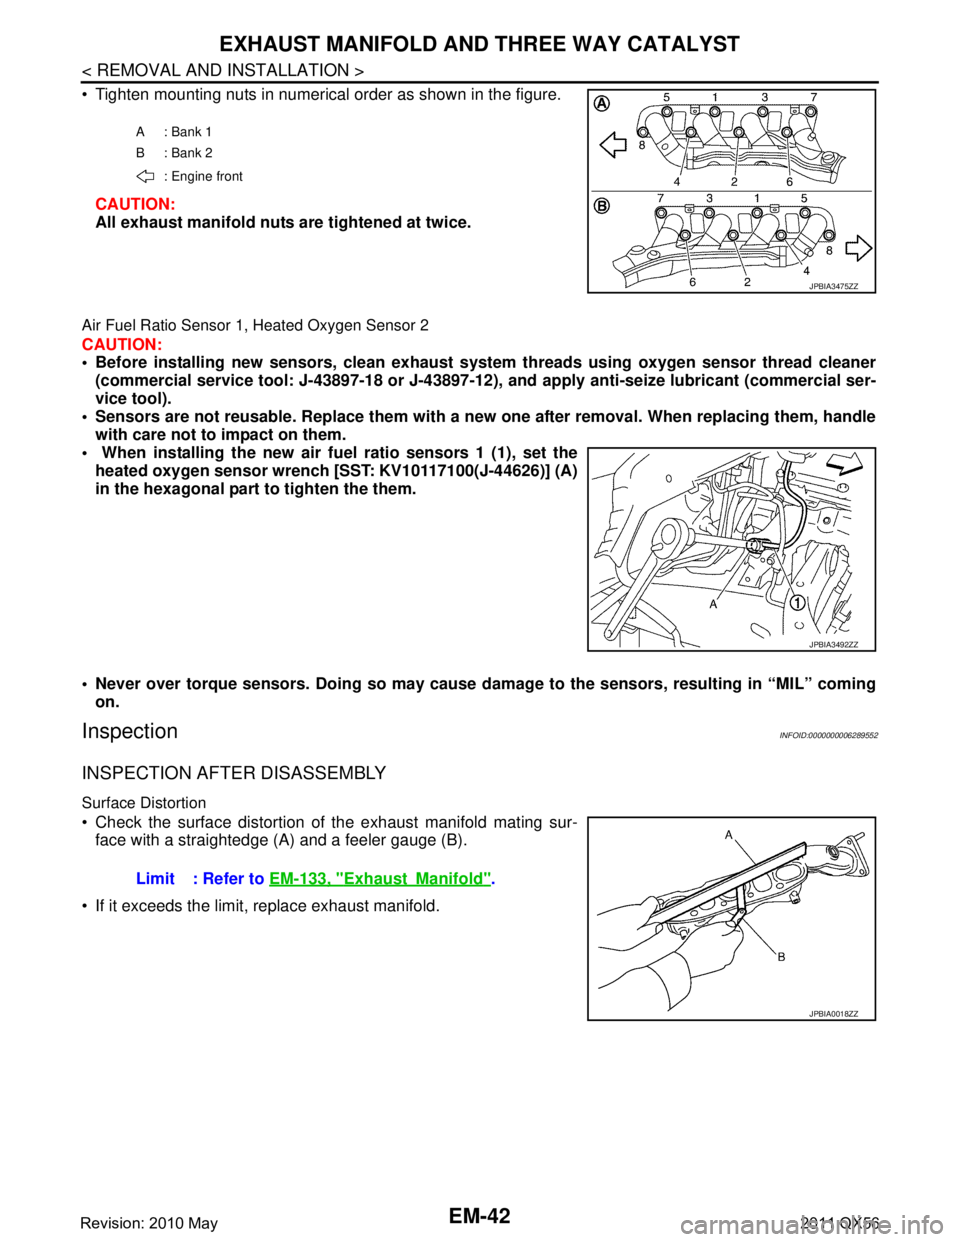
Tighten mounting nuts in numerical order as shown in the figure.CAUTION:
All exhaust manifold nuts are tightened at twice.
Air Fuel Ratio Sensor 1, Heated Oxygen Sensor 2
CAUTION:
Before installing new sensors, clean exhaust system threads usin g oxygen sensor thread cleaner
(commercial service tool: J-43897-18 or J-43897-12), and apply anti-seize lubricant (commercial ser-
vice tool).
Sensors are not reusable. Replace them with a ne w one after removal. When replacing them, handle
with care not to impact on them.
When installing the new air fu el ratio sensors 1 (1), set the
heated oxygen sensor wren ch [SST: KV10117100(J-44626)] (A)
in the hexagonal part to tighten the them.
Never over torque sensors. Doing so may cause da mage to the sensors, resulting in “MIL” coming
on.
InspectionINFOID:0000000006289552
INSPECTION AFTER DISASSEMBLY
Surface Distortion
Check the surface distortion of the exhaust manifold mating sur- face with a straightedge (A) and a feeler gauge (B).
If it exceeds the limit, replace exhaust manifold.
A: Bank 1
B: Bank 2 : Engine front
JPBIA3475ZZ
JPBIA3492ZZ
Limit : Refer to EM-133, "ExhaustManifold".
JPBIA0018ZZ
Revision: 2010 May2011 QX56
Page 2621 of 5598

OIL PAN (UPPER)EM-59
< REMOVAL AND INSTALLATION >
C
DE
F
G H
I
J
K L
M A
EM
NP
O
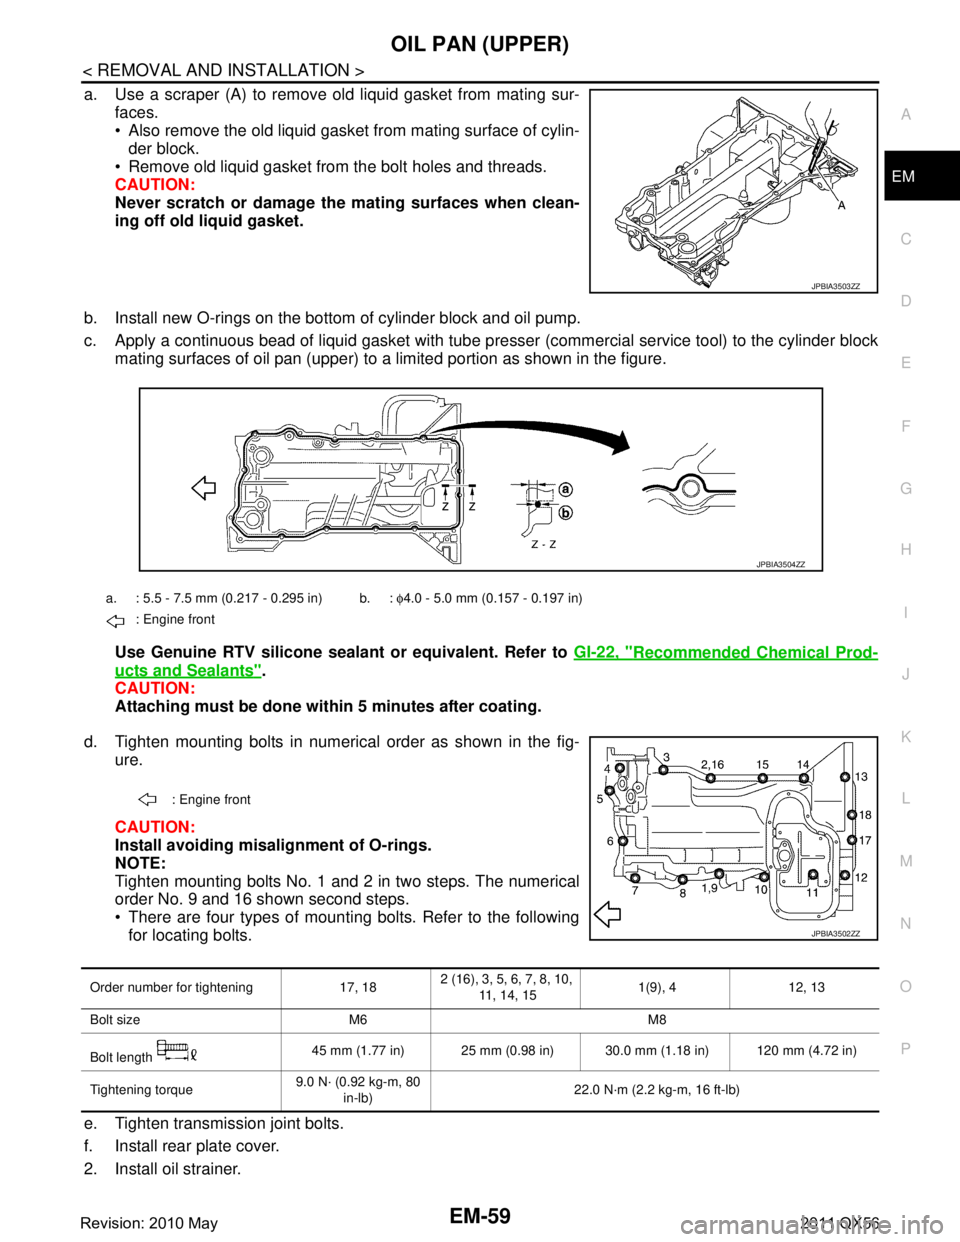
a. Use a scraper (A) to remove old liquid gasket from mating sur-
faces.
Also remove the old liquid gasket from mating surface of cylin-der block.
Remove old liquid gasket from the bolt holes and threads.
CAUTION:
Never scratch or damage th e mating surfaces when clean-
ing off old liquid gasket.
b. Install new O-rings on the bottom of cylinder block and oil pump.
c. Apply a continuous bead of liquid gasket with tube pre sser (commercial service tool) to the cylinder block
mating surfaces of oil pan (upper) to a limited portion as shown in the figure.
Use Genuine RTV silicone sealant or equivalent. Refer to GI-22, "
Recommended Chemical Prod-
ucts and Sealants".
CAUTION:
Attaching must be done with in 5 minutes after coating.
d. Tighten mounting bolts in numerical order as shown in the fig- ure.
CAUTION:
Install avoiding misal ignment of O-rings.
NOTE:
Tighten mounting bolts No. 1 and 2 in two steps. The numerical
order No. 9 and 16 shown second steps.
There are four types of mounting bolts. Refer to the following for locating bolts.
e. Tighten transmission joint bolts.
f. Install rear plate cover.
2. Install oil strainer.
JPBIA3503ZZ
a. : 5.5 - 7.5 mm (0.217 - 0.295 in) b. : φ4.0 - 5.0 mm (0.157 - 0.197 in)
: Engine front
JPBIA3504ZZ
: Engine front
JPBIA3502ZZ
Order number for tightening 17, 18 2 (16), 3, 5, 6, 7, 8, 10,
11, 14, 15 1(9), 4 12, 13
Bolt size M6 M8
Bolt length 45 mm (1.77 in) 25 mm (0.98 in) 30.0 mm (1.18 in) 120 mm (4.72 in)
Tightening torque 9.0 N· (0.92 kg-m, 80
in-lb) 22.0 N·m (2.2 kg-m, 16 ft-lb)
Revision: 2010 May2011 QX56