Page 17 of 84
Navigation 27
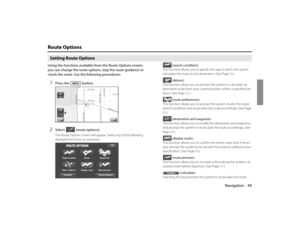
Setting RouteSetting Destination
Setting destination/waypoints by scrolling the mapEven if you do not know the exact address of your destination or a way-
point on your route to the destination, you can set it by scrolling the
map as follows:1
Touch the screen and scroll the map until the crosshair
reaches the destination or a waypoint.
2
Select the (destination or waypoint) key.The key will separate into the destination key and the waypoint key.
3
Select for setting the destinationThe system will calculate the route and display the entire route to
the destination on the map.
Select for a waypoint. The system will program the
address of the waypoint on your route (See Page 69). You can set
up to 5 waypoints per trip.
Page 18 of 84
28 NavigationSetting Route4
Select (start).Route guidance will begin along the displayed route.
NOTE
•If the system cannot find your desired route, select (change
route). This will allow you to access the ROUTE OPTIONS screen, from which
you can prompt the system to calculate a new route. (See Page 49.)
•Selecting (start) for more than 5 seconds will start the demon-
stration mode operation.
■Selecting routeUpon setting the destination, the system prepares to calculate three
types of routes to the destination (Quick, Alt., and Short). You can select
from any of the three options as follows:1
Select (3 routes).The system will be ready for calculation of any route you select
from the three options, namely, Quick (the fastest route), Alt.
(alternative route), and Short (the shortest route).
Page 19 of 84
Navigation 29
Setting Route
2
Select (information).The screen will display details (required time, total distance, roads
used, etc.) regarding each option.
3
Select (Quick), (Alt.), (Short)
or as you desire, and then select (Start) to con-
firm your selection.
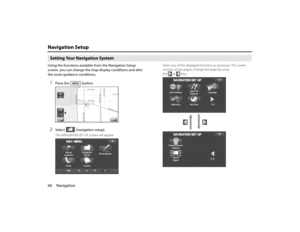
Setting the destination from the navigation menuYou can set your destination using a variety of methods if you start set-
ting from the DESTINATION ENTRY screen. Before you can use any of
these methods, perform the following steps:1
Press the button.
2
Select the method you want to use.
Page 20 of 84

or (previous page).
NOTE
•If the set destination area is different from the one displayed under \"Search
Area\" in")
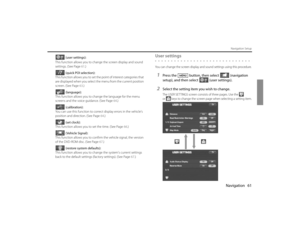
30 NavigationSetting Route
You can switch between screens by selecting (next page)
or (previous page).
NOTE
•If the set destination area is different from the one displayed under "Search
Area" in the right part of the screen, you must select the (change)
key and specify the desired area again.
•For the methods marked with an asterisk ( * ), you can use the "Change Search
Area" function to narrow the area where a destination or waypoint is located
by selecting the (change) key (See Page 41).•Depending on the method used or the status of the map displayed, the
located point may differ from where the facility you want to visit actually
exists. (Address)* See Page 31.
(Point of Interests)* See Page 34.
(Select from Map) See Page 35.
(Emergency) See Page 37.
(Memory Point) See Page 33.
(Previous Destination) See Page 35.
(Intersection)* See Page 39.
(Freeway Ent/Exit) See Page 36.
(Phone number) See Page 40.
(Coordinates) See Page 38.
(Home) See Page 33.
- (Category1) - (Category5)
Page 21 of 84
Navigation 31
Setting Route
■"Address" method1
Press the button and select (address).
2
Enter a house number using the keypad on the house
number input screen and select .
3
Enter the street name.If you enter enough letters to identify a street name and advance
to Step 4, a list showing several street names will be displayed.
Select the desired street name from the list.: Use this key to delete the last character entered. Select it
repeatedly if you want to delete all the characters entered.
You can switch between keypad screens showing different characters
by selecting (others), (symbols) or (alphabet).
4
Select (list).
5
Select the desired street from the list.If the same street name exists in more than one city, a list of these
cities will be shown.
Page 22 of 84
: Use this key to input the city name from the
keypad.
7
Select (destination) to set the address entered
in the above s")
32 NavigationSetting Route6
Select the correct city from the list.
(input name): Use this key to input the city name from the
keypad.
7
Select (destination) to set the address entered
in the above steps as your final destinationThe system will calculate the route and display the entire route on
the map.
Select (waypoint) to set the address entered in the
above steps as a waypoint on your route.
You can program up to five waypoints per trip.
8
Select (start).Route guidance begins along the displayed route.
NOTE
•If the system cannot find your desired route, select (change
route). This will allow you to access the ROUTE OPTIONS screen, from which
you can prompt the system to calculate a new route. (See Page 49.)
•If your DVD-ROM disc does not contain the relevant house number data, an
error message will be displayed and a street map will appear, allowing you to
set the destination using the map.
•If your destination is not on a road, set a destination point on a main road
nearest to your true destination.
•Selecting the (city) will display a screen that searches the destination
on a city basis.
: Search the destination from all cities.
: Search the destination from the nearby five cities
within 20 miles from the current position.
: Search the destination by inputting the city name.
You can also search the destination from the five cities that you searched in
the past.
Page 23 of 84

Navigation 33
Setting Route
■"Memory Point" methodIf you have saved some locations in the system's memory, you can
make use of an appropriate one to set the destination.1
Press the button and select (memory
point).
2
Select the address of the desired location (memory
point).
: Use this key to display up to five previous suggestions.
: Use this key to display the previous suggestion.: Use this key to display the next suggestion.
: Use this key to display up to five of the next suggestions.
3
Select (destination) or (waypoint).
NOTE
•Select the (Attribute), (icon), (name), or
(date) key to change the sequence in which memory points are
displayed.
•You cannot use the "Memory Point" method unless there are memory points
stored. To store memory points, See Page 70.■"Home" method or method using stored destinationsIf you have stored your home address in the system's memory, you can
use it for your destination or a waypoint. Similarly, if other locations are
stored in the memory, they can be conveniently used for quick setting
of destination and waypoints.1
First, choose either of the two procedures below to fol-
low the "home" method.Press the button.
2
Select (home) or one of the locations pro-
grammed to keys (Category 1)
through (Category 5).
Page 24 of 84
 or (waypoint).
NOTE
Icon (home) and keys (Category 1) through (Categ")
34 NavigationSetting Route
The map including your home location or the selected location
will be displayed.
3
Select (destination) or (waypoint).
NOTE
Icon (home) and keys (Category 1) through (Category
5) are displayed only when you have stored your home location and other loca-
tions in the memory. For instructions on how to store your home location and
other locations.■"Point of Interest" methodYou can use a selection from the "Point of Interest" listing as your desti-
nation or a waypoint.1
First, choose either of the two procedures below to fol-
low the "point of interest" method.Press the button and select (point of interest).
2
Enter the name of the desired point of interest and
select .
3
Select the desired point of interest from the list.
: Use this key to display up to five previous suggestions.
: Use this key to display the previous suggestion.
: Use this key to display the next suggestion.
: Use this key to display up to five of the next suggestions.
4
Select (destination) or (waypoint).


.Route guidance will begin along the displayed route.
NOTE
•If the system cannot find your desired route, select (change
route). This will allow you to acc")
.The screen will display details (required time, total distance, roads
used, etc.) regarding each option.
3
Select (Quick), (Alt.), (Short)
or as yo")
.
2
Enter a house number using the keypad on the house
number input screen and select .
3
Enter the street name.I")