Page 9 of 84
 will appear
on the screen. Then touch a desired point on the map. T")
Navigation 19
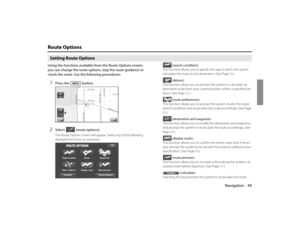
Markers and Controls Displayed on MapsScreens During Route SettingTouch a point on the map. A crosshair (scroll mark) will appear
on the screen. Then touch a desired point on the map. The
map will scroll with the selected point at the center.
(1) Time
Indicates the current time.
(2) Map orientation control
Used to select either a "north up" display or "heading up" dis-
play of the map. (See Page 24.)
(3) GPS marker
Shows the status of the signal from GPS satellites. When this
marker appears, your navigation system is receiving GPS sig-
nals and using them to calculate the position of your vehicle.
(4) Screen configuration control
Allows you to select a preferred display type for route guid-
ance. (See Page 43.)
(5) Map scale
Used to display the map scale.
(6) Zoom-out/zoom-in control
or is used to zoom out or zoom in the map.
Select or to select the map scale.
(7) Vehicle marker
Indicates the current position and direction of your vehicle.
(4)
Scroll the map
Press button to
return to the current map
screen.
(1)
(2)(6)(7)(5)(10)
(9) (8) (11)(3)
Page 10 of 84
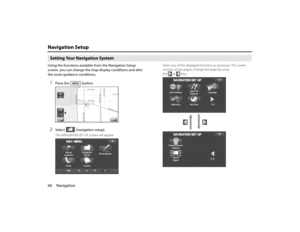
20 NavigationMarkers and Controls Displayed on Maps
(8) "Store memory point" key
Stores markers on the map.
This key appears just for a few seconds after a map screen is
selected.
(9) Point of interest (POI) key
Allows you to display the POI selection screen (See Page 79).
On the screen, you can program POIs to appear on a map as
markers. This key appears just for a few seconds after a map
screen is selected.
(10) Distance from current position
Indicates the distance from the current position to the posi-
tion marked by .
(11) Destination/waypoint key
Used to program a destination or waypoint at the position
marked by on a scroll screen.
Page 11 of 84
Navigation 21
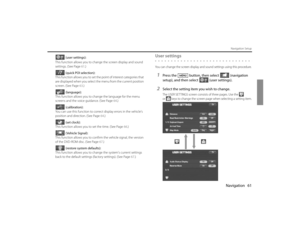
Markers and Controls Displayed on Maps
Screens During Route Guidance
(1) Distance and time to destination
Indicates the time (either approximate time required or time
of arrival) and the distance to the destination or a waypoint.
(2) Route
A thick blue line indicates the route you should follow.
(3) Turn guidance arrow
Indicates the direction of your turn at the next intersection/
intersection as well as the distance to the intersection/inter-
section.
(4) "Repeat voice" key
If this key is selected, the last voice guidance will be repeated.
(5) Current road name
Shows the name of the road you are currently driving on.
(6) "Display whole route" key
If this key is selected, a map containing the entire route will
be displayed. (See Page 56.)
(7) "Change route" key
Selecting this key displays the route option menu. Selecting a
new route option causes the system to calculate the selected
route.
(3)
(2)
(1)
(4)
(5)(6) (7)
Select the screen (5 seconds)
Page 12 of 84
22 NavigationMenu Screen Keys and Functions
The table below shows the keys displayed on the MENU screen,
the functions accessible by selecting these keys, and the pages of
this manual that describe the instructions you should follow when
using these functions.
Select to return to
the current map screen.
Page 13 of 84
Navigation 23
Menu Screen Keys and Functions
PhoneBluetooth Phone page 187
Redial List page 199
Received Calls page 199
Phone Book page 201
Memory Points page 193
Bluetooth Settings page 183
VersionVersion page 87
VOLVolume page 18 Menu screen key Function Reference page
Page 14 of 84
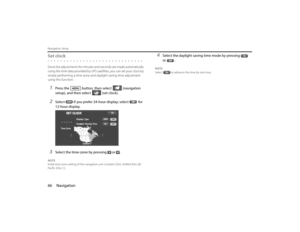
24 NavigationMap OperationsSelecting Map OrientationYou can select either "heading up" or "north up" display on
the current map screen by using the following procedure.1
Select or .If you select ("north up" display), the system rotates the
map so that north is always directly upwards on the screen.If you select ("heading up" display), the system rotates the
map so that the direction in which you are heading is always
directly upwards on the screen (the red arrow points to the north).
<"Heading up" display> <"North up" display>
Page 15 of 84
Navigation 25
Map Operations
Changing Map ScaleYou can increase or decrease the scale of the map using the
following procedure:1
Select or to change the map scale.
2
Selecting or changes the scale as shown
below.
Page 16 of 84
26 NavigationMap OperationsNOTE
•Selecting or allows you to change the map scale.
•You can keep selecting or allows you to change the map scale.
•Selecting either of the following on the scale bar displayed by
selecting or allows you to change to the specified map scale.
•The scale can be displayed in Imperial or metric units. To change the units, See
Page 61.
Imperial display
Metric display1/32 mi (mile)
50 m1/4 mi (mile)
500 m2 mi (mile)
4 km16 mi (mile)
32 km128 mi (mile)
256 km
Current scale
Scale to be changed


 \"Store memory point\" key
Stores markers on the map.
This key appears just for a few seconds after a map screen is
selected.
(9) Point of intere")
 Distance and time to destination
Indicates the time (either approximate time required or time
of arrival) and th")


