Page 13 of 84
Navigation 23
Menu Screen Keys and Functions
PhoneBluetooth Phone page 187
Redial List page 199
Received Calls page 199
Phone Book page 201
Memory Points page 193
Bluetooth Settings page 183
VersionVersion page 87
VOLVolume page 18 Menu screen key Function Reference page
Page 20 of 84

30 NavigationSetting Route
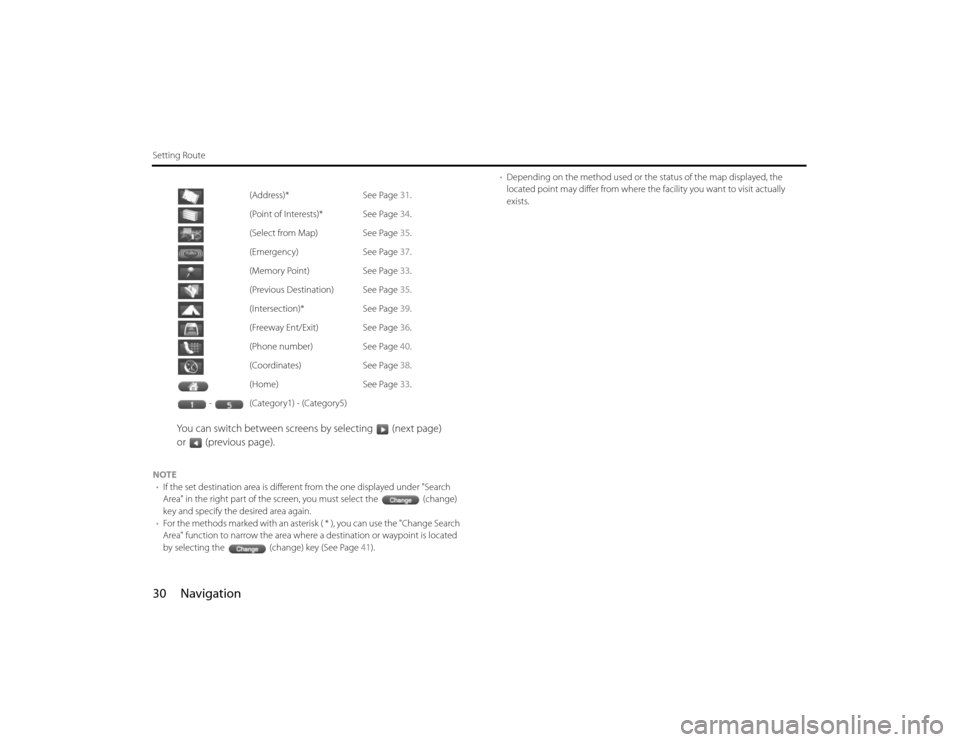
You can switch between screens by selecting (next page)
or (previous page).
NOTE
•If the set destination area is different from the one displayed under "Search
Area" in the right part of the screen, you must select the (change)
key and specify the desired area again.
•For the methods marked with an asterisk ( * ), you can use the "Change Search
Area" function to narrow the area where a destination or waypoint is located
by selecting the (change) key (See Page 41).•Depending on the method used or the status of the map displayed, the
located point may differ from where the facility you want to visit actually
exists. (Address)* See Page 31.
(Point of Interests)* See Page 34.
(Select from Map) See Page 35.
(Emergency) See Page 37.
(Memory Point) See Page 33.
(Previous Destination) See Page 35.
(Intersection)* See Page 39.
(Freeway Ent/Exit) See Page 36.
(Phone number) See Page 40.
(Coordinates) See Page 38.
(Home) See Page 33.
- (Category1) - (Category5)
Page 30 of 84
40 NavigationSetting Route5
When there are two or more candidates, a list of intersec-
tions will be displayed. Select an intersection of your des-
tination.
6
Select (destination) or (waypoint).
NOTE
No intersection is defined if
•the two streets do not cross each other,
•the two streets are a freeway and a highway,
•either street is for right or left turns only,
•both are one-way streets,
•either street is for U-turns,
•the two streets cross on the inside lane,
•either street is an on/off ramp,
•either street is a frontage street, and/or
■"Phone number" methodThis function allows buildings and the like to be located using their
phone numbers.1
Press the button, select , and then select
(phone number).
2
Enter the phone number starting with the area code.
3
Select .
Page 32 of 84

42 NavigationSetting Route■Area (West)Arizona, California, Colorado, Idaho, Kansas, Montana, Nebraska,
Nevada, New Mexico, North Dakota, Oklahoma, Oregon, South Dakota,
Texas, Utah, Washington, Wyoming, Canada■Area (Mid)Alabama, Arkansas, Illinois, Indiana, Iowa, Kansas, Kentucky, Louisiana,
Michigan, Minnesota, Mississippi, Missouri, Nebraska, North Dakota,
Ohio, Oklahoma, South Dakota, Tennessee, Texas, Wisconsin, Canada
■Area (East)Alabama, Connecticut, Delaware, Florida, Georgia, Kentucky, Maine,
Massachusetts, Maryland, New Hampshire, New Jersey, New York, North
Carolina, Ohio, Pennsylvania, Rhode Island, South Carolina, Tennessee,
Vermont, Virginia, Washington D.C., West Virginia, CanadaNOTE
•Road information for all of the above locations is included on the map discs.
This means that the following operations can be performed regardless of
which map disc is loaded in the system;
-Scrolling Map to Select Destination (Select from Map)
-Selecting Destination from the previously registered points as a memory
point (Home, Memory Point, Previous Destination) within the same area.
-Selecting Destination by Latitude and Longitude (Coordinates), Phone num-
ber, Emergency, and Quick POI.
•After replacing the map disc, stored data including the POI icon on the map
and stored Avoid Street settings will be deleted, and Quick POI selections will
return to default.
•In the Current Location display, the arrival time and the distance to the desti-
nation are displayed for Next Way Point.
Page 49 of 84
Navigation 59
Route Options
POI keys:When you select one of the six POI category keys, the system will
retrieve the selected POI from the Quick POI storage and display it on
the map. When you select the (others)
key, you can find POIs of other categories. For more details, See Page 63.If, for example, the (to next POI) category
key is selected and a simulation drive is started, your simulation
vehicle will then stop at a restaurant on the route.
If you then select (information), the system will display
information on the restaurant.
.
Selecting allows you to make a phone call to the phone
number displayed.
* The Bluetooth Phone is required to be set in advance.
NOTE
You must finish the simulation drive before you actually start to drive. Although
the simulation drive will automatically stop when you actually start to drive, not
finishing it properly can lead to an error in the display of your vehicle's current
position.
Page 61 of 84
Navigation 71
Stored Locations
3
Set the memory point using the preferred method avail-
able on the displayed screen.
NOTE
Up to 100 memory points can be stored. Once that number has been reached,
you must delete memory points that you no longer require (See Page 74) before
you can store new memory points. The number of memory points you can store
is indicated on the screen.
■Reviewing and modifying memory pointsUsing this function, you can review the stored memory points in the
form of a list on the screen and modify names, icons, telephone num-
bers, and other memory point data.1
Press the button, then select (stored loca-
tions), and then select (memory points).
2
Select (list).
Page 63 of 84

Navigation 73
Stored Locations
NOTEThe "With direction" ( / ) keys in the "With Sound" page are
used to activate response sounds only when you come near the mem-
ory point from the specified direction. Select or and set
the direction using or . Selecting allows you to listen to
respective sounds.
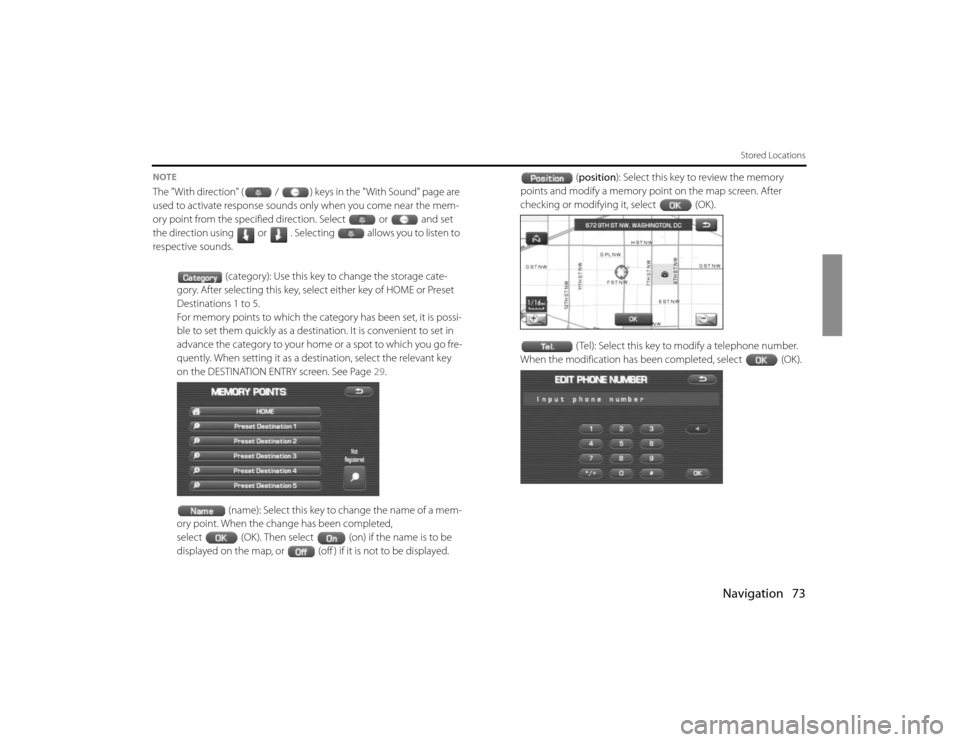
(category): Use this key to change the storage cate-
gory. After selecting this key, select either key of HOME or Preset
Destinations 1 to 5.
For memory points to which the category has been set, it is possi-
ble to set them quickly as a destination. It is convenient to set in
advance the category to your home or a spot to which you go fre-
quently. When setting it as a destination, select the relevant key
on the DESTINATION ENTRY screen. See Page 29.
(name): Select this key to change the name of a mem-
ory point. When the change has been completed,
select (OK). Then select (on) if the name is to be
displayed on the map, or (off ) if it is not to be displayed.(position): Select this key to review the memory
points and modify a memory point on the map screen. After
checking or modifying it, select (OK).
( Tel): Select this key to modify a telephone number.
When the modification has been completed, select (OK).
Page 71 of 84
Navigation 81
Other Functions
Displaying POI dataYou can display the information on a POI, such as the name, address
and telephone number.1
Display the desired POI markers on the current map
screen. (See Page 63 and 79 for the procedure.)
2
Select the POI marker for which you want information by
moving the crosshair over it.The name of the POI will appear.
If no data is stored for the selected POI, no name is displayed.
3
Select (information).The information on the POI will be displayed.
: Use this key to store the POI location as a memory point.