Page 49 of 84
Navigation 59
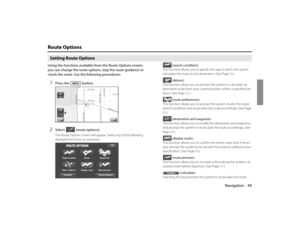
Route Options
POI keys:When you select one of the six POI category keys, the system will
retrieve the selected POI from the Quick POI storage and display it on
the map. When you select the (others)
key, you can find POIs of other categories. For more details, See Page 63.If, for example, the (to next POI) category
key is selected and a simulation drive is started, your simulation
vehicle will then stop at a restaurant on the route.
If you then select (information), the system will display
information on the restaurant.
.
Selecting allows you to make a phone call to the phone
number displayed.
* The Bluetooth Phone is required to be set in advance.
NOTE
You must finish the simulation drive before you actually start to drive. Although
the simulation drive will automatically stop when you actually start to drive, not
finishing it properly can lead to an error in the display of your vehicle's current
position.
Page 50 of 84
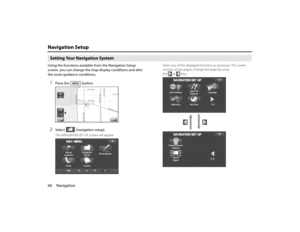
60 NavigationNavigation SetupSetting Your Navigation SystemUsing the functions available from the Navigation Setup
screen, you can change the map display conditions and alter
the route guidance conditions.1
Press the button.
2
Select (navigation setup).The NAVIGATION SET UP screen will appear.Select any of the displayed functions as necessary. This screen
consists of two pages. Change the page by using
the or keys.
Page 51 of 84
:
This function allows you to change the screen display and sound
settings. (See Page 61.)
(quick POI selection):
This function allows you to set the poi")
Navigation 61
Navigation Setup
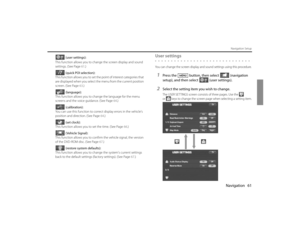
(user settings):
This function allows you to change the screen display and sound
settings. (See Page 61.)
(quick POI selection):
This function allows you to set the point of interest categories that
are displayed when you select the menu from the current position
screen. (See Page 63.)
(language):
This function allows you to change the language for the menu
screens and the voice guidance. (See Page 64.)
(calibration):
You can use this function to correct display errors in the vehicle's
position and direction. (See Page 64.)
(set clock):
This function allows you to set the time. (See Page 66.)
(Vehicle Signal):
This function allows you to confirm the vehicle signal, the version
of the DVD-ROM disc. (See Page 67.)
(restore system defaults):
This function allows you to change the system's current settings
back to the default settings (factory settings). (See Page 67.)
User settingsYou can change the screen display and sound settings using this procedure.1
Press the button, then select (navigation
setup), and then select (user settings).
2
Select the setting item you wish to change.The USER SETTINGS screen consists of three pages. Use the
or keys to change the screen page when selecting a setting item.
Page 52 of 84

and (mile).
Road Restriction Warnings:
You can select or deselect display of traffic restriction warnings
during r")
62 NavigationNavigation Setup
Distance:
Units of distance can be selected from (km)
and (mile).
Road Restriction Warnings:
You can select or deselect display of traffic restriction warnings
during route guidance.
Keyboard layout:
The layout of input keys can be selected from ("ABC" lay-
out) or ("QWERTY" layout).
Arrival Time:
Time of arrival at the destination or a waypoint can be displayed in
two different ways: estimated arrival time or remaining driving
time. Select for the estimated arrival time display
or for the remaining time display.
Map Mode:
The map display mode can be set to any of the automatic, day-
time, and nighttime modes.
(automatic):
The brightness of the display will automatically change to day-
time brightness and nighttime brightness when the headlights
are turned off and on, respectively.(daytime):
The brightness of the display is fixed at the daytime setting
regardless of whether the headlights are on or off.
(nighttime):
The brightness of the display is fixed at the nighttime setting
regardless of whether the headlights are on or off.
Guidance Screen:
This function allows you to select or deselect display of guidance
messages on the screen.
Freeway Information:
This function allows you to select or deselect display of guidance
messages when driving on freeway.
Auto Volume:
A setting can be made so that the sound volume of the naviga-
tion system automatically increases as the speed of the vehicle
increases.
Beep:
A setting can be made so that a beep sounds.
Clock Display:
A setting can be made so that the clock is displayed.
Audio Status Display:
A setting can be made so that the status of the audio system is
displayed.
Reverse Mute:
A setting can be made so that the sound volume of the audio sys-
tem is reduced while reversing the vehicle.
Page 53 of 84
Navigation 63
Navigation Setup
Quick POI selectionUsing this function, you can set the point of interest categories that are
displayed when you select the Point of Interest menu key on the cur-
rent map screen. Set up to six different categories that you use most fre-
quently. (See Page 79 for the method of displaying POI categories on
the map and searching for the nearest points of interest.)1
Press the button, then select (navigation
setup), and then select (quick POI selection).
2
Select one of the six category keys you wish to program
into the Quick POI storage.
(default):
Use this key to restore the factory settings.
3
Select a category.Once you have selected a category key, subcategories will be dis-
played.
(all category list):
Subcategories from all individual categories will be displayed
together.
4
Select the subcategories to be displayed on the map.
NOTE
Repeat Steps 1 to 4 to add more POI categories for display on the menu screen.
Page 54 of 84
64 NavigationNavigation SetupLanguage SelectionUse the following procedure to select your preferred language for the
menu screens and the voice guidance.1
Press the button, then select (navigation
setup), and then select (language)
2
Select your preferred language from the list.
CalibrationThis function allows you to correct any display errors in the position and
direction of your vehicle on the map display.■Adjusting current position and direction1
Press the button, then select (navigation
setup), and then select (calibration).
2
Select (position/direction).
Page 55 of 84
Navigation 65
Navigation Setup
3
Move the crosshair to the correct position, and then
select
.
4
Use or to adjust the direction in which you are
heading, and then select .■Distance
When selected, this function automatically corrects an error in the cur-
rent position display that might occur after tire replacement.1
Press the button, then select (navigation
setup), and then select (calibration).
2
Select .
NOTE
You will have to drive about 6 miles (10 km) before the distance correction is
complete.
Page 56 of 84
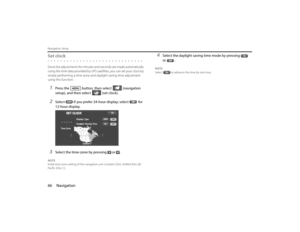
66 NavigationNavigation SetupSet clockSince the adjustments for minutes and seconds are made automatically
using the time data provided by GPS satellites, you can set your clock by
simply performing a time-zone and daylight saving time adjustment
using this function.1
Press the button, then select (navigation
setup), and then select (set clock).
2
Select if you prefer 24-hour display; select for
12-hour display.
3
Select the time-zone by pressing or .
NOTE
Initial time-zone setting of this navigation unit is Eastern (Disc A)/Mid (Disc B)/
Pacific (Disc C).
4
Select the daylight saving time mode by pressing
or .
NOTE
Select to advance the time by one hour.