Page 137 of 199
 Owners Manual Fuel
136
FuelPetrolGrades of petrolYour vehicle can only be operated with unleaded petrol, which complies with the
standard EN 228. The individual grades of petrol are distinguished by their octan")
Fuel
136
FuelPetrolGrades of petrolYour vehicle can only be operated with unleaded petrol, which complies with the
standard EN 228. The individual grades of petrol are distinguished by their octane
number (RON). On the inside of the fuel filler flap, you will find the information
regarding the octane number required by your engine page 137, fig. 119 - right.
Prescribed types of fuel - unleaded petrol RON 95/91
Use unleaded petrol 95 RON. You can also use unleaded RON 91. However some loss
of power is to be expected when doing so.
If, in an emergency, the only fuel availa ble is one which has a lower octane number
than that required by the engine then only drive at medium engine speeds and
minimal engine load. Driving at high engine speeds or heavy engine loads can lead to
serious engine damage! Refuel with petrol with the specified octane number as often
as possible.
Prescribed fuel - unleaded petrol min. 95 RON
Use unleaded petrol 95 RON.
If unleaded RON 95 is not available, you ca n refuel with unleaded RON 91 in an emer-
gency. After refuelling, co ntinue driving at medium engine speeds and minimum
engine load. Driving at high engine speeds or heavy engine loads can lead to serious
engine damage! Refuel with petrol with the specified octane number as often as
possible.
Fuel with a lower octane number than RON 91 must not be used even in an emer-
gency. Otherwise you can ca use serious engine damage!
You can find further information on refuelling page 137, “Refuelling”.
Prescribed types of fuel - unleaded petrol RON 98/(95)
Use unleaded petrol 98 RON. You can also use unleaded RON 95. However some loss
of power is to be expected when doing so. If unleaded RON
98 or RON 95 is not available, you ca n refuel with unleaded RON 91
in an emergency. After refuelling, conti nue driving at medium engine speeds and
minimum engine load. Driving at high engine speeds or heavy engine loads can lead
to serious engine damage! Refuel with pe trol with the specified octane number as
often as possible.
Fuel with a lower octane number than RON 91 must not be used even in an emer-
gency. Otherwise you can ca use serious engine damage!
You can find further info rmation on refuelling page 137, “Refuelling”.
Unleaded petrol with a higher octane number
You can use unleaded petrol which has a higher octa ne number than the one
prescribed without restriction.
On vehicles with prescribed unleaded petrol RON 95/91, the use of petrol with a
higher octane number than 95 does not result in a noticeable power increase or a
lower fuel consumption.
On vehicles with prescribed unleaded petrol RON 95/91, the use of petrol with a
higher octane number than 95 does not result in a noticeable power increase or a
lower fuel consumption.
Caution
All Škoda vehicles with petrol engines are equipped with a catalytic converter and
must be only driven with unleaded petrol. Fi lling the tank even only once with leaded
petrol will result in the cata lytic converter being destroyed!
Only use unleaded petrol which complies with the standard EN 228.
Operating the engine with petrol of a lo wer octane number than that prescribed
can result in serious engine damage.
s2bs.2.book Page 136 Monday, September 27, 2010 9:53 AM
Page 138 of 199
 Owners Manual Fuel137
Using the system
Safety
Driving Tips
General Maintenance
Breakdown assistance
Technical Data
DieselDiesel fuelYour vehicle can only be operated with diesel fuel, which complies with the stand")
Fuel137
Using the system
Safety
Driving Tips
General Maintenance
Breakdown assistance
Technical Data
DieselDiesel fuelYour vehicle can only be operated with diesel fuel, which complies with the standard
EN 590 (standard DIN 51628 in Germany, standard ÖNORM C 1590 in Austria).
Fuel additives
You must not use fuel additives, so-called “flow improvers” (petrol and similar prod-
ucts) in diesel fuel.
You can find information on refuelling page 137, “Refuelling”.
Caution
Therefore, only operate your vehicle with diesel fuel which complies with the
standard EN 590 (standard DIN 51628 in Germany, standard ÖNORM C 1590 in
Austria). Filling the tank even only once with diesel fuel that does not comply with the
standard can result in damage to the engine parts, the lubrication system, the fuel and
exhaust system.
If you inadvertently fill up the vehicle with fuel other than the prescribed diesel
fuel, e.g. petrol, do not under any circumstan ces start the engine or turn on the igni-
tion. Extensive engine damage is possible! Contact a specialist garage who will clean
out the fuel system.
Water which has collected in the fuel fi lter can result in engine problems.
Your vehicle is not adapted for use of bio-diesel (RME), therefore this fuel must not
be refuelled and driven. Using this biodiesel can lead to damage to the engine or the
fuel system.
Operation in winterWinter-grade diesel fuel
A different grade of diesel fuel is available at filling stations in winter than during the
summer. Using “summer-grade diesel fuel” at temperatures below 0 °C can result in
operational problems because th e diesel becomes viscous as a result of paraffin sepa-
ration. It is therefore the case that the standard
EN 590 (standard DIN 51628 in Germany,
standard ÖNORM C 1590 in Austria) is the diesel fu el class prescribed for certain
periods of the year which can also be purc hased at the corresponding time during the
year. “Winter-grade diesel fuel” will still operate properly even at a temperature of -20
°C.
It is often the case in countri es with different climatic conditions that diesel fuels avail-
able have a different temperature characteristic. The authorised Škoda Service Part-
ners and filling stations in the country conc erned will be able to provide you with infor-
mation regarding the diesel fuels available.
Prewarming fuel
The vehicle is fitted with a fu el filter prewarming system. This secures operation of a
vehicle using diesel fuel down to an environmental temperature of -25 °C.
Caution
It is not permitted to add the various fuel additives on the market, including petrol, to
diesel fuel in order to improve its flow properties.RefuellingFig. 119 Right rear side of the vehicle: Open fuel filler flap/fuel filler flap with cap unscrewedOpening the fuel filler cap– Press in the middle of the left area of the fuel filler flap in direction of arrow
fig. 119 .
– Unlock the fuel filler cap on the fuel fi ller tube to the left using the vehicle key.
A1
s2bs.2.book Page 137 Monday, September 27, 2010 9:53 AM
Page 139 of 199
 Owners Manual Fuel
138
– Unscrew the fuel filler cap anti-clockwise and place the fuel filler cap from above
on the fuel filler flap page 137, fig. 119 - right.Closing fuel filler cap– Screw on the fuel")
Fuel
138
– Unscrew the fuel filler cap anti-clockwise and place the fuel filler cap from above
on the fuel filler flap page 137, fig. 119 - right.Closing fuel filler cap– Screw on the fuel filler cap by turning it to the right until it is heard to click.
– Lock the fuel filler cap on the fuel filler tube by turning the vehicle key to the right
and withdraw the key.
– Close the fuel filler flap until it locks.
The correct grade of fuel for your vehicle as well as the tyre size and inflation pressures
are stated on a sticker affixed to the inside of the fuel filler flap. Further information on
fuel page 136.
The fuel tank has a capa city of about 55 litres.
WARNING
Pay attention to any legal requirements if you do carry a spare canister in the
vehicle. We do not recommend carrying any fuel canisters in your vehicle for
safety reasons. The canister can be damaged in the event of an accident and fuel
may leak out.
Caution
Remove any fuel which has spilled onto th e paintwork of your vehicle immediately
- risk of paint damage!
Vehicles fitted with catalytic converter should never be allowed to let the fuel tank
to run completely empty. An irregular supply of fuel to the engine can result in misfiring
and unburnt fuel may get into the exhaust sy stem, which may result in overheating and
damage to the catalytic converter.
Make sure that the valve is not pressed into the filler tube when inserting the pump
nozzle into the filler tube. Otherwise you are unintentiona lly filling up the volume,
which in case of heat can cause an expansion of the fuel. This can lead to an overflow
of fuel or damage to parts of the fuel reservoir.
The fuel tank is full just as soon as th e pump nozzle switches off for the first time,
provided the nozzle has been operated prop erly. Do not continue refuelling - other-
wise the expansion volume is filled up.
s2bs.2.book Page 138 Monday, September 27, 2010 9:53 AM
Page 140 of 199
 Owners Manual Inspecting and replenishing139
Using the system
Safety
Driving Tips
General Maintenance
Breakdown assistance
Technical Data
Inspecting and replenishingEngine compartmentBonnet remote releaseBonnet rem")
Inspecting and replenishing139
Using the system
Safety
Driving Tips
General Maintenance
Breakdown assistance
Technical Data
Inspecting and replenishingEngine compartmentBonnet remote releaseBonnet remote release– Pull the unlocking lever below the dash panel on the driver's side fig. 120 .
The bonnet jumps out of its lock as a result of the spring force. A locking lever appears
at the same time in the radiator grille.Opening and closing the bonnet.Fig. 121 Radiator grille: Release lever / se curing the bonnet with the bonnet support
Opening the bonnet– Unlock the bonnet fig. 120 .
– Ensure that the arms of the windscreen wipers are correctly in place against the windscreen before opening the bonnet otherwise damage could occur to the
paintwork.
– Pulling on the release lever in direction of arrow fig. 121 will unlock the
bonnet.
– Grip with the hand under the radiator grille and lift up the bonnet.
– Take the bonnet support out of its holder and set it in the opening on the bonnet.Closing the bonnet– Lift the bonnet slightly and unhook the bonnet support. Press the bonnet support into the holder designed to hold it.
– Allow the bonnet to drop from a height of about 20 cm into the lock - bonnet do
not press down on it !
WARNING
Never open the bonnet if you see that steam or coolant is flowing out of the
engine compartment - risk of scalding! Wait long enough until the steam or
coolant has stopped escaping.
For safety reasons, the bonnet must always be properly closed when
driving. One should therefore check that the lock has in fact engaged properly
after closing the bonnet.
Stop your vehicle immediately while driving if you notice that the lock is not
properly engaged and close the bonnet properly - risk of an accident!Caution
Never open the bonnet using the locking lever - danger of causing damage.
Fig. 120 Bonnet release lever
A1
A2
s2bs.2.book Page 139 Monday, September 27, 2010 9:53 AM
Page 141 of 199
 Owners Manual Inspecting and replenishing
140
Working in the engine compartment
Particular care is required when carrying out any work in the engine
compartment!There is a risk of injuries, scalding, acci dents an")
Inspecting and replenishing
140
Working in the engine compartment
Particular care is required when carrying out any work in the engine
compartment!There is a risk of injuries, scalding, acci dents and fire when working in the engine
compartment, e.g. inspecting and replenishing oil and other fluids. For this
reason, it is essential to comply with the warning instructions stated below and
with the general applicable rules of safe ty. The engine compartment of your car
is a hazardous area .
WARNING
Never open the bonnet if you see that steam or coolant is flowing out of the
engine compartment - risk of scalding! Wait long enough until the steam or
coolant has stopped escaping.
Switch off the engine and pull out the ignition key.
Apply the handbrake firmly.
Move the gear lever into the Neutral position.
Allow the engine to cool down.
Keep children clear of the engine compartment.
Never spill oil and other fluids over the hot engine. Such fluids (e.g. the anti-
freeze contained in the coolant) may ignite!
Avoid short circuits in the electrical system - particularly on the battery.
Never place your hand into the radiator fan as long as the engine is still
warm. The fan might suddenly start running!
Never open the cap of the coolant expans ion bottle as long as the engine is
still warm. The cooling system is pressurized!
Cover over the cap of the coolant expansion reservoir with a large cloth
when opening it as protection for your face, hands and arms from hot steam or
hot coolant.
Do not let objects, such as e.g. cleaning cloth or tools lie in the engine
compartment.
If you wish to work under the vehicl e, you must secure the vehicle from
rolling away and support it with suitable supporting blocks; the lifting jack* is
not sufficient for this - risk of injury!
In cases where it be necessary to carry out inspection work when the engine
is running there is an additional risk fr om rotating parts (e.g. the V-ribbed belt,
alternator, radiator fan) and from the high-voltage ignition system. Please
observe in addition the following:
Never touch the electrical cabl es of the ignition system.
Absolutely avoid any jewellery, loose it ems of clothing or long hair from
getting into the rotating parts of the engine - Hazard! Therefore remove any
jewellery beforehand, tie up your hair and wear tight fitting clothing.
Please also comply with the warnin g instructions stated below when
carrying out any essential work on the fu el system or on the electrical system:
Always separate the car battery from the electrical system.
Do not smoke.
Never carry out any work close to naked flames.
Always keep a working fire extinguisher at hand.Caution
When replenishing fluids in the engine, always ensure that the fluids are on no account
mixed up. This may result in major oper ating problems and also vehicle damage!
WARNING (continued)
s2bs.2.book Page 140 Monday, September 27, 2010 9:53 AM
Page 142 of 199
 Owners Manual Inspecting and replenishing141
Using the system
Safety
Driving Tips
General Maintenance
Breakdown assistance
Technical Data
Overview of the engine compartment
The main inspection points.Fig. 122 1.6")
Inspecting and replenishing141
Using the system
Safety
Driving Tips
General Maintenance
Breakdown assistance
Technical Data
Overview of the engine compartment
The main inspection points.Fig. 122 1.6 ltr./75 kW petrol engine
Coolant expansion bottle . . . . . . . . . . . . . . . . . . . . . . . . . . . . . . . . . . . . . . .
Windshield washer fluid reservoir . . . . . . . . . . . . . . . . . . . . . . . . . . . . . . .
Engine oil filler opening . . . . . . . . . . . . . . . . . . . . . . . . . . . . . . . . . . . . . . . .
Engine oil dipstick . . . . . . . . . . . . . . . . . . . . . . . . . . . . . . . . . . . . . . . . . . . . . .
Brake fluid reservoir . . . . . . . . . . . . . . . . . . . . . . . . . . . . . . . . . . . . . . . . . . . .
Battery (below a cover) . . . . . . . . . . . . . . . . . . . . . . . . . . . . . . . . . . . . . . . . .Note
The location of the inspection points in th e engine compartment of petrol and diesel
engines is practically identical.
Engine oilCheck engine oil level
The dipstick indicates the le vel of oil in the engine.Checking the oil level– Ensure that the vehicle is po sitioned on a level surface.
– Switch the engine off.
– Open the bonnet in “Working in the engine compartment” on page 140.
– Wait a few minutes and pull out the oil dipstick.
– Wipe off the dipstick with a clea n cloth and insert it again fully.
– Then withdraw the dipstick again and read off the oil level.Oil level within range –You must not top up the oil.Oil level within range –You may top up the oil. It is possible that the oil level may then be within range
after doing this.Oil level within range –You must top up the oil page 142. It is sufficient, once this is done, to keep the
oil level within range .
A1
143
A2
150
A3
142
A4
141
A5
145
A6
146
Fig. 123 Dipstick
AAAB
AA
ACAB
s2bs.2.book Page 141 Monday, September 27, 2010 9:53 AM
Page 143 of 199
 Owners Manual Inspecting and replenishing
142
It is normal for the engine to consume oil. The oil consumption may be as much as 0.5
l/1 000 km depending on your style of driving and the conditions under which you")
Inspecting and replenishing
142
It is normal for the engine to consume oil. The oil consumption may be as much as 0.5
l/1 000 km depending on your style of driving and the conditions under which you
operate your vehicle. The oil consumption may be slightly hi gher than this during the
first 5000 kilometres.
One should therefore check the oil level at regular intervals, preferably every time after
the fuel tank is filled or after driving for long stretches.
We recommend maintaining the oil level within the range - but not above this, if
the engine has been operating at high load s, for example during a lengthy motorway
trip during the summer months, towing a tr ailer or negotiating a high mountain pass.
The warning light in the instrument cluster* will indicate page 25, “Engine oil pres-
sure ” whether the oil level is too low. In this case, check the oil level as soon as
possible. Top up with an appropriate quantity of oil.
Caution
The oil level must on no account extend beyond the range . Danger of damaging
the catalytic converter.
Do not continue your journey if for some reason it is not possible under the
conditions prevailing to top up with oil. Switch the engine off and obtain professional
assistance from a specialist garage, otherwise it could lead to severe engine damage.Note
Engine oil specifications page 179, “Technical Data”.Replenishing engine oil– Inspecting the engine oil level page 141.
– Unscrew the cap of the engine oil filler opening.
– Pour in a suitable grade of oil in portions of 0.5 litres page 180, “Engine oil spec-
ifications”.
– Inspect the oil level page 141.
– Carefully screw on the cap of the filler opening and push the dipstick in fully.
WARNING
Avoid dripping oil onto hot parts of the engine when topping up will oil - a
risk of fire!
Read and observe the warning notes page 140, “Working in the engine
compartment” before working in the engine compartment.For the sake of the environment
The oil level must on no acco unt extend beyond the range page 141. Oil will
otherwise be drawn in through the crankc ase ventilation and may pass through the
exhaust system to atmosphere. The oil ma y combust in the catalytic converter and
damage it.Changing engine oilThe engine oil must be changed at the intervals stated in the Service schedule or
according to the service interval indicator page 17, “Service Interval Display”.
WARNING
Only carry out the engine oil change, if you have the required professional
knowledge!
Read and observe the warning notes page 140, “Working in the engine
compartment” before working in the engine compartment.
First of all, let the engine cool down, we ar an eye protection and gloves - risk
of caustic burns due to hot oil.Caution
You must not pour any additives into the engine oil - risk of engine damage! Damage,
which results from such product, are excluded from the warranty.
For the sake of the environment
You must on no account pour oil into the ground or into the sewage system.
AAAA
AA
s2bs.2.book Page 142 Monday, September 27, 2010 9:53 AM
Page 144 of 199
 Owners Manual Inspecting and replenishing143
Using the system
Safety
Driving Tips
General Maintenance
Breakdown assistance
Technical Data
In view of the problems involved in prop erly disposing of old oil, the")
Inspecting and replenishing143
Using the system
Safety
Driving Tips
General Maintenance
Breakdown assistance
Technical Data
In view of the problems involved in prop erly disposing of old oil, the necessary
special tools and the knowledge required for such work, we recommend that you have
the oil and oil filter change carried out by an authorised Škoda Service Partner.Note
After your skin has come in contact with th e oil, you must thoroughly wash your skin.Cooling systemCoolant
The job of the coolant is to cool the engine.The cooling system does not require any maintenance under normal operating condi-
tions. The coolant consists of water with a concentration of coolant additive of 40 %.
This mixture not only provides antifreeze protection down to -25 °C but also protects
the cooling and heating system from corrosion. It also prevents the formation of scale
and significantly increases the boiling point of the coolant.
You must therefore not reduce the concentration of antifreeze agent in the coolant by
adding water, also not during the summer mo nths or in countries with a warm climate.
The concentration of coolant additive in the coolant must be at least 40 %.
You can increase the amount of antifreeze in the coolant if a higher concentration of
antifreeze is necessary for climatic reasons but only up to 60 % (antifreeze protection
down to approx. -40 °C). The antifreeze pr otection tails off above that concentration.
Vehicles exported to countries with a cold climate (e.g. Sweden, Norway, Finland) are
already factory-filled with a coolant which offers antifreeze protection down to about
-35 °C. In these countries the concentration of coolant additive should be at least 50 %.
Coolant
The cooling system is factor y-filled with coolant (purple in colour), which complies
with the specification TL-VW 774 G.
We recommend that you use the same coolant additive - G12 PLUS-PLUS (purple in
colour) for topping up the system. Please contact an authorised Škoda Serv
ice Partner if you have any questions
regarding the coolant or if you wish to fill up with a different coolant.
An authorised Škoda Service Partner can also supply you with the correct coolant addi-
tives.
Coolant quantity
Caution
Other coolant additives may cause operational problems which, in particular,
involves significantly reduci ng the anticorrosion effect.
Any faults or problems resulting from corrosion may cause a loss of coolant
and, as a consequenc e of this, result in major engine damage.
Inspecting the coolant levelThe coolant expansion bottle is located in the engine compartment on the right.
– Switch the engine off.Petrol engines
Content
1.4 ltr./59 kW - EU4
7.1
1.6 ltr./75 kW - EU4, EU2
7.4
Diesel engine
Content
2.0 ltr./81 kW TDI CR - EU4
8.4
Fig. 124 Engine compartment: Coolant
expansion bottle
s2bs.2.book Page 143 Monday, September 27, 2010 9:53 AM
 1
1 2
2 3
3 4
4 5
5 6
6 7
7 8
8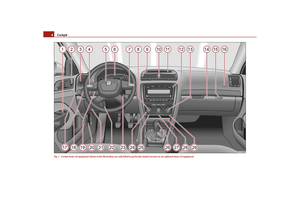 9
9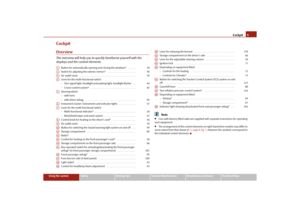 10
10 11
11 12
12 13
13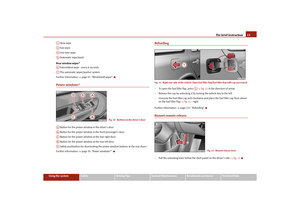 14
14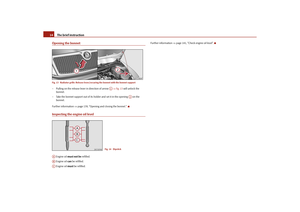 15
15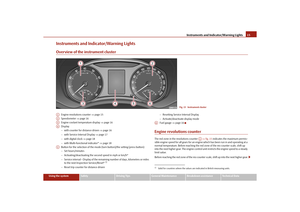 16
16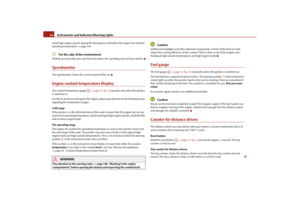 17
17 18
18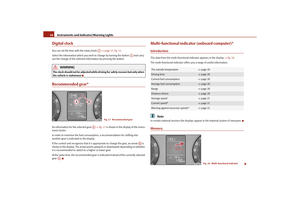 19
19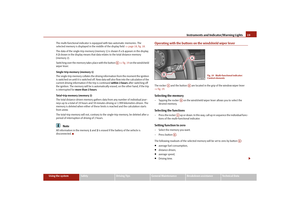 20
20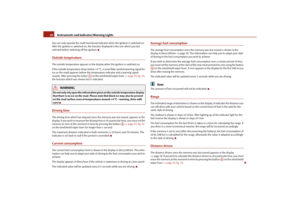 21
21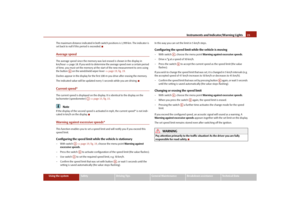 22
22 23
23 24
24 25
25 26
26 27
27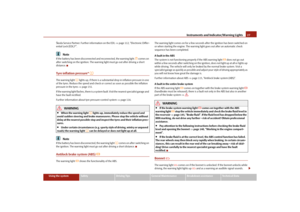 28
28 29
29 30
30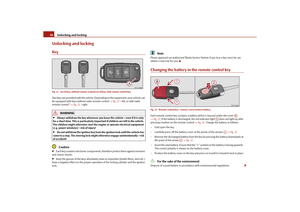 31
31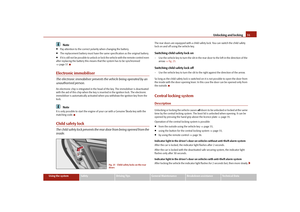 32
32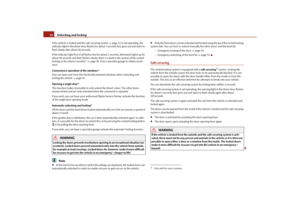 33
33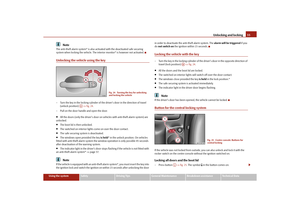 34
34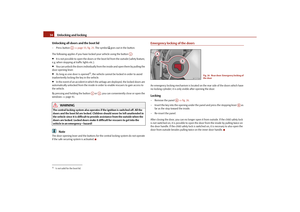 35
35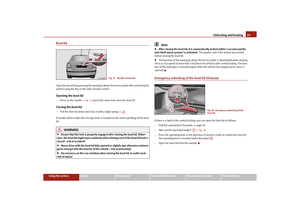 36
36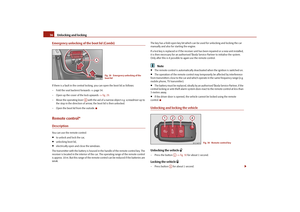 37
37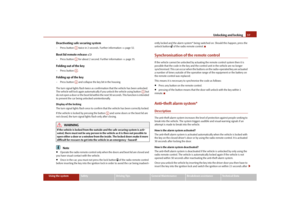 38
38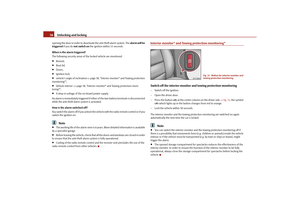 39
39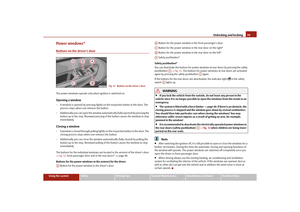 40
40 41
41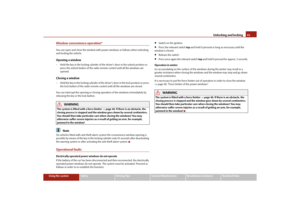 42
42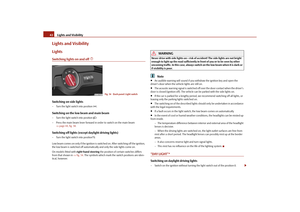 43
43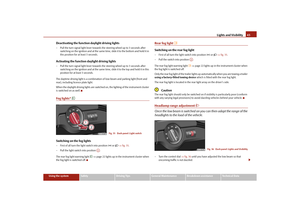 44
44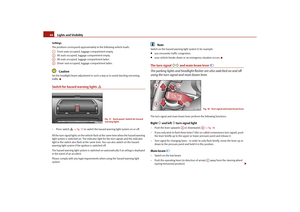 45
45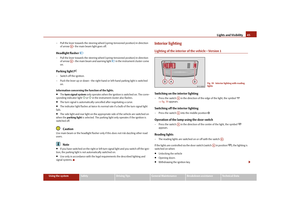 46
46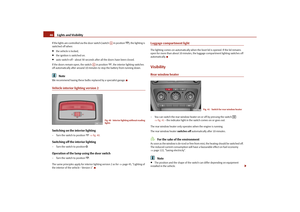 47
47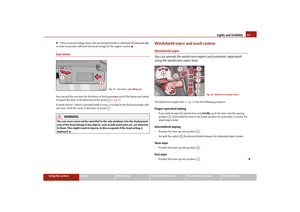 48
48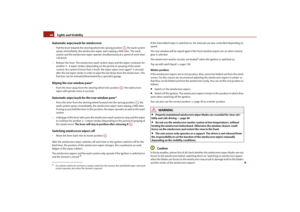 49
49 50
50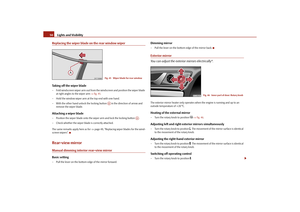 51
51 52
52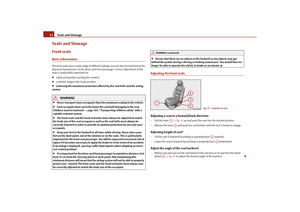 53
53 54
54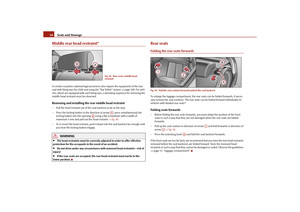 55
55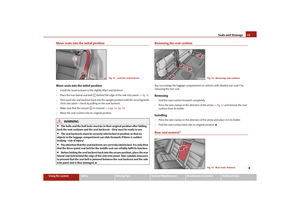 56
56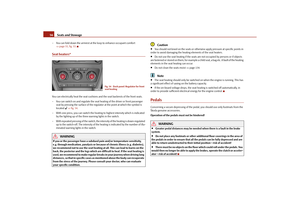 57
57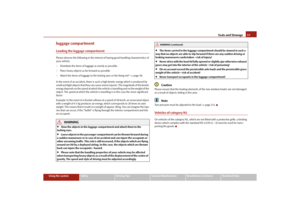 58
58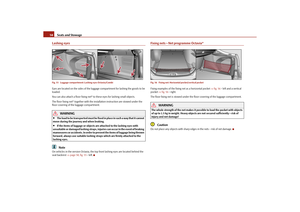 59
59 60
60 61
61 62
62 63
63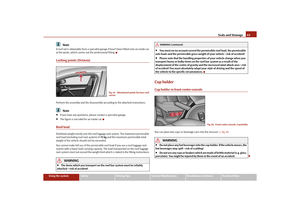 64
64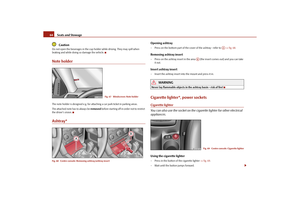 65
65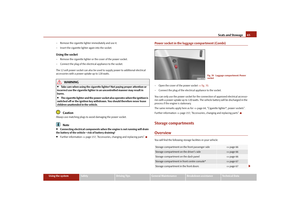 66
66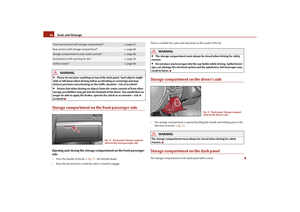 67
67 68
68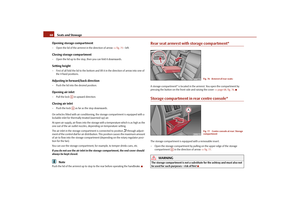 69
69 70
70 71
71 72
72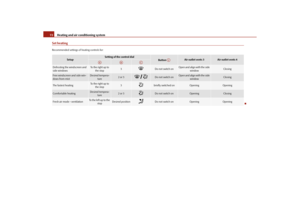 73
73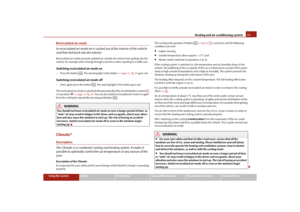 74
74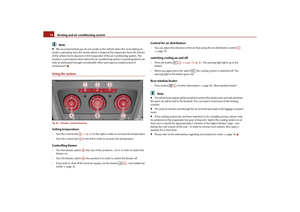 75
75 76
76 77
77 78
78 79
79 80
80 81
81 82
82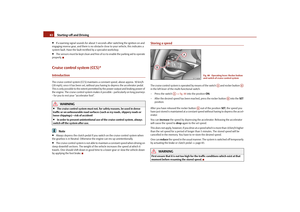 83
83 84
84 85
85 86
86 87
87 88
88 89
89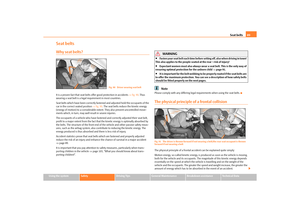 90
90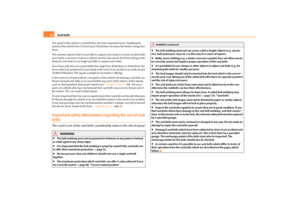 91
91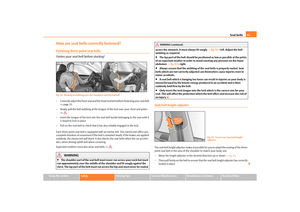 92
92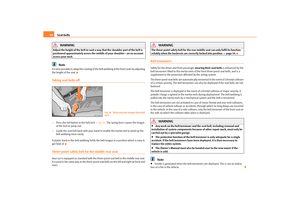 93
93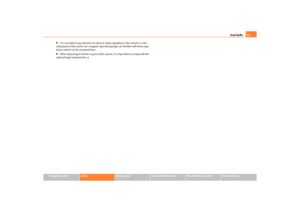 94
94 95
95 96
96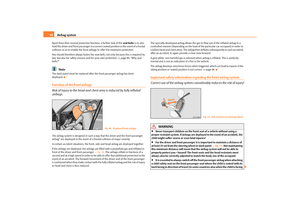 97
97 98
98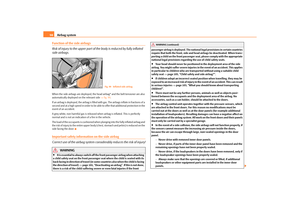 99
99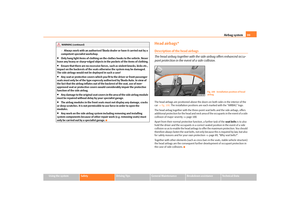 100
100 101
101 102
102 103
103 104
104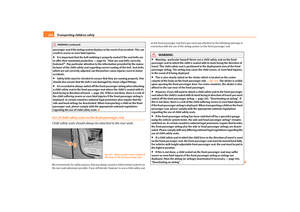 105
105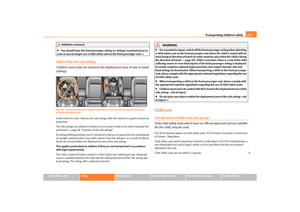 106
106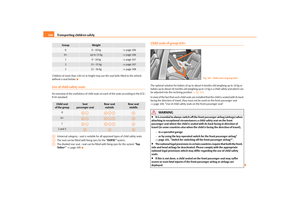 107
107 108
108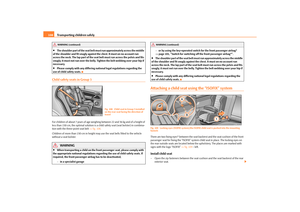 109
109 110
110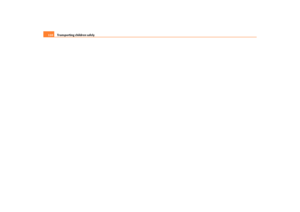 111
111 112
112 113
113 114
114 115
115 116
116 117
117 118
118 119
119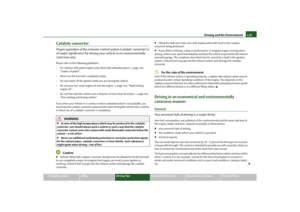 120
120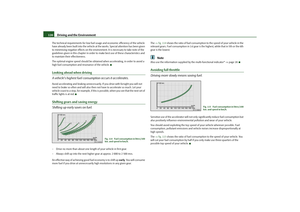 121
121 122
122 123
123 124
124 125
125 126
126 127
127 128
128 129
129 130
130 131
131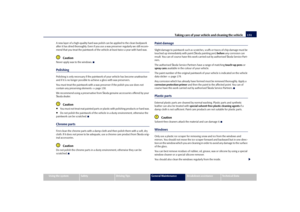 132
132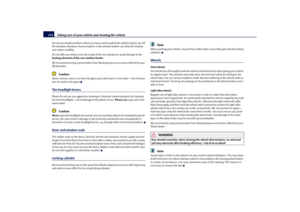 133
133 134
134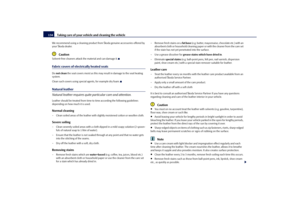 135
135 136
136 137
137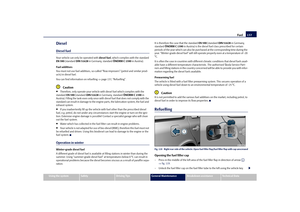 138
138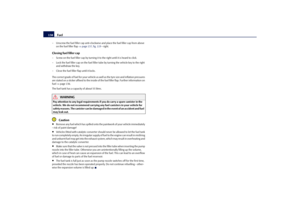 139
139 140
140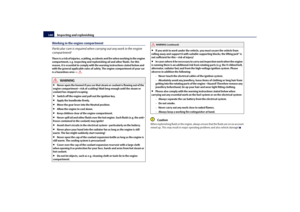 141
141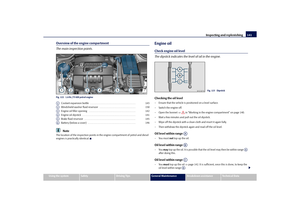 142
142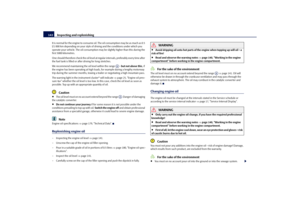 143
143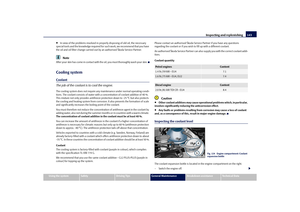 144
144 145
145 146
146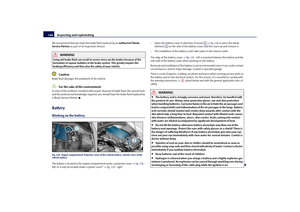 147
147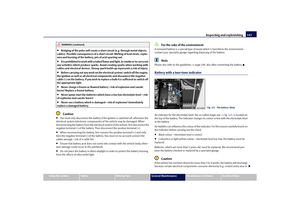 148
148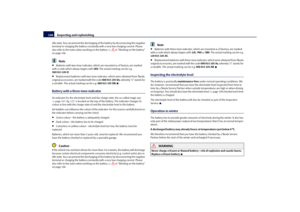 149
149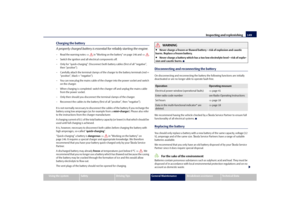 150
150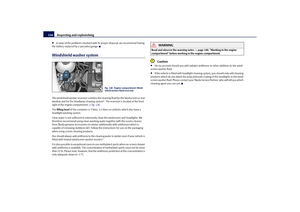 151
151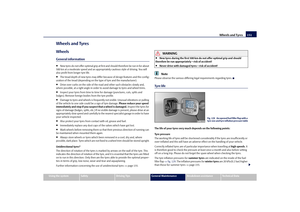 152
152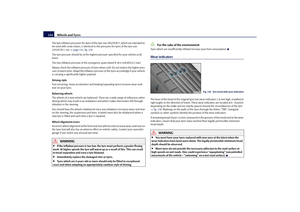 153
153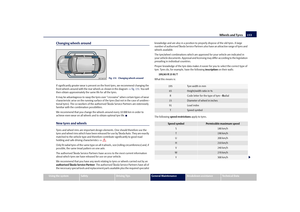 154
154 155
155 156
156 157
157 158
158 159
159 160
160 161
161 162
162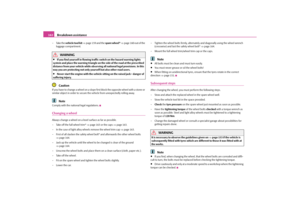 163
163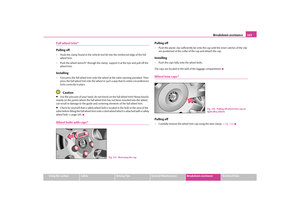 164
164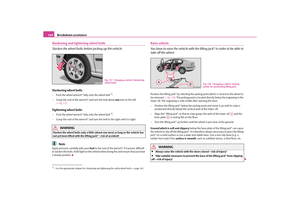 165
165 166
166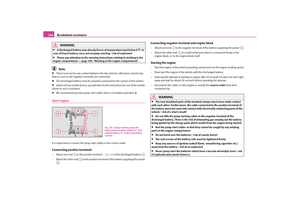 167
167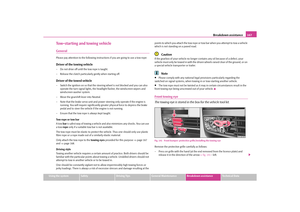 168
168 169
169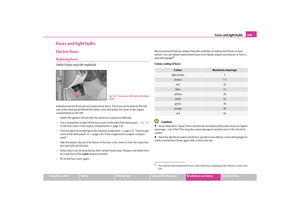 170
170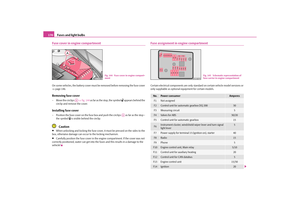 171
171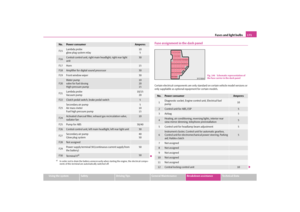 172
172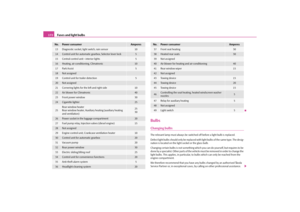 173
173 174
174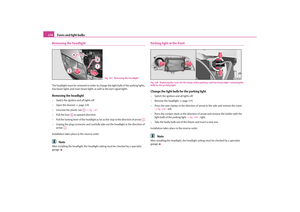 175
175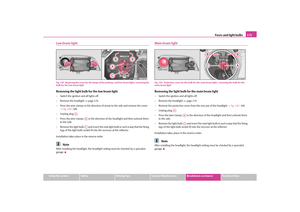 176
176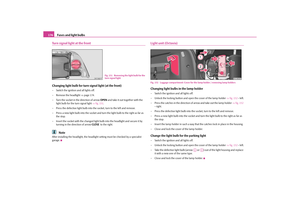 177
177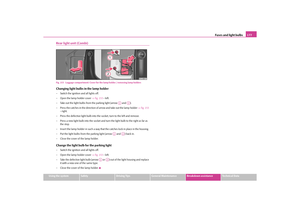 178
178 179
179 180
180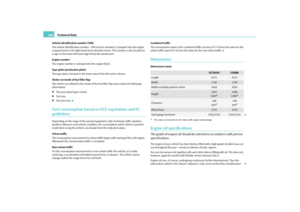 181
181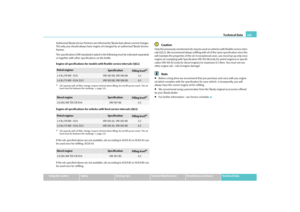 182
182 183
183 184
184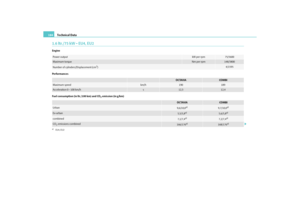 185
185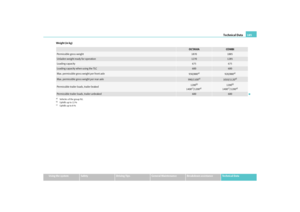 186
186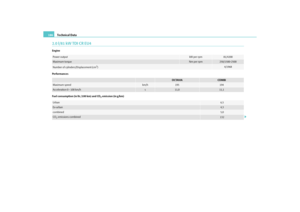 187
187 188
188 189
189 190
190 191
191 192
192 193
193 194
194 195
195 196
196 197
197 198
198