2010 SKODA OCTAVIA TOUR tow bar
[x] Cancel search: tow barPage 54 of 199

Seats and Stowage53
Using the system
Safety
Driving Tips
General Maintenance
Breakdown assistance
Technical Data
Adjusting lumbar support*– Turn the wheel until you have set the most comfortable curvature of the seat
upholstery in the area of your spine.
The driver's seat should be adjusted in such a way that the pedals can be fully pressed
to the floor with slightly bent legs.
The seat backrest on the driver's seat should be adjusted in such a way that the upper
point of the steering wheel can be easi ly reached with slightly bent arms.
WARNING
Only adjust the driver seat when the vehicle is stationary - risk of injury!
Take care when adjusting the seat! Adjusting the seat without care can lead
to bruises or injuries.
The seat backrests must not be angled too far back when driving otherwise
this will affect proper operation of the se at belts and of the airbag system - risk
of injury!
Head restraintsFig. 48 Adjusting head restraint/pulling outBest protection is achieved if the top edge of the head restraint is at the same level as
the upper part of your head.
Adjusting the height of a head restraint– Grasp the side of the head restraint with both hands and push the head restraint up
or down in direction of arrow fig. 48 .
– Move the head restraint downwards if required by pressing the locking button with one hand in direction of arrow and by pressing with the other hand the head
restraint downwards.Removing and installing a head restraint– Pull the head restraint up out of the seat backrest as far as the stop (on the rear
head restraints fold forward the seat backrest).
– Press the locking button in the direction of arrow fig. 48 and pull the head
restraint out.
– To re-insert the head restraint, push it do wn into the seat backrest far enough until
you hear the locking button engage.
The position of the front and rear outer head restraints is adjustable in height. The
middle rear head restraint* is adjustable in two positions.
The head restraints must be adjusted to ma tch the size of the seat occupant. Correctly
adjusted head restraints together with the seat belts offer effective protection for the
occupants page 86, “Correct seated position”.
WARNING
The head restraints must be correctly adjusted in order to offer effective
protection for the occupants in the event of an accident.
Do not drive under any circumstance with removed head restraints - risk of
injury!
If the rear seats are occupied, the rear head restraint must not be in the
lower position.
A4
A1A2
A2
s2bs.2.book Page 53 Monday, September 27, 2010 9:53 AM
Page 63 of 199
Seats and Stowage
62WARNING
The belt locks and the belts must be in their original position after folding
back the seat cushions and the seat backrests - they must be ready to use.
The seat backrests must be securely interlocked in position so that no
objects in the luggage compartment can slide forwards if there is sudden
braking - risk of injury!
Pay attention that the rear seat backrest is correctly interlocked. It is only
then that the three-point seat belt for th e middle seat can reliably fulfil its func-
tion.
First check for yourself that the cross road is inserted into the mounts in
the front position!
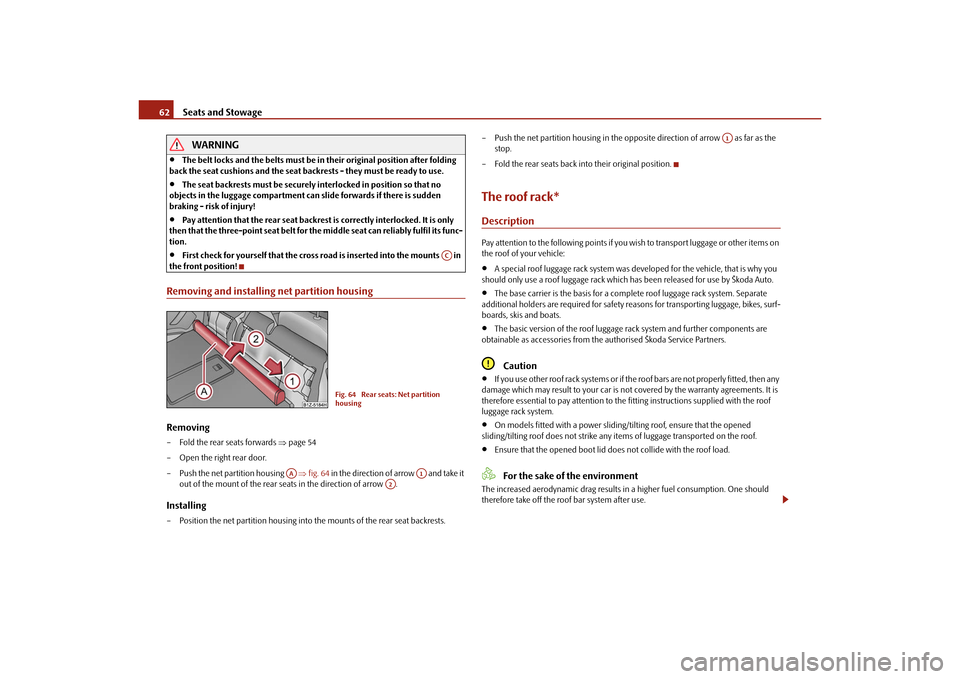
Removing and installing net partition housingRemoving– Fold the rear seats forwards page 54
– Open the right rear door.
– Push the net partition housing fig. 64 in the direction of arrow and take it
out of the mount of the rear seats in the direction of arrow .Installing– Position the net partition housing into the mounts of the rear seat backrests. – Push the net partition housing in the oppo
site direction of arrow as far as the
stop.
– Fold the rear seats back into their original position.
The roof rack*DescriptionPay attention to the following points if you wish to transport luggage or other items on
the roof of your vehicle:
A special roof luggage rack system was de veloped for the vehicle, that is why you
should only use a roof luggage rack which has been released for use by Škoda Auto.
The base carrier is the basi s for a complete roof luggage rack system. Separate
additional holders are required for safety reasons for transporting luggage, bikes, surf-
boards, skis and boats.
The basic version of the roof luggage rack system and further components are
obtainable as accessories from the authorised Škoda Service Partners.Caution
If you use other roof rack systems or if the roof bars are not properly fitted, then any
damage which may result to yo ur car is not covered by the warranty agreements. It is
therefore essential to pay attention to the fitting instructions supplied with the roof
luggage rack system.
On models fitted with a power sliding/tilting roof, ensure that the opened
sliding/tilting roof does not strike any items of luggage transported on the roof.
Ensure that the opened boot lid do es not collide with the roof load.For the sake of the environment
The increased aerodynamic drag results in a higher fuel consumption. One should
therefore take off the roof bar system after use.
AC
Fig. 64 Rear seats: Net partition
housing
AA
A1
A2
A1
s2bs.2.book Page 62 Monday, September 27, 2010 9:53 AM
Page 64 of 199

Seats and Stowage63
Using the system
Safety
Driving Tips
General Maintenance
Breakdown assistance
Technical Data
Note
A roof rail is obtainable from a specialist garage if hasn't been fitted onto an estate car
at the works, which carries out the professional fitting.Lashing points (Octavia)Perform the assembly and the disassembly according to the attached instructions.
Note
If you have any questions, please contact a specialist garage.
The figure is not valid for an estate car.
Roof loadDistribute weight evenly over the roof luggage rack system. The maximum permissible
roof load (including roof rack system) of 75 kg and the maximum permissible total
weight of the vehicle should not be exceeded.
You cannot make full use of the permissible ro of load if you use a roof luggage rack
system with a lower load carrying capacity . The load transported on the roof luggage
rack system must not exceed the weight limit which is stated in the fitting instructions.
WARNING
The items which you transport on the roof bar system must be reliably
attached - risk of accident!
You must on no account exceed the pe rmissible roof load, the permissible
axle loads and the permissible gross weight of your vehicle - risk of accident!
Please note that the handling proper ties of your vehicle change when you
transport heavy or bulky items on the roof bar system as a result of the
displacement of the centre of gravity and the increased wind attack area - risk
of accident! You must absolutely adapt your style of driving and the speed of
the vehicle to the specific circumstances.
Cup holderCup holder in front centre consoleYou can place two cups or beve rage cans into the recesses fig. 66 .
WARNING
Do not place any hot beverages into the cup holder. If the vehicle moves, the
hot beverages may spill - risk of scalding!
Do not use any cups or beakers which are made of brittle material (e.g. glass,
porcelain). You might be injured by them in the event of an accident.
Fig. 65 Attachment points for base roof
carrier
WARNING (continued)
Fig. 66 Front centre console: Cup holder
s2bs.2.book Page 63 Monday, September 27, 2010 9:53 AM
Page 82 of 199

Starting-off and Driving81
Using the system
Safety
Driving Tips
General Maintenance
Breakdown assistance
Technical Data
WARNING
Please note that the handbrake must be fully released. A handbrake which
is only partially released can result in the rear brakes overheating which will
have a negative effect on the operation of the brake system - risk of accident! In
addition this can result in premature wear of the rear brake pads.
Never leave children unattended in the vehicle. Children might, for
example, release the handbrake or take the vehicle out of gear. The vehicle
might then move off - risk of accident!Caution
Each time the vehicle is parked, first of all apply the handbrake and then additionally
engage the 1st gear.Rear parking aid*The parking aid provides a warning of obstacles behind the vehicle.The audible parking aid determines the distan ce from the rear bumper to an obstacle
behind the car with the aid of ultrasound sensors. These ultrasound sensors are inte-
grated in the rear bumper.
Range of sensors
The clearance warning begins at a distance of about 160 cm from the obstacle (area
fig. 87 ). The interval between the warning signals becomes shorter as the clearance
is reduced. A continuous tone sounds from
a distance of approx. 30 cm (area ) - danger area.
Do not reverse any further after this signal sounds! If the vehicle is equipped with
a factory-fitted towing device*, the border of the danger area - continuous tone -
extends 5 cm further behind the vehicle. The vehicle can be extended through an
installed detachable towing device.
On vehicles equipped with a factory-fitted radio*, the distance to the obstruction is
shown graphically in the display. On vehicles with a factory-fitted towing device, the
sensors are deactivated when towing a traile r. The driver is informed about this by a
graphic display (vehicle towing a trailer) in the radio* display. The factory-fitted radio*
can be set so that the play function volume decreases when activating the parking aid,
see Owner's Manual radio*. This improves the audibility of the parking aid.
Activating
The parking aid is activated automatically when reverse gear is engaged and the igni-
tion is turned on. This is confirmed by a brief acknowledgement signal.
Deactivating
The parking aid is deactivated by ta king the car out of reverse gear.
WARNING
The parking aid is not a substitute for the driver paying proper attention and
it is always the driver's responsibility to take care when parking the vehicle or
carrying out similar manoeuvres.
You should therefore satisfy yourself, before reversing, that there is no small
obstacle, such as a rock, thin post, trai ler drawbar etc., behind your vehicle.
Such obstacles might not be within the range detected by the sensors.
Under certain circumstances, surfaces of certain objects and types of
clothing cannot reflect the signal of the parking aid. Thus, such objects or
people may not be recognised by the sensors of the parking aid.Note
The parking aid does not operate if you are towing a trailer (applies to models
which feature a factory-fitted towing device*).
Fig. 87 Parking aid: Detection range of
rear sensors
AA
AB
s2bs.2.book Page 81 Monday, September 27, 2010 9:53 AM
Page 126 of 199

Towing a trailer125
Using the system
Safety
Driving Tips
General Maintenance
Breakdown assistance
Technical Data
Towing a trailerTo w i n g a t r a i l e rTechnical requirementsYour vehicle is designed primarily for tr ansporting persons and luggage. It can,
however, also be used for towing a traile r - provided certain technical equipment is
fitted.
If your vehicle has already been supplied with a factory-fitted towing device then
everything that is necessary for towing a trai ler in technical terms, and in terms of the
law, has already been taken into account.
Your vehicle is fitted with a 13-pin power socket for the electrical connection between
the vehicle and trailer. If the trailer which you wish to tow has a 7-pin connector, you
can use a suitable adapter
6) from Škoda original accessories.
This work must be carried out in accordance with the manufacturer's specifications if
a towing device is retrofitted.
Authorised Škoda Service Partners can provid e information about retrofitting a towing
device and for any necessary modifications to the cooling system.
WARNING
We recommend that you have the towing device from Škoda original accesso-
ries installed by an authorised Škoda Service Partner. He is familiar with all the
relevant details relating to retrofitting such equipment. There is a risk of an
accident if the towing device is not properly fitted!General MaintenanceTrailer load
The permissible trailer load must on no account be exceeded. You can negotiate appropriately steeper inclin
es and descents if you do not make full
use of the permissible trailer load.
The trailer loads specified only apply for altitudes up to 1 000 metres above mean sea
level. The fact that the engine power outp ut drops with increasing height due to a
lowering of air pressure and thus the abil ity to climb, means that the towed weight
must be reduced by 10 % for every further increase of 1 000 metres in height above
sea level. The towed weight is the weight of the (laden) vehicle and the (laden) trailer
together. One should take this into account before driving up to higher altitudes.
The trailer and drawbar load information on the type plate of the towing device
are merely test data for the towing device The data relating to your vehicle, which
is often less than this test data, can be found in your vehicle registration docu-
ments.
Distribution of the load
Distribute the load in the trailer in such a way that any heavy items are located as close
as possible to the axle. Secure th e items to prevent them slipping.
Tyre inflation pressure
Select the tyre inflation pressure on yo ur vehicle for that of “fully laden”, page 151.
The inflation pressure of the tyres fitted to the trailer adjust in accordance with the
manufacturer's recommendation.
Exterior mirrors
You have to have additional exterior mirrors fitted if you are not able to see the traffic
behind the trailer with the standard rear-view mirrors. Both exterior mirrors should be
attached to folding arms. Adjust the mirrors so that they provide you with an adequate
field of view to the rear.
Headlights
Before starting off with a hitched trailer, al so check the setting of the headlights. Alter
the setting as necessary with the aid of the headlight beam adjuster page 43.
Detachable ball head
The ball rod is detachable on vehicles whic h feature a factory-fitted towing device.6)In some countries the adapter is supplied with the towing device.
s2bs.2.book Page 125 Monday, September 27, 2010 9:53 AM
Page 161 of 199
Breakdown assistance
160
here for the removable ball head of the trailer towing device*. The box is attached with
a strap on the spare wheel.
The vehicle tool kit contains the following parts (depending on equipment fitted):
Wire clamps for removing the full wheel trims,
Plastic clip for a wheel bolt cover,
Wheel wrench,
To w i n g e y e ,
Adapter for the wheel bolts lock.
Tyre repair kit
Before placing the lifting jack* back in its storage area, screw in the arm of the lifting
jack fully.
WARNING
The factory-supplied lifting jack* is only intended for your model of vehicle.
On no account attempt to lift a heavier vehicle or other loads - risk of injury!
Ensure that the vehicle tool kit is safely attached in the luggage compart-
ment.Note
Ensure that the box is always secured with the strap.Spare wheel*
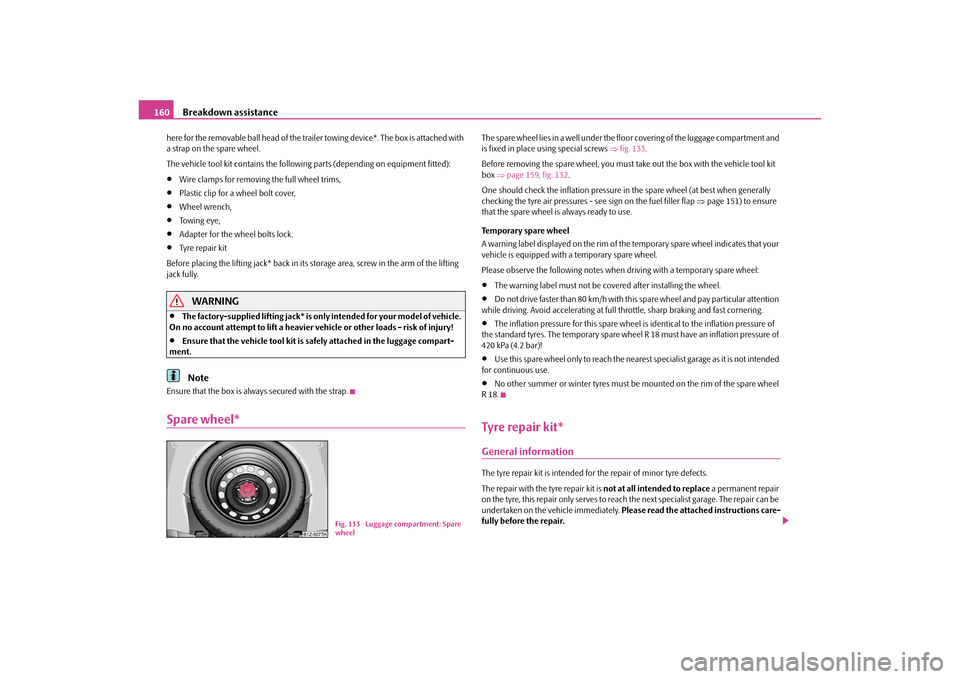
The spare wheel lies in a well under the floor covering of the luggage compartment and
is fixed in place using special screws fig. 133 .
Before removing the spare wheel, you must take out the box with the vehicle tool kit
box page 159, fig. 132 .
One should check the inflation pressure in the spare wheel (at best when generally
checking the tyre air pressures - see sign on the fuel filler flap page 151) to ensure
that the spare wheel is always ready to use.
Temporary spare wheel
A warning label displayed on the rim of the temporary spare wheel indicates that your
vehicle is equipped with a temporary spare wheel.
Please observe the following notes when driving with a temporary spare wheel:
The warning label must not be covered after installing the wheel.
Do not drive faster than 80 km/h with this spare wheel and pay particular attention
while driving. Avoid accelerating at full throttle, sharp braking and fast cornering.
The inflation pressure for this spare wheel is identical to the inflation pressure of
the standard tyres. The temporary spare wheel R 18 must have an inflation pressure of
420 kPa (4.2 bar)!
Use this spare wheel only to reach the nearest specialist garage as it is not intended
for continuous use.
No other summer or winter tyres must be mounted on the rim of the spare wheel
R 18.
Tyre repair kit*General informationThe tyre repair kit is intended fo r the repair of minor tyre defects.
The repair with the tyre repair kit is not at all intended to replace a permanent repair
on the tyre, this repair only serves to reach the next specialist garage. The repair can be
undertaken on the vehicle immediately. Please read the attached instructions care-
fully before the repair.
Fig. 133 Luggage compartment: Spare
wheel
s2bs.2.book Page 160 Monday, September 27, 2010 9:53 AM
Page 168 of 199

Breakdown assistance167
Using the system
Safety
Driving Tips
General Maintenance
Breakdown assistance
Technical Data
Tow-starting and towing vehicleGeneralPlease pay attention to the following instructions if you are going to use a tow rope:Driver of the towing vehicle– Do not drive off until the tow rope is taught.
– Release the clutch particularly gently when starting off.Driver of the towed vehicle– Switch the ignition on so that the steeri ng wheel is not blocked and you can also
operate the turn signal lights, the headlight flasher, the windscreen wipers and
windscreen washer system.
– Move the gearshift lever into Neutral.
– Note that the brake servo unit and power steering only operate if the engine is running. You will require significantly grea ter physical force to depress the brake
pedal and to steer th e vehicle if the engine is not running.
– Ensure that the tow rope is always kept taught.
Tow rope or tow bar
A tow bar is safest way of towing a vehicle an d also minimizes any shocks. You can use
a tow rope only if a suitable tow bar is not available.
The tow rope must be elastic to protect the vehicle. Thus one should only use plastic
fibre rope or a rope made out of a similarly elastic material.
Only attach the tow rope to the towing eyes provided for this purpose page 167
and page 168.
Driving style
Towing another vehicle requires a certain am ount of practice. Both drivers should be
familiar with the particular points about to wing a vehicle. Unskilled drivers should not
attempt to tow in another vehicle or to be towed in.
One should be constantly vigi lant not to allow impermissibly high towing forces or
jerky loadings. There is always a risk of excessive stresses and damage resulting at the points to which you attach the tow rope or
tow bar when you attempt to tow a vehicle
which is not standing on a paved road.
Caution
If the gearbox of your vehicle no longer contains any oil because of a defect, your
vehicle must only be towed in with the driven wheels raised clear of the ground, or on
a special vehicle transporter or trailer.
Note
Please comply with any national legal provisions particularly regarding the
switched on signal systems, when towi ng in or tow-starting another vehicle.
The tow rope must not be twisted as it may in certain circumstances result in the
front towing eye being unscrewed out of your vehicle.
Front towing eye
The towing eye is stored in th e box for the vehicle tool kit.Fig. 141 Front bumper: protective grille/installing the towing eyeRemove the protective grille carefully as follows:
– Press on grille with the hand (at the end removed from the licence plate) and
release it in the direction of the arrow fig. 141 - left.
s2bs.2.book Page 167 Monday, September 27, 2010 9:53 AM
Page 169 of 199
Breakdown assistance
168
– Screw in the towing eye by hand to the left up to the stop page 167, fig. 141 -
right. For tightening, we recommend that you use for example the wheel wrench*,
the towing eye of another vehicle or anot her, similar object which you can push
through the eye.
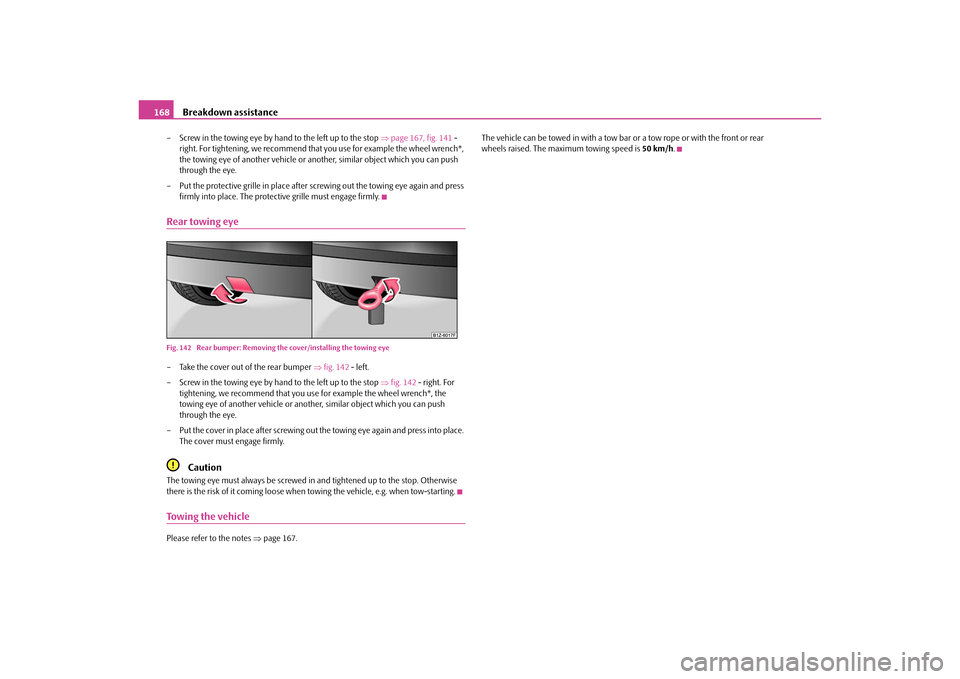
– Put the protective grille in place after screwing out the towing eye again and press firmly into place. The protective grille must engage firmly.Rear towing eyeFig. 142 Rear bumper: Removing th e cover/installing the towing eye– Take the cover out of the rear bumper fig. 142 - left.
– Screw in the towing eye by hand to the left up to the stop fig. 142 - right. For
tightening, we recommend that you use for example the wheel wrench*, the
towing eye of another vehi cle or another, similar object which you can push
through the eye.
– Put the cover in place after screwing out the towing eye again and press into place.
The cover must engage firmly.
Caution
The towing eye must always be screwed in and tightened up to the stop. Otherwise
there is the risk of it coming loose when to wing the vehicle, e.g. when tow-starting.Towing the vehiclePlease refer to the notes page 167. The vehicle can be towed in with a tow bar
or a tow rope or with the front or rear
wheels raised. The maximum towing speed is 50 km/h.s2bs.2.book Page 168 Monday, September 27, 2010 9:53 AM